
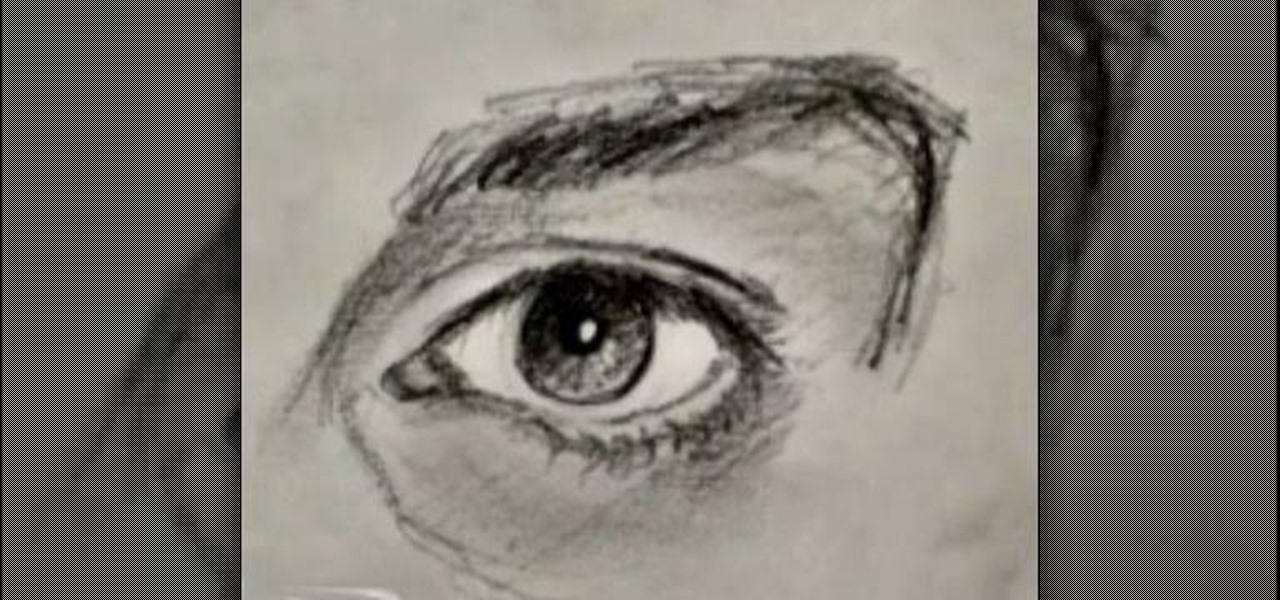
How To: Master drawing a human eye in two minutes
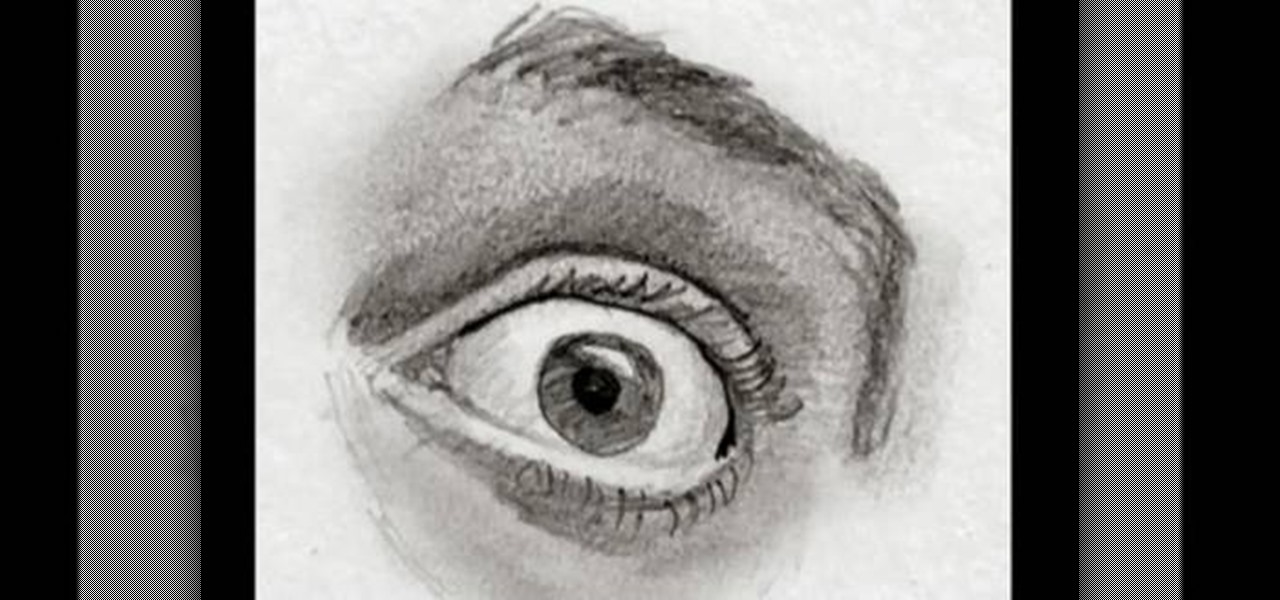
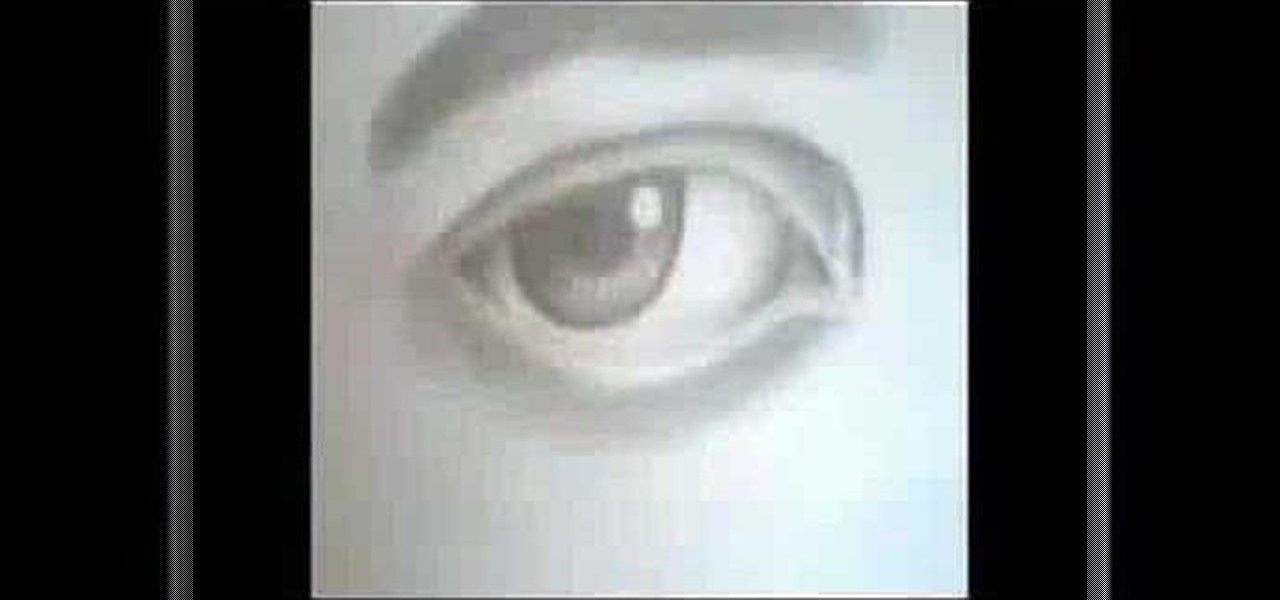
Watch this fine art video tutorial to learn how to master drawing a human eye in two minutes.

Watch this fine art video tutorial to learn how to master drawing a human eye in two minutes.
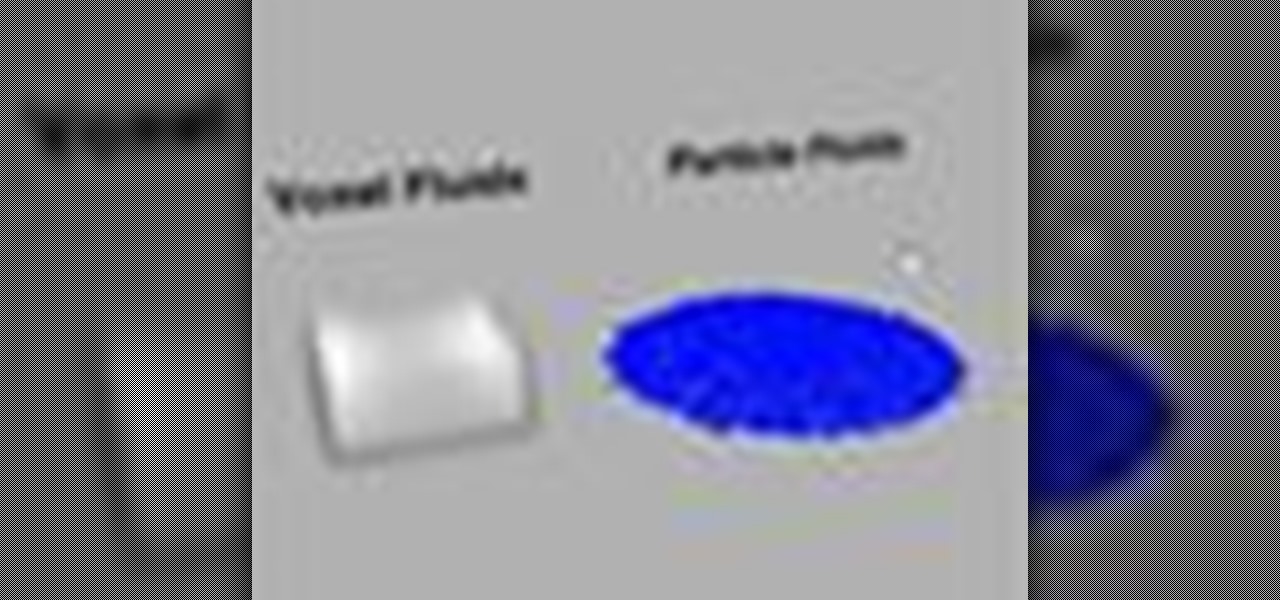
Created by Houdini Product Specialist Stephen Tucker, this crash course series focuses on the concept of fluid dynamics and how they work within Houdini. These videos on Voxel Fluids should help any artist get up in running with the foundation tools available for creating fluid effects in Houdini 9.5. Topics range from how to create a container to how to gain access to fluid attributes for shading, and even passing data from volumes to particles.
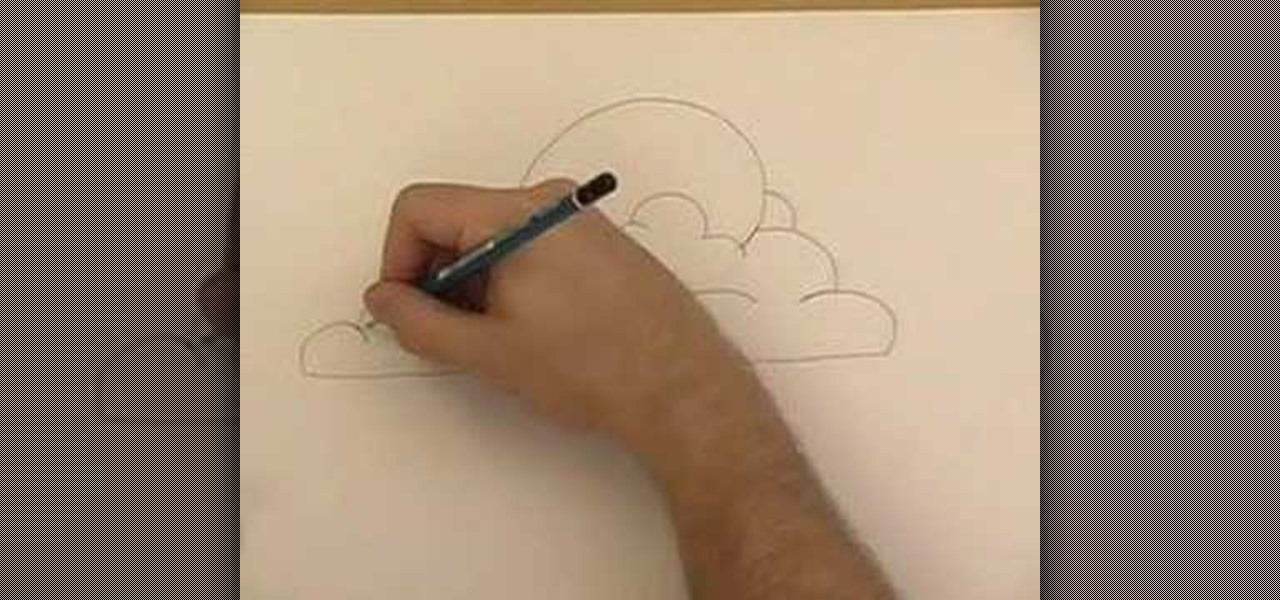
Cloud drawing is a snap, and it's a great place to learn how to smudge your pencil lead when you are drawing.
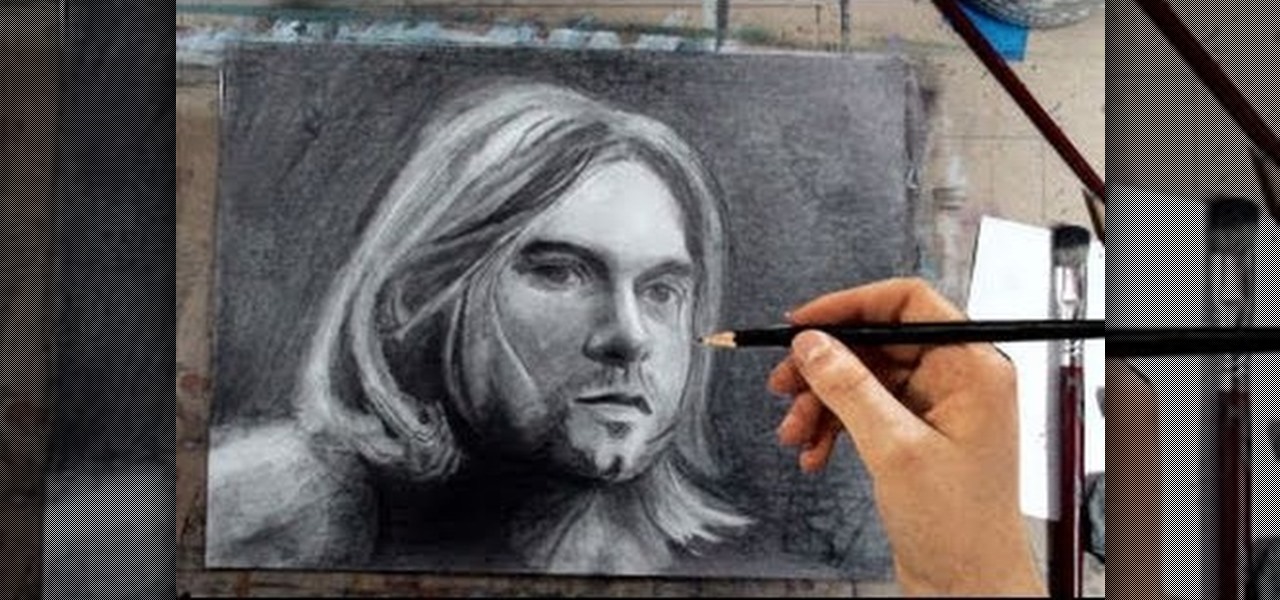
Merrill never fails to amaze. In this video, he instructs you to "come as you are— but bring a pencil." And you don't have to be a diehard Nirvana fan to understand what this tutorial's about— Kurt Cobain. Watch and learn how to draw Kurt Cobain in a portrait, step by step, using pencils and a few art tricks.
Watch this fine art video tutorial to learn how to master drawing a fearful eye in two minutes. In two minutes you will be able to draw the expression of fear in the eye.

Tinting your eyebrows is unlike drawing your brows in with pencil or shading them in with brow powder and wax. Tinting create a much softer, more diffused look that makes your brow hairs look naturally defined.
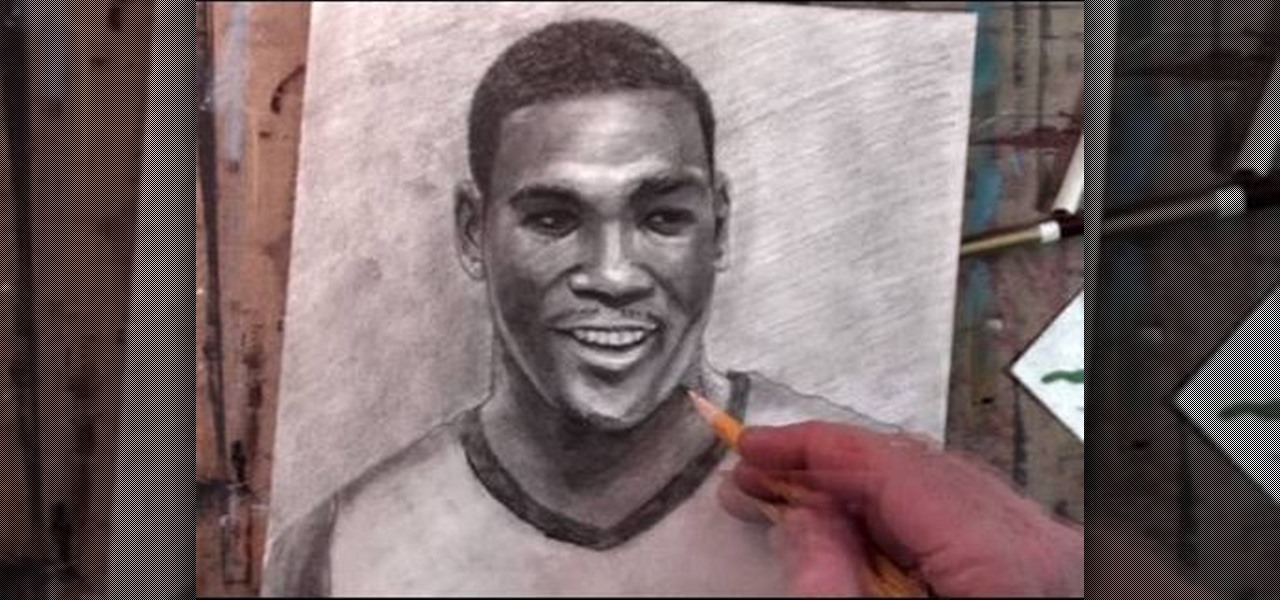
If you're a fan of the Oklahoma City Thunder, then you must be a fan of Kevin Durant (previously of the Seattle SuperSonics). And since you're a fan of Kevin Durant, you should try putting your art skills to test and attempt to draw a nice portrait of this great basketball player in his Team USA uniform.
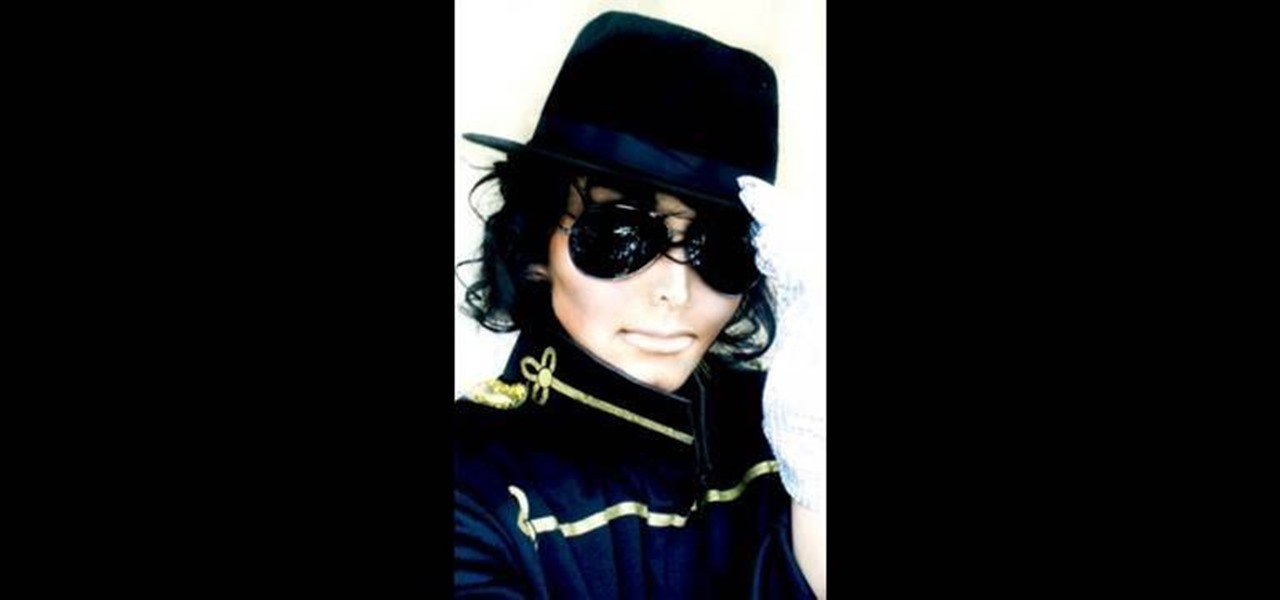
Make-up artist, Kandee Johnson transforms herself into the King of Pop, Michael Jackson! With just some shading and contouring, watch as Kandee remarkably alters the shape of her face with the illusion of makeup!

In this video, we learn how to draw a waterfall landscape by hand. Start out by drawing the outline for the drawing with a light pencil. From here, you will start to fill in the different areas with the shading where you would like it. After this, bring in your browns to the rocks and then bring in your greens and oranges. Once you have added the blues and whites, then complete the outline of all the different images. When finishes, you can add in the final details for the drawing. This will ...
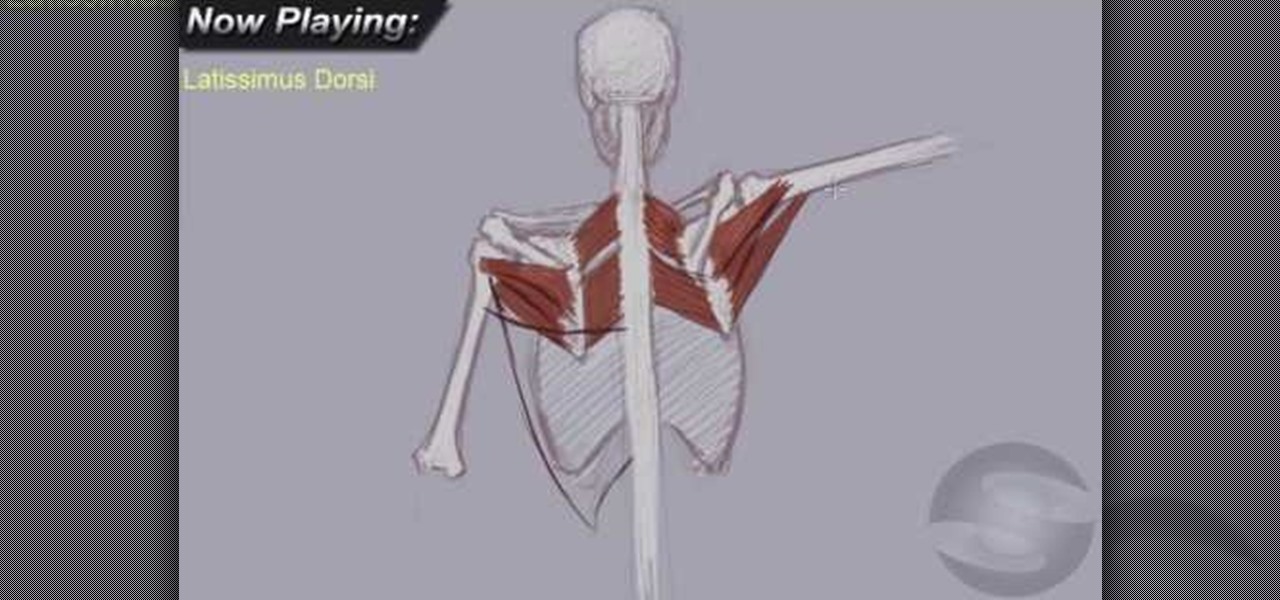
In this video, we learn how to understand the anatomy of the upper back for drawing. First, you will need to learn how to draw the skeletal block of the body. Once you have drawn the outline for the skeleton, you can continue onto the rest. Make sure to add in the details for all the parts of the body, using thin lines at first, then thicker lines. Color these in white once you have the bone shapes made, then color in the "meat" on top of those. Draw in lines to create shading and realism on ...
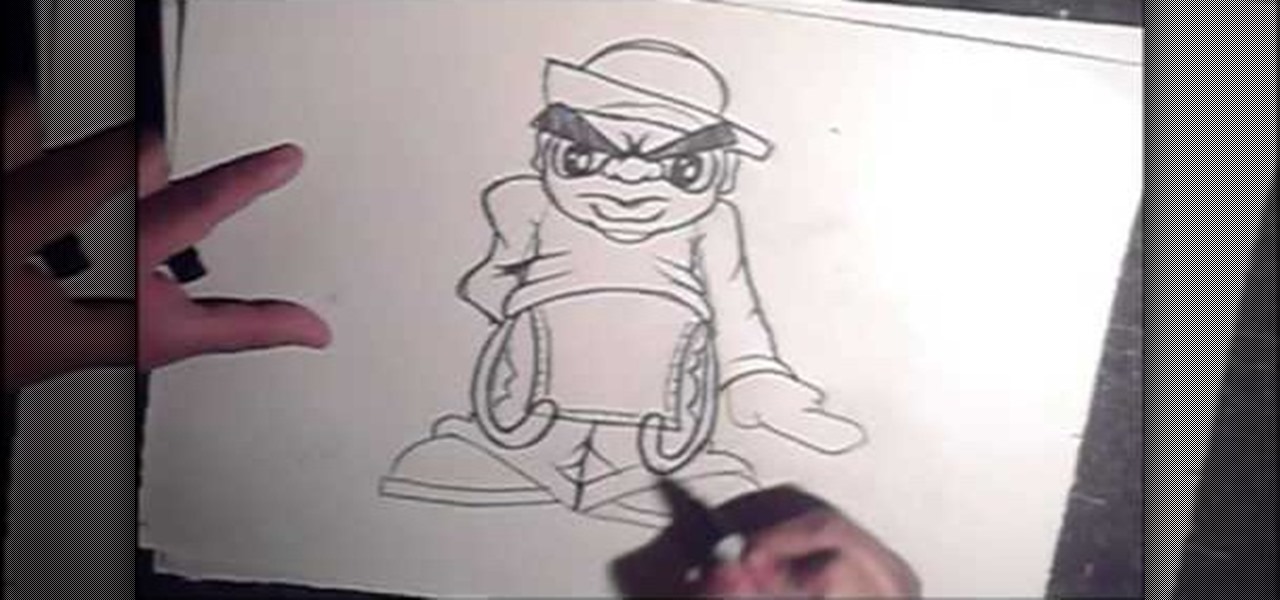
In this tutorial, we learn how to draw a graffiti style hip hop cartoon character. First, make a circle, then draw long triangles for eyes and a mouth plus a rectangular shaped body with very large feet. Then, draw in the arms with large hands and draw a hat on the top of the head. Then, fill in the color for eyebrows and fill in the pupils. After this, outline the character with a darker pencil or a black marker and fill in details for the outfit, like pants and a long sleeved shirt. To fini...

In this tutorial, we learn how to draw a behatted cartoon skull. Start out by drawing hollowed out eyes , then draw a hollowed out nose underneath. After this, draw a wide open mouth with a goatee on the chin and teeth smiling in the mouth. Next, draw a hat on the top of the head, making a bow on the side of it. Next, draw cracks in the skull and add shading to the inside of the hat and on the entire skull. Draw lines around the mouth and head to show where cracks in the bone are, and when fi...
This clip offers instruction on how to export a model from Blender to Unity 3D and import it into a game. The tutorial also demonstrates how to bake a normal map and a color map from a highpoly model to the lowpoly counterpart, real-time display of the color/normal maps in the Blender viewport with GLSL shading, and real-time updating of assets in Unity. Whether you're new to the Blender Foundation's popular open-source 3D computer graphics application or are a seasoned digital artist merely ...
YOUTUBE Shigeru Miyamoto demonstrates using simplistic shapes and lines, how to draw his freehand creation of Mario. Shigeru, without speaking, begins by drawing two ovals for the eyes, and then adds a third oval for the nose, sticking to a very simplistic, shape-oriented method. He works outward from the details of the face, to the surrounding details, such as the facial structure and then finishes by adding the hat with the characteristic capital "M". A few minimal additions, such as shadin...
Artist Stephanie Valentin takes us through the steps of how to draw the X-Men character Wolverine in Photoshop. She outlines the necessary tools to be able to make the drawing and provides detailed information on width, shading, and opacity to make sure the colors are all accurate. After creating a series of layers, gradients and various sketches, she shows us how to create the character. In just five hours with this tutorial, you can learn how to create Wolverine using Photoshop.

In this tutorial, we learn how to create a Halloween leopard or cheetah face with makeup. Start by applying a white foundation to the face with a brush. After this, brush in a darker color right underneath the nostril and darken up the eyebrows. Apply a darker color on the sides of the chin, on the bridge of the nose, and on the corners of the forehead. Then, shape the sides of your face and start to blend this in, creating the face of a cheetah. Take your time when blending in, creating shad...
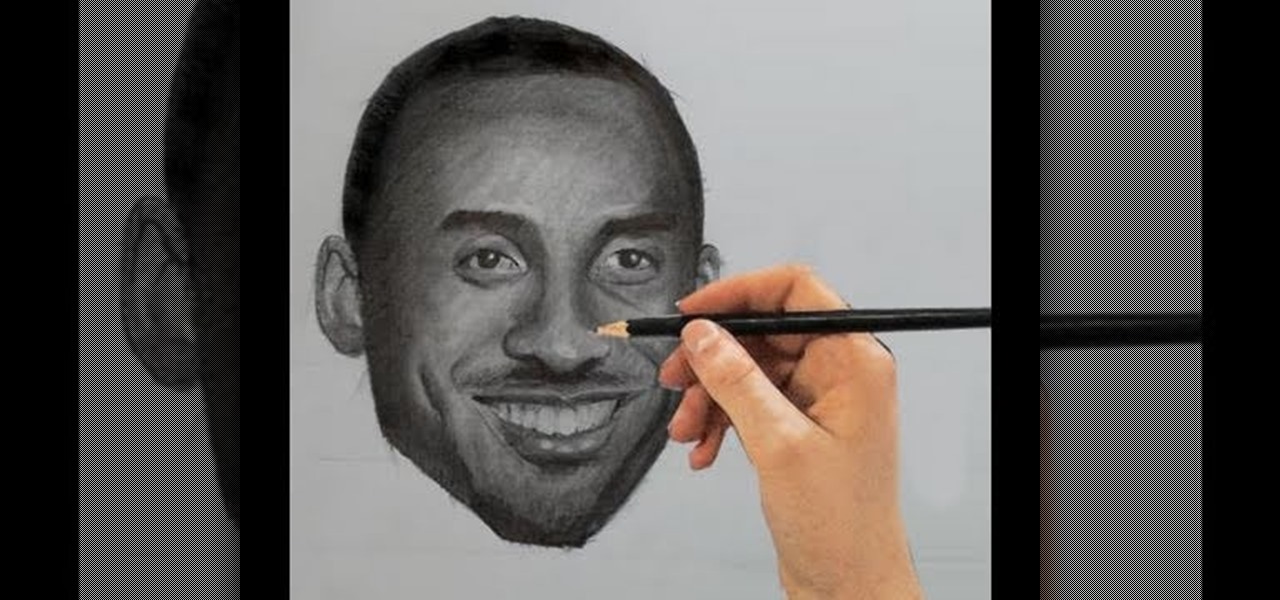
Love basketball? Then you probably love Kobe Bryant… everybody loves Kobe. Watch this tutorial to learn how to draw Kobe Bryant. Make sure to pause the video after each step and look at the screen every few seconds while you are drawing.
In this tutorial, we learn how to draw transparent objects. Start out using light pencil markings, and draw the basic shape of the bowl. After you have the round top and have make it three dimensional, add shading to the bottom circle in the bowl so that you can see the bottom of the inside. After this, add shading to the side of the bowl to give it a realistic feel like it's sitting on a table. Next, use your eraser to remove some of the shading, then fill in darker pencil marks onto these s...
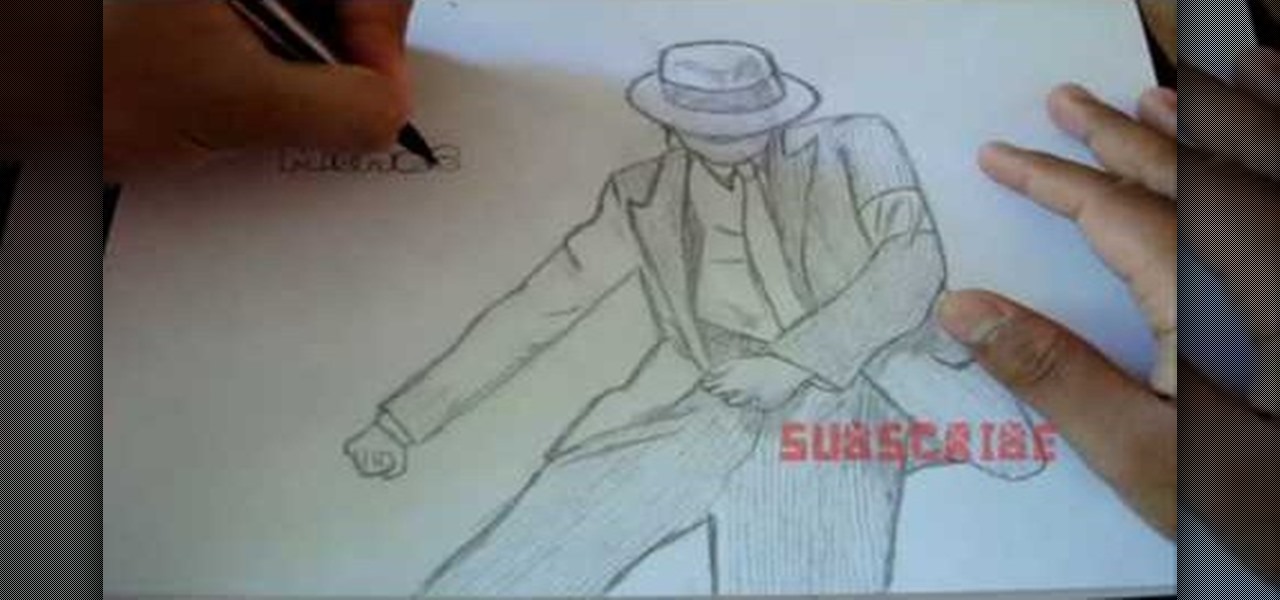
In this video, we learn how to draw Michael Jackson. Start out by drawing the body shape, outlining the clothes first. Draw details on the pants and shirt, then add a hat on top, shading the face. Now, draw hands onto the drawing, along with shoes on the bottom. Next, add details to the hat and a tie to the shirt with a collar. After this, draw on a belt and shading and lines to the jacket and pants. Add shading underneath the hat to make it look as though the face is underneath, then when fi...
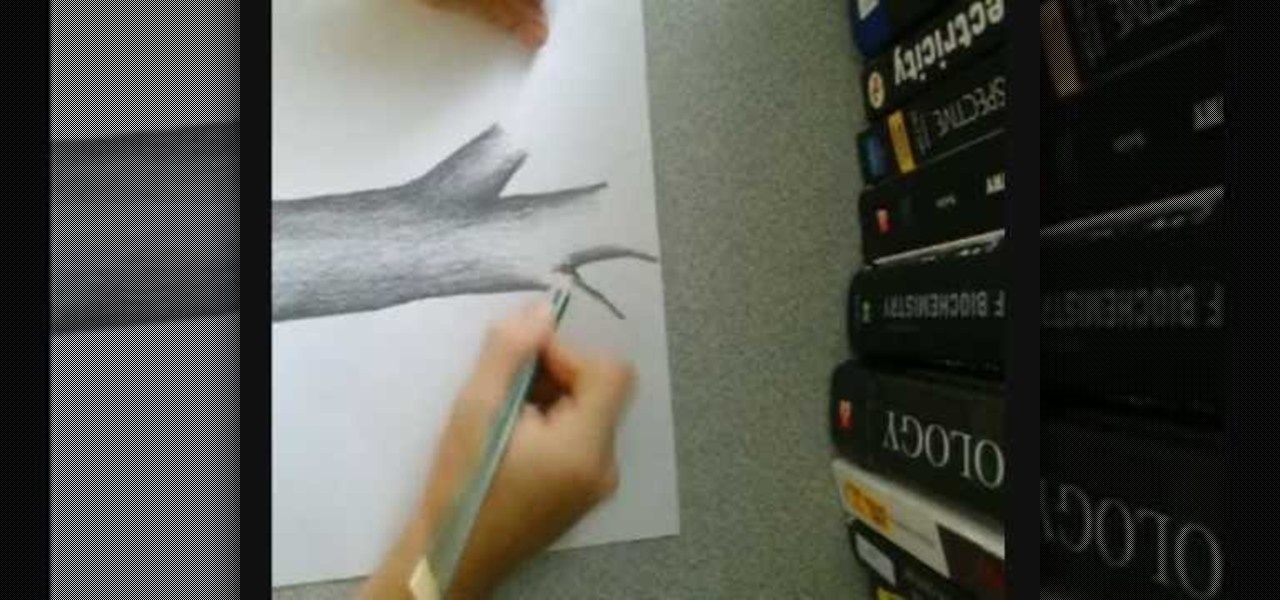
This video demonstrates how this artist draws a tree using a pencil and paper. After creating the outline of your tree trunk, darken the line and add shading as necessary throughout the tree to add dimension to your drawing. The darker shading is focused on the outside edges of the trunk, lightening as you go towards the center of the trunk. Sharpen your pencil as necessary, since it is easier to add detail to your tree with a sharp pencil. Add further branches to your initial trunk and creat...
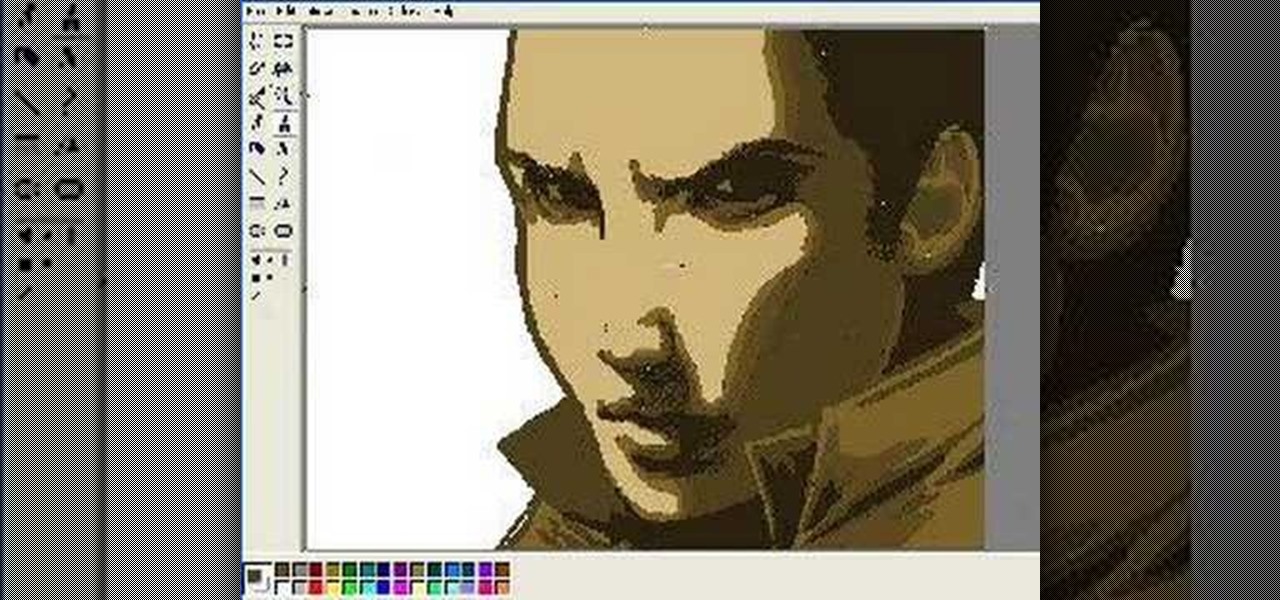
How to draw a face in MS Paint. The video is obviously made by a professional, it shows a sped up replay of a man using MS Paint to draw a very well done face. He starts with the basic outlines, then moves into coloration and shading. Notice all of the shading is done in unison and correlates with a particular direction that remains the same with all shading properties. Also take note of the fact, that the colors and lines are blending together, that the detail isn't as sharp as a high resolu...
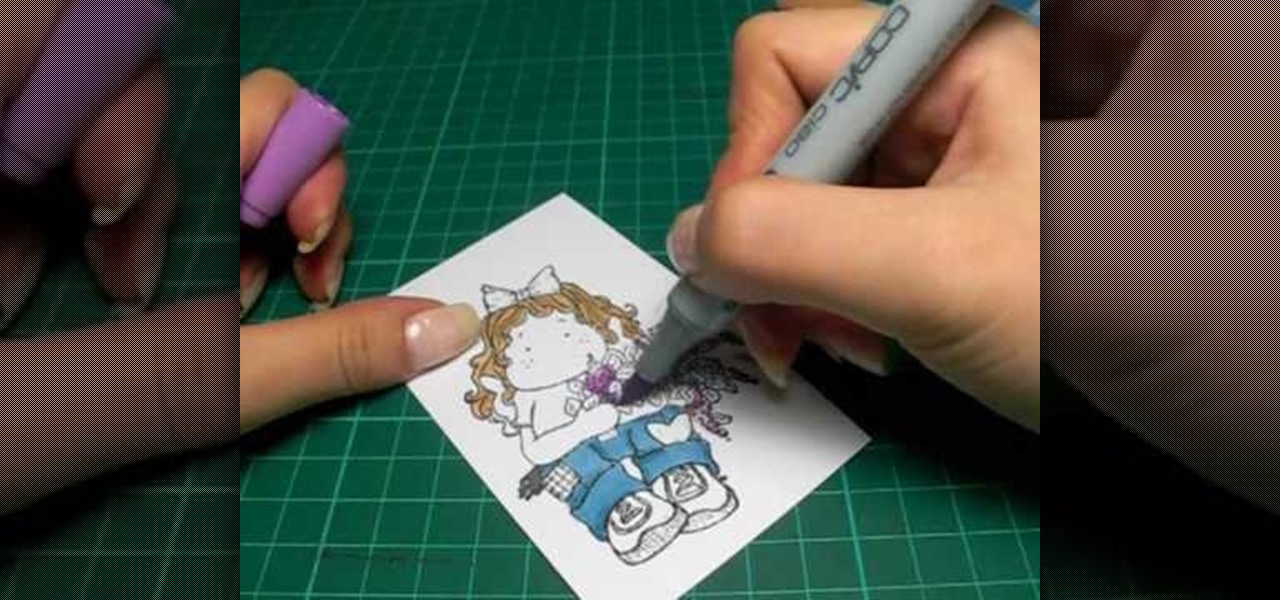
In this tutorial, we learn how to color with Copic pens. First, grab a picture that you want to color with your pens. After this, start to color in the picture with your different colored pens. After you fill in the colors, use a darker colored pen to add in shading and make the lines darker along the sides. Continue to color in your picture, adding shading where you prefer. Add in different colors and make the lines darker when you want them to look more bold. Make sure to add in highlights ...
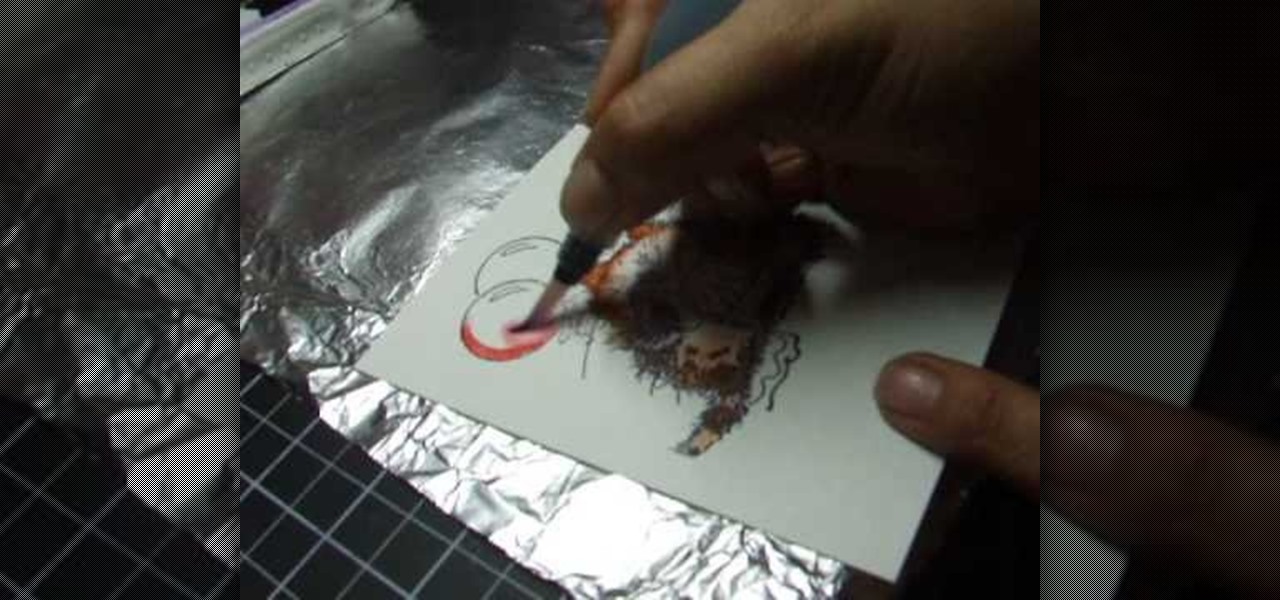
Maria Bell demonstrates to create the watercolor project, add color to the watercolor paper by first outlining the image or the shape with the SU marker. Then, distribute the color from the edge of the image or shape to the center of the image or shape with an aqua painter or watercolor brush. Fill in the images with shading details as desired. The technique produces gradient shading and a quick spread of colors without the use of watercolor pencils or crayon. Painting watercolors with SU mar...
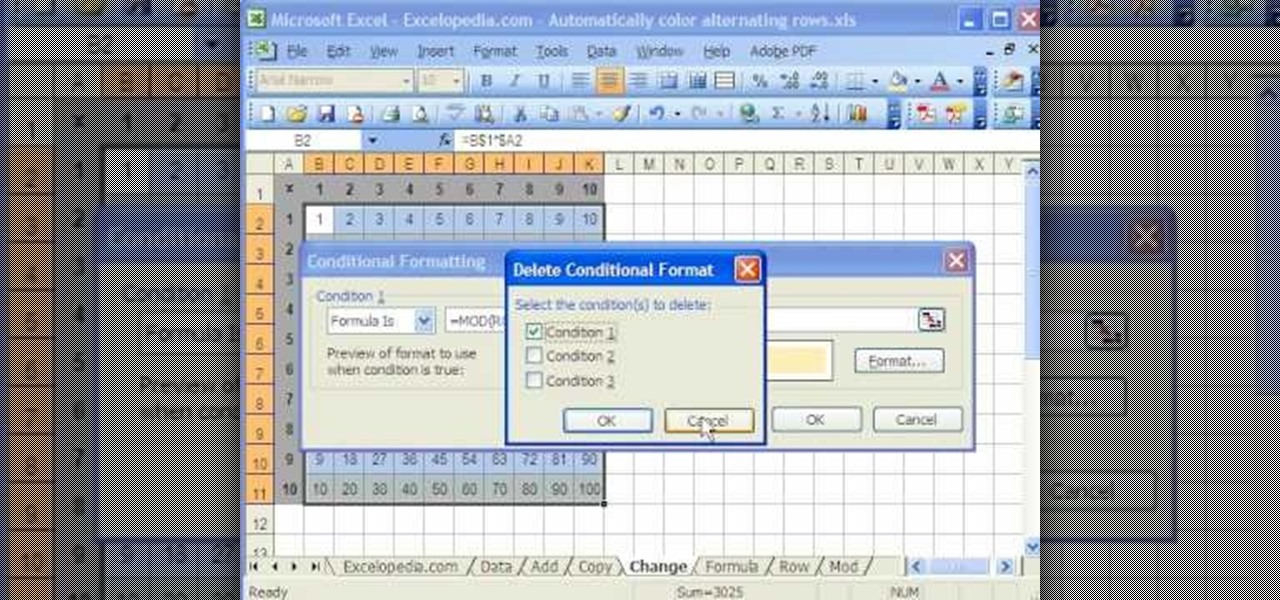
This video is a tutorial on using the Conditional Formatting function of Excel to automatically color alternating rows, which helps your eye to follow across the row. This can be done manually with the “Fill Color” button, but if you add or delete rows after applying the shading, the whole purpose is defeated.

Basic bust drawing : Starting with the standard ball and crossed lines for the face. The artist fleshes out the chin before moving onto the eyes, giving them the general feel of the face. The nose and mouth follow suite. The tribal marking on the characters face are added next and shaded darkly.
Mark demonstrates how to draw flapping flags or scrolls. He starts with a paper in a binder but any paper will work. In this demonstration he uses a pencil to create his drawing but any pen or pencil will do. He draws the flagpole first starting on the left side of the page. He draws multiple circles creating cylinders that you may have learned how to draw in a previous lesion by Mark Kistler. He uses shading to create the effect of a curve and depth of the flag. He shows how to create the ef...
This video will show you have to make a glass bar in Photoshop. Adobe Photoshop is a great program for manipulating photo and adding interesting effects to your pictures. The glass bar is distinctive because of it’s colored shading.
In this six-part drawing tutorial hosted by artist Wayne Tully, learn how to draw a firey flaming skull. Start from scratch in part one with the outline of the skull, then move onto the skull's features including the eyes and jaw in part two. Part three takes you through shading under the skull's eyes and around the skull's cheekbones to add dimension. In part four, learn how to strengthen pencil lines & add shading to define the cheekbones. Once the skull is done, part five goes over how to ...
In this video we learn how to draw Neji Shippuuden. First, draw the outline for the head, use lines in the middle of the face to figure out where to place the facial features. After this, use a pencil to draw on the hair around the face and then draw on the headband. From here, add on the details to the hair and then start to add in shading around the face to make it look more realistic. After this, draw in the shoulders on the side and then draw in the rest of the details of the face. Finish...
In this tutorial, we learn how to draw Danzo. To start, you will draw the outline with the light touch of the pencil. After this, draw in the final outline darker and then erase the background lines. Next, you will add in the details around the character and then add in lines to show creases and make it look more realistic. From here, you will add in shading to make the drawing have some more depth. After this, you will finish up by cleaning any stray lines with an eraser. You can also use th...
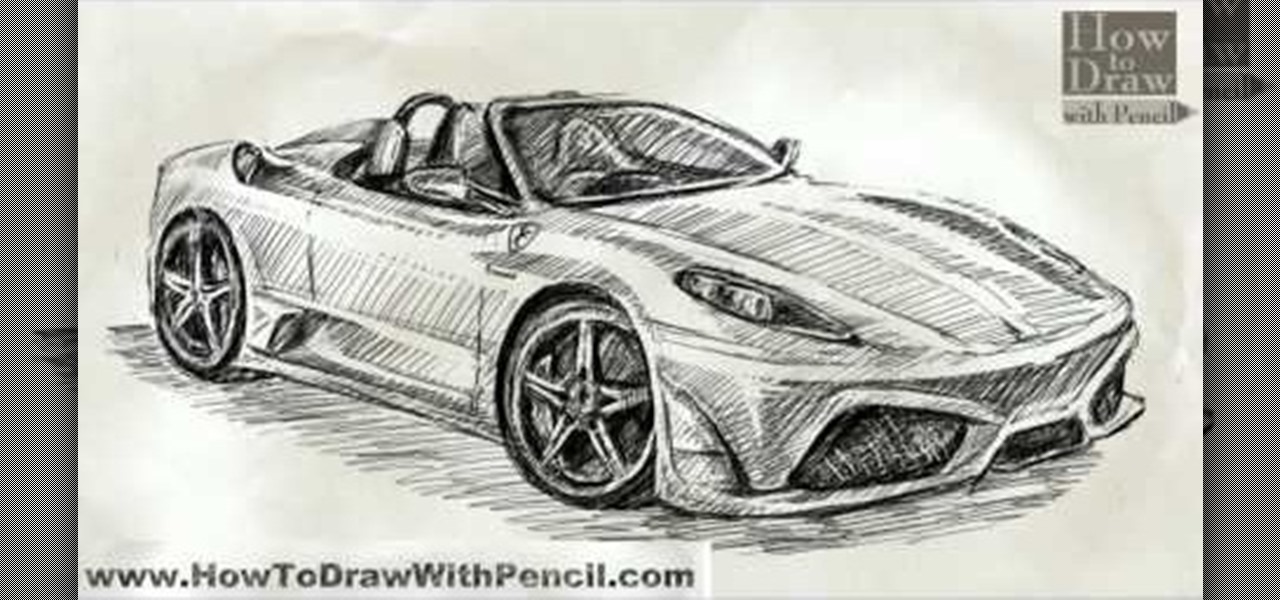
In this tutorial, we learn how to draw a Ferrari Scuderia Spider 16M. Start out by drawing the outline of the vehicle. Make sure you draw in the areas for the tires and the windshield, as well as the other areas of the car. After this, add in shading around the car on all of the sides. Next, start to draw in the details around all of the car. Add in shading and additional lines to make it look more realistic. After this, you will need to use the eraser to erase any unwanted lines that don't b...
In this video, we learn how to draw a perfect eye. Start out by drawing the outline of the eye, the create the basic shape. After this, draw the crease above the eye and then the inside details of the eye. Darken the pupil, then add in lines around the pupil to show detail. Create a circle eraser mark near the pupil to show the eye having a glare, making it look more glossy. After this, shade in the sides of the eye and underneath where the bottom lash line is. From here, create the eyebrow a...
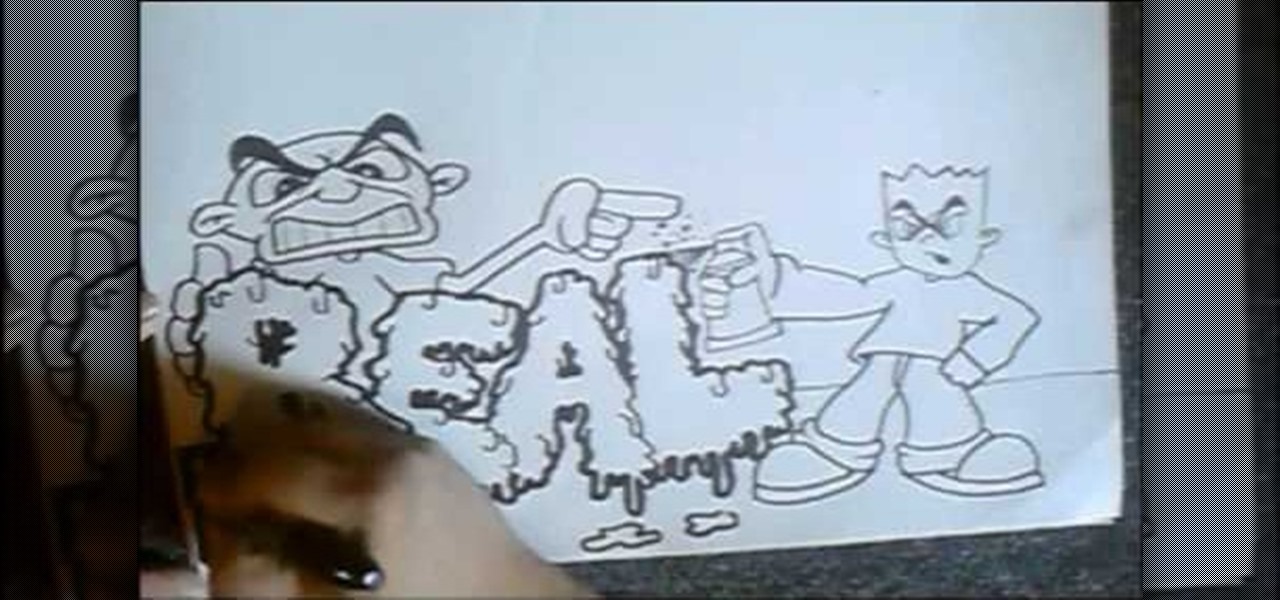
In this tutorial, we learn how to draw graffiti letters. When you are drawing these letters, you will want to use as much imagination as you can. Make sure to add in your own personal flare to give each of the letters a special touch. Now, you will draw the letters making them into a large 3D letter. Add in swirls and lines to the edges of the letters to give them a wet look and then add in shading to the side to make it look darker. Add in more shading and darker outlines, then when you are ...
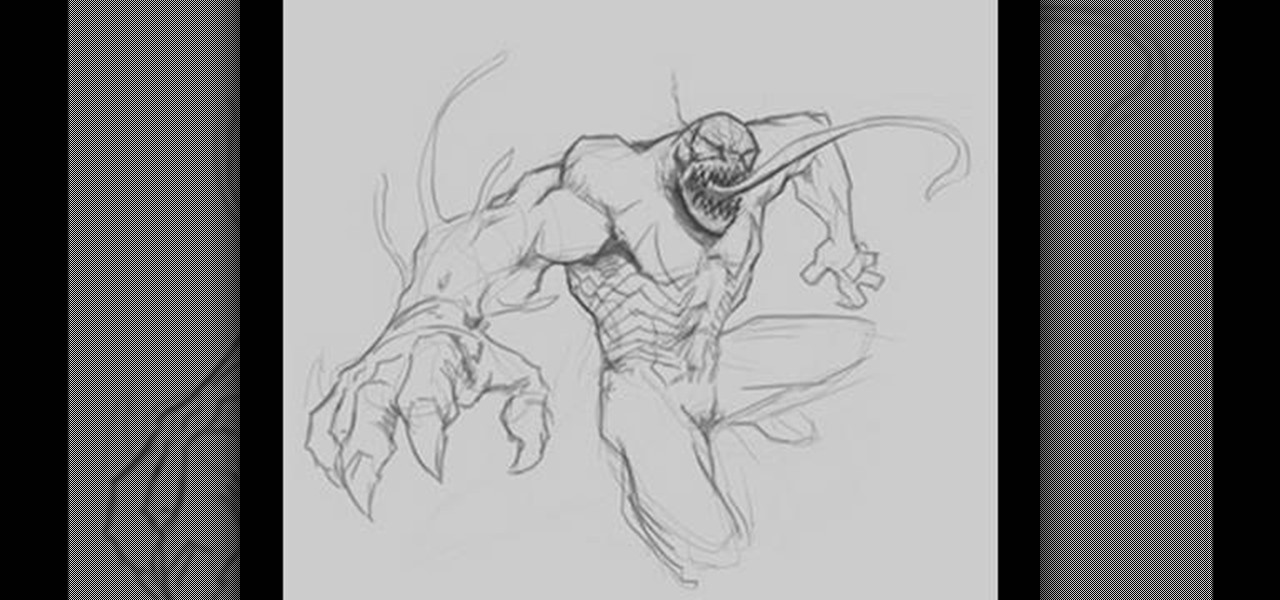
In this video, we learn how to draw Venom. Start out by drawing the outline of the entire body of the character. Use a soft line to create light lines throughout the entire body. After you have completed this, use a more bold line to draw around the body and start filling in details. Add the veins to the arms and then use shading to make them look more realistic. Draw in the details of the face and tongue, then continue on until you reach the torso to the feet. Once finished with the drawing,...
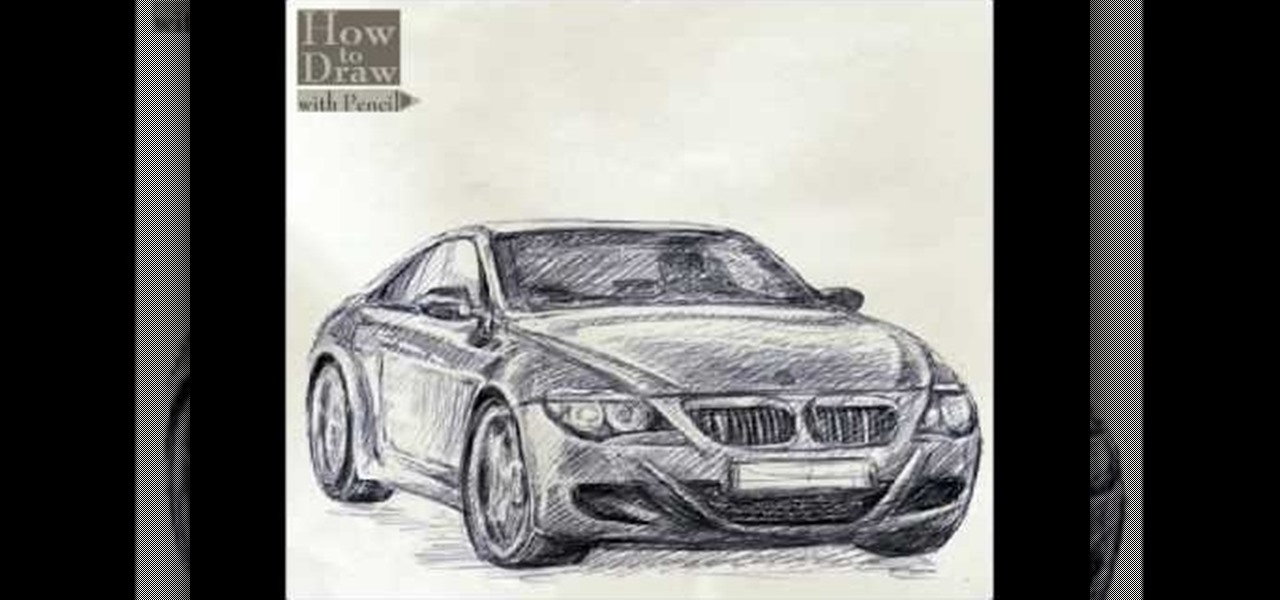
In this video, we learn how to draw a BMW car. Start off by drawing the outline of the car. After this, start to shade the drawing and add in the details of the car. Draw in the windshield, headlights, grill, license plate, and all the other small details. Make sure to use shading underneath the car to make it look more realistic. Also do shading inside the driver's seat to make it look like someone is inside of the car driving. Erase lines where you don't need them to make the car look more ...

In this video, we learn how to draw a realistic skull. Start off by using a pencil to draw out the basic outline of the skull. After this, add in further details, such as shading on the side of the head to show that it is hollow. Also add in the sockets for the eyes and show where the nose is at. Draw in the jaw bone as well as the teeth and the jaw line around it. Draw on cracks to the face at different places to make it look more realistic. Add in shading and darker lines where you feel nec...
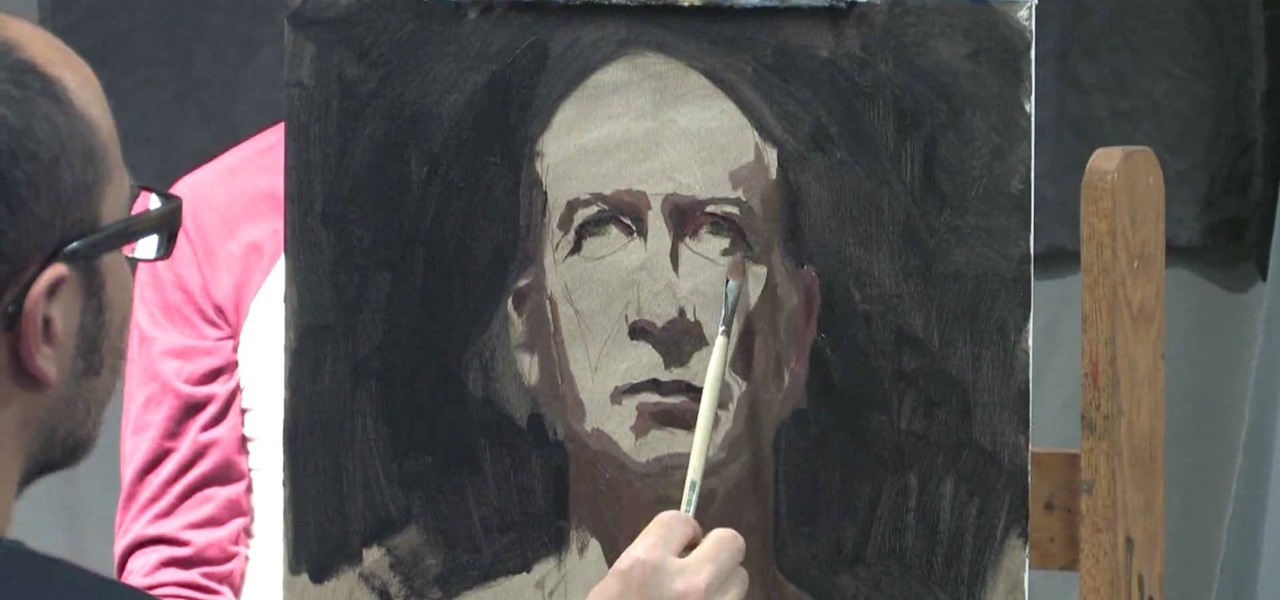
In this tutorial, we learn how to paint a portrait. Start off by having a subject to draw, then hold your paint brush loosely. Start to outline the face of the subject, then paint in the facial features. Shade around the eyes and cheekbones, and add the ears to the face. Use the paintbrush to create different types of strokes to the painting that fit the face you are looking at. Use shading to your advantage, because this can make a person look older or younger, depending on where you place t...

This video demonstrates how to draw a detailed half face portrait of a person by drawing the eye and hair. Begin by drawing the outline of the eye, adding detail such as the inner fold of the eye where the tear ducts are as well as creases above the eye. Draw the pupil of the eye, adding highlights to the center. Then, continue by drawing highlights and further shading details to the rest of the eye, including eyelashes and then the eyebrow. Continue by drawing the outline of the face near th...

In this how-to video, you will learn how to draw a human skull. First, start off with the main outline of the skull. From here, add the eye and nose sockets. Next, redo the outline of the skull to give it more texture. You can do the same for the holes. From here, add the teeth and the jaw lines of the skull. You can start adding in details such as the shading of the sockets and the jaw. Erase the old outlines to fine tune the skull. You can also add details such as cracks and texture marks. ...
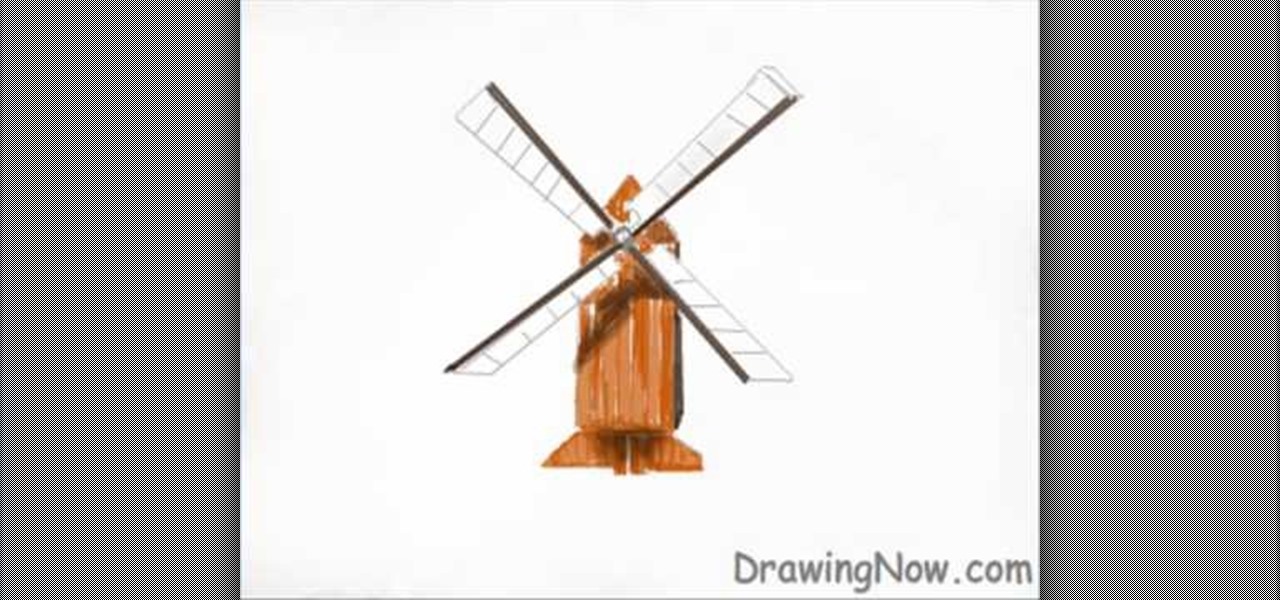
In this how-to video, you will learn how to easily draw a wind mill from scratch. First, start off with the building of the mill. Next, draw the arms of the wind mill. Include the flaps on the arms. Next, fill in the smaller details such as the center of the rotation. Next, you can fill in the color of the building. In this case, brown was used. Next, fill in the arms of the wind mill. Add appropriate shading on top of the building. You can also add shading to the arms. Next, fill in the back...