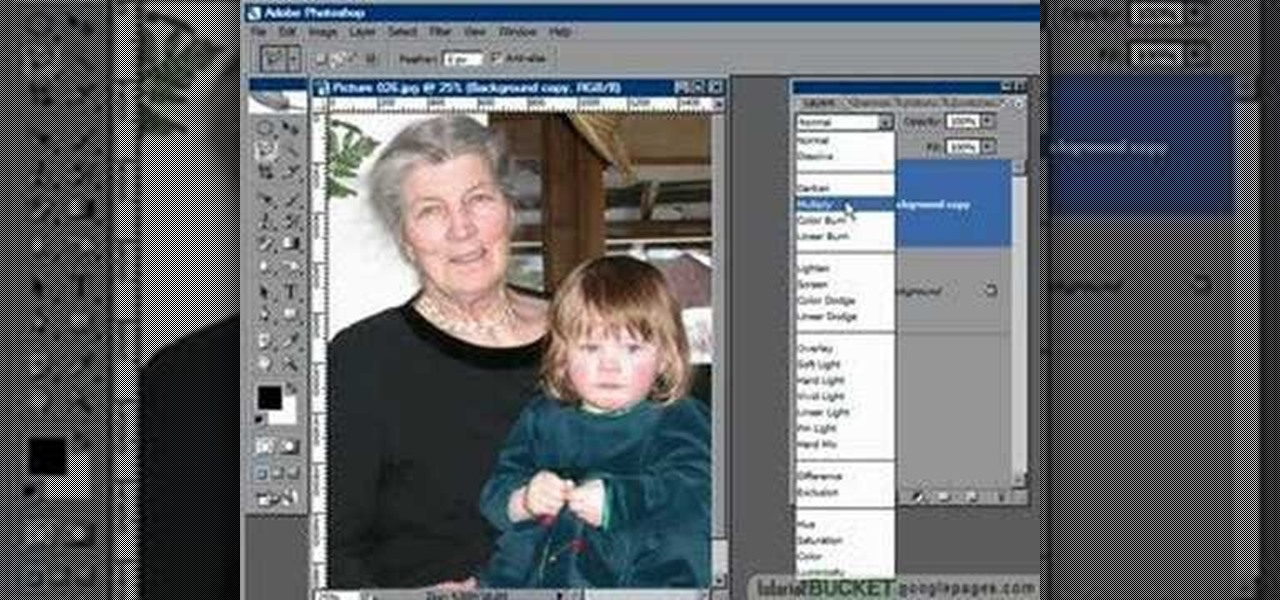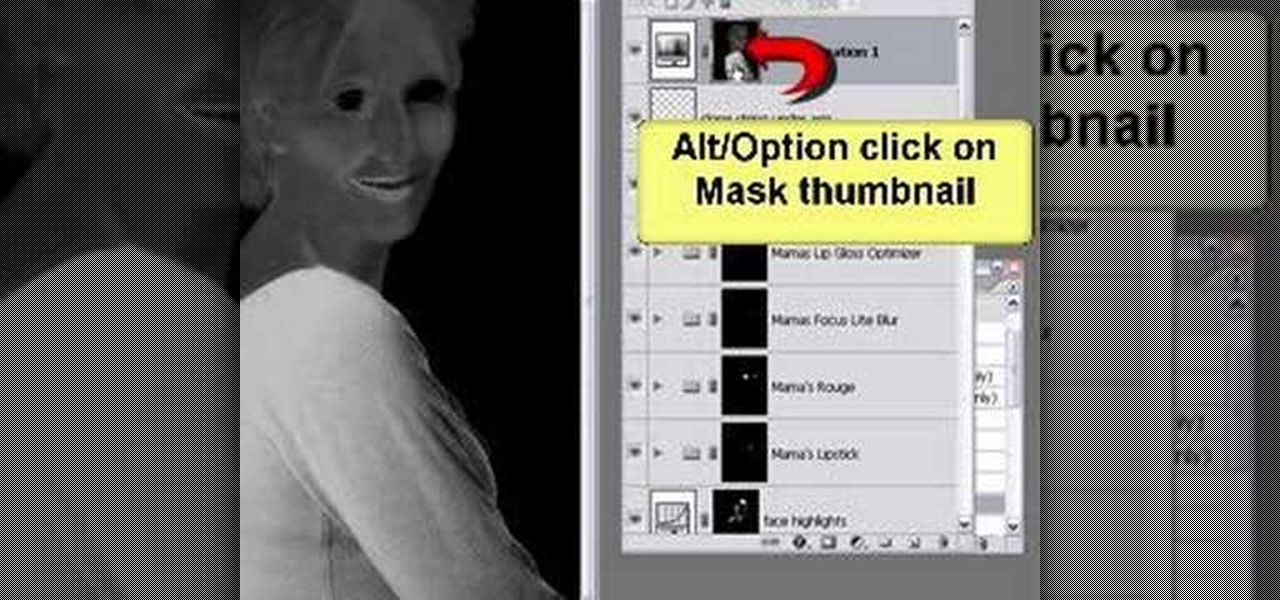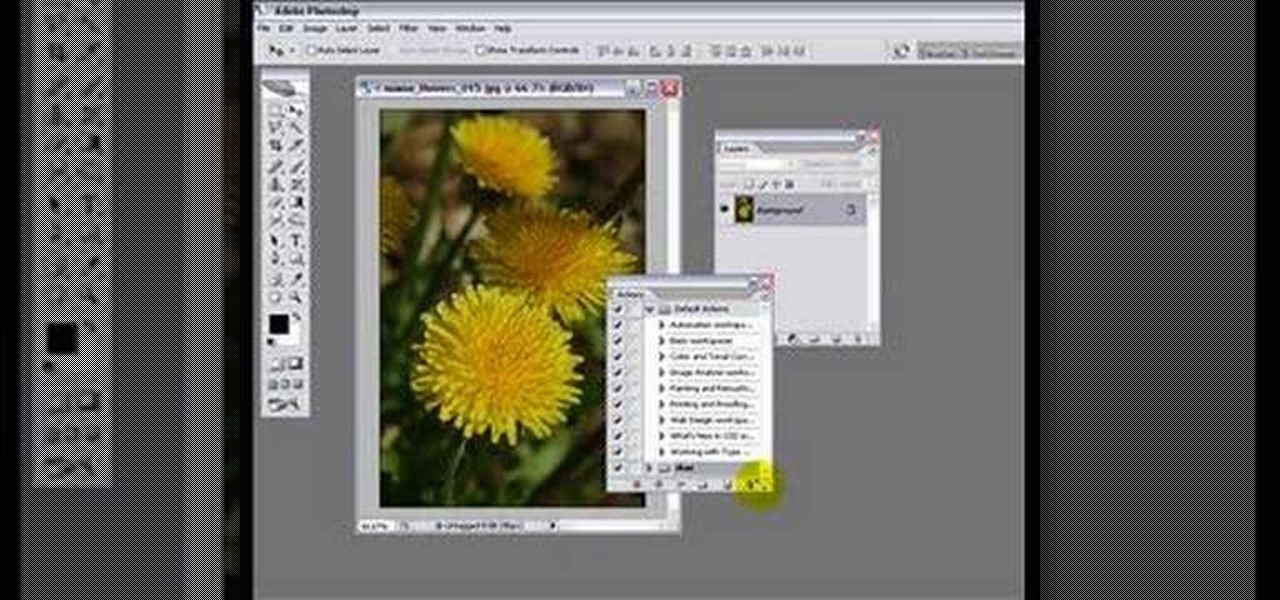
Short and sweet Photoshop "how to" for utilizing the Invert Adjustment Layer as a means to achieve a color infra red effect. Tutorial also shows you how to make an action of this process so you can simply click a "play" button to achieve it on any color image.

Cross processing is a Photoshop version of slide processing. The result would be you get all these weird color shifts. For reasons best known to people who run the fashion magazines, this look became very popular in the 1990s. Start by adding in a curves layer. Add a new adjustment layer for curves. If you've never used curves before it is recommended that you take a curves tutorial first as for this effect we will need to adjust individual color channels. It is not difficult but if you don't...
In this video, we learn how to adjust the spring tension on a Tremolo. First, find the strings in the back that are parallel to the body of the guitar. Then, unlock the nut and set the fine tuners so you have maximum range of adjustment. Start to twist the tuners at the bottom of the guitar until the tension on the strings is enough for you to play correctly. Then, go to the back of the guitar and adjust the crimp screws that are along it. When finished with tightening your guitar, test it ou...

In this clip, actress Julie Crisante explains some of the hardships you might have when you uproot and make the move to Los Angeles. Make sure you are ready for the major adjustment you will be facing. Los Angeles is an incredible city - it is beautiful, the people are friendly and always fun - but moving as an actor can be difficult for some. A lot of actors wind up leaving in their first year when faced with the cost and competition. Stay focused and stay in LA with these helpful tips from ...
This video tutorial by VvCompHelpvV gives you two methods to achieve the Sin City effect in your photos using Photoshop. The Sin City effect is making the main subject of the photo appear colored while the rest of the photo looks black and white. In the first method the subject should be selected using a pen-tool using the settings mentioned. After that right click on the selected areas and make the feather radius 3, inverse the selection and go to image > adjustments and de-saturate and your...

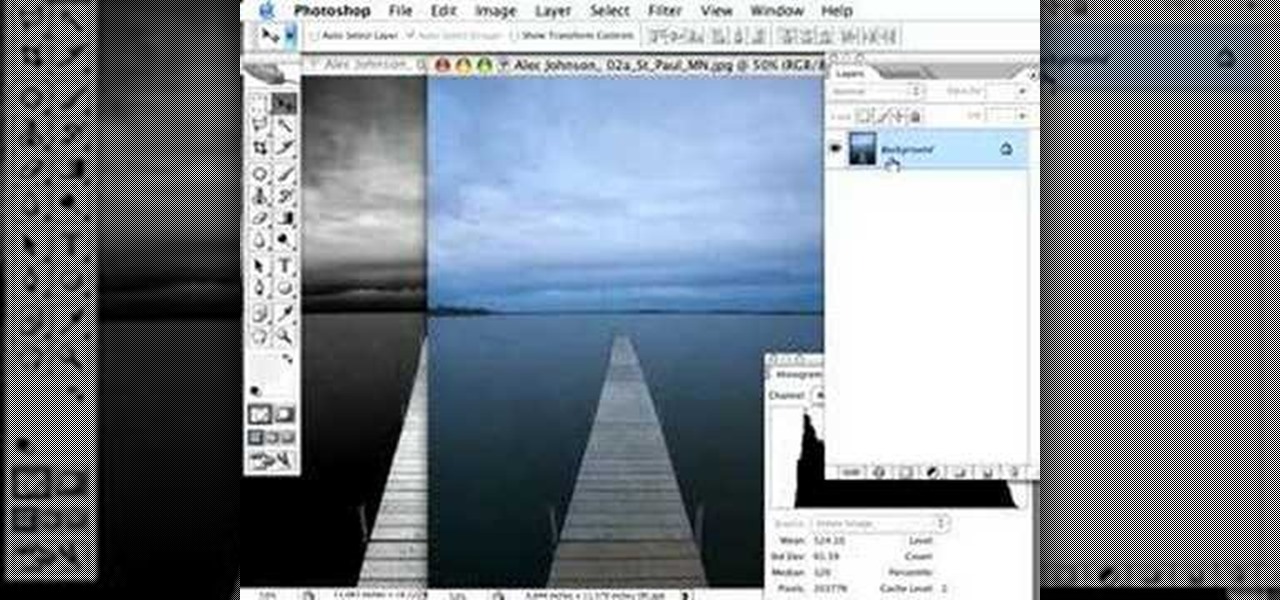
In this video tutorial the instructor shows how to perform basic lighting corrections in Adobe Photoshop. The levels tool is the Photoshop's most used command which has many features to it. Its most basic function is as a lighting correction tool. In this video open an image and work on its adjustment layer so that you do not damage the original picture. Now choose the levels option by right clicking and it shows a pop up window which contains a histogram which shows the population of the col...

Don't know how to create the night vision effect using Photoshop? Well, this video is the solution for you. First of all, select the image that you want to create the effect on. Then you need to open up a new black and white adjustment layer. In the setting box that pops up, go under the preset drop down box and select red filter. Next, go down and check the tint box. After wards, the viewers can set their own photo and saturation base on their own preference.
This is a quick and easy tutorial for Photoshop on how to create a simple but effective reflection of an object. This tutorial uses vector masking, scaling, hot keys, vertical flip, gradient tool, and opacity adjustment. After watching this video you will be able to make a reflection of any object you would like. The product of the tutorial will be a half faded reflection that actually seems as though the image is sitting on a reflective surface such as metal, glossy tile, or a wet surface. A...
In this motorcycle tutorial you will learn how to check and then adjust the valves on a Kawasaki KLR650 motorcycle. You will need to remove the bodywork of the bike first. Once you've done that, watch this video and get ready to do a valve check on the KLR and then a valve adjustment.
This video will show you how to use Adobe Photoshop to create a very realistic looking light ray using a Mask, Radial Blur and adjustment layers. Give your images a beautiful sun-kissed appearance with the techniques demonstrated in this how-to video.
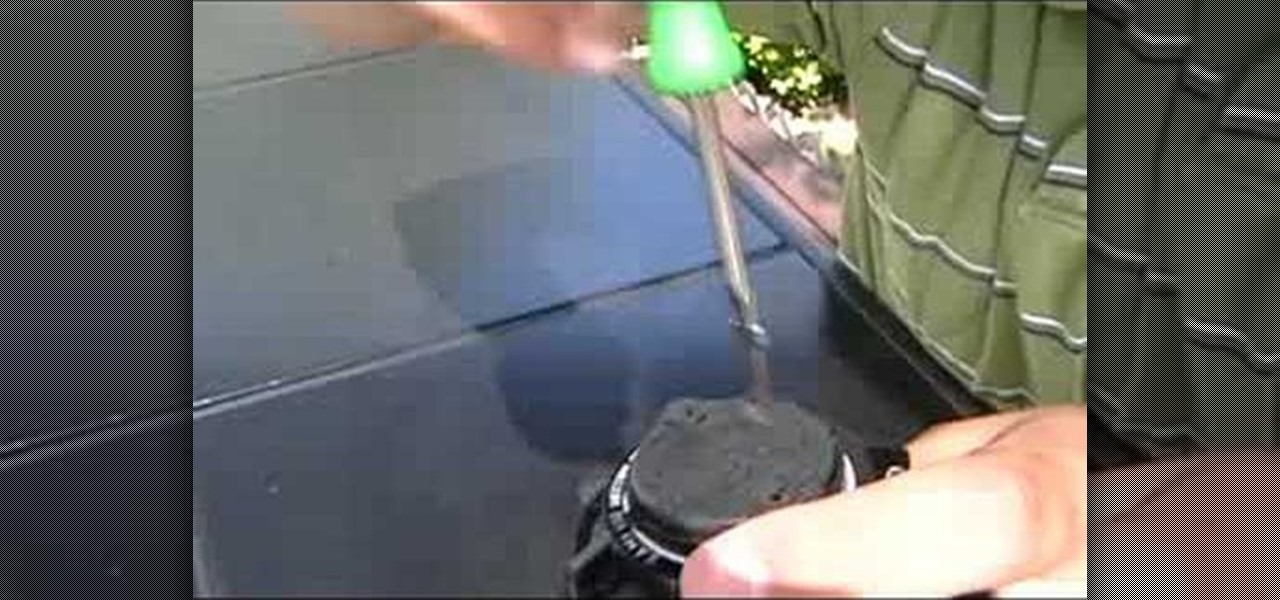
See how to adjust a Rain Bird 5000 Series sprinkler spray arc with help from Sprinkler Daddy's Sean Stefan.
Color correction is a color adjustment you can take advantage of in Adobe Photoshop to alter the balance and contrast of color in a photo or other image. This tutorial shows you how you can take a shaded image and bring out the color and detail in your project.
Unlike rear derailleurs, which are very complicated and come in at least two very different styles, front derailleurs are pretty standard across manufacturers. That means you only have to watch this one video to learn how to adjust them! It features a professional mountain bike mechanic walking you through the adjustment process. This ensures proper shifting and chain flow, which will keep you on the bike and riding smoothly.
THere are many parts of the rear derailleur on a mountain or road bike that need frequent adjustment to function properly and give you proper performance on your rides. This video will teach you how to adjust the cable tension, the jockey wheel, and the hanger of the derailleur, ensuring that the whole system is functioning smoothly and that your bike will work as well as possible.
Tutvid shows you how to add flare and dramatic color to your raw camera images (usually the format of a DSLR). In a step-by-step guide with narration, Tutvid takes you through the process of using CameraRaw (used as an extension of Photoshop but never really brings it in photoshop) to add desired colors to your picture. Pull up your raw file in CameraRaw, and press "Command" or "Ctrl + R" to open up the editing panel. With an example, he shows you how to bring out lights in underexposed (dark...
This video tutorial will show you how to create a seamless background texture using Photoshop using any square or rectangular portion of a picture. The narrator in the video demonstrates step-by-step how to achieve a seamless tiling of a photo through Photoshop and dictates the options that you will need to select. You first have to select a portion of the picture that you want to use. Then the narrator explains that you have adjust the sides of the square portion you chose--labeled A, A' , B...
Open the Adobe Photoshop program. Choose a picture with a head shot. This maybe something that is already in your pictures folder on your computer, downloaded from the internet or transferred from your flash drives, and those photos you may have scanned and saved in your computer.
This how-to video is about how to darken an over exposed image in Photoshop.
Need to lighten or darken up a digital picture? You can make most of your lightening and darkening adjustments, even before you learn more complex Photoshop features like curves and levels; It's easy. Here's how.
This Adobe Photoshop CS3 tutorial shows you how to create a basic cartoon effect on images. This is a great tutorial for beginners and just scratches the surface of what can be done with adjustment layers and the artistic filters in Photoshop. This Photoshop cartoon effect tutorial is best viewed at full screen.
Sue at Paper Source demonstrates how to glue like a pro. PVA is a great paper glue, while methyl cellulose extends drying time (which is perfect for precise adjustment) and is also reversible (making it really handy for archiving). Watch this video crafting tutorial and learn how to use PVA and methyl cellulose glues.
Are you used to feeling stiff and uncomfortable when you drive for more than a few minutes? You'll be amazed how large an effect proper seat-adjustment can have. Learn how to adjust your seat for long car trips and make your road trips ergonomically correct in just a few minutes.
This Photoshop tutorial will show you one method for changing clothing color utilizing the Select Color Range command and fine tuning techniques to use on the mask of the Hue and Saturation adjustment layer. Also shows how to clone.
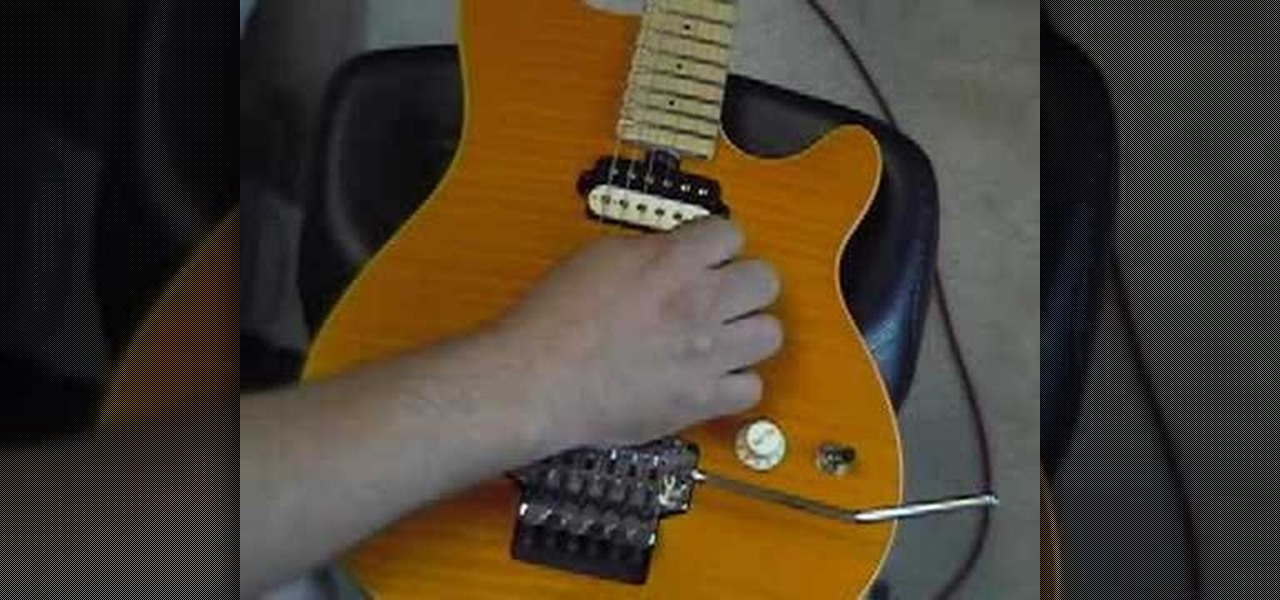
This episode features guitar tech Steve Soest showing us how to adjust the action (bridge adjustment) on our electric guitar.
Using a series of submitted images as guides, this video tutorial looks at creating high contrast black & white images as a vehicle of communicating subject relationships. Technically, you will learn to create adjustment layers. Learn also how to use levels to adjust the tones of the image.
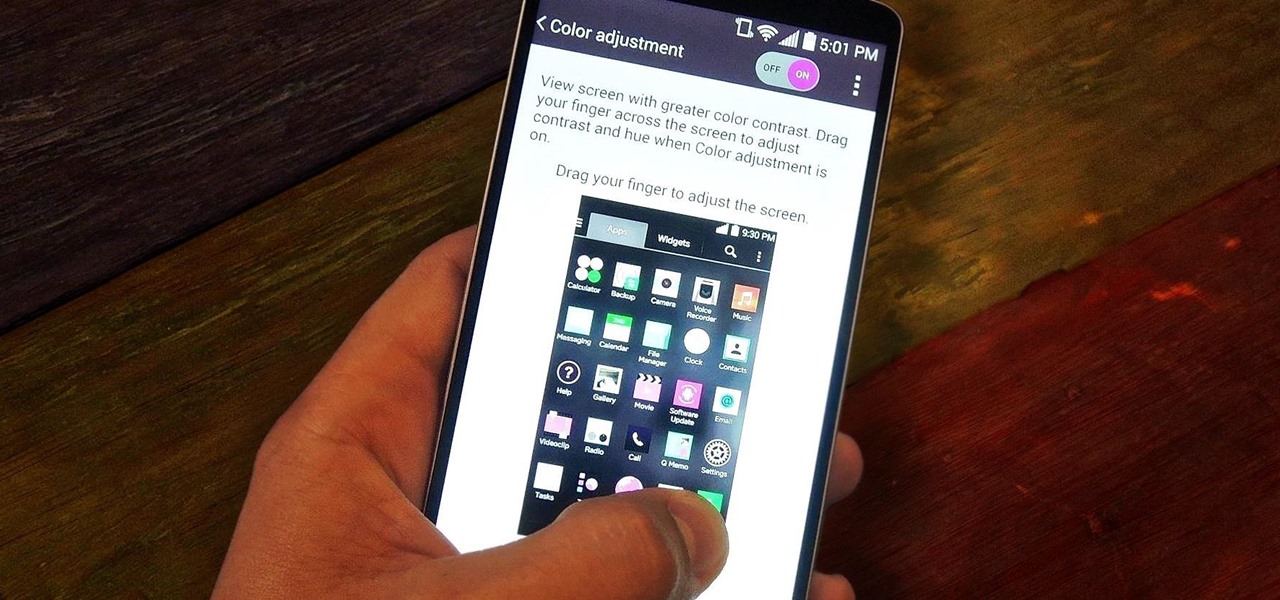
The first thing you probably noticed after turning on your LG G3 for the first time was its gorgeous Quad HD display. The G3 is the first device to offer the soon-to-be standard QHD screen, and it's a beauty. That being said, the colors can look flat and dull, especially when compared to my previous device, the Galaxy S4.
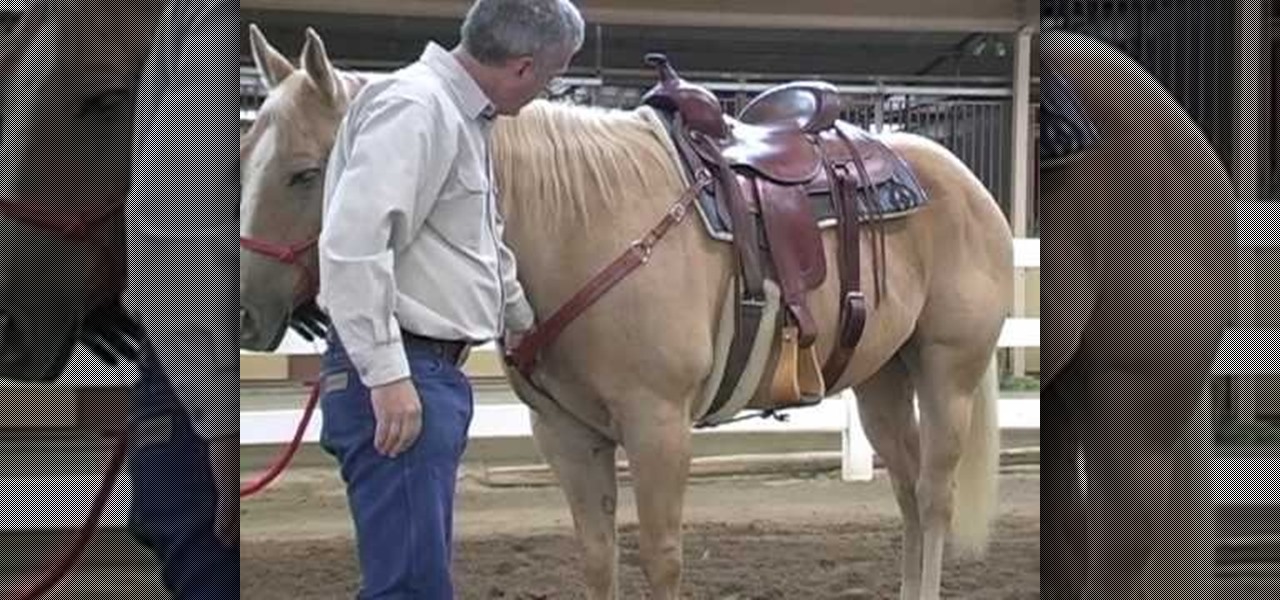
First of all you have to check the breast collar which is attached and hanged to the saddle. You have to maintain safety by not ducking under the horse neck. It is better for you to go around and do your job. Keep your head away from the horse head while attaching a collar. Ask your handler to hold the horse for you. Now pick your breast collar up and reach around the horse. Don’t duck under the horse head, but bring the collar belt to your side and then attach it to the ring on the saddle. N...
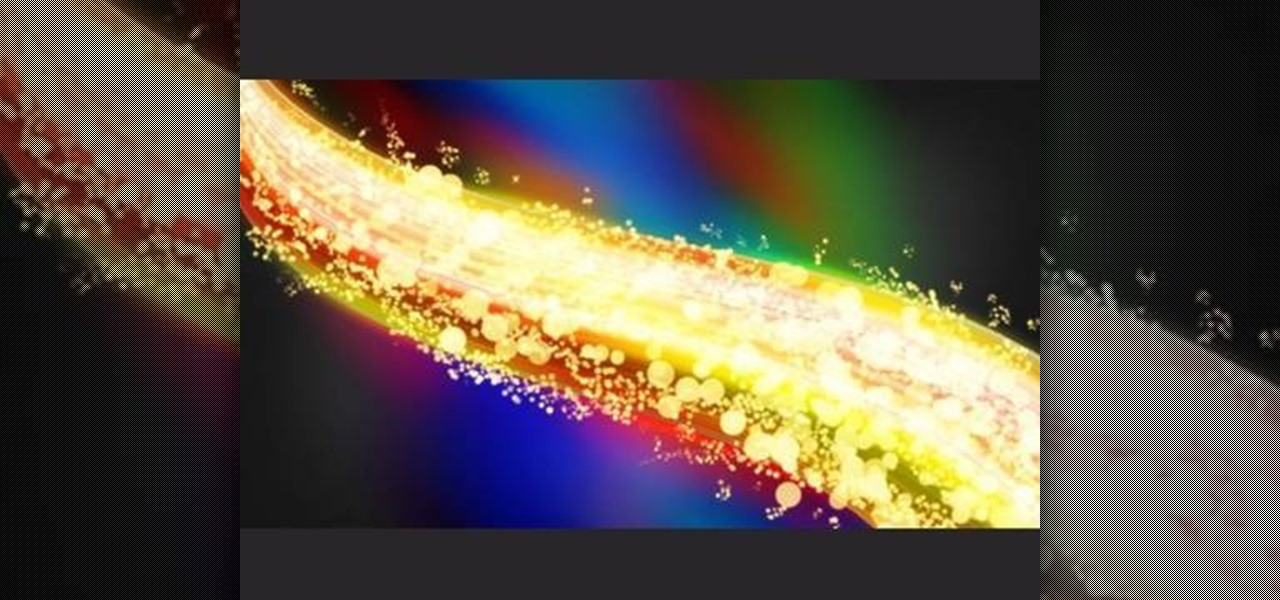
This video will help you learn how to create an Explosive rainbow color swath in Photoshop. First open a new file, keep the width 845, height 475, RGB color mode and white background.
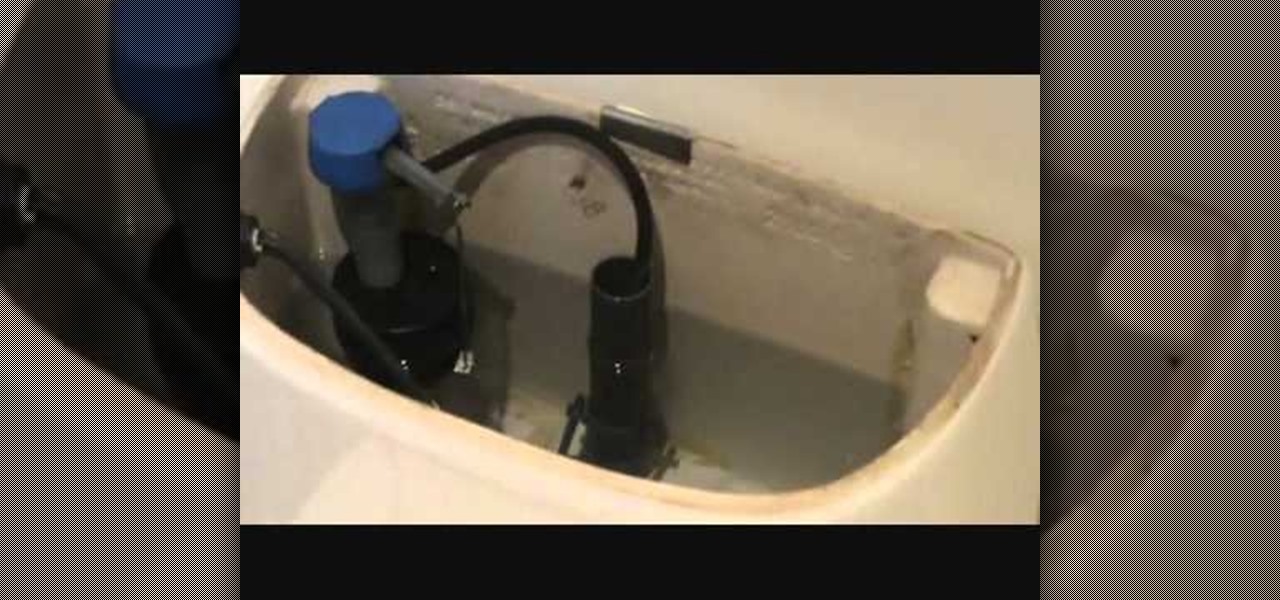
Trim down your water bill and do the planet a favor by adjusting the water height in your toilet tank. The Fluidmaster's float cup on the fill valve can easily be adjusted to set water height in the cistern, just by fine-tuning the water level adjustment clip. This process is very similar for regular fill valves, too, with float balls instead of float cups. All you need to do is hit the sweet spot—the lowest water height needed to properly flush the toilet.
Check out this video tutorial to see how to adjust a Rain Bird 5000 Series sprinkler spray radius with help from Sean Stefan of Sprinkler Daddy.
Null objects in After Effects CS5! In this clip, you'll learn all about them: what they are, how to create them and how to link layers to them. This clip also looks at adjustment layers and their relative advantages over making changes to individual layers within your projects.
In this tutorial, we learn how to create a Lomo effect in Photoshop. This is a contrast that gives the photo a "cool" vibe and change up the effect that you see. First, load up your picture into Photoshop and then go to adjustments, then curve. From here, add a slight s-curve and then add a green channel with the same s-curve that you just created. Go to the blue channel and create the opposite s-channel from the others, then click "ok". Now, go to layer, new adjustment layer, then gradient m...
In order to pattern a wool blanket shirt, you'll need a blanket, scissors, a needle, and thread.
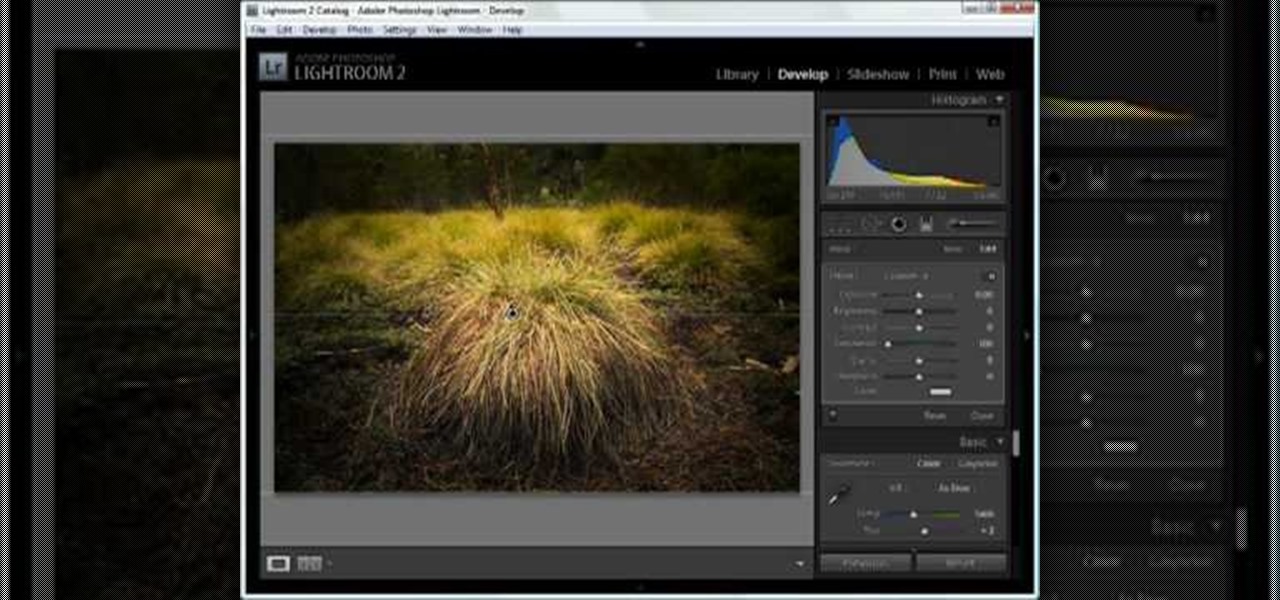
In this tutorial, we learn how to dodge and burn in Lightroom 2. First, open up your image in Lightroom 2 and use the brushes to change the saturation and the colors in the image. You can also use the graduated filter which you can use to apply effects across the image itself. Next, you can add a tint onto the picture and apply a second filter to make the top of the image darker, then make the middle of it brighter. Change the exposure and saturation to make the picture look more realistic. U...
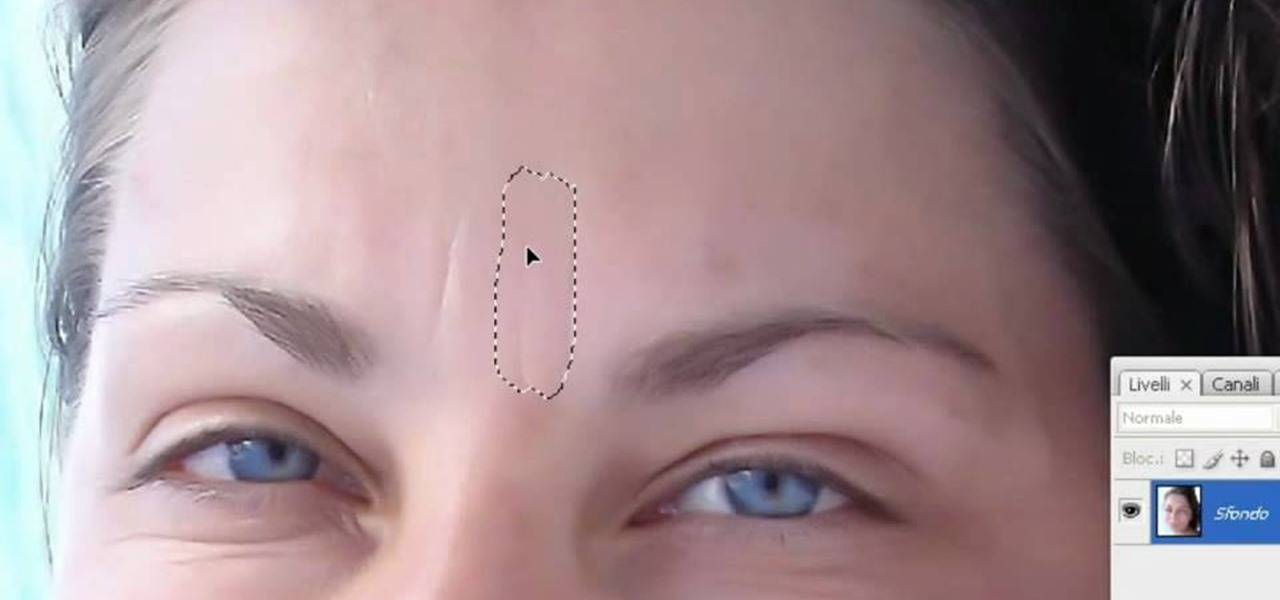
This tutorial teaches us how to touch up eyes while using Photoshop. First, open up Photoshop and zoom into the eyes on a picture you want to touch up the eyes on. First, select the adjustment layer icon and brighten the image. Next, invert the mass and select the "v" key, then pain the eyes on both sides. Next, click "filter" and then click "blur" so you will soften the edges so the picture doesn't look fake. Now, you can click on "before and after" to see what the picture results look like....
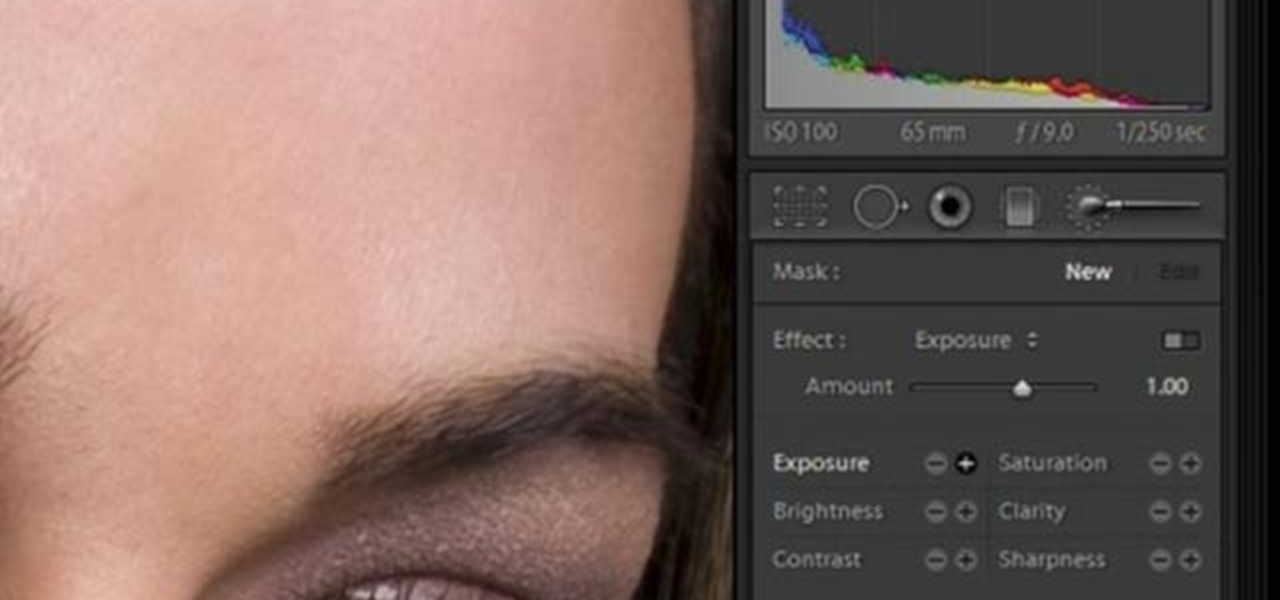
In this software video tutorial you will learn how to soften skin feature in Lightroom 2 in Yanik's Photo School. Select a photo and zoom in to the skin area. Click on the adjustment brush, or ctrl K. Here you can adjust 7 features; exposure, brightness, contrast, saturation, clarity, sharpness and color. But, if you click on the other 'exposure' dropdown menu, you will get these 7 options and additionally a 'soften skin' option. Click on 'soften skin' and it gives you the options to add nega...
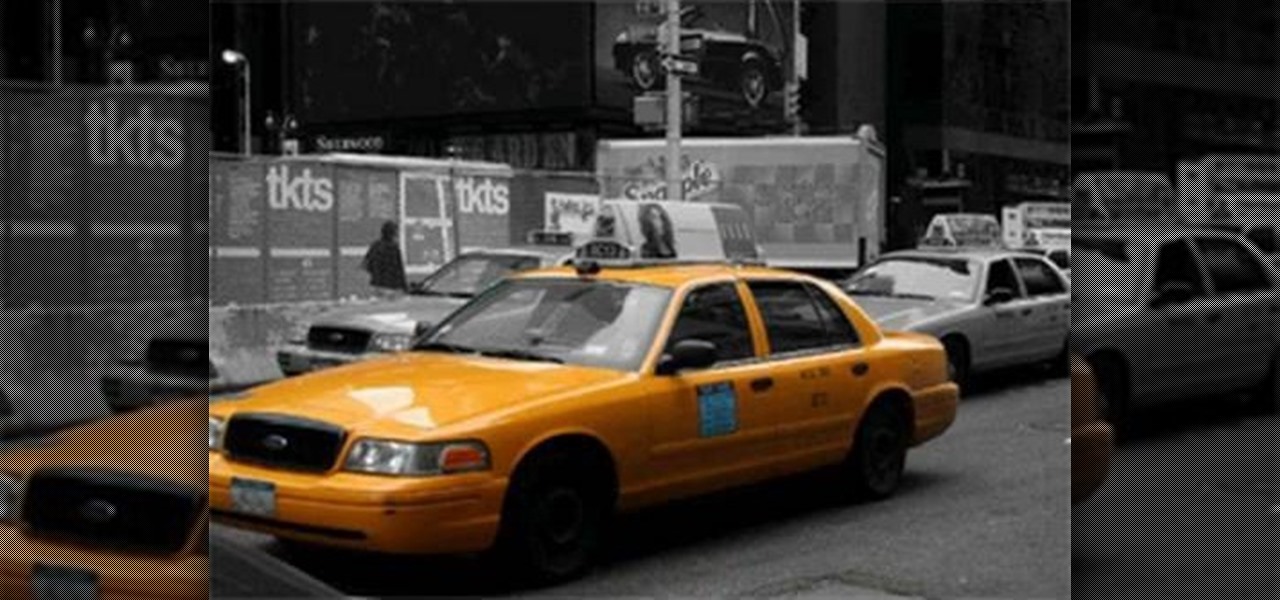
This video shows us how to turn parts of a color photo into black and white and keep the colors for the parts we choose. Start by choosing the polygonal asso tool in the tool box. Now create borders for the parts of the image that you want to keep the colors. Hold the ALT key while clicking to draw borders around a second or third object. Once all the borders are created, right click on your selection and click "select inverse". Now go to "image menu, highlight "adjustment", and then click "b...
In this video tutorial, viewers learn how to smooth skin with noise-ware plug-in using Adobe Photoshop. Users will need to first download the plug-in to be able to use it from the menu of the filters. Now modify the values of Noise Level Adjustment and Noise Suppression. Max the Luminance and set the other values to 50%. Click on the preview from above to see the difference. Then use the filter a second time to make a stronger effect. Any small wrinkles can be eliminated with the patch tool. ...
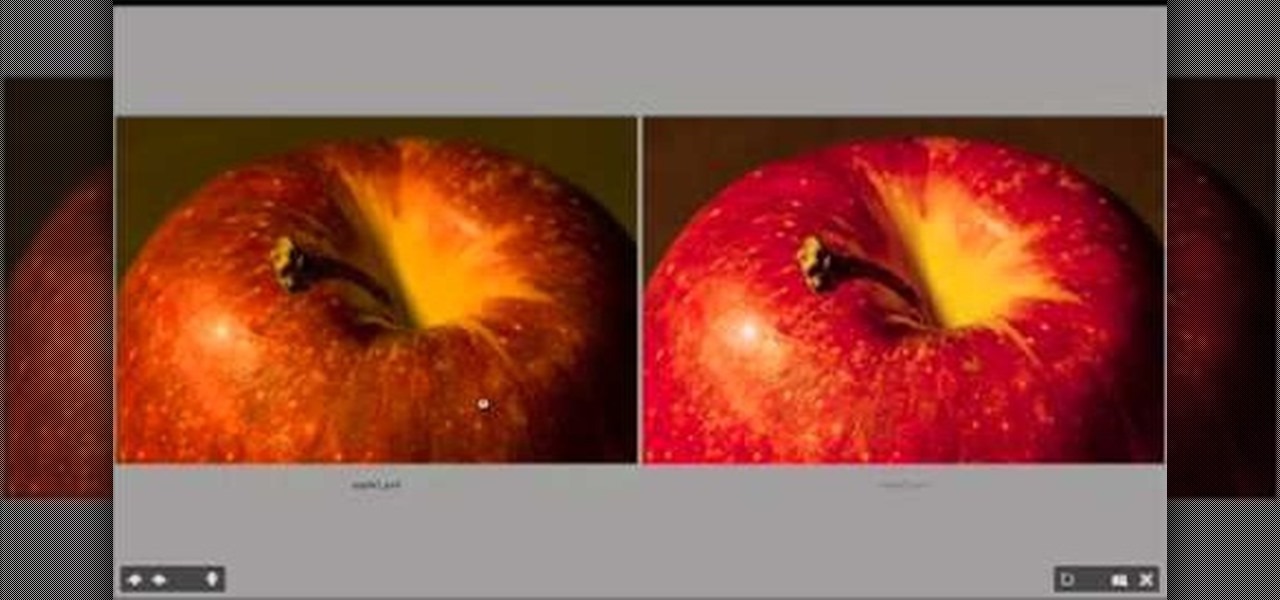
Clicks are made on "Image",then "Adjustments", followed by "Brightness/Contrast" ; contrast is set to 30 and brightness is set to 60 to add more light to the picture. "Adjustment", "Variations" are clicked in that order and both yellow and red are increased. "Filter", "Render", "Lightening Effects" are chosen in that order and a new window appears; within which the style is set to "Soft Omni". The brightness is decreased ;similar to the way it was increased, and contrast is increased to 60. T...
In this how to video, you will learn how to turn a photo into a line drawing in Photoshop. First, open your image in Photoshop. Create three layers of the same photo. The top two layers will be worked with. The bottom layer will remain the same. Take the top layer and change it to color dodge. Select control and I on the keyboard to invert it. Go to filter and blur to choose Gaussian blur. If you have dark lines, use a small amount of blur. You can use a lot of blur to get a unique look. Clic...