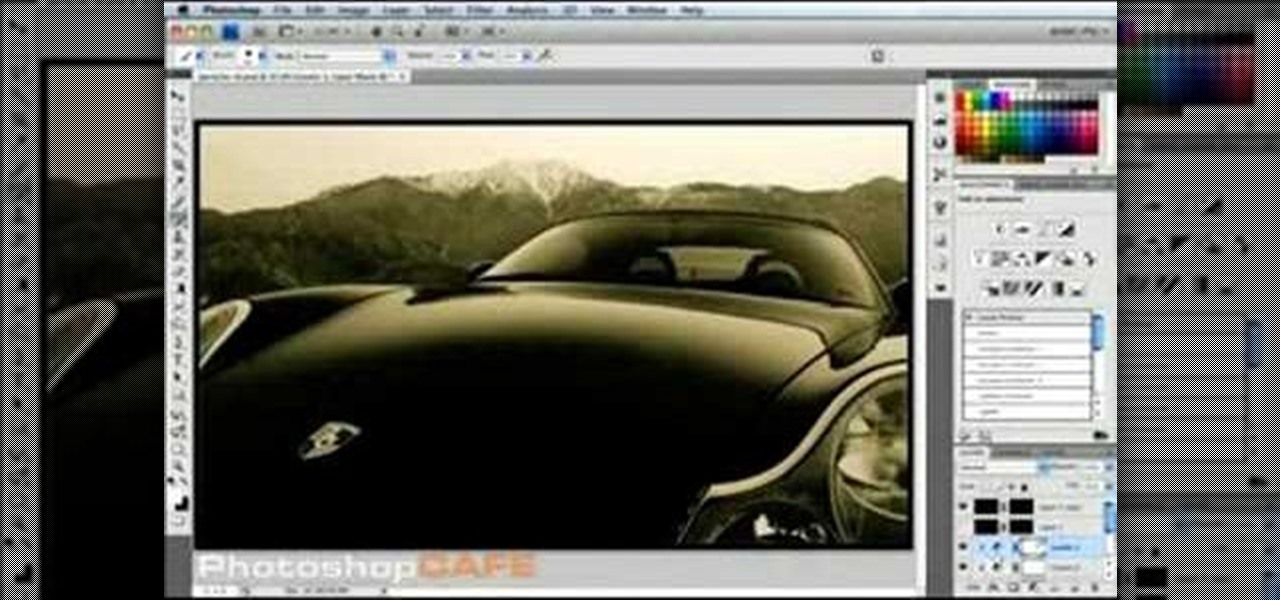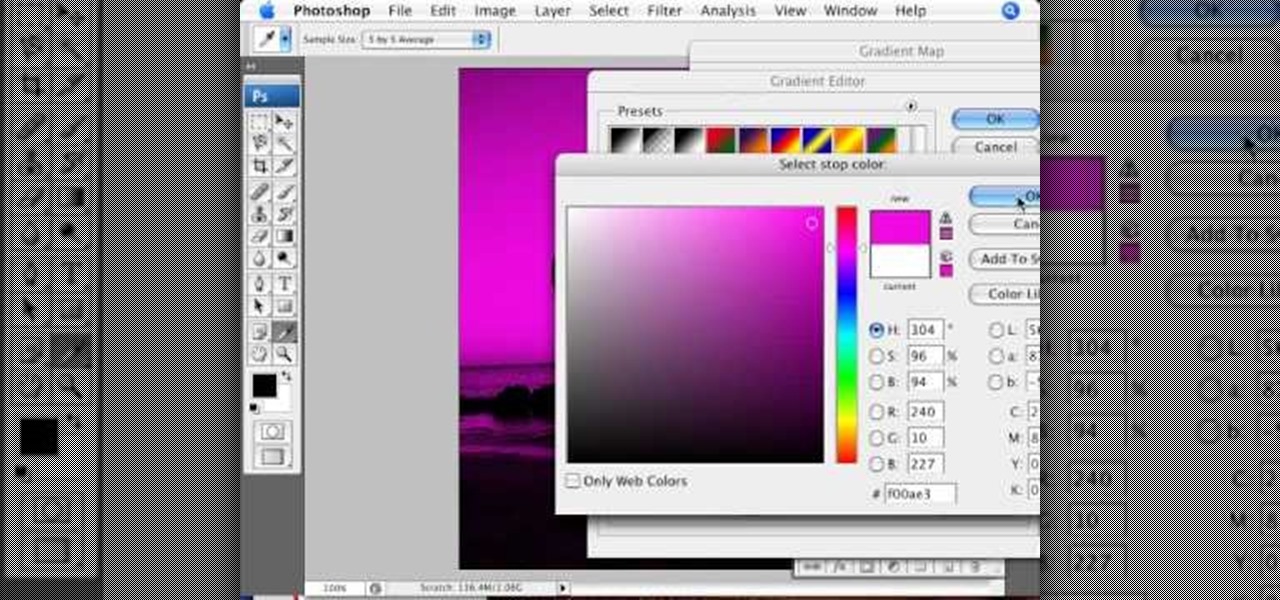
In this video tutorial brought to you by photoshopuniverse, you will learn how to apply mood lighting to images in Photoshop. This is achieved by applying an adjustment layer, called a gradient map, which allows you to adjust the color of the light in an image. You will learn how to access the gradient map from the adjustment layers menu, how to apply the gradient map, then overlay the new layer and fine tune the gradient to create more dramatic looking images.

Creating a game using Flash CS4 and Actionscript 3 is a great way to start the gamemaking career you've always dreamed of. If you want a game company to hire you, it will really help if you have at least one simple, creative game in your portfolio. If you want help with this undertaking, this seven-part video series will teach you how to create a simple spaceship shooting game from start to finish. The first three videos cover physics topics like acceleration, friction, and velocity, the adju...
Pixel Perfect is the "perfect" show to help you with your Photoshop skills. Be amazed and learn as master digital artist Bert Monroy takes a stylus and a digital pad and treats it as Monet and Picasso do with oil and canvas. Learn the tips and tricks you need to whip those digital pictures into shape with Adobe Photoshop and Illustrator. In this episode, Ben shows you how to use color correction in Photoshop.
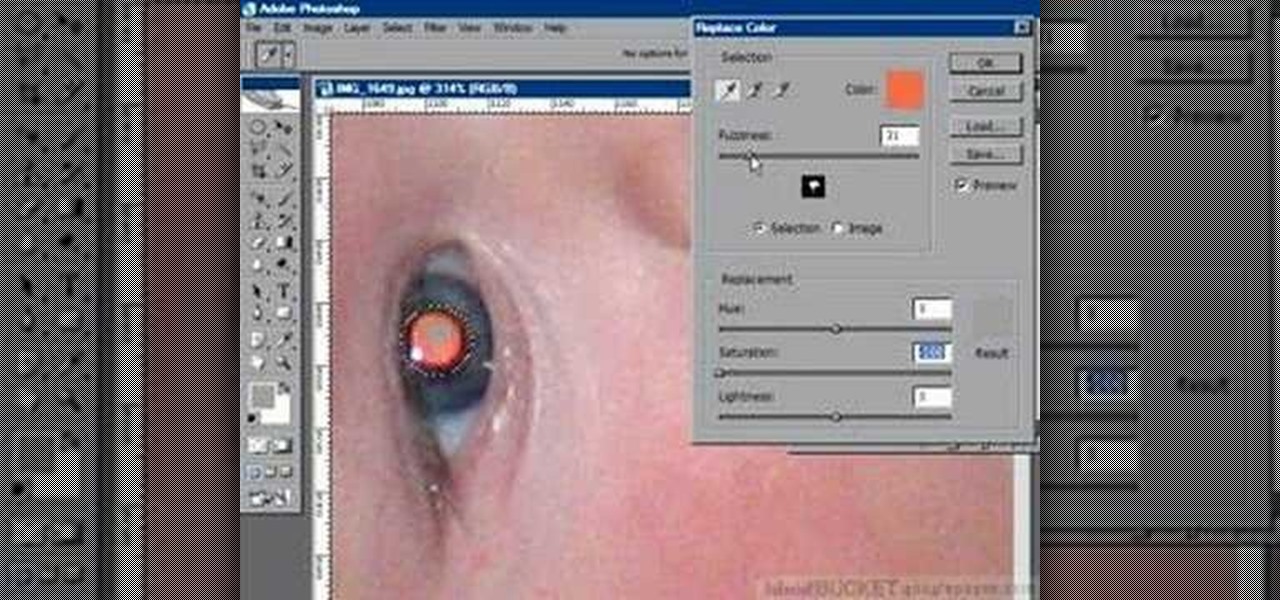
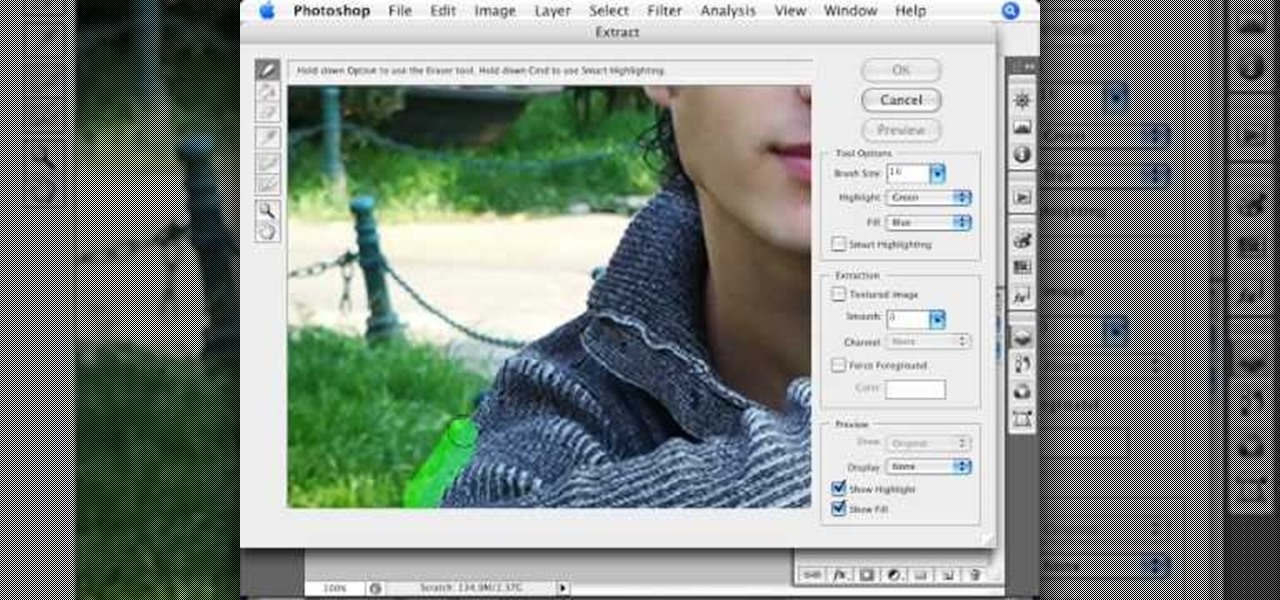
If you have a photograph with an extreme red eye problem, then you will have to take steps above and beyond using the built-in red eye reduction tool in Adobe Photoshop. In extreme cases, red eye will actually contain colors outside of the red spectrum of light. Since the red eye tool only works on this spectrum of light, you will have to manually fix extreme red eye by working on tools that are effective across all different wavelengths of light. The most effective tool at your disposal in t...

Mr. Shane Benedict describes the delicate balances necessary to hit that perfect boof every danged time.
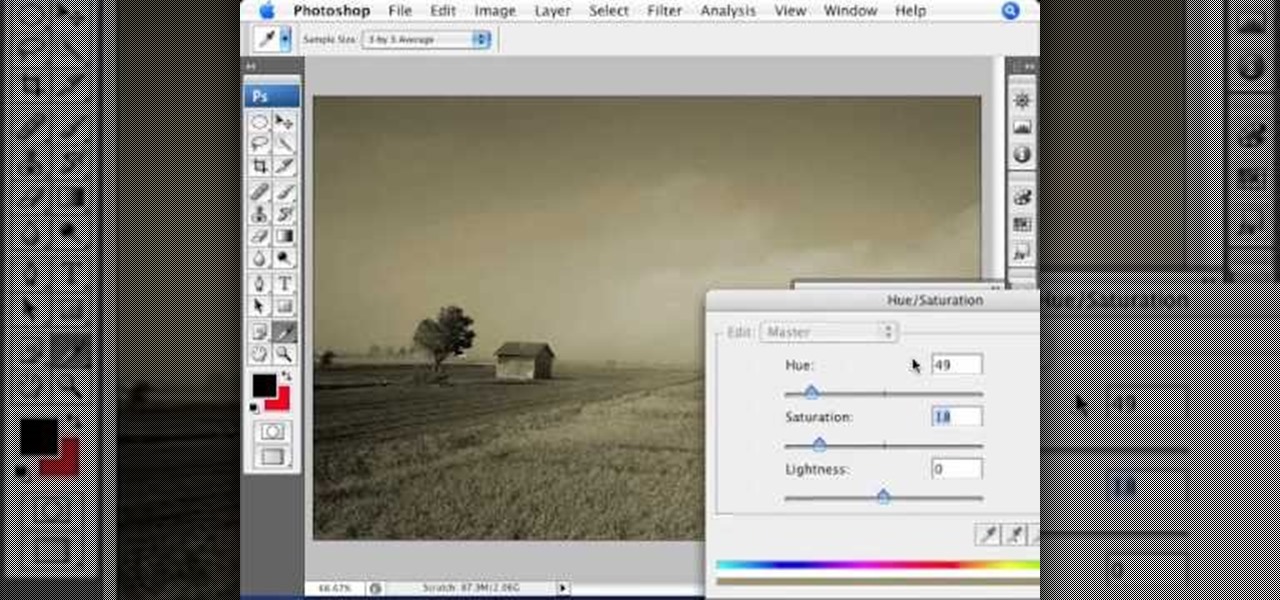
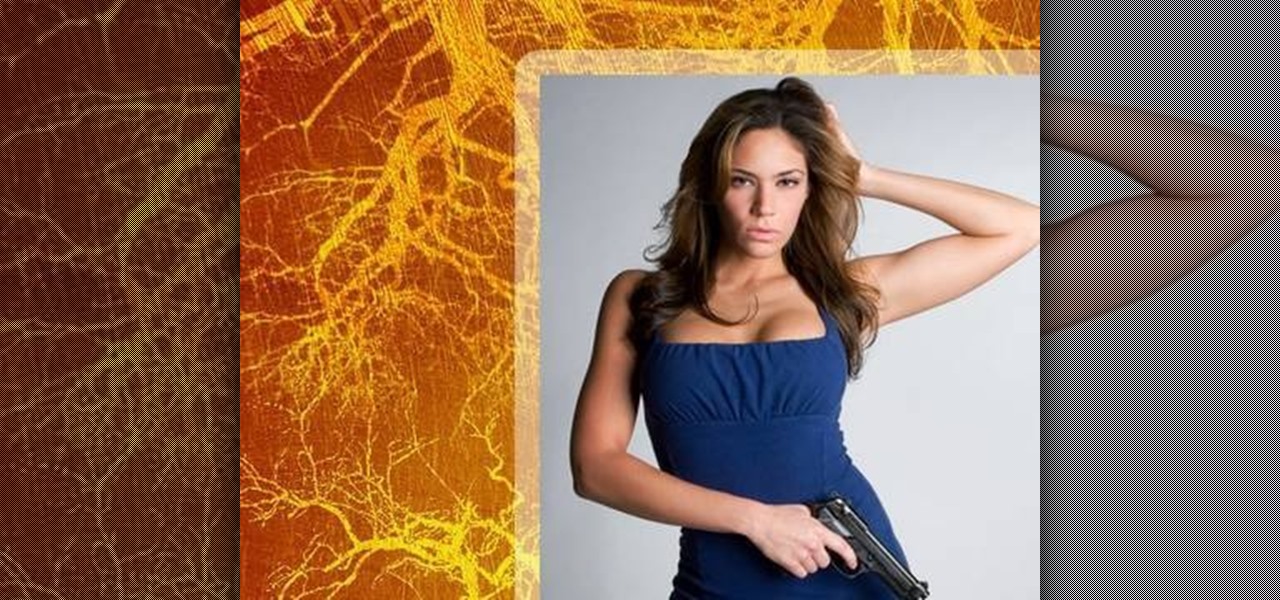
This how-to video is about how to add a color tint to photos in Photoshop.

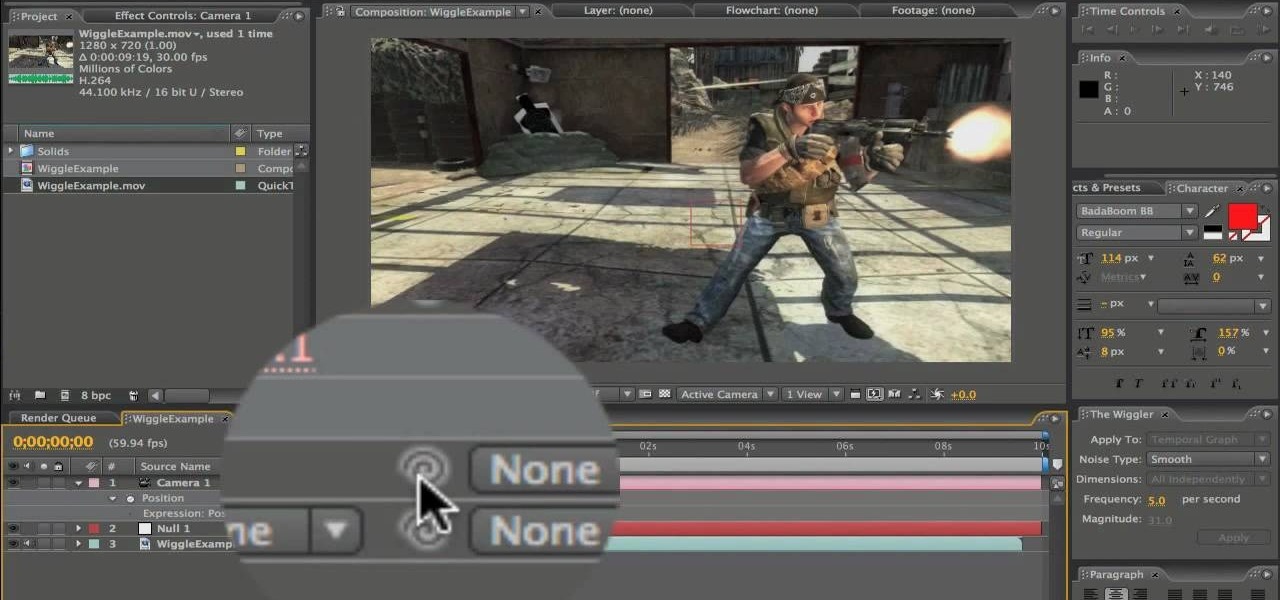
Increase the realism of your video footage with camera movement and color correction. In this video tutorial, Adobe After Effects is used to add realistic camera wiggle and shake to video footage from Call of Duty: Black Ops, simulating a handheld camera. In addition, the video tutorial also goes over some basic curve adjustment for color correction to give the video footage a unique look.
In this clip, learn how to use masks, adjustment layers and layer effects to enhance your digital images in Adobe Photoshop CS4 or CS5. Whether you're new to Adobe's popular raster graphics editor or a seasoned designer looking to better acquaint yourself with the new features and functions of the latest iteration of the application, you're sure to benefit from this free software tutorial. For more information, watch this video guide.
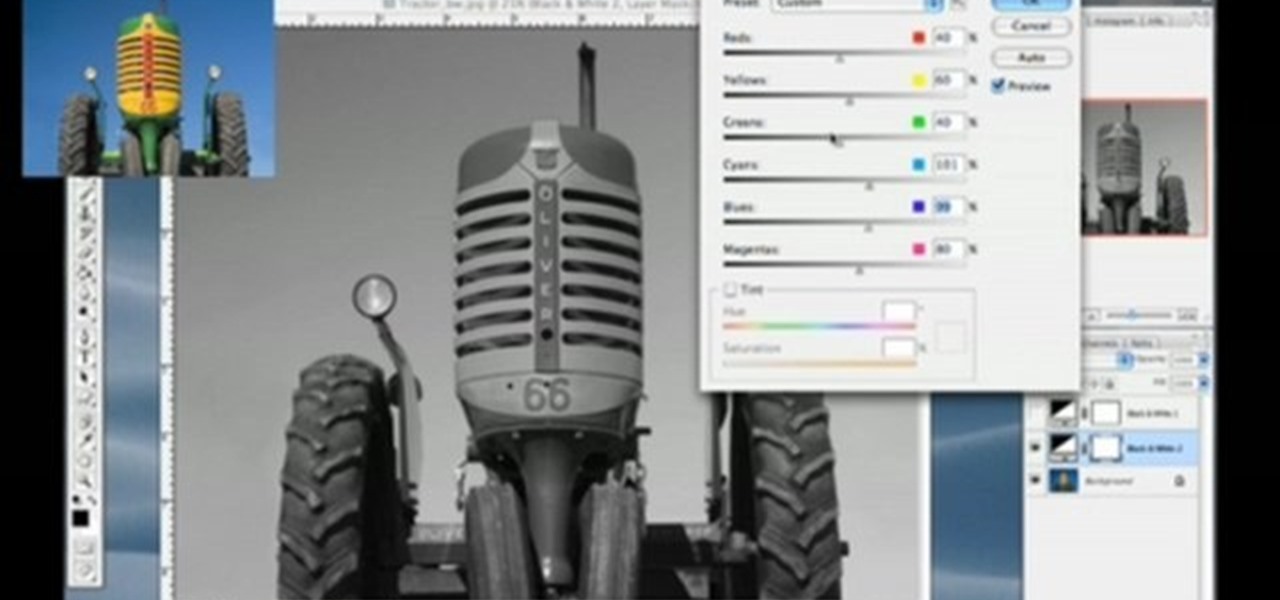
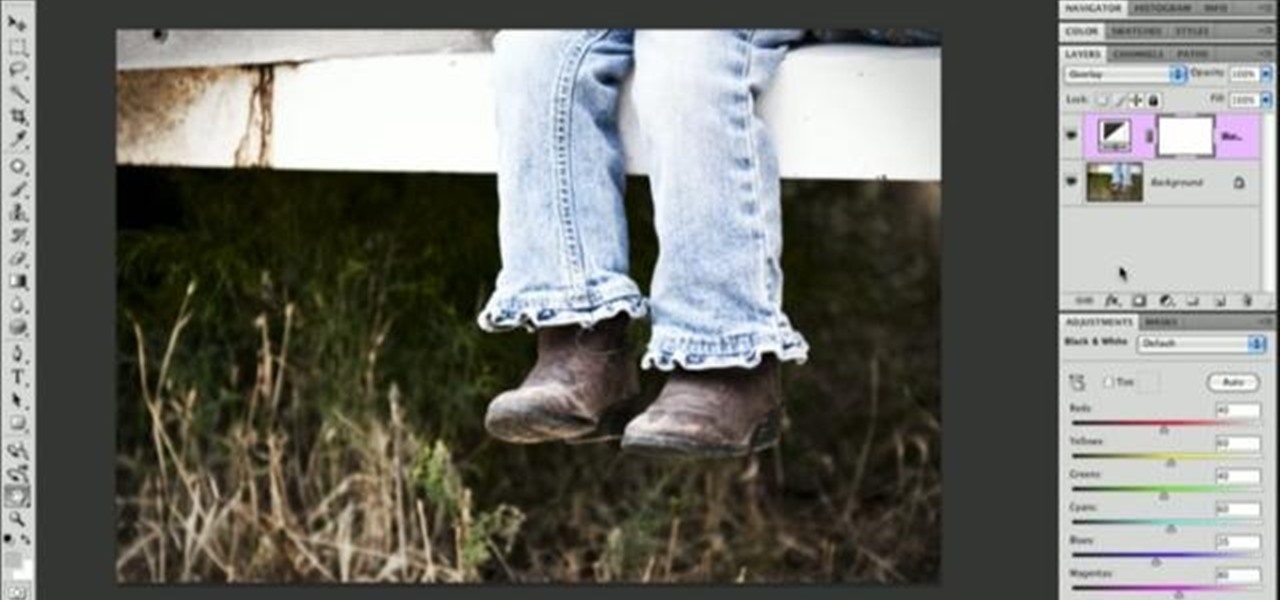
In this tutorial Lindsay Adler will teach you how to do exquisite black and white conversions in Photoshop (cs3 and newer). Using the black and white adjustment layer tool in Photoshop, photographers are given complete control and simplicity for converting images to black and white. Lindsay will introduce you to the power of this Photoshop tool and provide several tips on making conversions.
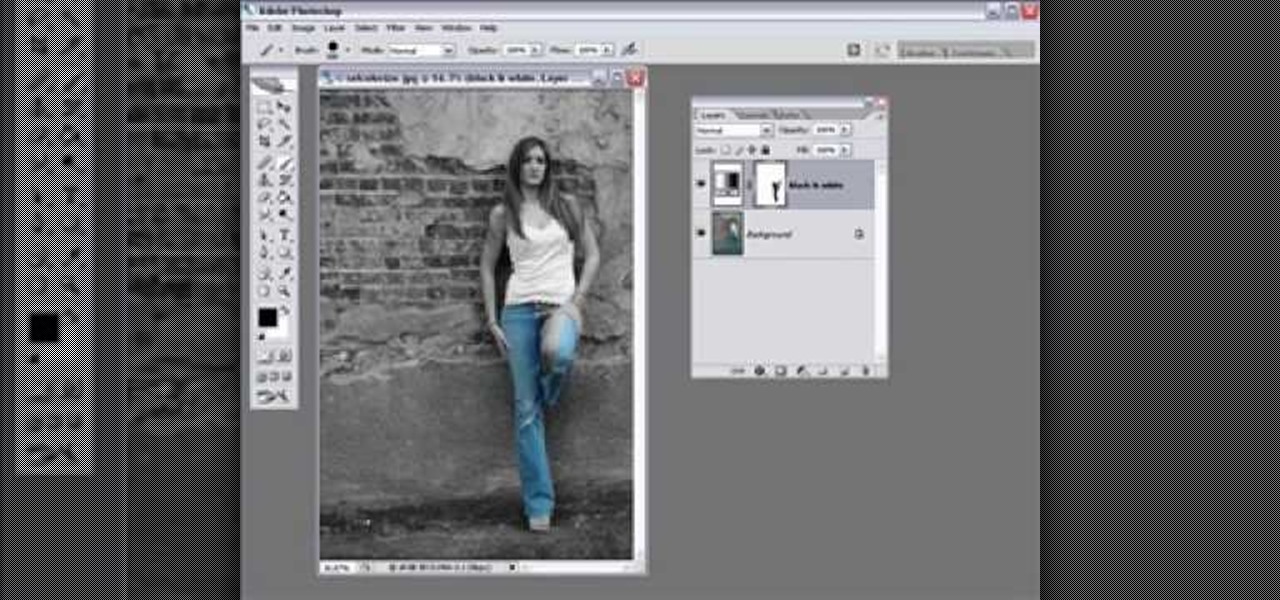
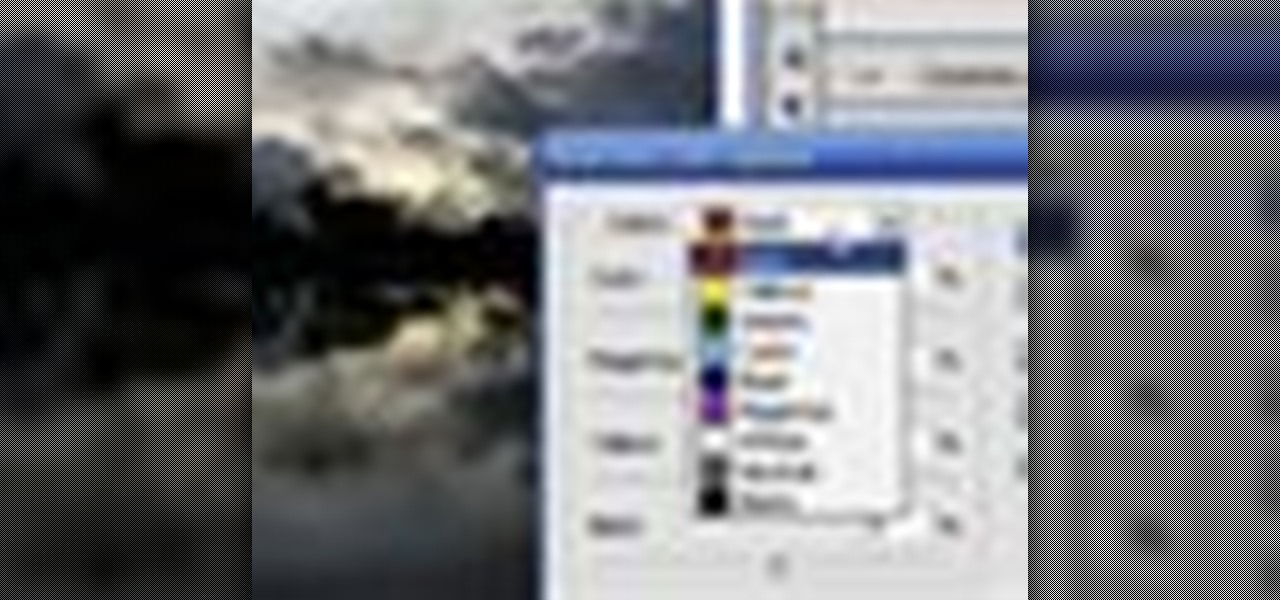
Learn one very simple way, using the mask of the Black & White Gradient Map Adjustment layer in Photoshop to conceal or reveal parts of the image in color and other parts as a black and white version.
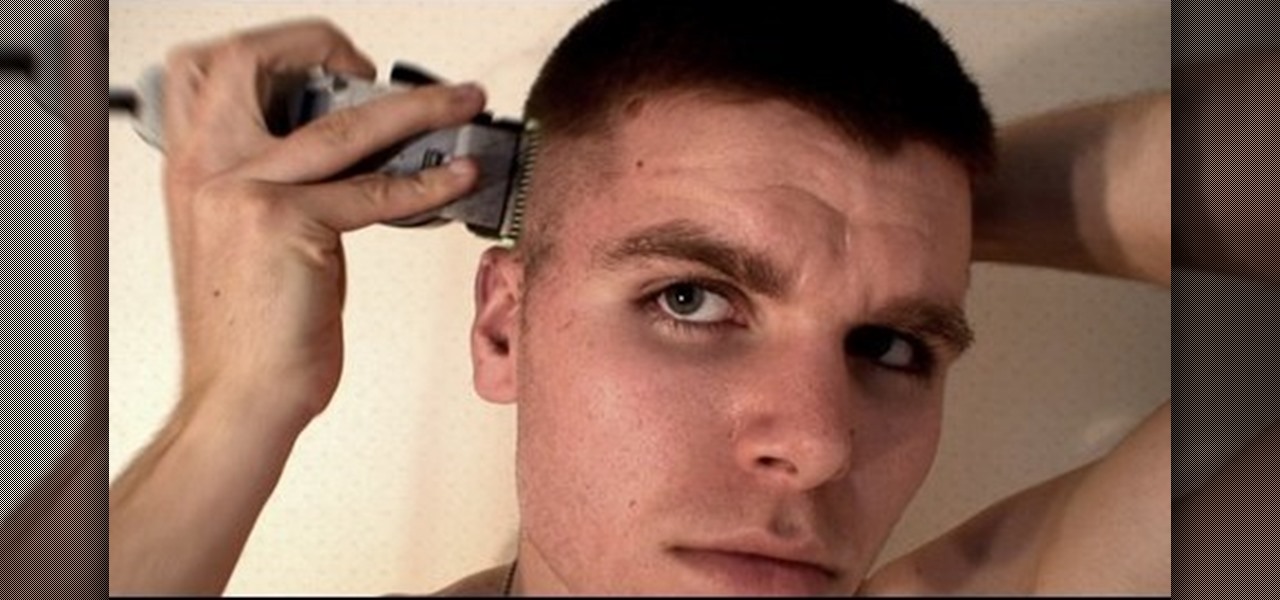
In this video, we learn how to cut your own hair high and tight. Make sure you don't miss any spots by your ears, and make sure the sides are cut evenly. If you have bangs in the front, cut from the back to the front using a shaver. If you want to get rid of your bangs, cut from the front to the back. When you're done, feel the back and make sure it feels completely even. On the razor, there's an adjustment lever, so you can use this to make different feel from the bottom to the top of your h...
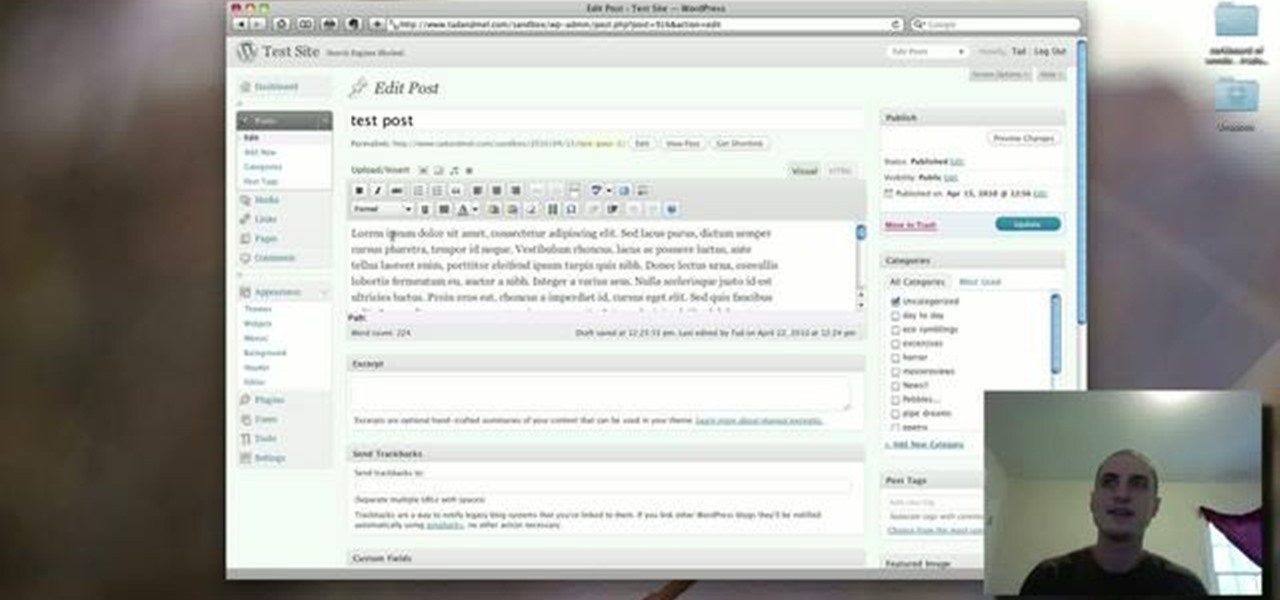
In this clip, learn how to use the Format Dropdown Menu, Underline, Align Full and color adjustment buttons in the WordPress editor. Every version of WordPress brings with it new features, new functions and new ways of doing things. Fortunately, the very same technology that allows an open-source blog publishing application like WordPress to exist in the first place also makes it easy for its users to share information about the abovesaid things through videos like this one. Take a look.
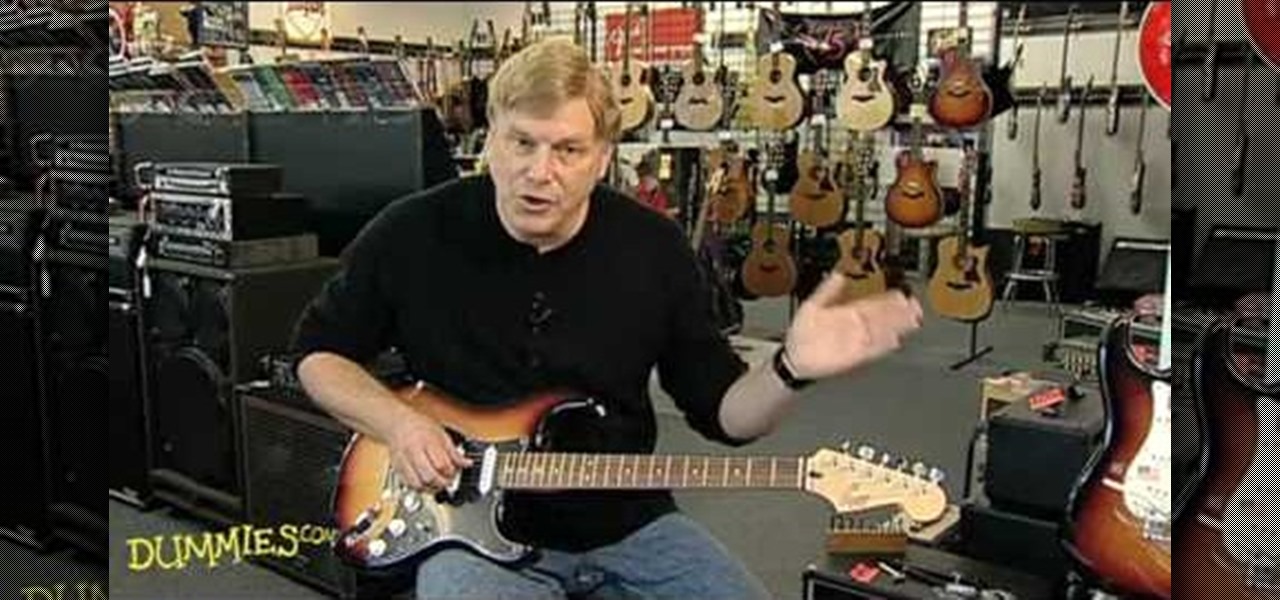
First off, if you're new to electric guitars, here are some handy dandy definitions for you before you watch this video:
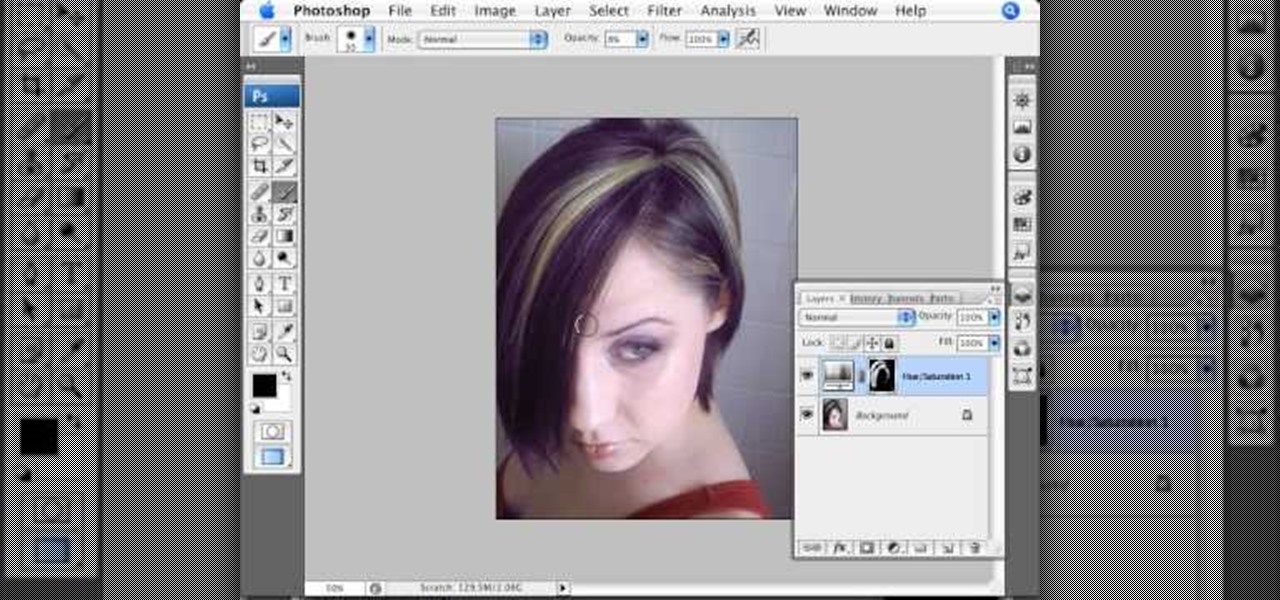
Photoshopuniverse will show you how to change a person's hair color in PhotoShop. You can achieve this by using hue and saturation adjustment layers and set to colorize. Set the saturation to about 50%. Go back to the background layer and select the color range select parts of the hair color, select the parts of the hair you want to change and with the eye dropper click it. Once the selection is made invert the selection the color will change. You can now change the hue to make it what you want.
This video by photoshopuniverse shows you how to make any photo seem as it was taken in a studio. Take the working photo and add a new layer over it and fill it in black as shown. Add a newer layer over that and add the filter> render> clouds effect. Increase the opacity of the cloud layer and merge it with the black layer as shown. Add the splatter effect and the sprayed stoke effect as shown onto the merged layer and add a hue and saturation adjustment layer and colorize it as desired. Go t...
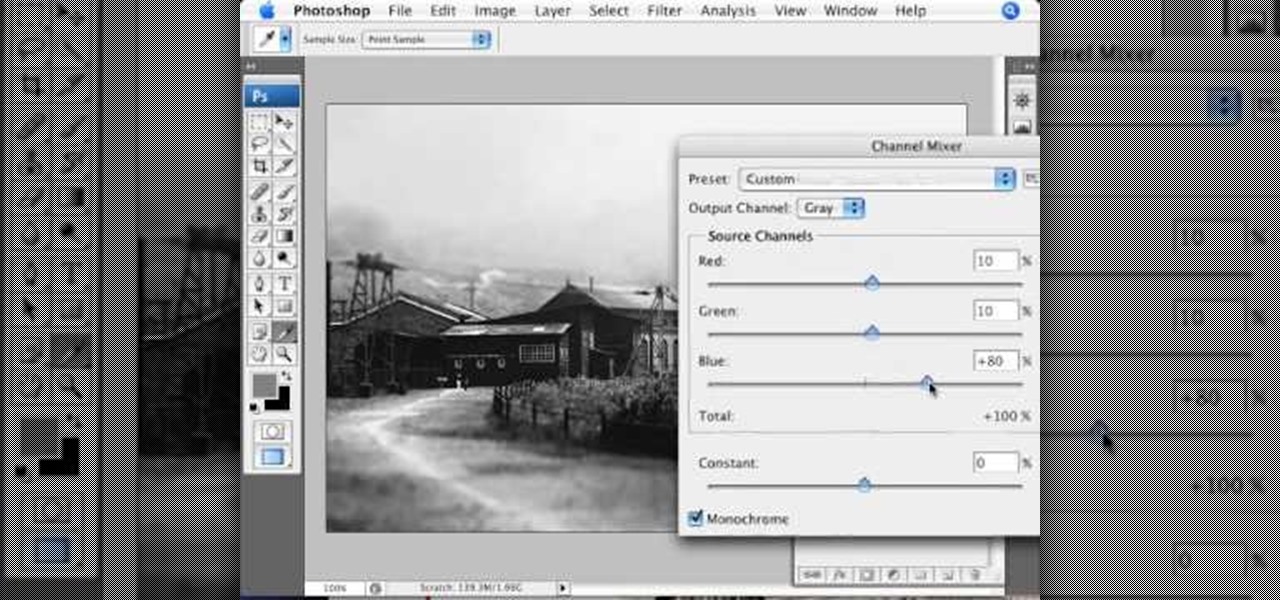
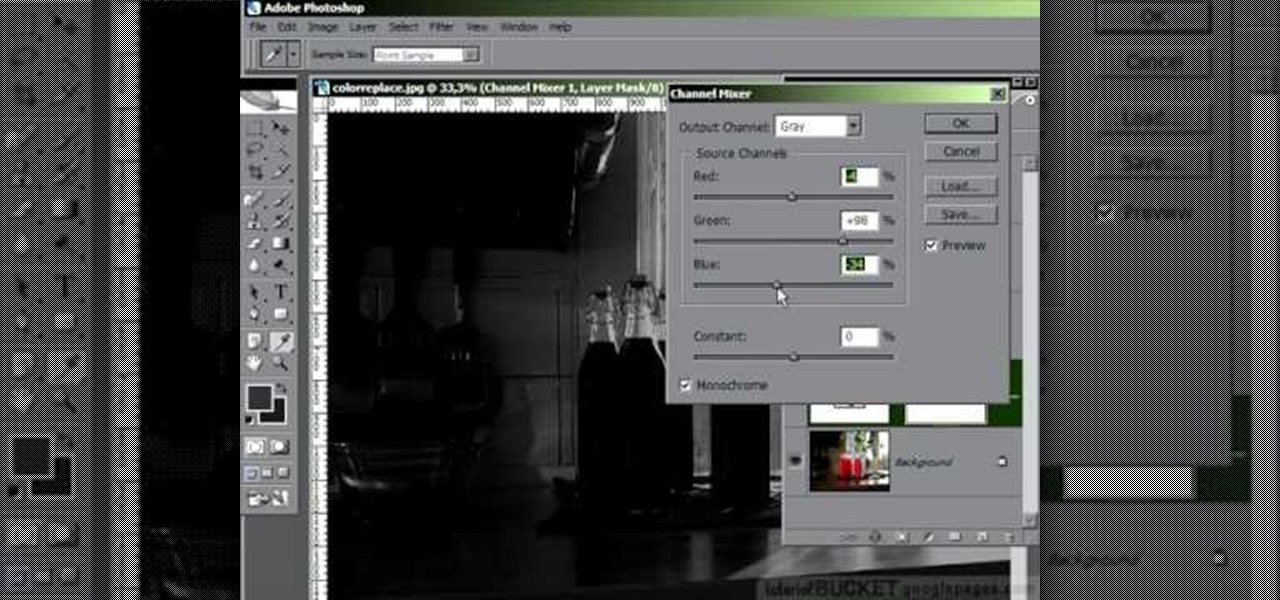
This video demonstrates the split tone effect in Photoshop. A split tone effect makes a picture look more rustic by changing the tones. First, add an adjustment layer to the picture by opening the channel mixer window. Select Monochrome and adjust the RGB values to create a black and white image to your own personal preference. Next, add another layer by opening the color balance window. Here you can change the colors of the light areas by selecting Highlights and changing the color sliders, ...
This video shows you how to use an aspect of Photoshop so that you can fix snapshot pictures that may have gotten an exposure level you did not want. This quick and easy tutorial video shows you how easy it is to adjust the layers in the screen. With different adjustment tricks for the layers to use if you are unsatisfied with the results you are getting. Each video will take moments to do and once saved you can move on to edit any other photos that did not come out with exposures that you wa...
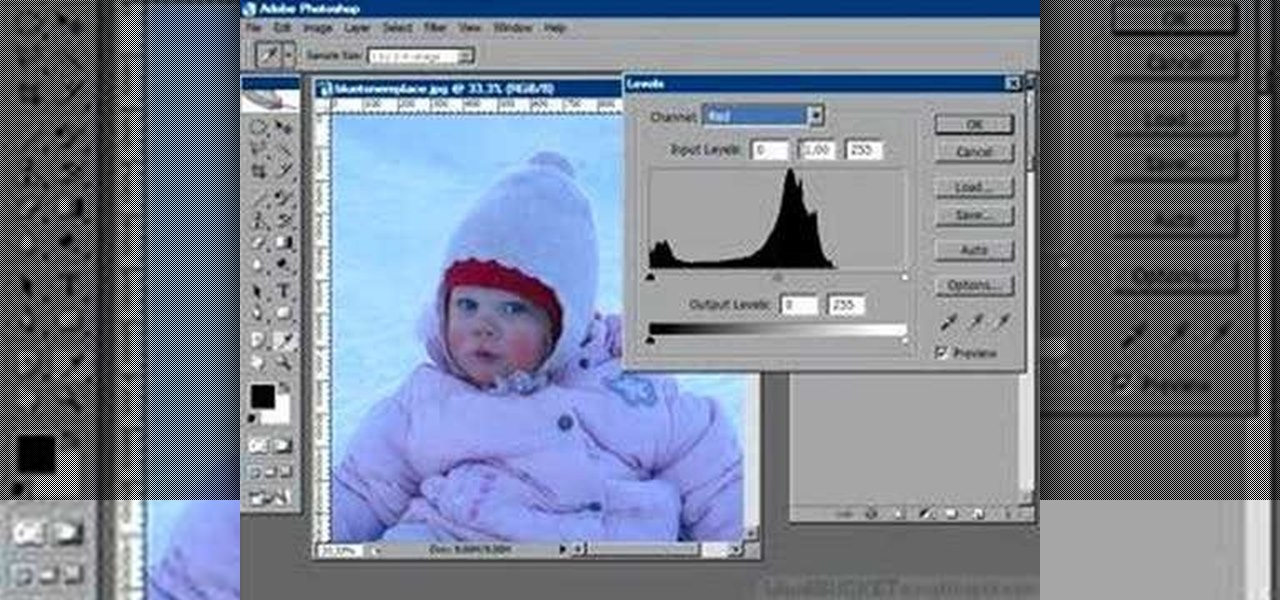
This how-to video is about how to color correct photos using Photoshop levels.
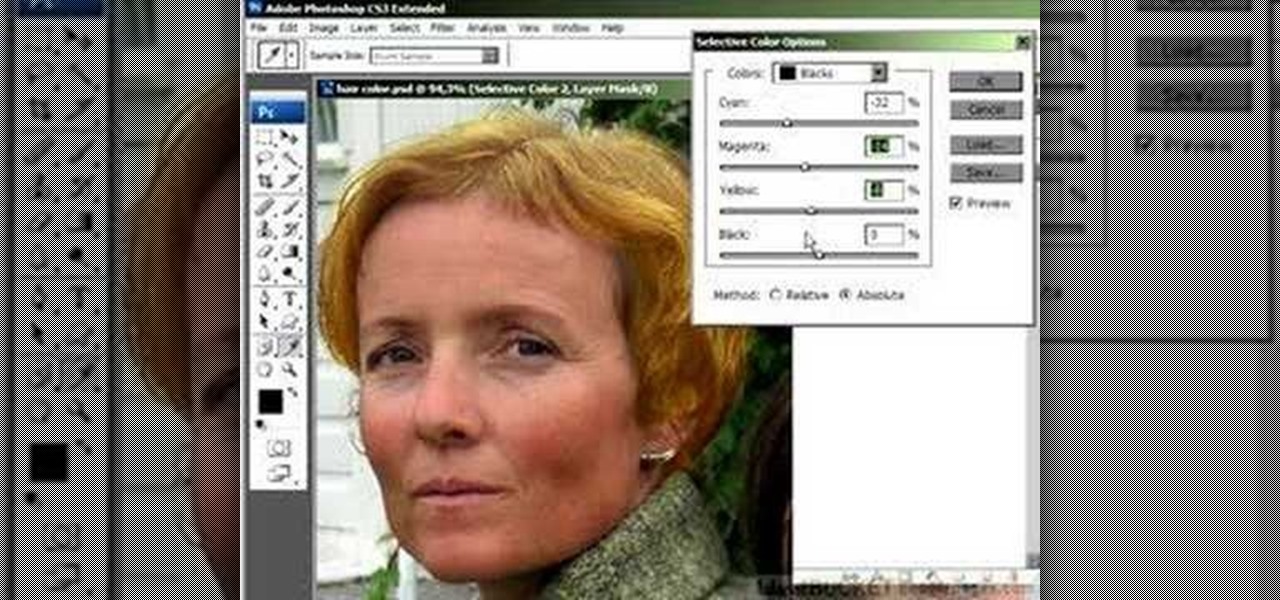
In this Photoshop tutorial the instructor shows how to change the dark hair color to blond. To get this accomplished you need to use a couple of very special techniques. First use the selective adjustment layer and select the outline of the hair. Now use the selective color option and change cyan and magenta settings to about minus forty. Now changing the other yellow color to achieve saturation and black colors to achieve the effect with shadows. Now next change the colors of black so that t...
In this video we are going to light cast a window so we can add more focus to the photos. First take unremarkable photo, then find a window image to transfer and select all Ctrl+a. After that copy it to the previous image. Click layer 1, then select the white space in the window that allows the sun light to pass by using magic tool quick select the part of the window. Delete the layer, after that go to adjustment layer, select levels. Adjust the level so that the color of the window is darker...
Adjusting the color of specific objects within your images in Photoshop is crucial. Sometimes fine tuning the color of just one component in an image is required. While an image may be adjusted globally at once, this approach lacks flexibility. This tutorial will show you the proper steps from the creation of an adjustment layer to the appropriate and functional calibration of the hue and saturation options. Get the most out of these tools and maximize your productivity in Photoshop.
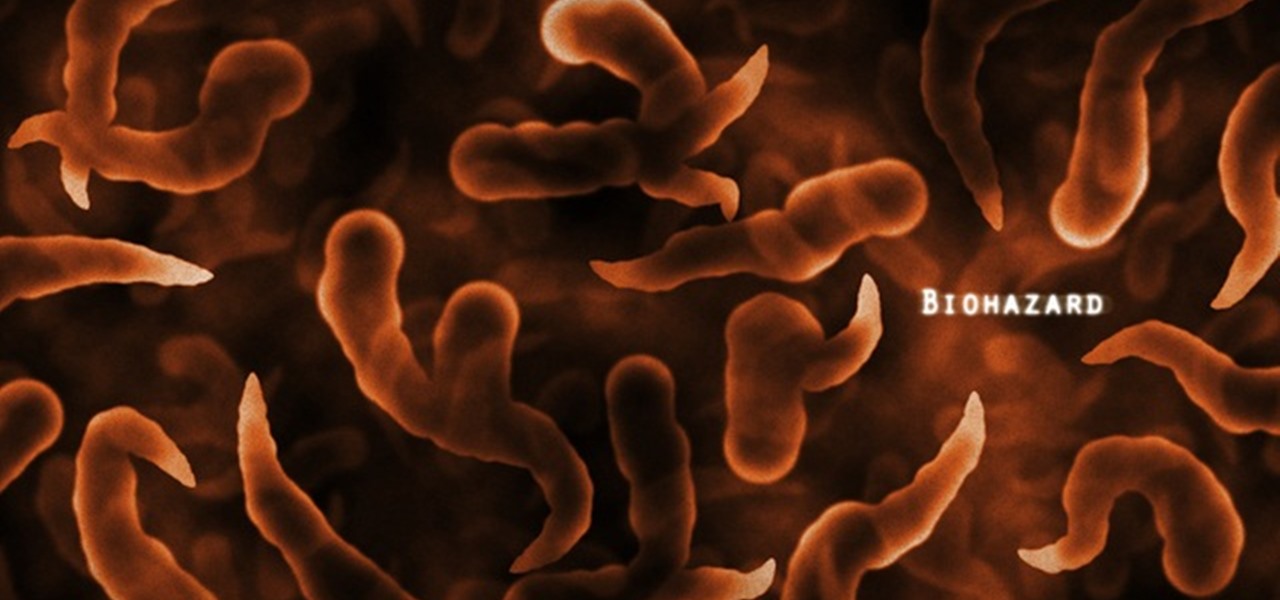
Learn how to make a "Resident Evil"-style Biohazard Virus with nothing except the brush tool and layer effects in Photoshop. Use adjustment layers to create extra grain and contrast to your made from scratch hi-res microscopic bacteria and learn more about those brush tool options you didn't know about.
In order to add a nice contrast punch to an image using Photoshop, go to your adjustment layer and click on the black and white adjustment layer. Then go to your "blend modes" and change it to "overlay". If you find that the effect is too harsh you can adjust your opacity settings or you can switch your blend mode to "soft lights". In "overlay" using the black and white adjustment panel you can change your settings to meet your preference. If you are using a previous version of Photoshop that...
This is a tutorial in Adobe Photoshop CS2 demonstrating primarily the use of the quickmask tool to make precise selections of organic shapes. Other topics covered include adjustment layers and layer masks. So watch and learn how to enhance photos using quickmasks, layer masks and adjustment layers in Photoshop CS2.
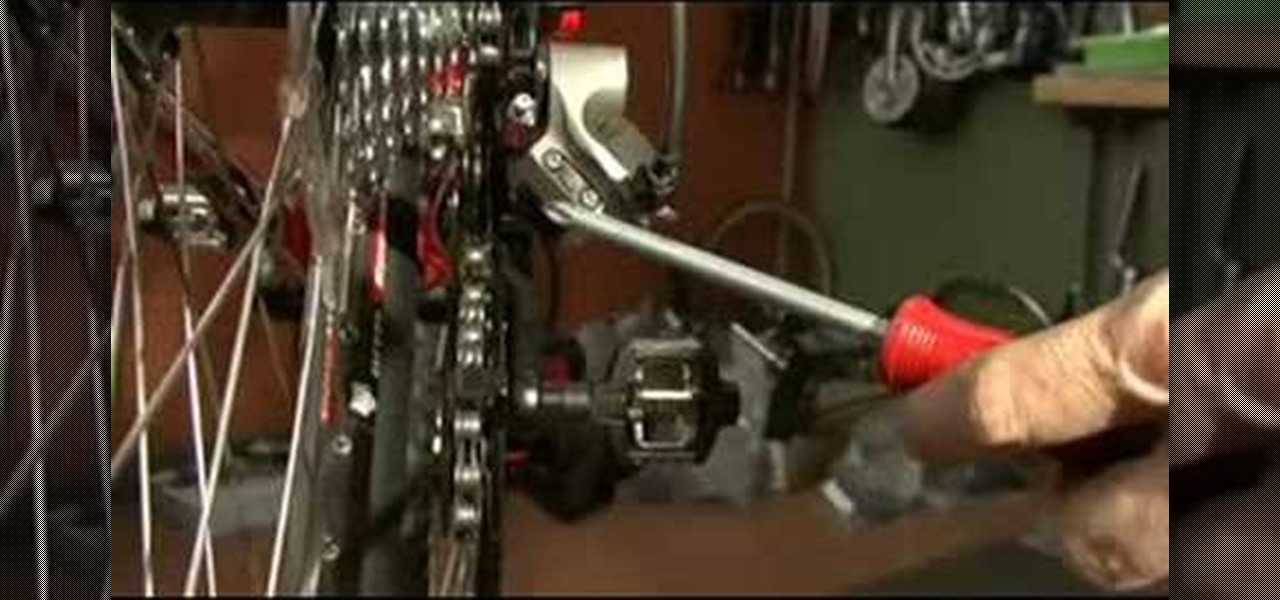
Use a 5mm Allen wrench and loosen the bolt holding the cable on the rear derailleur. Thread the shift cable through the cable stays and tighten it in the rear derailleur with as little slack as possible. Make sure that the adjustment screw on the shifter is in the mid point of the adjustment.
This video tutorial belongs to the software category which is going to show you how to darken the background in Photoshop using the burn tool. This is an example of how to improve your dodging and burning using the adjustment layers.
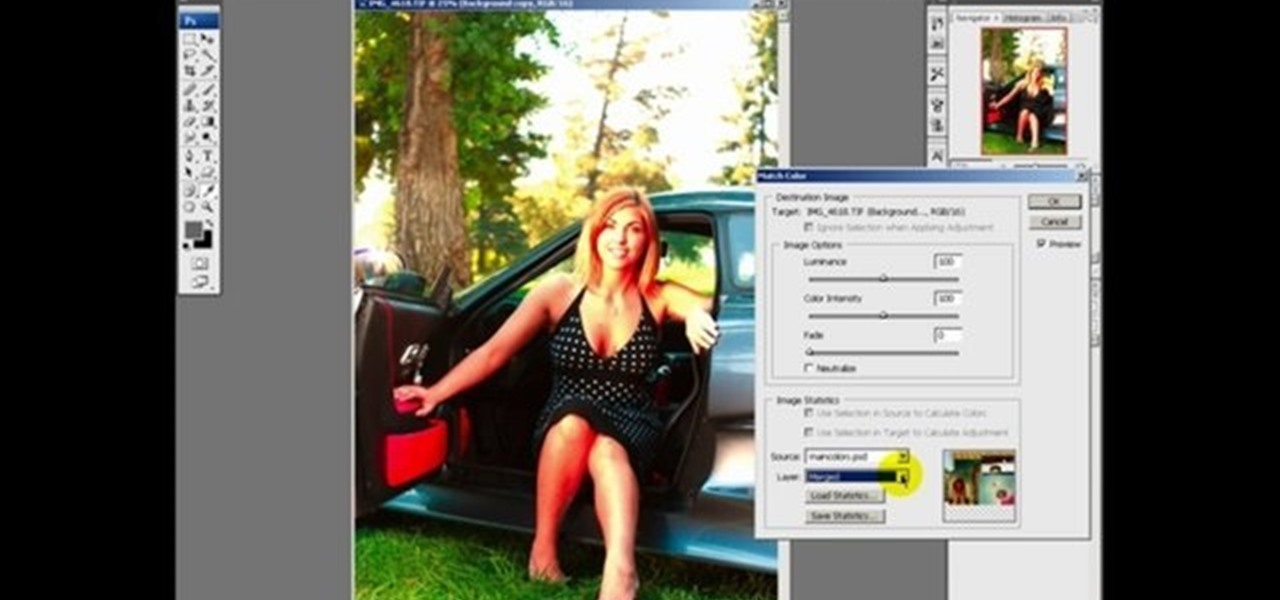
This Photoshop tutorial explaine the simple use of Match Color Adjustment in any version of Photoshop. Before starting this tutorial please create a .PSD file and add at least a dozen or more high res, high quality, vivid color photos and place each photo into it's own layer inside the .PSD file. Once you have your Photoshop file ready, follow along with this tutorial and learn how to use the Match Color adjustment tool in Photoshop on color photos and black and white photos.
In this tutorial, we learn how to create a warm grunge background in Photoshop. First, create a large circle on a burnt orange background in Photoshop. Now, go to layer, adjustment layer, then levels. Hit "ok" then the level's adjustment layer will be masked. Now, go grab the bottom black slider and brighten up the middle. Use the overlay to create a center glow. Next, bring in texture using a brushed metal texture from this photo. Now, even the image out by going to image, then image rotatio...
In this video tutorial, learn the several methods to get black & white images from color originals in Photoshop. The first method is the simple desaturate by going to image > adjustments > desaturate and it will wipe out the color from your image. The second non-destructive way of doing this is going into the layers palette, adding a new adjustment layer, choosing hue and saturation and dragging the saturation slide all the way down to minus (-) 100. The next method is going to the channels p...
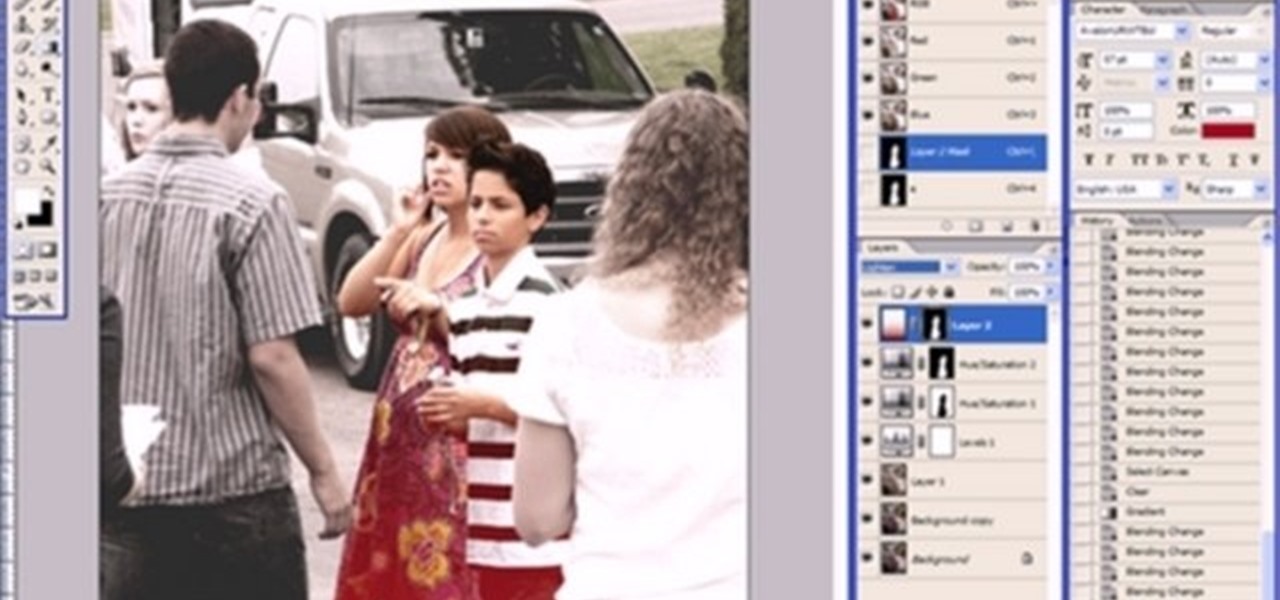
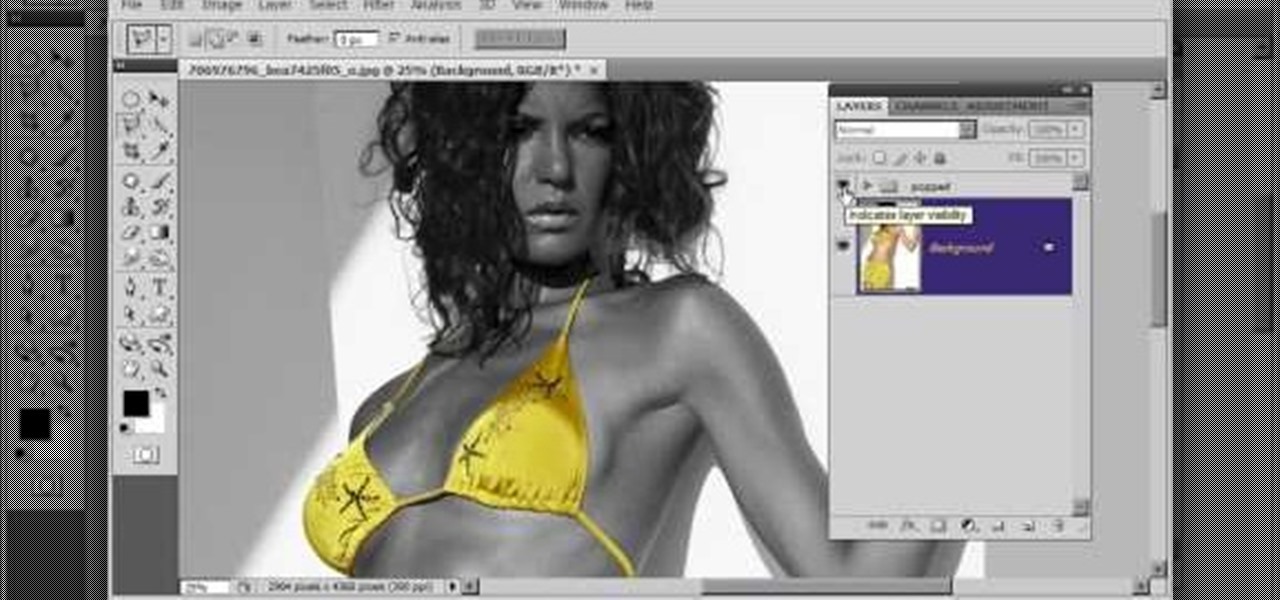
Learn to create a fashion editorial style color in Photoshop! 1. From CHANNELS button select color of the Model. It will show different colors select as per your choice. 2. Click on Levels it will show the image selected. 3. Right click and select Black&White it will open ADJUSTMENTS button adjust the color. 4. Go back to CHANNELS button they all images will look same. Copy channel Blue and Select Blue copy3 and color model's body and hair with black. 3. Click on ADJUSTMENT button and adjust ...
In this video, we learn how to adjust the flame on your RV water heater. First, open up the area where your gas valves are. Find the air opening to make a smaller air adjustment. The setting should be 1/4 of the way open. Snug down the locking screw when you have adjusted it properly. Now, you have to fire up the water heater by turning on the water heater switch first. Once the main flame is lit, you will see it with a nice blue color. Play with the adjustment some more until it's adjusted h...
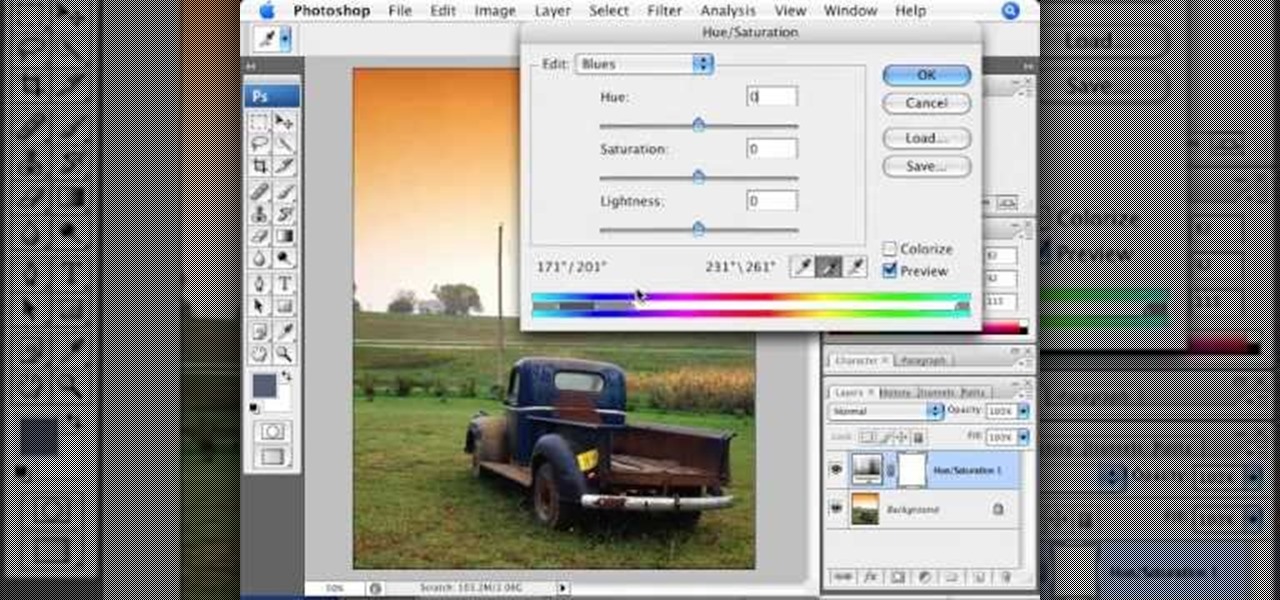
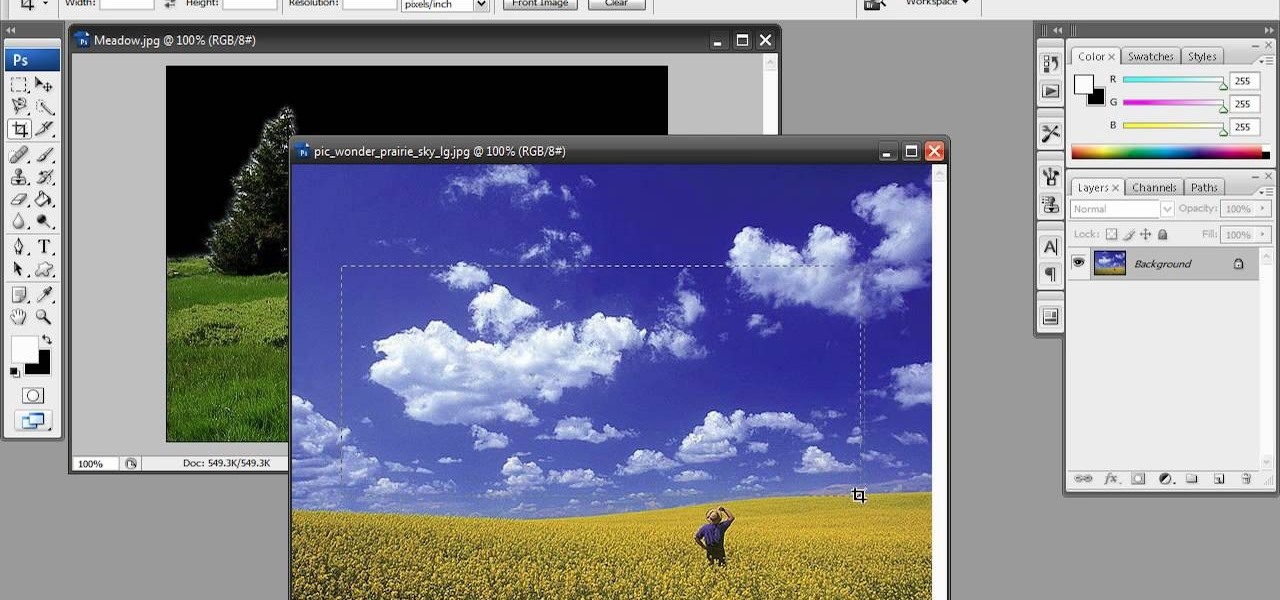
Learn how to edit a picture to alter the color of the sky using Photoshop's selective color adjustment layer. This tool allows you to change a color in a photo. A good example of what this tool can do is to change a sunset to a sunrise in a photo. To begin with, you will need to open the selective color adjustment layer under the layer tab. Under the color menu, select the color that you want to alter. The tutorial goes over how much of each color to add or remove to get the desired effect. W...
Brighten skies with Adobe Photoshop. Whether you're new to Adobe's popular image editing software or simply looking to pick up a few new tips and tricks, you're sure to benefit from this free video tutorial, which offers a step-by-step guide to enhancing dull skies using Photoshop's various color and contrast adjustment tools.
Color correct your digital photos in Adobe Photoshop Elements! Whether you're new to Adobe's popular image editing software or simply looking to pick up a few new tips and tricks, you're sure to benefit from this free video tutorial from the folks at IT Stuff TV. For more information, including step-by-step instructions on how to adjust an image's color balance using a levels adjustment layer in Photoshop Elements, watch this PSE guide.
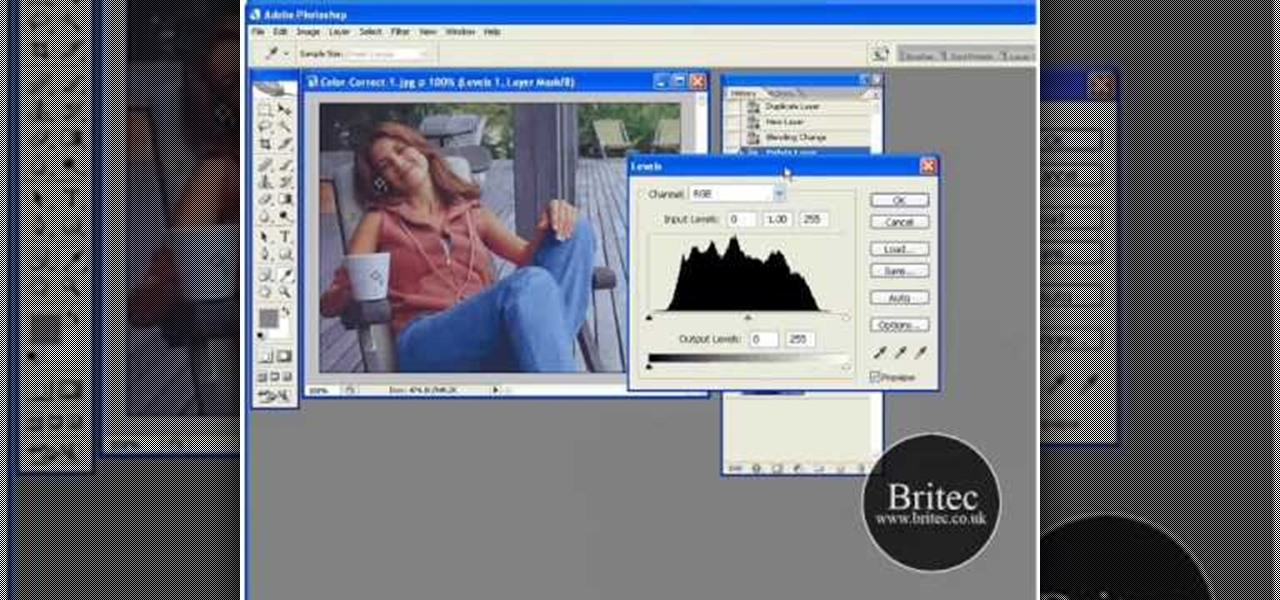
Want to color correct a digital image within Adobe Photoshop? Whether you're new to Adobe's popular image editing software or simply looking to pick up a few new tips and tricks, you're sure to benefit from this free video tutorial from the folks at Britec Computer Systems. This video offers a step-by-step guide on how to color correct images using Photoshop's curve adjustment tool.
Retouching images is one of the main reasons the world loves Photoshop, and version CS4 has added some new twists and tools to your retouching options. Rediscover the Adjustment layers through the powerful Adjustments panel in Photoshop CS4. Colin Smith shows you all the main features as well as using the new Mask panel. The revamped Dodge, Burn and Sponge tools are mentioned too in this image retouching Photoshop CS4 tutorial.
This software tutorial shows you how to use the threshold adjustment tool in Photoshop CS3. The gradient tool is covered as well. See how using threshold and gradient can turn a boring image into a more dramatic tonal image using Photoshop CS3.
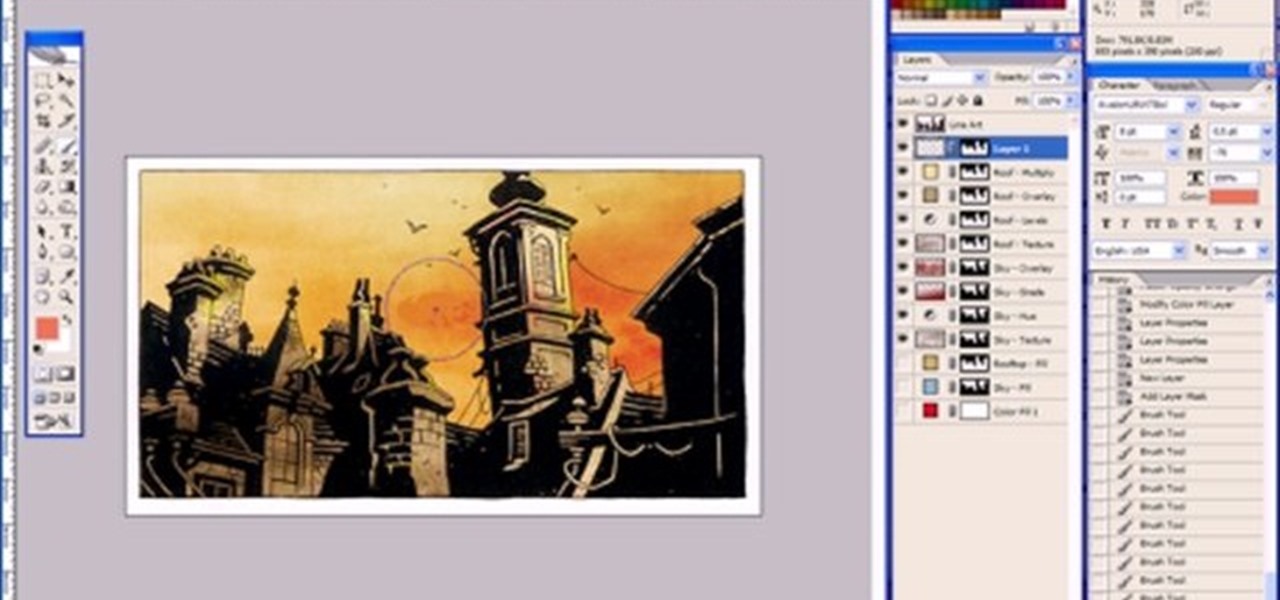
This Adobe Photoshop tutorial is a demonstration of coloring technique using Photoshop CS2's layer masks, adjustment layers, and blend modes. Just like in a coloring book, you can use Photoshop to color in line art as shown in this video.
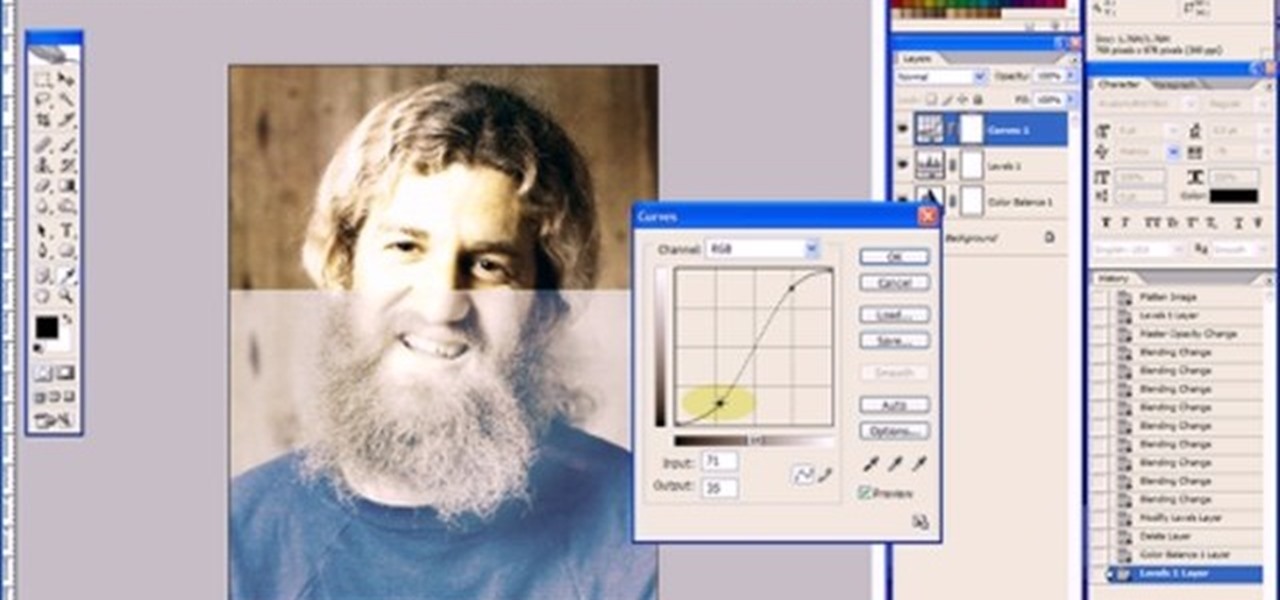
This Adobe Photoshop tutorial covers using adjustment layers in Photoshop CS2 to help out a badly desaturated photo from the early '70s. Learn to use Photoshop levels, curves and color balance tools to color correct and fix faded old photos.
This motorcycle maintenance tutorial shows you how to adjust the balancer chain on a Kawasaki KLR650.