Illustrator denotes how to create a road. First select the pen and draw a path. Now go to stroke. It depend 130. Deselect dash line. Now move our path a little bit upper. Now select our path. Now duplicate of our path several times. Now turn off the new layers. Focus on our first path. Turn on the second path. Change the stroke weight value to 125 and change the color to gray. Now go to the next path. Select our path and change the stroke weight value to 115 and leave the black color. Now go ...

In this video tutorial, viewers learn how to add to the Fire Mozilla browser tabs. Begin by going to the Firefox Mozilla add-ons site and search for "colorful tabs". Click Add to Firefox to install it onto your web browser. Once installed, the browser tabs will be randomly assigned to a color. In the add-on options, users are able to configure the color scheme, selected tab and miscellaneous. This video will benefit those viewers who use Firefox Mozilla as their web browser, and would like to...
The color picker component in Adobe Flash Creative Suite 3 will let visitors to your website choose their own color from a pre-selected palette and apply it to your specially indicated dynamic objects. Useful for paper-doll programs or other similar applications!
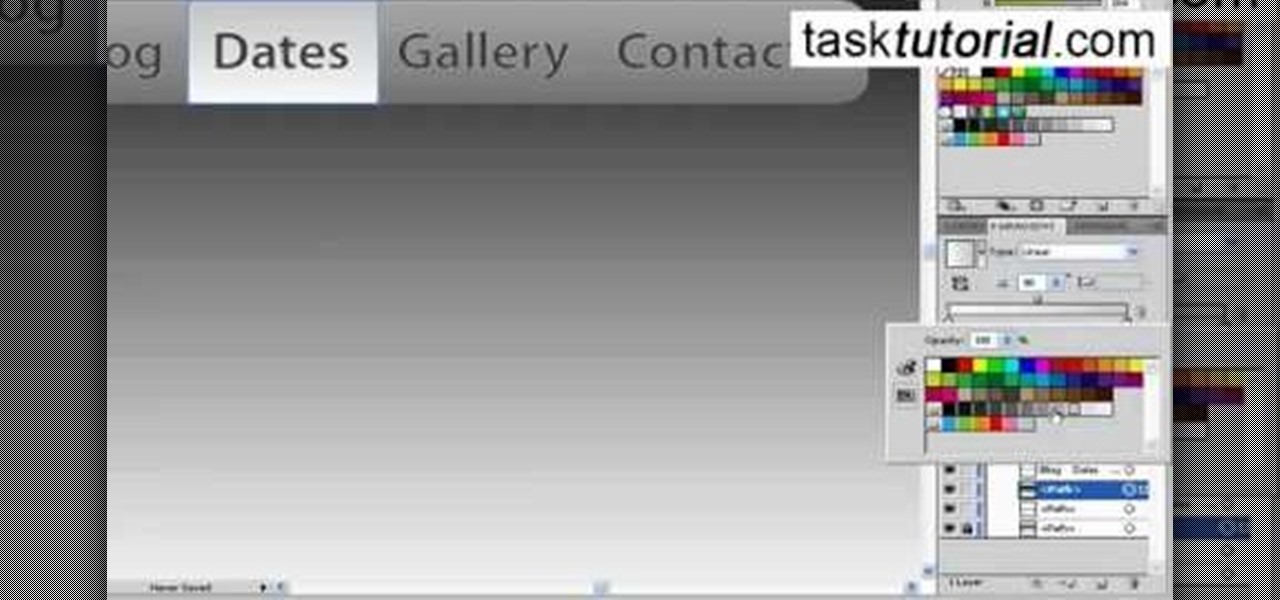
First thing you need to do this is to select rectangle tool and make a shape and select the gradient fill and change the angle of gradient to 90 degree. Now color and resize it as showing in the video. Now type your navigation texts like blog, contact, gallery etc. Now size your text for your rectangle shape. Now set the texts in the bar and resize your bar.
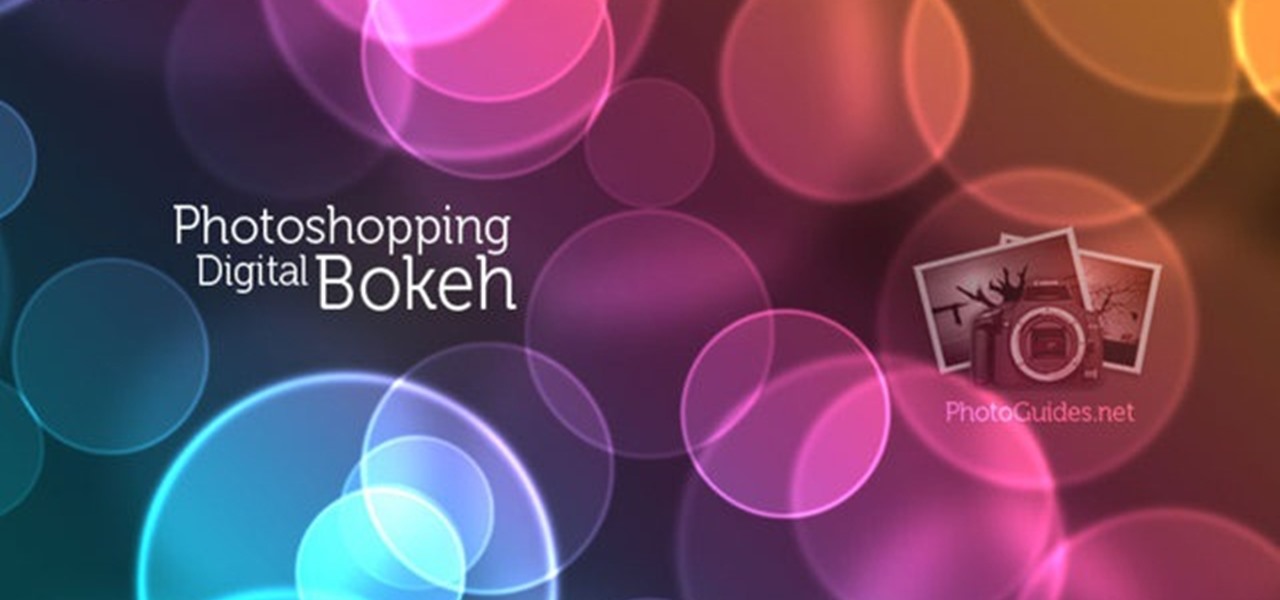
Ash Davies teaches us how to Photoshop digital bokeh with this tutorial. First, open up Photoshop and create a new canvas with your width at 1920 and your height at 1200. Now, create a new layer and set your background layer as invisible. Now create a medium size circle and reduce the fill to 50%. Now enter blending options and add a stroke of 10 pixels to the inside with the color set to black. Now define the shape as a brush and then click "edit" and "define brush preset" name this, "bokeh"...
Make your video look like a Hollywood film in 3 simple steps

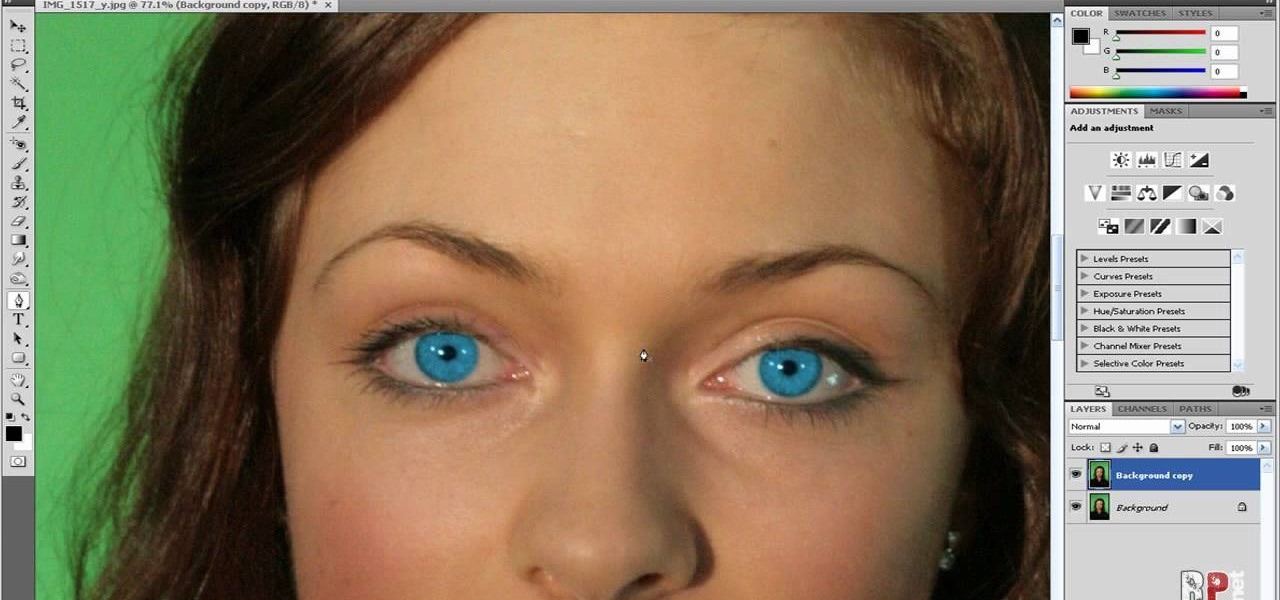
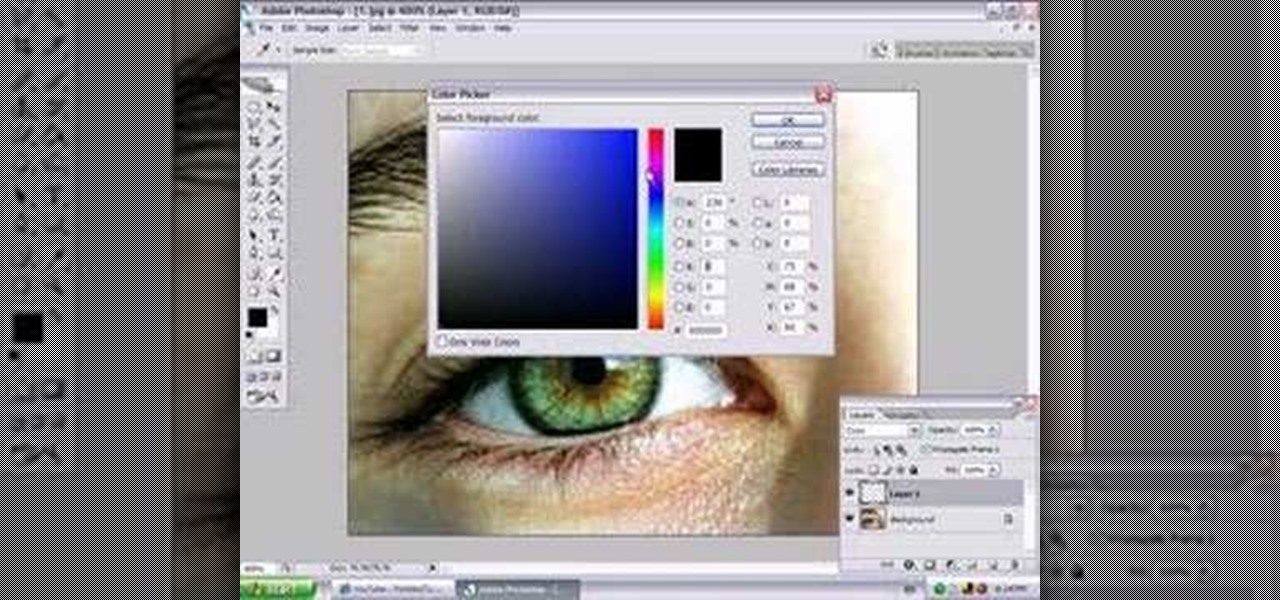
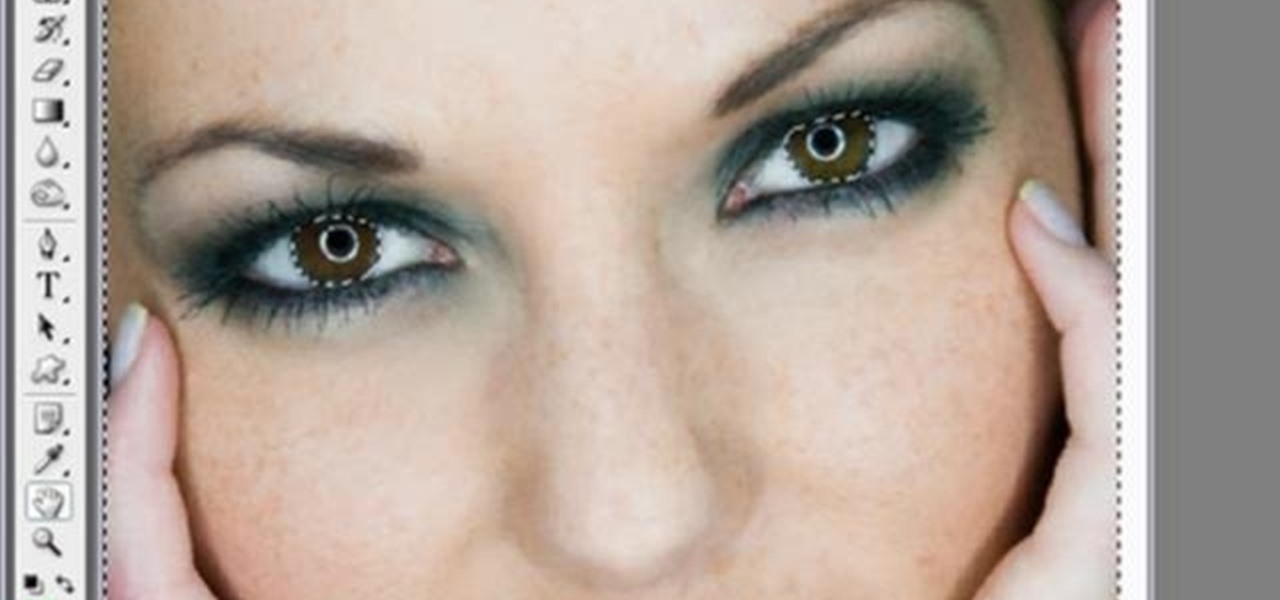
In this how-to video, you will learn how to change eye colors using Adobe Photoshop. First, open the image, Duplicate the background image. Zoom in to one of the eyes and select the pen tool. Set it to paths. Now, go around the iris of the eye. This does not have to be perfect. Click and drag to the other eye and select the other iris as well. Once these are both selected, right click into one of the selections and set the feather radius to about three pixels. Go to Image and Adjustments and ...
To make a Mario avatar begin by going to change my features. Under hair go to pate three of ten and select the middle one. For color, go to page two of three and pick the bottom middle one. For the eyes, he used the right middle one, but says that you can use really any one you like. As for eye color, again just choose whichever you like. For the eyebrows, go to page three of three and select the bottom middle one and color them brown. For the ears, use the first one available. For the noses,...
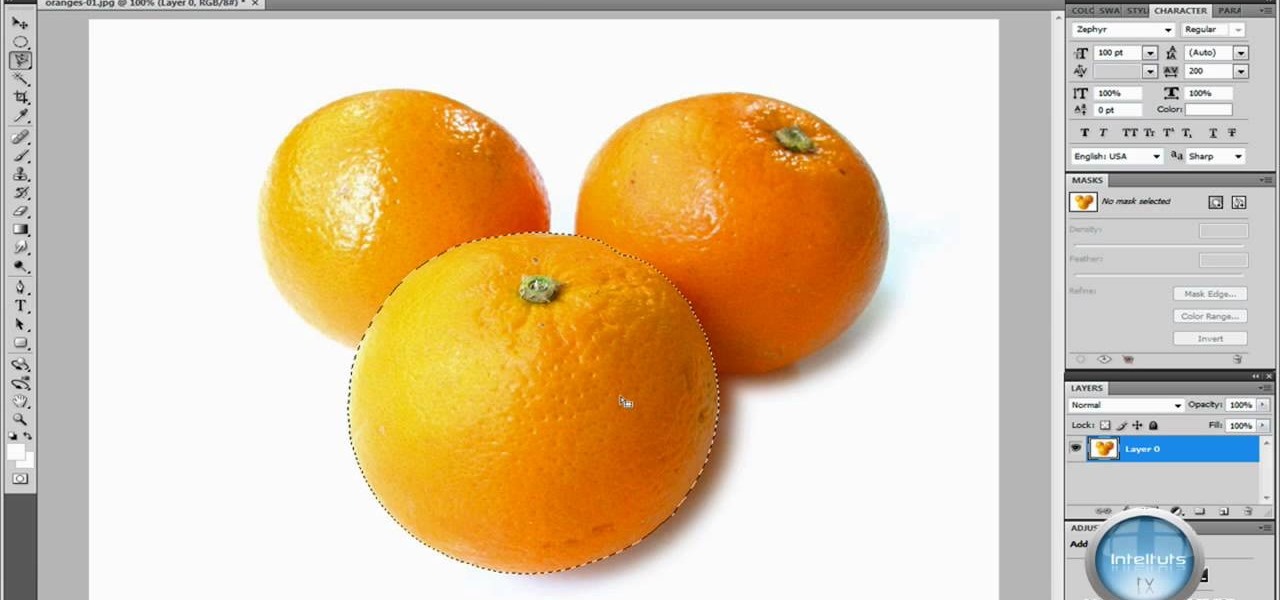
In this Software video you will see how to extract and apply color correction in Photoshop CS4. First select the object and extract it. The tool that you use to extract will depend on the type of image. For example, for oranges, select the Magnetic Lasso Tool from the left hand panel. Take the cursor, click on the outer line of an orange and drag the cursor along the outline of the orange. The tool automatically creates anchor points. You don’t have to click. But, if you want to create an anc...
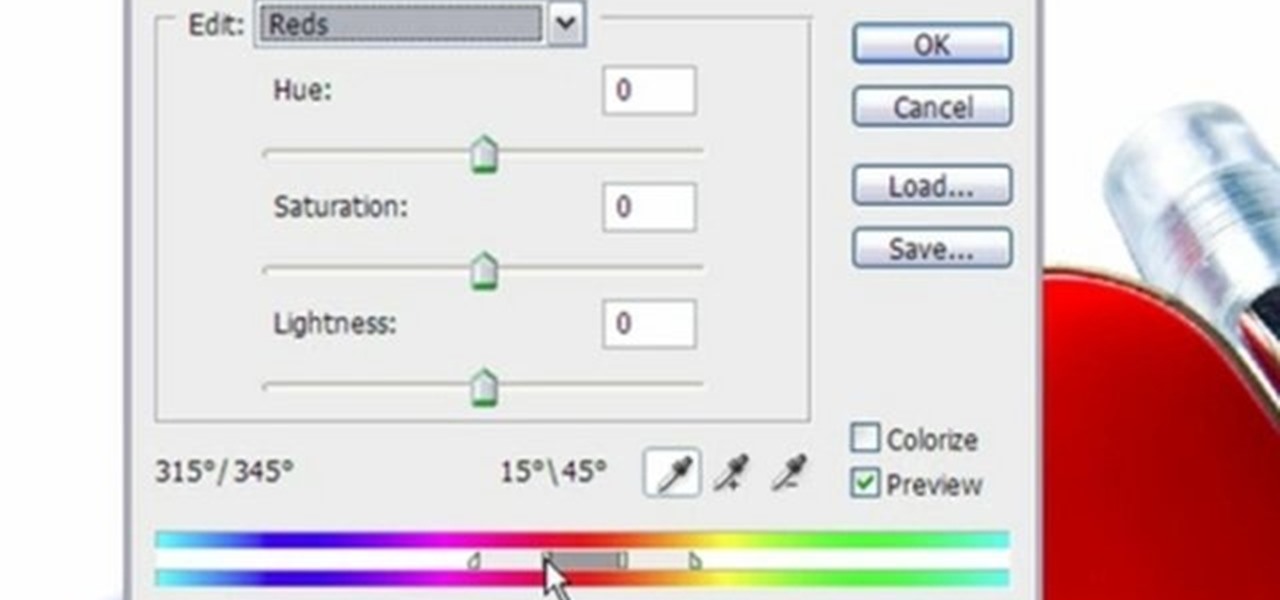
This video shows three ways to change the color of an object in Photoshop. The first method is of hue and saturation. Go to 'Image' & 'Adjustments' and choose 'Hue/Saturation' or press Ctrl+U as shortcut. Go to Edit and choose the color you want to change. As you select the color, a grey bar appears in between the rainbow bars at the bottom representing the color you want to change and the feathering which it will cause. You can change it by sliding it outwards. Slide the 'Hue' slider to chan...
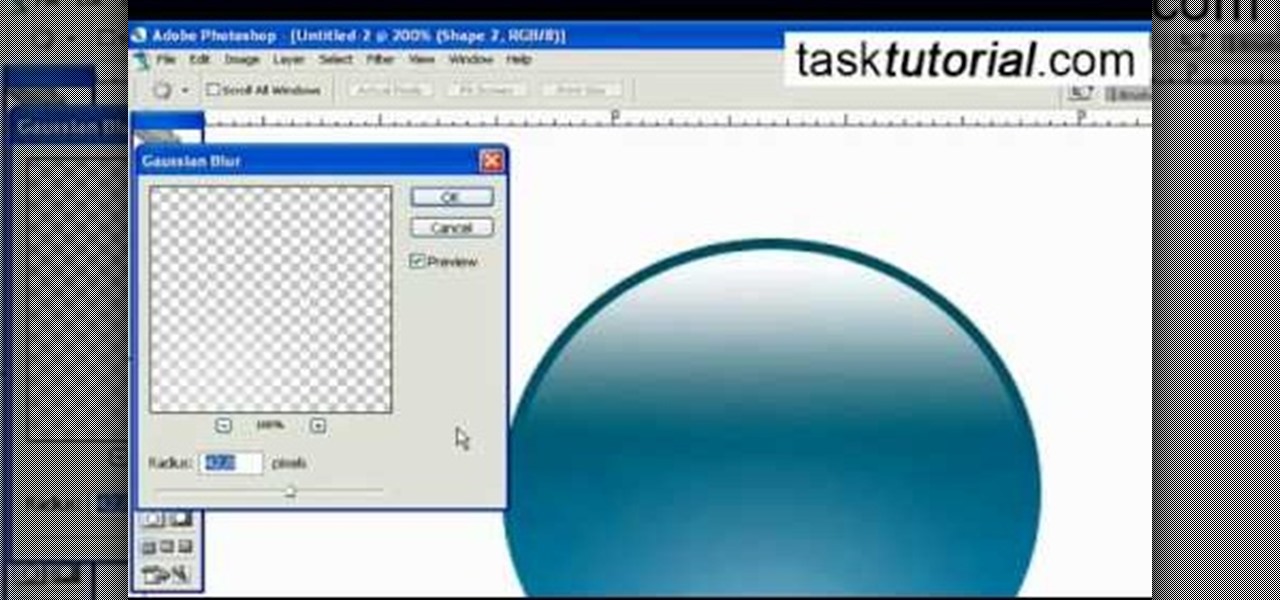
In this Photoshop tutorial the instructor shows how to create a glossy sphere. Now to get started open the tool and select the oval tool. Using the oval tool create a sphere shape. Draw holding the shift key button and set it to green color. Now similarly draw ellipse and give it white color. Create a few more ellipses this way. Now go to filers and then glowers and then Gaussian glower. Now go to shape free and select gradient and set the gradient. Now you can apply color changes to it and g...
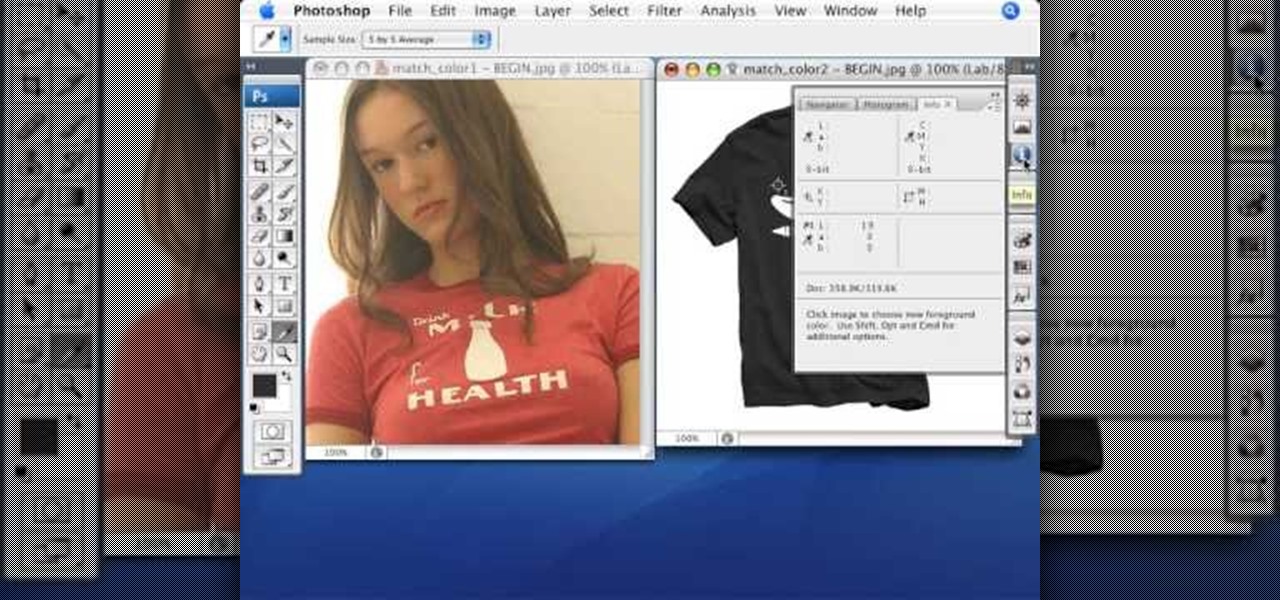
Match the color of objects on Photoshop. Take a picture of your self of one shirt that the shirt is on different color mean while choose the black tea shirt because it the traditionally one of the harder colors, change the image mode to the lab color for both images then use eyedropper tool and expose the info pallet select the neutral part of the image i.e. red. Hold down shift then we can see the icon changes then add contrast to it by hue saturation present in the layer pallet.
From task tutorial.com that how to create an envelope icon on illustrator. First draw a rectangle change the angle to 90 degrees then select gray color, select pen tool draw a shape and then go to layer select duplicate then rotate the shape using left mouse button by selecting the rotate tool. Now using down arrow key move the shape to down ,choose select tool and resize the shape then select the path go to gradient and change it angle to 90 degrees. Finally select the layer and go to effect...
Learn the science of hair coloring in this free hair care video series about how to choose and apply hair color from hair experts.
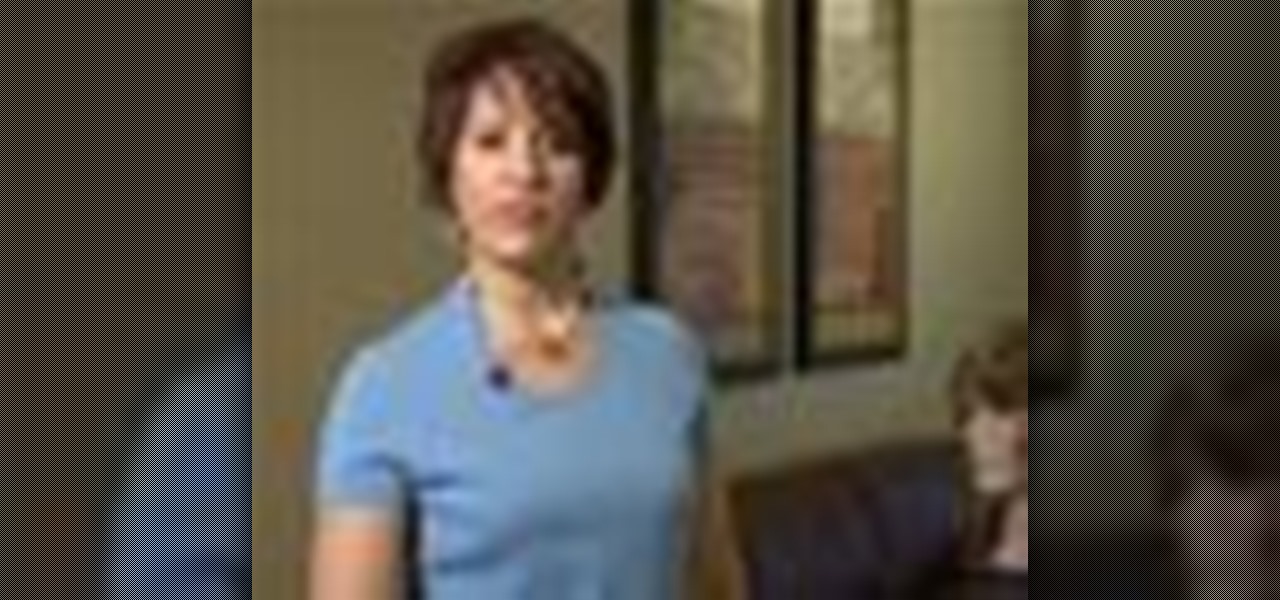
With Adobe Photoshop on your computer, it's super easy to change or adjust the skin tone of somebody in a digital photo. The process uses some basic selection and color adjustment tools, and it's a fun way to make a friend's face nauseously green or lessen the effects of overly strong, sometimes even orange, makeup.
This Photoshop tutorial will show you one method for changing clothing color utilizing the Select Color Range command and fine tuning techniques to use on the mask of the Hue and Saturation adjustment layer. Also shows how to clone.
In this video, Jessica shows us how to change eye color using Photoshop. First, open up Photoshop on your computer. Open up your picture and zoom in on the eyes so you have a great view of it. Then add a new layer or "control +j". Where it says "normal" change that to color. Then select your paintbrush tool and make it a reasonable size for your eye. Click the color palette square and change the color to whichever one you choose. Now, paint over the eye and it will completely change the look!...
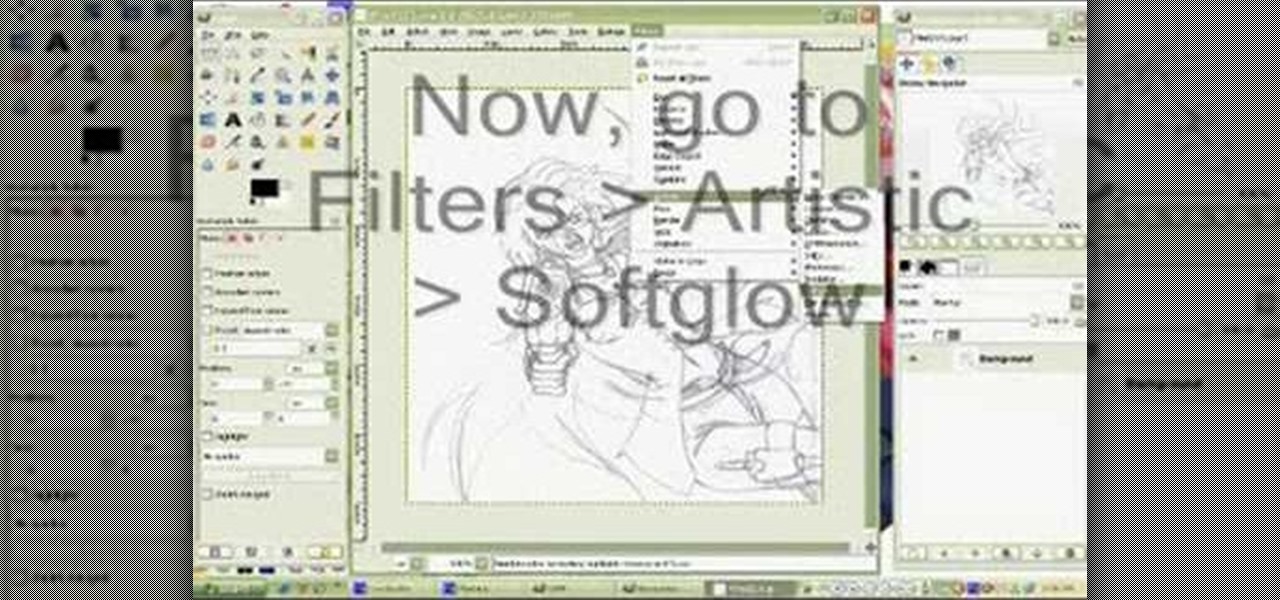
In this how to video, you will learn how to clean up scanned drawings using Gimp. You will need a scanner, drawing, and Gimp installed to do this. First, open the scanned drawing in Gimp. Next, select Select by Color. Click on an area that should be white and hit ctrl + x. Next, go to filters and select soft glow under the artistic sub menu. Play around with the settings to lighten the image and darken the important lines. Click okay once you are finished. Next, go to the artistic sub menu an...
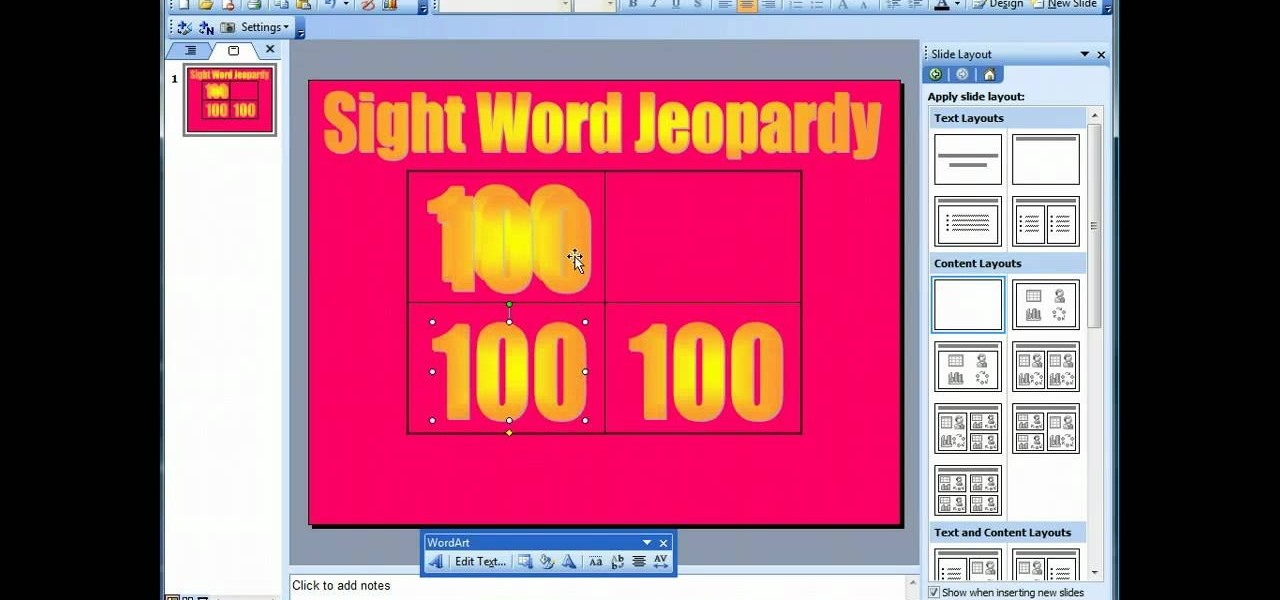
This video demonstrates how to make a basic Jeopardy game in Microsoft PowerPoint. First, choose a background color by clicking Format on the top bar menu. Select Background and choose the color you wish to have. Click Apply To All to apply it to your entire PowerPoint presentation. Then, click Insert on the top bar menu and select Table. Fill in the number of columns or rows you wish to have for your table and then click OK. In this example, create a 2x2 table. Make a title for your game by ...
This video tutorial from TutVid shows how to create a simple movie poster text effect in Adobe Photoshop CS4.
Let TutVid teach you how to make metallic text is Adobe Illustrator CS3. This video shows you how to do it step by step. You only need basic knowledge of Adobe Illustrator CS3 to do this.
1. First of all select 'filter' at the ‘top tool bar’. Now select the 'artistic' from the ‘drop down’. Then select 'fresco' and then click 'ok'.
To create glossy or reflective vector image, you will need to know how to use the offset options in Adobe Illustrator and the basics for pathfinder. You will be creating a vector image that can be resized without hurting its quality. To start select you text style, which be glossy for this. You will have first a white layer, a shadow, a radiant layer, a white outline and a shadow going underneath. In this video the Oh Gizmo Logo! is being used as the template. Right click create outlines. You...
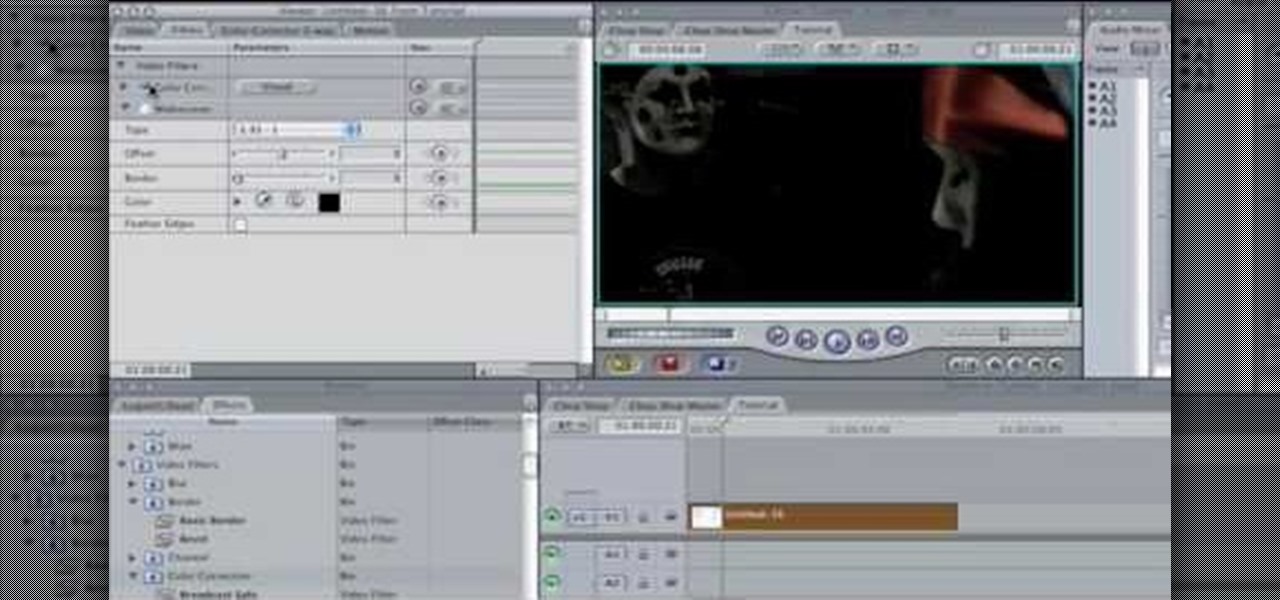
In this Software video tutorial you will learn how to apply the Film Look effect in Final Cut Pro. This is an advanced technique. This essentially takes a video and makes it look like a film. Select the video clip that you want to work with. Then select the ‘color corrector 3 way’ filter. This is under the ‘Effects’ tab. The key to any color correction is to crush the blacks. So, decrease the blacks with the slider. Then increase the whites as films have higher white level. Depending on the s...
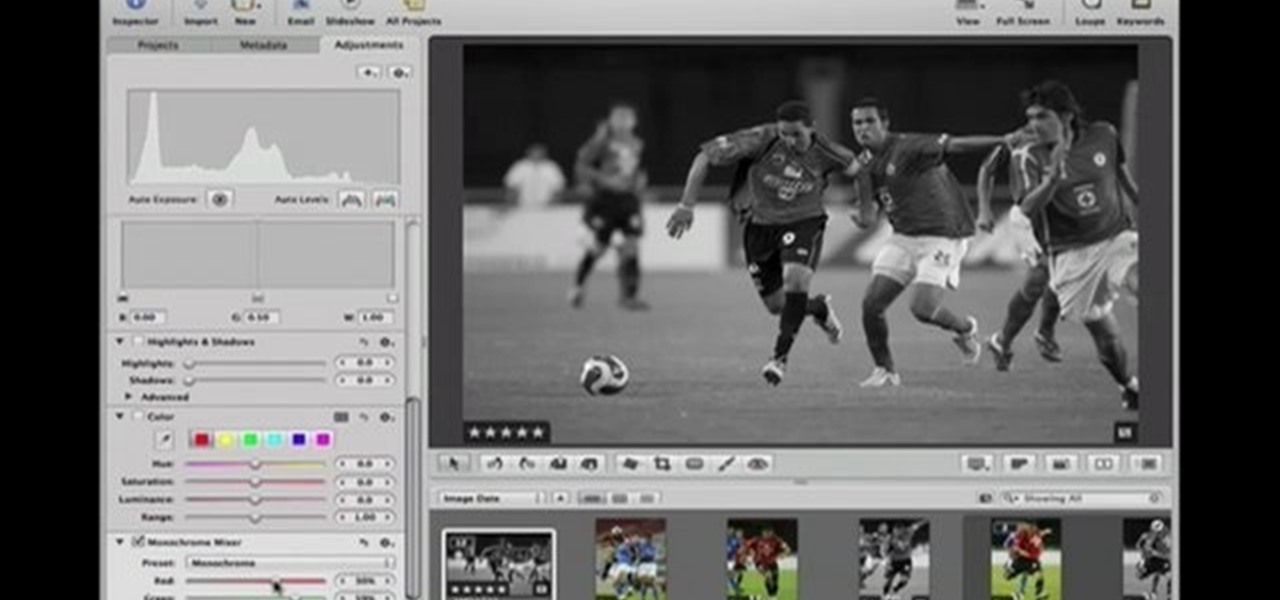
This Software video tutorial shows how to convert color images to black and white in Aperture. Scott Bourne presents this video. Open up ‘aperture’ program and select a color photo that you want to convert to black and white. Now move from the ‘projects’ page to the ‘adjustments’ page by clicking on it. Then click on the ‘+’ sign and select ‘Monochrome Mixer’. When you do this, the picture instantly turns to black and white. It’s as simple and easy as that. For editing the picture further, on...
Yanik Chauvin continues his online photo school with this video on how to change eye color in Photoshop. Yanik makes this complicated program seem simple as he shows exactly what steps to take to make realistic color change in the eyes of a person. He creates a layer that will be used to edit the eyes, then zooms in on and selects them. He picks a nice green color to use, shows what settings to use to make it look realistic, then applies final touches by changing the opacity of the new color....
For that, first, click insert, select any shape from the given options. Take drawing tools from format option. In that, we can choose from the most used colors , like, black, blue and red. Also we have options like, fill color. In that, theme color can be used for different type of colors. Also there are options for gradient colors, color effects. We can make 3D effects of the shape we inserted 3D options in format option. In text wrapping option, we have edit wrap points.
This video takes us through the procedure of creating a transform effect in Illustrator. First, choose a rectangular box and fill color in it. Input some text inside the box. The font and the color of the text can also be changed. Then position the text properly. Make a group of the shape and text. Now go to effect and choose transform. Transform is a very powerful effect which lets us create duplicates. Now select the number of copies, for example, one copy. Select preview. Now set the point...
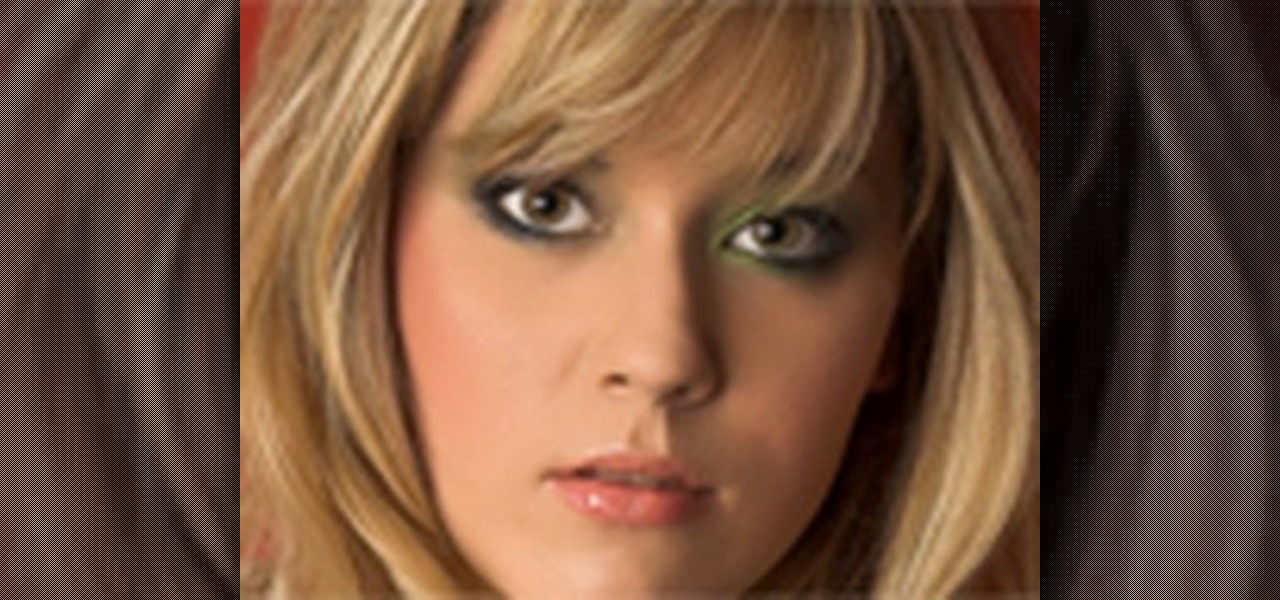
This video tutorial is about removing makeup in a photo using Photoshop. To do this, first of all, open the photo. Then zoom in on the area where you want to remove the makeup. The tool that is to be used to remove makeup is the brush tool. It can be selected from the left pane. After that, on top there will be an option which says mode. Click on the option just near to that and a drop down menu appears. From that list, select the hue option or color option. Both the options serve the same pu...
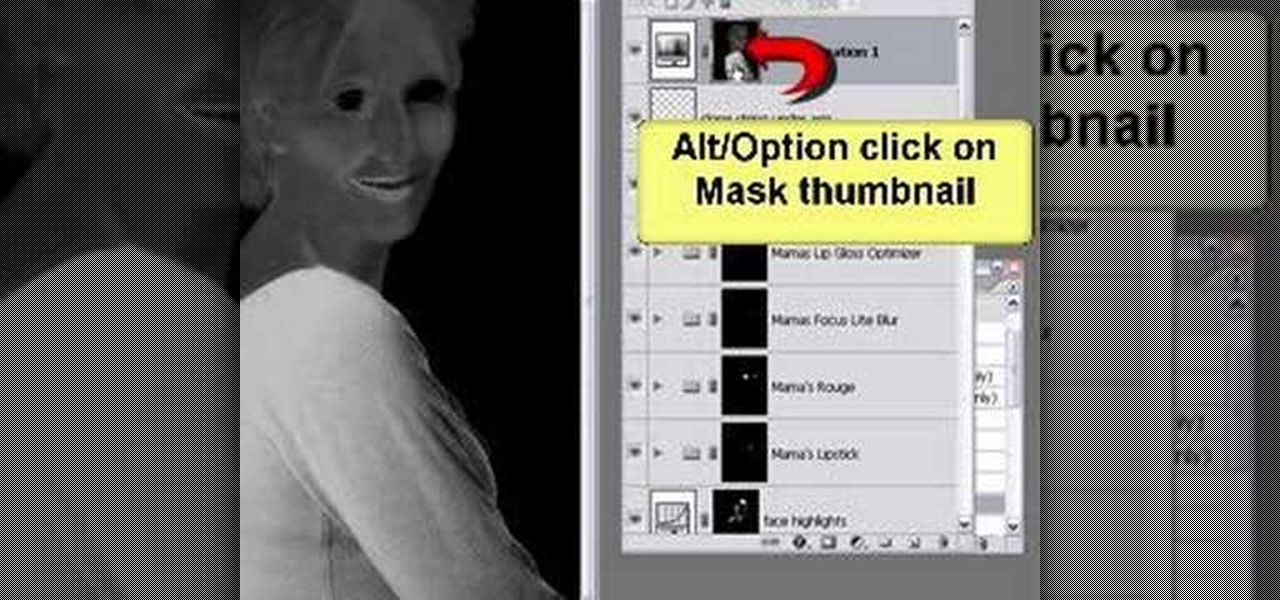
Thanks to technology, art savvy users can visually edit pictures with the click of a button. This video tutorial demonstrates how to color hair in Adobe Photoshop CS. In Quick Mask Mode, color over the hair area with a fairly large brush. Under Filter, select the Blur category and apply a Gaussian Blur to soften the edges of the mask. Revert back to Standard mode where the mask will appear as a selection, and under Select, choose the Inverse option. Finally, adjust the hue and saturation to s...
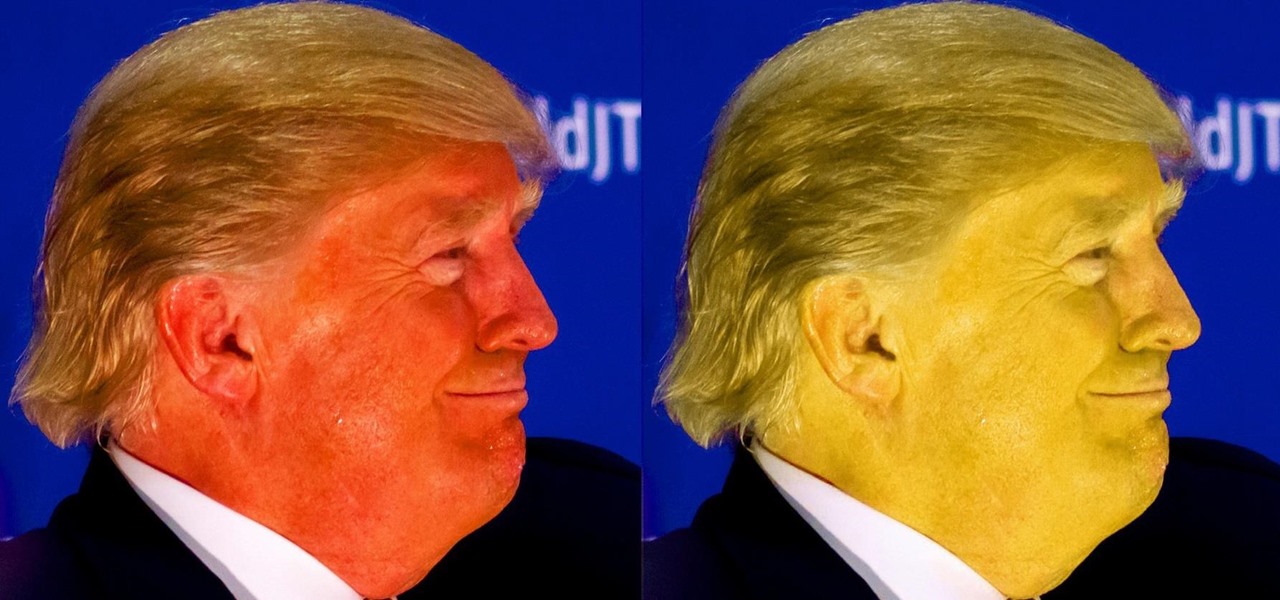
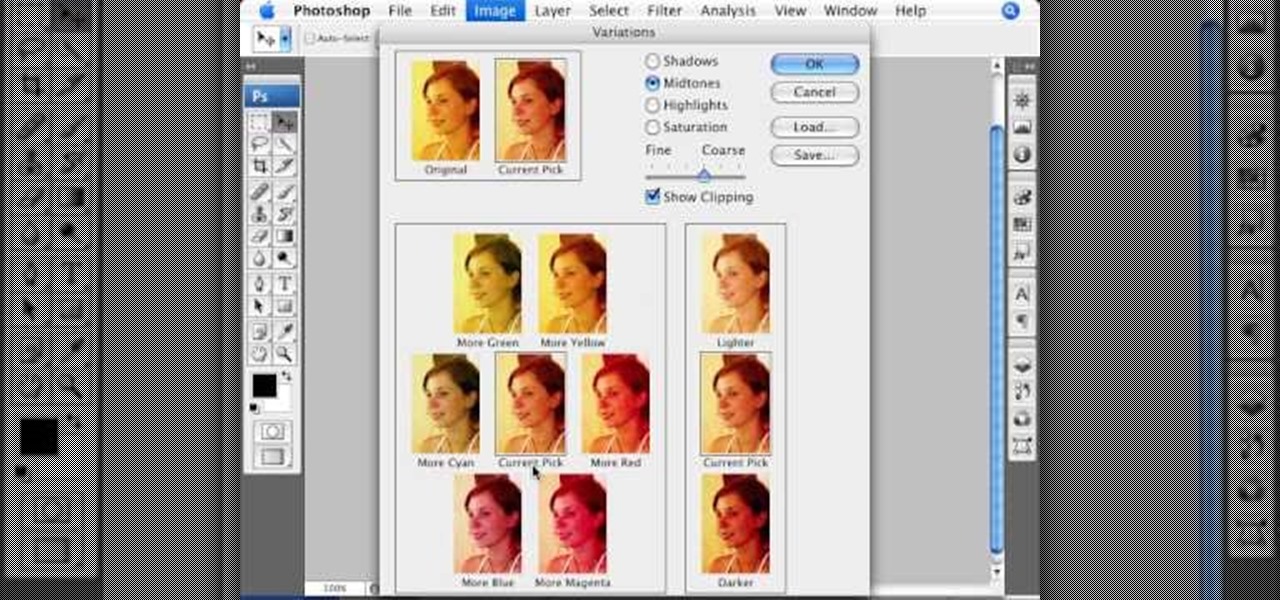
This informative video tells you how to use the variations panel in Adobe Photoshop to correct color issues in your photo. Too much yellow in your picture? Learn how to use the variations setting to instantly fix this with the corresponding opposite color. With simple clicks and easy preview-able pictures, you can correct color over-exposures with a click of the mouse. First go to the Images drop down and select the variations option. The original photo on the top can be clicked to revert you...
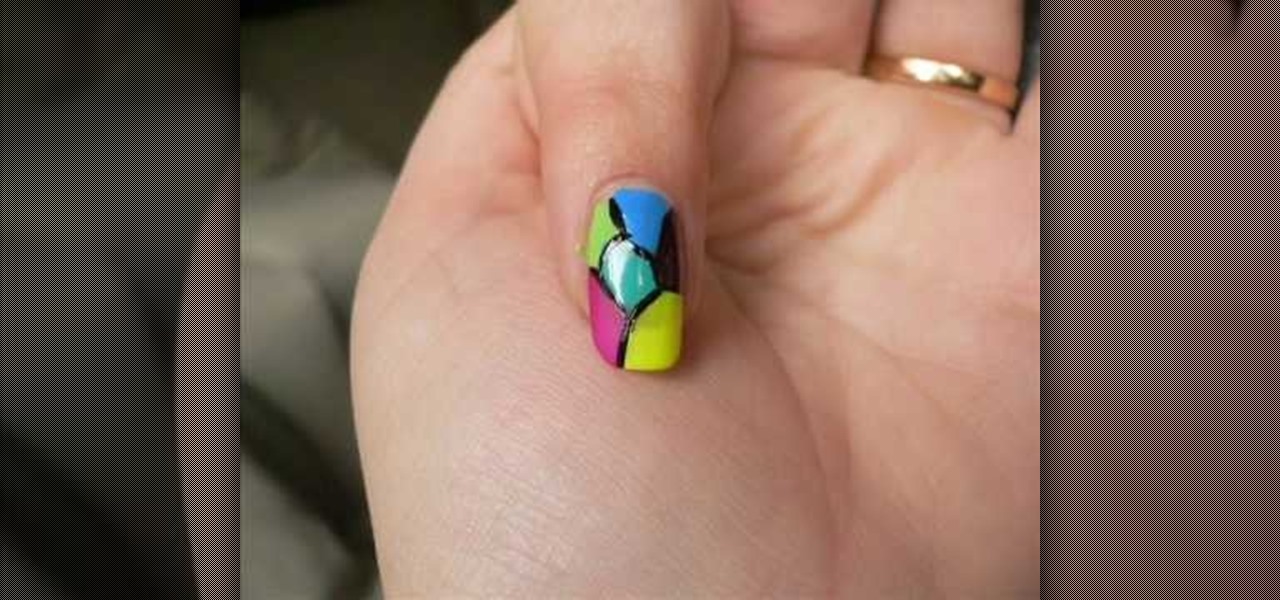
This video relates to Neon Mosaic Nail Tutorial. This video teaches how to make the nails good looking and also pleasing. In this video she teaches how to select the colors of nail polish and also she teaches the steps to be followed regarding which color nail polish to be applied first and also to create a mosaic by using multiple colors. She also add some border line to create and pleasing look. She also narrates to change the colors in applying to each nail. She also teaches how to create ...
Pixel Perfect is the "perfect" show to help you with your Photoshop skills. Be amazed and learn as master digital artist Bert Monroy takes a stylus and a digital pad and treats it as Monet and Picasso do with oil and canvas. Learn the tips and tricks you need to whip those digital pictures into shape with Adobe Photoshop and Illustrator. In this episode, Ben shows you how to turn images into watercolor paintings in Photoshop.
First download Paint.net. Save the YouTube logo on your computer and then open it using Paint.net. Press S and select the "You" from YouTube, once selected press delete. Now press F and choose the white color, pain the deleted area to fill it with the white color. Press T to select the text tool, select the font Arial Narrow and choose the font size 144, press ctrl+shift+N to create a new layer. Now click on where you want to the text appears and type anything you want. Go to File and Save As...
Change object colors via ActionScript in Flash 8
In this Software video tutorial you will learn how to create a vector RSS icon in Illustrator. Open illustrator and open a new document. Select the ‘rounded rectangle tool’ from the rectangle menu. Click and drag to draw a rounded square. Select the gradient fill on the left side and change the color to orange on the right side and make it dark to light from top to bottom. Next grab the corner and turn it around 180 degrees. Move the picture to one side and select the ellipse tool. Draw a...
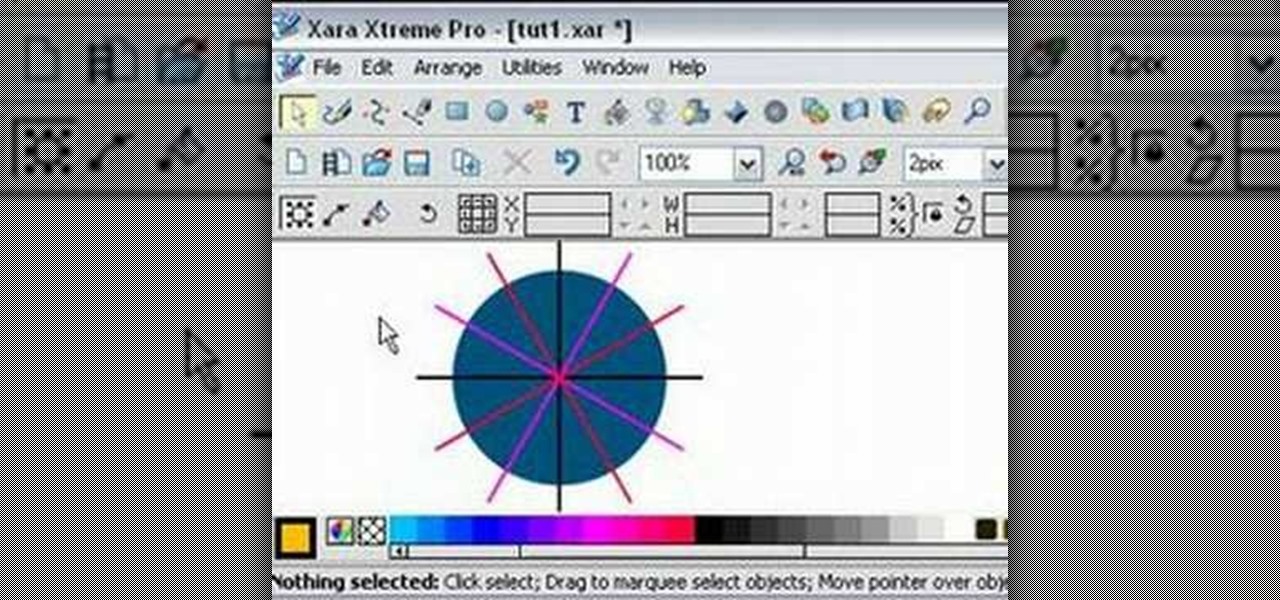
Learn how to split a circle into segments with Xara Xtreme. First select the shape editor tool. Drag the tool to the circle. The dialogue at the bottom communicates what steps to choose next. Holding the Ctrl key drag a straight line within the circle, click on the selector tool (yellow arrow on the left of the middle row) to enable the option of selecting. This saves 1 line on drawing layer 1 also and enables the marquee (flexible box) that you want to manipulate around the circle encasing t...
This video describes how to create an easy glossy button in Photoshop. This is done by "simpleretouch.com" website. First select the "Ellipse Tool" from the Photoshop tool bar and then drag it on the layer; it will give the ellipse shape in the layer. Select the "Blending options" from the "Layers" Menu by double click on the layer which is right below corner. From the blending options choose only the "Gradient Overlay" and in that we can choose color and its gradient as your wish. Now take a...
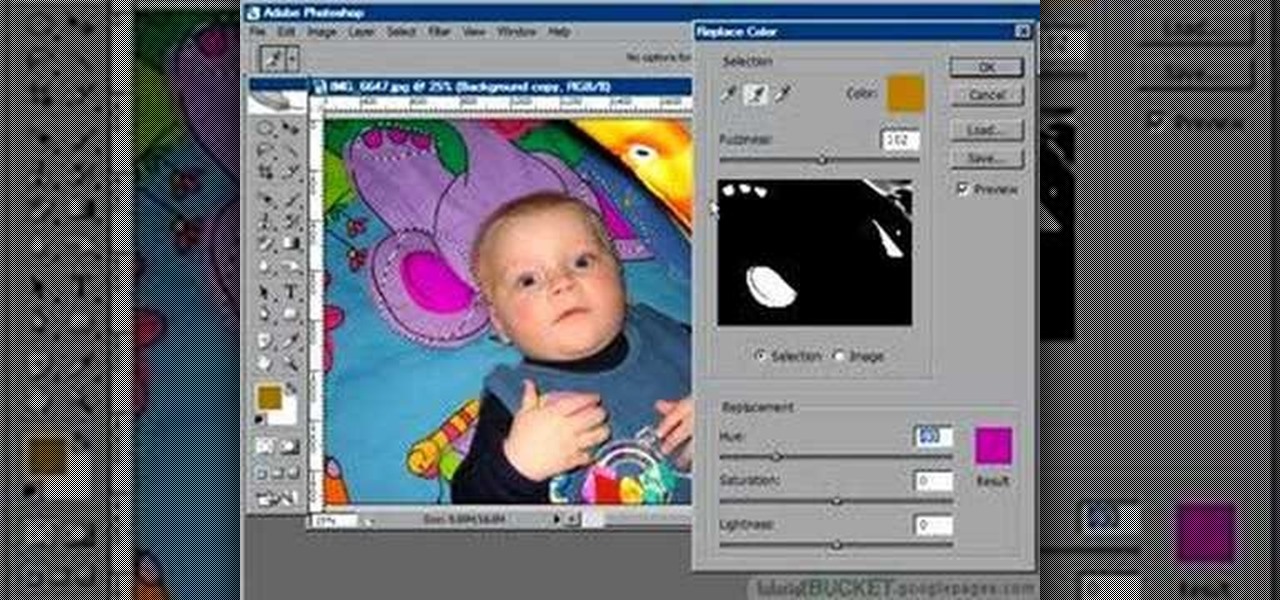
The replace color command is a nifty tool in Photoshop that enables you to change a color in an imagine very quickly and effectively. The tool requires that you make a copy of the original layer, as the replace color command is a destructive function. It requires parts that you want replacing to be selected first, to change the color of the desired areas. The result is a very realistically edited image, that is extremely fast and easy to accomplish.
This video tutorial by tasktutorial shows you how to create stylish text in Photoshop. Launch Photoshop and select the type tool and choose myriad-pro font light. Create a text field and type in the text as indicated. Increase the font size and location as desired. Thereafter open the layer options, choose a gradient and create a new gradient by selecting the color as required. Apply a white color outer glow change the size, range and opacity. If you want to add more text create a new layer a...