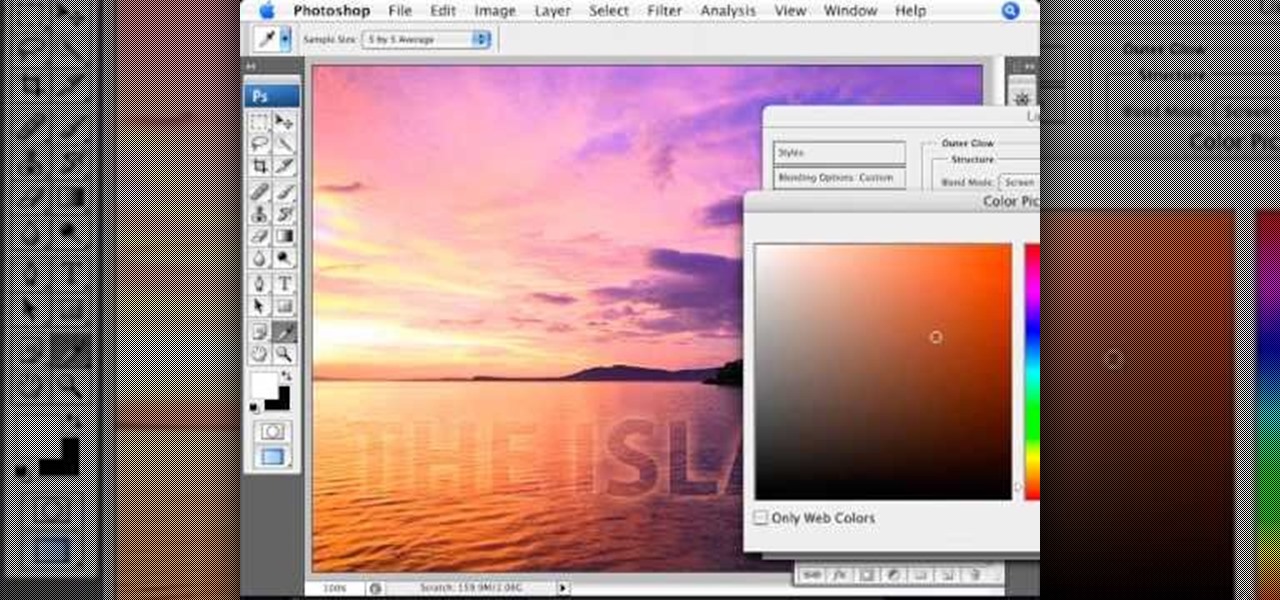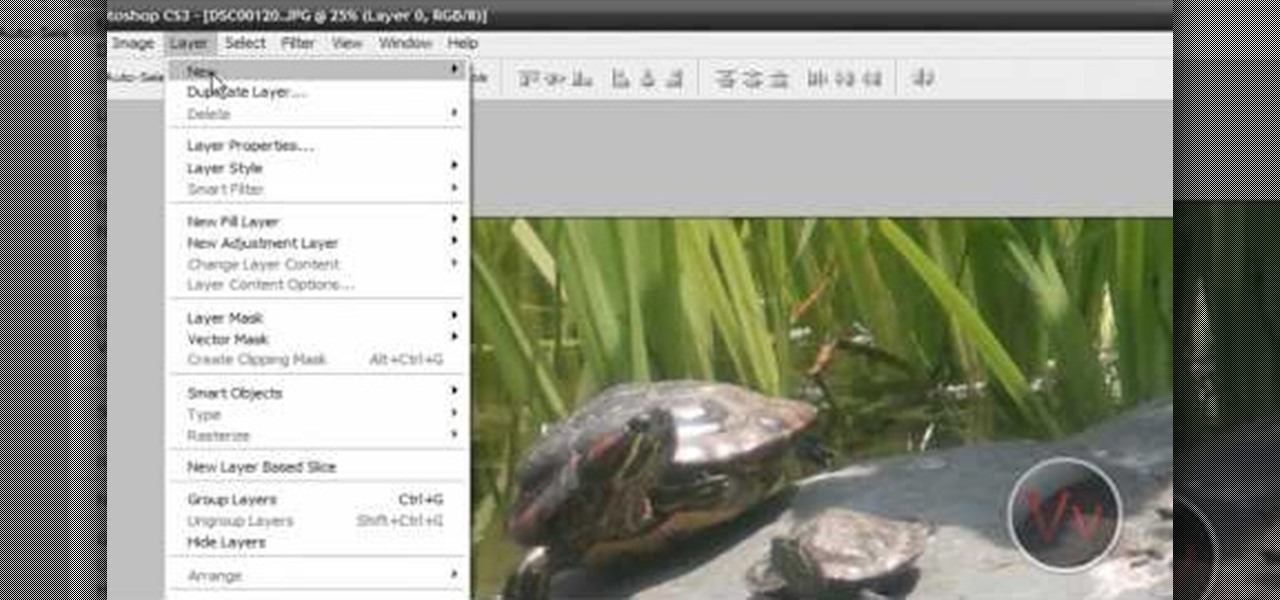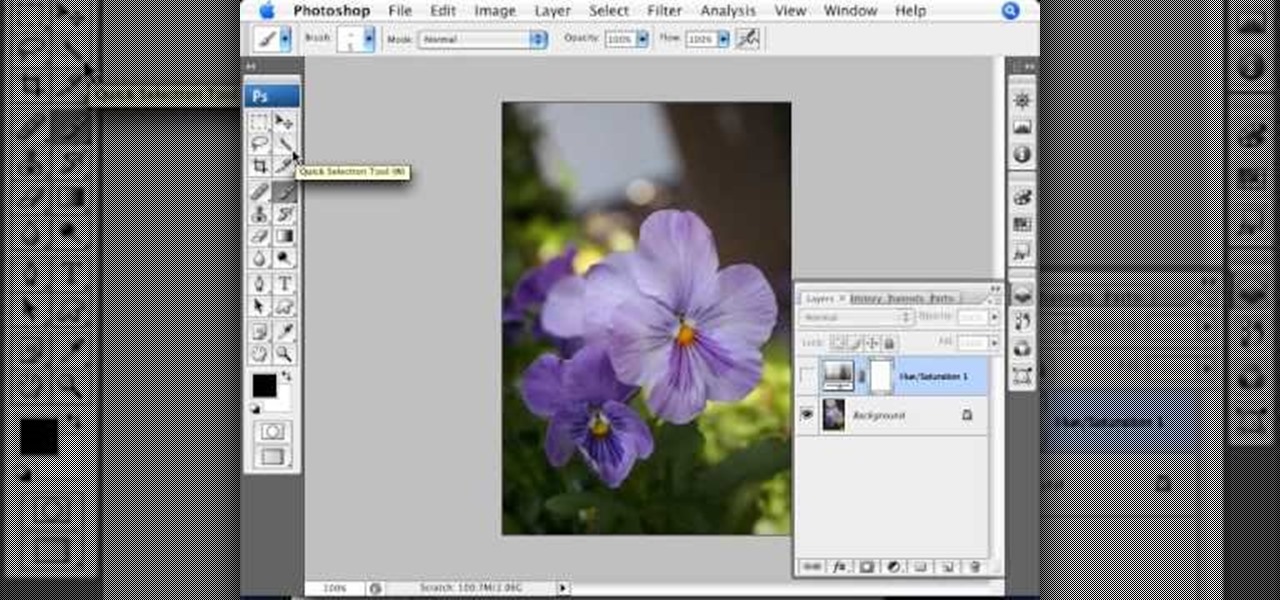
Pixel Perfect is the "perfect" show to help you with your Photoshop skills. Be amazed and learn as master digital artist Bert Monroy takes a stylus and a digital pad and treats it as Monet and Picasso do with oil and canvas. Learn the tips and tricks you need to whip those digital pictures into shape with Adobe Photoshop and Illustrator. In this episode, Ben shows you how to use color correction in Photoshop.

To do that, first select the pen tool, choose yellow stroke color and draw the path as showing in the video then deselect and choose pen tool again, pink color in stroke and draw the path again. Now you need to select the blend tool and click on both paths. Now go to object, blend and choose blend options. Now select the specified steps, put the value of 25 there and click on ok. Now open the blend in layer window and select the paths. Now set color to white

In this Software video tutorial you will learn how to change the font color in Word 2007. The default font color in Word 2007 is black. But, you can change the color of the font to just about any color that you want. Click on the ‘home’ tab of the ribbon on top of the page and you will see a small window with the letter ‘A’ in it. Click on the arrow next to it and it will display a color palette with automatic, theme colors, standard colors and more colors sections. Here you select any color ...
Learn how to blend shapes and colors in Illustrator with this tutorial. Open Illustrator and put the circle with color which you want. Put the square on the color you want. Select the object, go the title bar select the object and then select the blend. You will be shown the result on the screen. Select the square and circle where you place the object by click and drag method. Go to the object and select the blend and choose the blend options. Change in specific steps which you want in the sc...
Use the "Magic Wand" tool to select the color you wish to change. The next step is to open the replace color box. Go to Image > Adjustments > Replace Color. After the Replace Color box is open, you may have to select the color that you want to change in the image. Sometimes, it will automatically select the color you're changing, but sometimes you will have to use the Eyedropper Tool and click a hue of the color you wish to change. After the color is selected in the "Replace Color" box, you c...

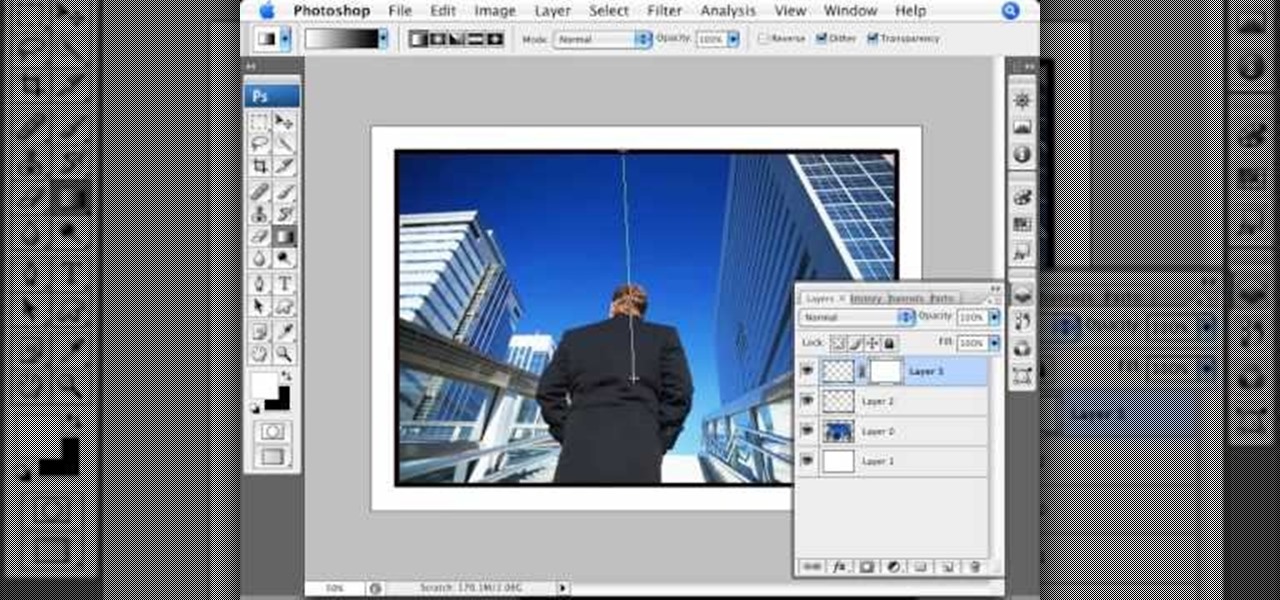
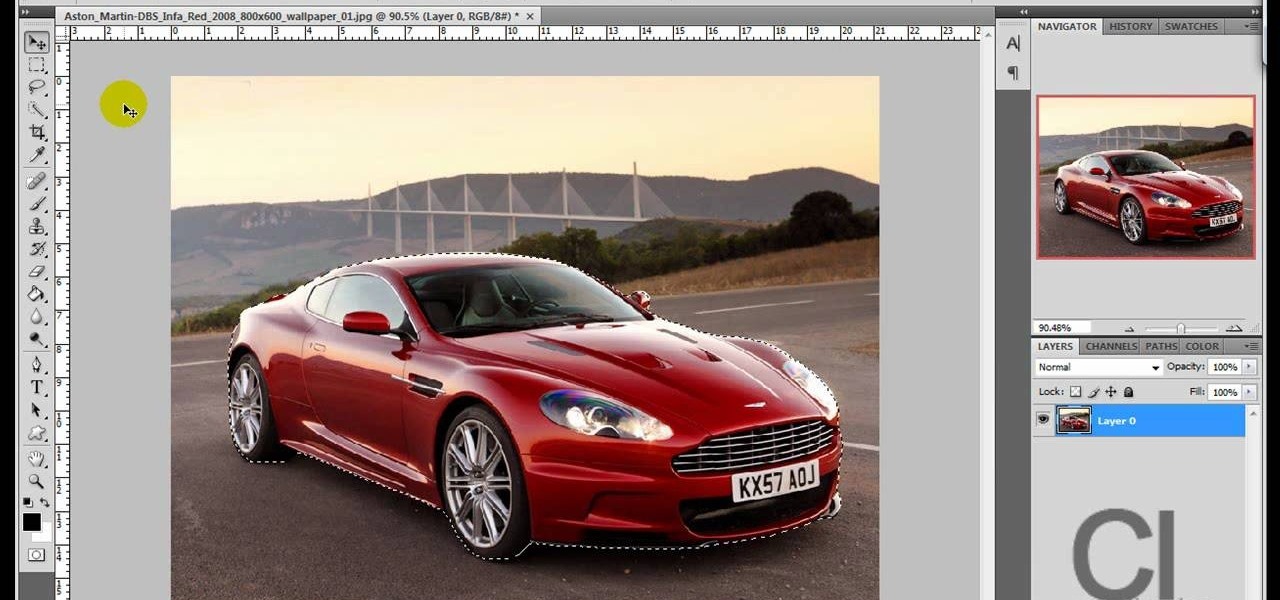
You can learn how to color adjust in photoshop. You can select one color and let the rest of your picture be black and white. First, you select the picture and make a duplicate layer for the background.

Learn how to create glowing text in Photoshop with this awesome video! 1. Write any text using text button T on the selected image as a background. Write a suitable text and place it somewhere. 2.Select the text and make it Bold. 3. right click and set Opacity and Fill options. Opacity changes the color of the text as well as its effect. Whereas Fill changes the color only . If you have set it to 0% then you can't see the text if its exist also. Set Opacity to 100%. 4. For glowing text select...
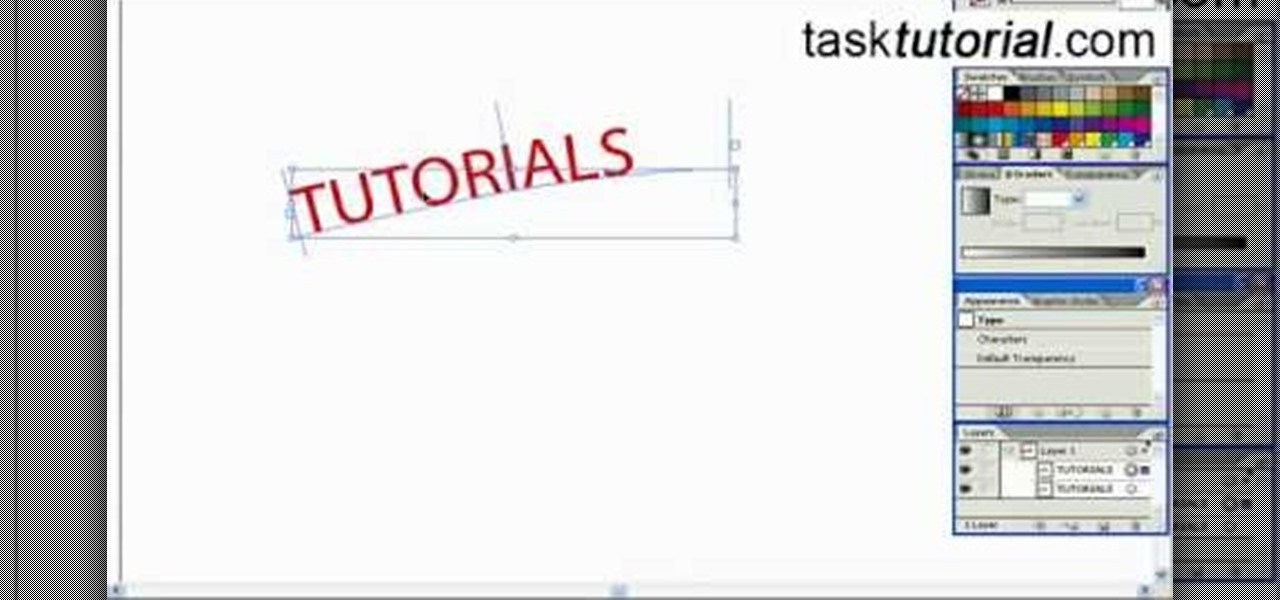
In this tutorial, we learn how to create a cool blend text effect in Illustrator. First, open up Illustrator and draw a path, then change the color to black. After this, click on the line and type in your desired text. Increase the font size to 36 points, then select the red color. After this, copy your path and select the duplicate button. Now, move the duplicated path and change the background color to yellow. Now, scale the path and resize, then place on to of the red path. When finished, ...
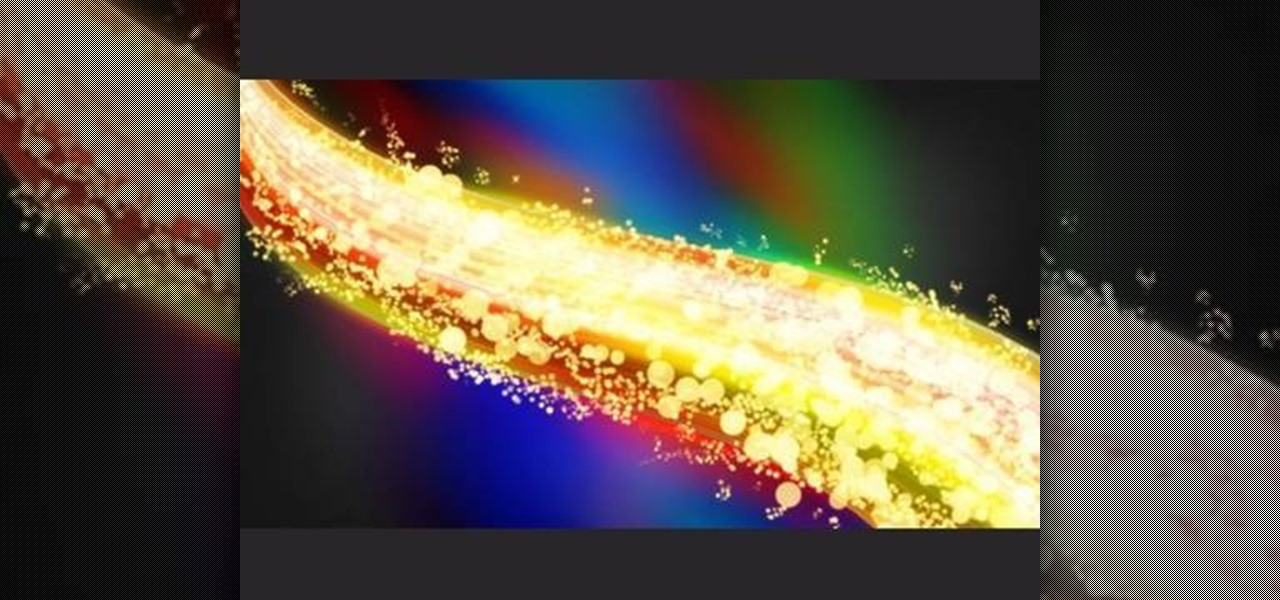
This video will help you learn how to create an Explosive rainbow color swath in Photoshop. First open a new file, keep the width 845, height 475, RGB color mode and white background.
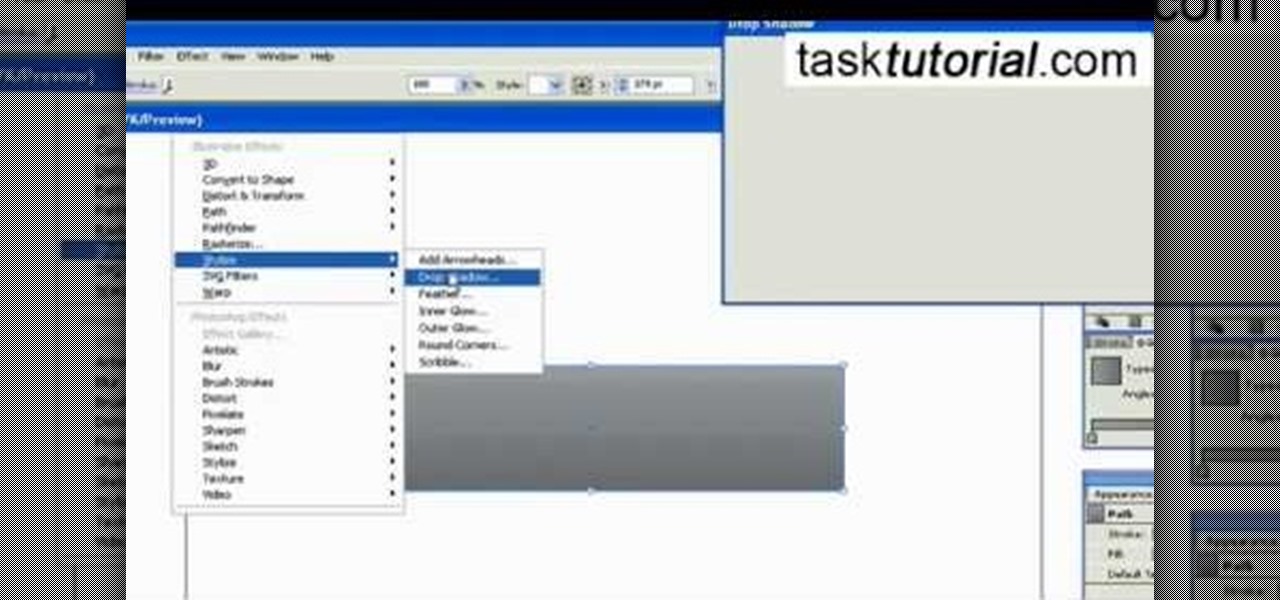
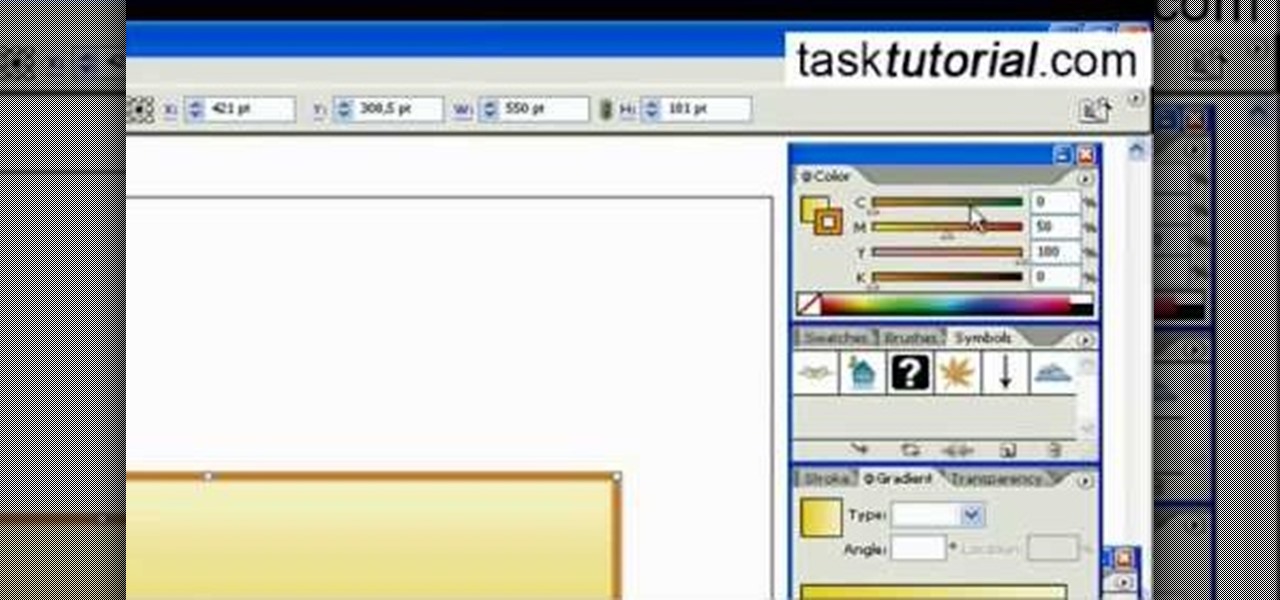
This video tutorial by Tasktutorial shows you how to create an Apple style bar in Illustrator. First, select the rectangle tool in Illustrator and draw a bar as shown. Now select the path, go to gradient and choose the black and white gradient from the swatches. Select two shades of gray and change the angle to -90 degrees as shown. Tweak the colors and go to effects-stylize and select drop shadow, change the opacity value and select black color, normal blend mode as shown. Select the type to...
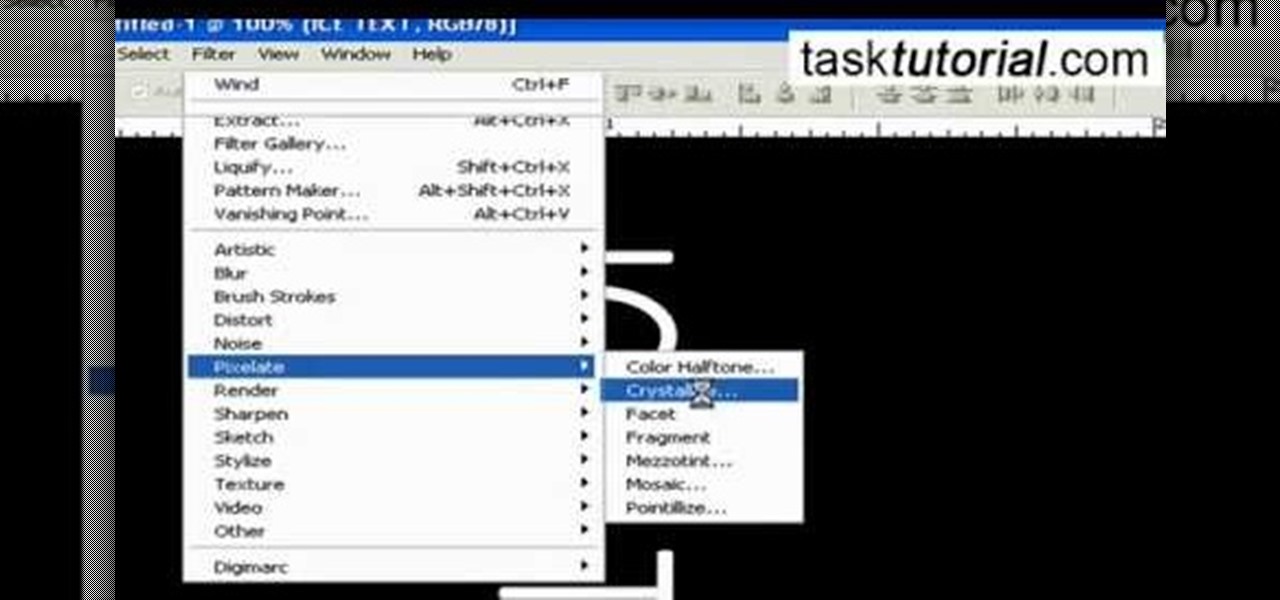
It is a tutorial that how to make an ice text effect on Photoshop. First create a new layer select paint bucket tool switch black color and paint the layer now create an other layer, choose type tool then switch the white color and create a text "ice text" after go to layer pallet merge the layers after that again create another layer select paint bucket tool and select black color now select ice text layer then go to image menu rotate canvas click clock wise then go to filter choose crystall...
In this video, we learn how to change hair color in Photoshop CS3 and CS4. First, open up your image and zoom in on the hair. From here, you will click on the selection tool with a circle to select your image. Now, make sure this is the perfect size for the entire image. Right click and make sure it's sized out right. Now, select the hair and a red marker will appear. Select the whole surface of the hair, and as you get to the short hair use a smaller circle tool, don't worry about the smalle...
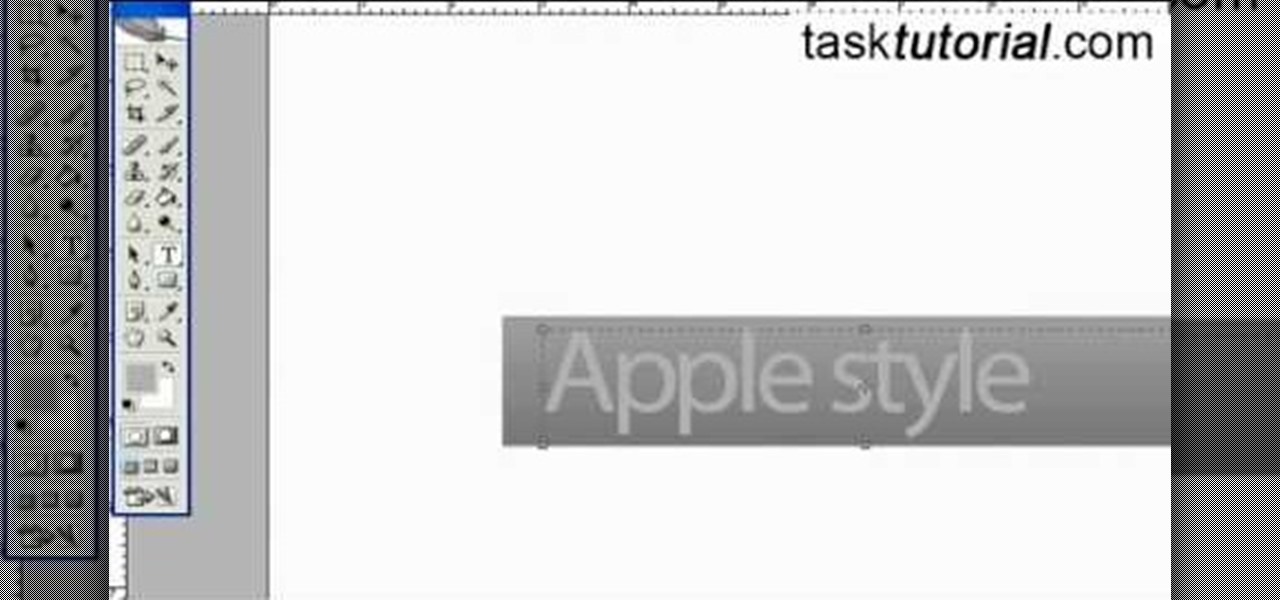
First select the rectangle tool and draw the bar. Now you have to open up the layer style and choose gradient overlay. Now you need to edit the colors as showing in the video and then go to drop shadow option, you have to change the opacity of it to 20%, distance to 2 and click ok. Now type "Apple style" in new layer as showing in the video, set the size of text to 72pt. Now open layer style for the text and choose color overlay and set its color to dark grey, go to drop shadow and choose nor...
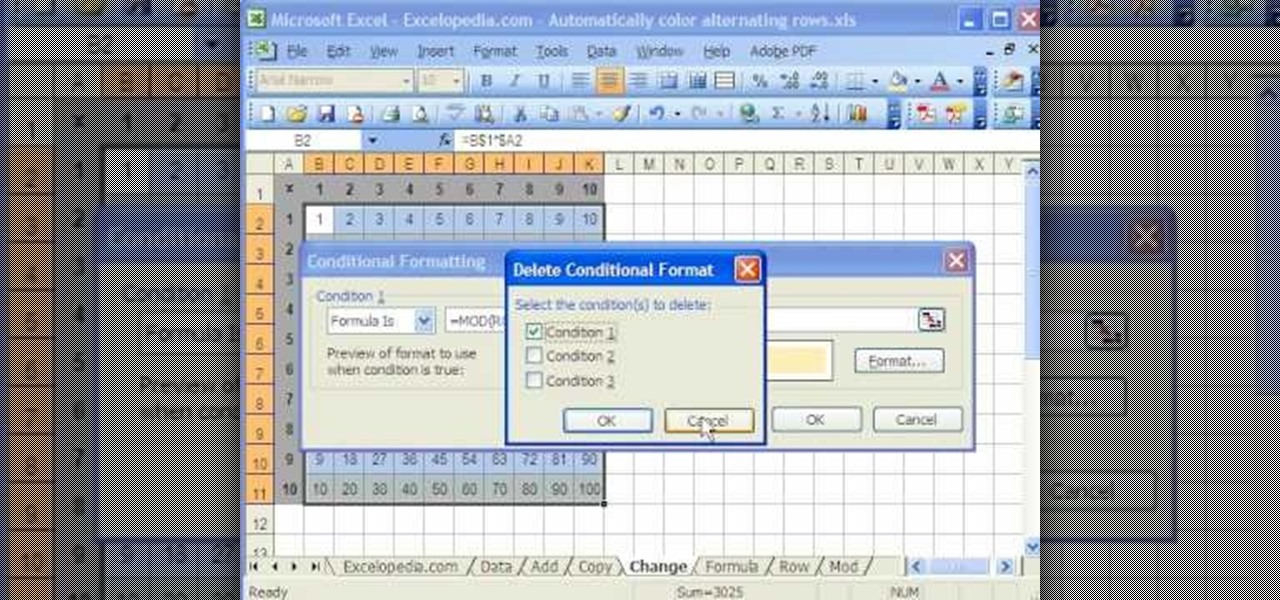
This video is a tutorial on using the Conditional Formatting function of Excel to automatically color alternating rows, which helps your eye to follow across the row. This can be done manually with the “Fill Color” button, but if you add or delete rows after applying the shading, the whole purpose is defeated.
Open up the GIMP on your computer, and then proceed to open up the photo you wish to modify. Now, select the scissors tool from your Tool palette or by clicking "Tools" on the menu bar, then click "Selection Tools," and also click "Intelligent Scissors." Use this tool to outline the person's hair in the photo by clicking along the hairline at about 1/4-inch intervals until you return to the first place you clicked.
Don't know how to add some line frames in Photoshop? Well, this video teaches the viewers how to exactly add line frames, or borders for their images using Photoshop. First of all, change the background layer into a normal layer. Next, go to image size and add in some more pixels in order to allow room for the border. Next, add another layer and set it to transparent. Now select where you want your border to be, then go to strokes, and select a color. At this point, the viewer should have a b...
This video is about using a luminosity mask in Photoshop. The luminosity mask is used to enhance the color and contrast in photos that lack each of these. The color is enhanced or punched up. Choose the manipulation tool: channel and RGB. To choose RGB, touch control and then select RGB. Select the 100 % white or light parts of the photo, it will not select the darker or black images. Copy the light parts of the image by using control J. Choose to copy the lightest parts by selecting overlay ...
In this Software video tutorial you will learn how to make a winking animated GIF in Adobe Photoshop. Select a photograph of two eyes and duplicate the layer. Now copy the top eyelashes and paste them on top of the bottom eyelashes. Go to the eye drop tool and select a dark color. Then go to paint brush, choose a brush with size 1 and select darken in the ‘mode’ dropdown menu. Reduce opacity to 50%. Now darken the lower eyelashes as shown in the video. Then go to healing brush tool and se...
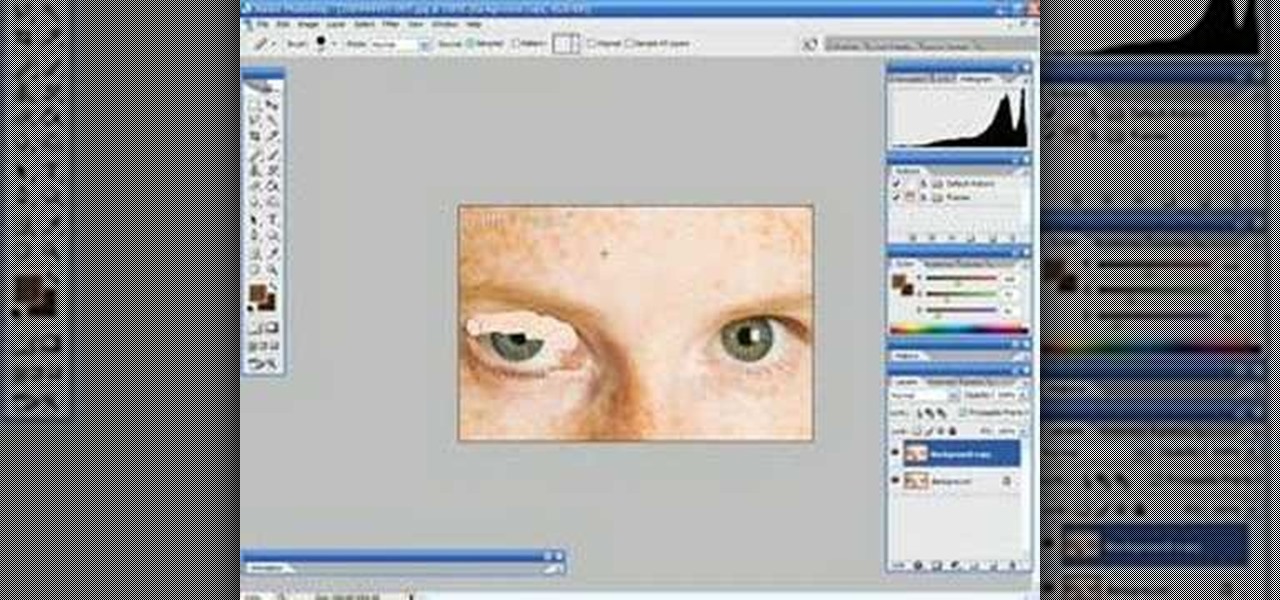
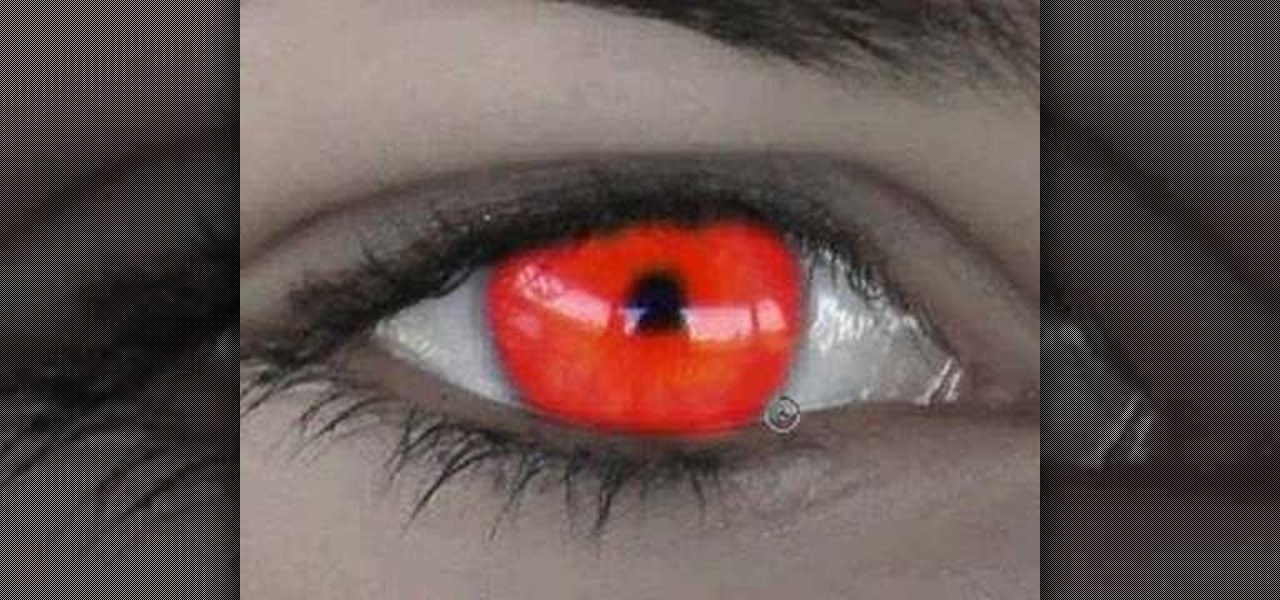
This video is about how you can change someone's eye color. The first thing to do is to load up a picture in which you want the eye color to change. The next step is to zoom in the eye that you're interested in working on. Just simply press "D" button on the keyboard and draw a rectangular shape on the eye. Now that you've zoomed in, make a selection of the iris, the part that we want to change the color on. The first thing is, you need to set up colors found on the lower left of the window. ...
In this video tutorial by Task Tutorial we learn how to create a YouTube subscribe button using Adobe Illustrator. The first step to creating a button is to select the rectangle tool and draw a bar and then select a gradient fill. Next create the first color in the gradient and then the second color in the gradient. After that you'll want to change the gradient angle and also change the stroke width. Then you'll want to edit the stroke color to 9.6%. Then select the text tool and create your ...
The step by step methods to isolate colors in Photoshop have been shown in the video. In a layer we have to place an image and first select the particular part to be isolated with the pen tool which has free form pen tool, add subtract, intersect and exclude overlapping path options. After that make a right click and select make selection option. Keep the feather be in 3 and click ok. Paste this in a new layer by pressing control+d keys. Create a copy layer of 2 and open Hue and saturation pa...
In this video tutorial, viewers learn how to change the color of lips in Adobe Photoshop. Begin by importing the image into the program. Select the quick mask tool and then select the brush tool. Now color the part that you want to retouch. This will allow the mask to create a selection. No click on the masking tool to create a selection. Then select the marquee tool. Right-click the selection and click on Select Inverse. Right-click the selection again and select Feather. Make it 1 pixel and...
This how to video shows you how to create wallpaper for your computer desktop. Open Photoshop and create a new file. Change the dimensions to the size of your desktop. Click okay and go to edit and fill. Choose color and select black. Click okay to fill the screen with black. Duplicate the layer. Once this is done, go to filter, render, and lens flare. Make sure the lens flare is in the center. Edit the settings to your liking. Click okay to add the effect on to the image. Go to filter, disto...
This how to video shows you how to make your avatar look like the Joker from Batman Arkham Asylum. First, go to the avatar edit menu. Hold the button down for 60 seconds until the box tilts. Now, search for spiky hair and choose a green color. Now, move on to the eyes. Choose evil eyes and select any eye color. For the eyebrows, choose a curved shape for an evil look and select a black color. For the ears, choose long ears. For the nose, select a wide or defined nose. For the mouth, select a ...
This Software video tutorial shows how to create a glass text effect in Photoshop CS3/CS4. Download a free trial version of Photoshop CS4 from Adobe. Open Photoshop, go to ‘file’ and click ‘open’. In the next box, give it a name, select width and height at 90 pixels, background contents to ‘transparent’ and click OK. Select the color palette and choose the background color and click OK. Now open ‘paint bucket tool’ and fill in the color. Then go to ‘text tool’, select the font, size and posit...
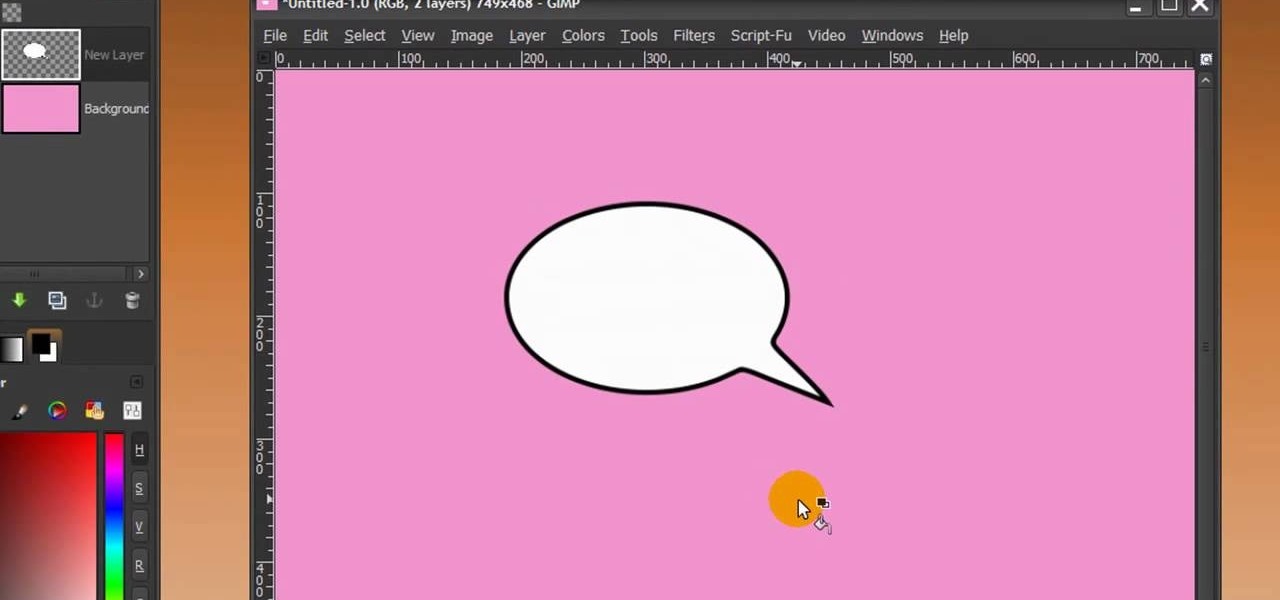
First of all open any image and create a new ‘layer’ and add it to your image. Click on the transparency and then click ‘ok’. Now from the right menu bar choose the ‘elliptical’ icon to make a round balloon. Now select the 'free select tool' and select ‘mode’ to 'add to current selection' and then draw a triangle with the base inside the previous balloon and the pointed end outside the balloon. Now select the 'bucket fill' tool and make sure your ‘background’ color is selected as white and th...
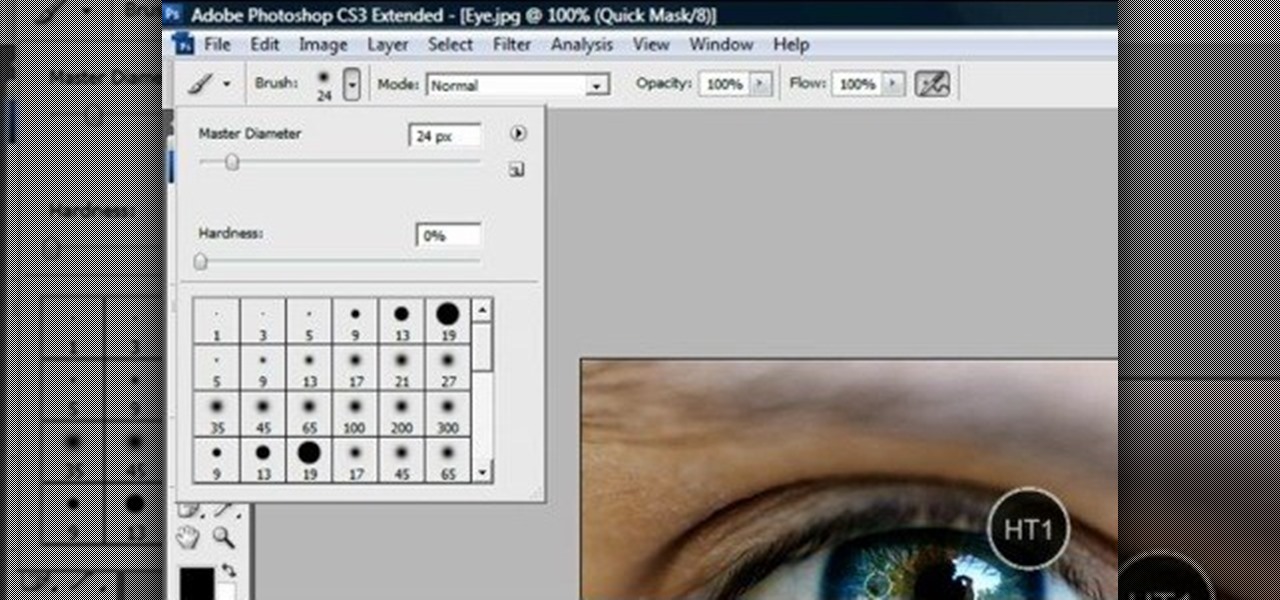
This video shows “How to change eye color in Photoshop CS3” First open the eye picture you want to change. Now select brush tool by
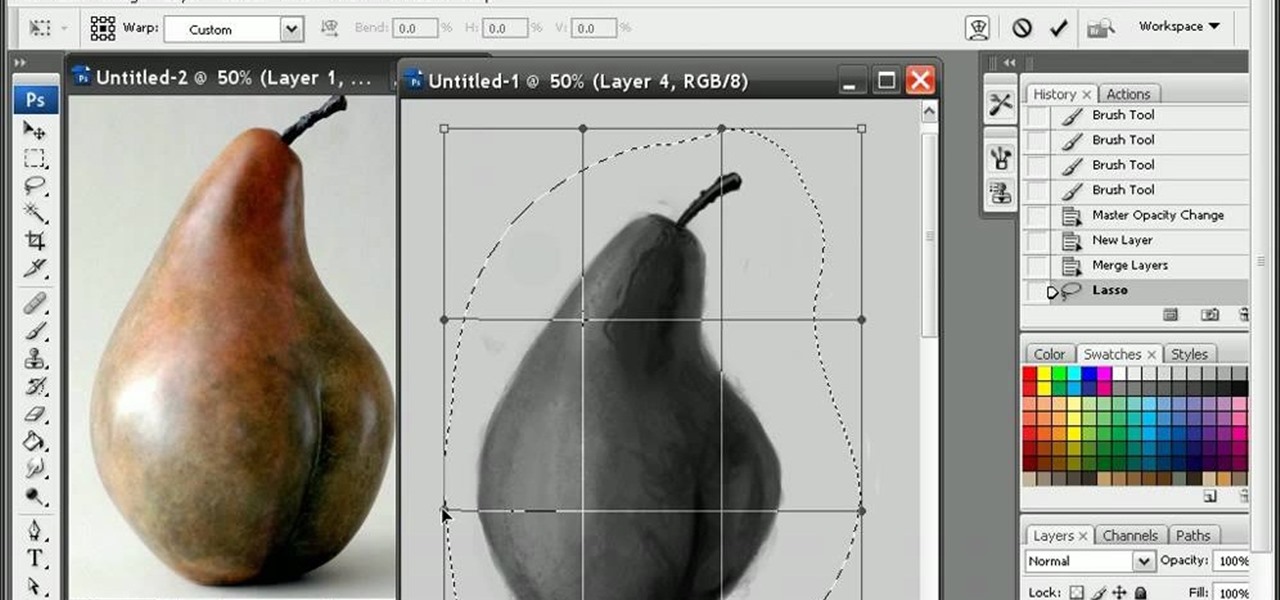
If you are looking to improve your Photoshop skills by learning how to digital paint in it, this video shows you how to do it. To do this, open a new Photoshop canvas and select your brush to paint with. In this example the author shows how to paint a pear for demonstration purposes. You start by drawing a rough sketch, just using your paint brush and reference an image of a pear that you find in this tutorial. Now do the dark textured work on the non lighting side as shown in the video. Now ...
This video shows you how to create beautiful make-up using the loreal hip products. Products Used:
First of all open an image which shows many different lights in a night background. Now make a new layer now set the color of background to black by first and the foreground color set to white. Click the background for the bottom of the left bar and then pressing 'd'’. Next select the 'gradient' tool. Make sure to select the style from the foreground to background. Select the 'mode' to 'normal' and ‘opacity’ to '100%'. Now drag the top right hand corner to the bottom of the left hand corner. ...
This video tutorial by VvCompHelpvV gives you two methods to achieve the Sin City effect in your photos using Photoshop. The Sin City effect is making the main subject of the photo appear colored while the rest of the photo looks black and white. In the first method the subject should be selected using a pen-tool using the settings mentioned. After that right click on the selected areas and make the feather radius 3, inverse the selection and go to image > adjustments and de-saturate and your...
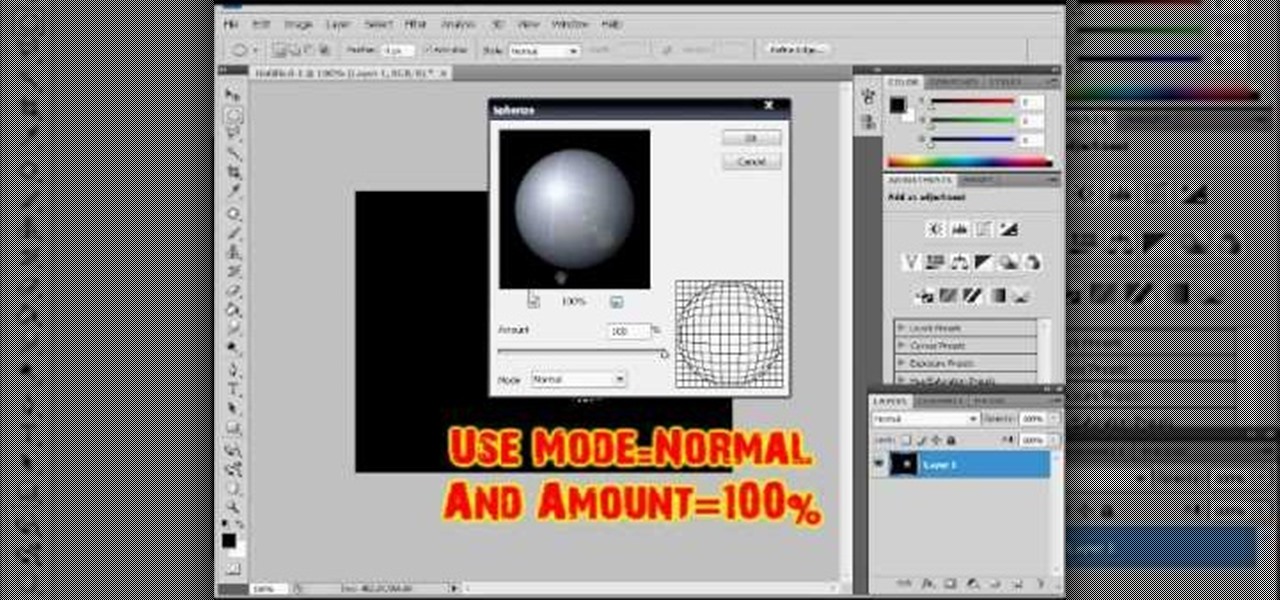
In this video tutorial, viewers learn how to make a shiny glass ball in Adobe Photo-shop. Begin by creating a new document with the default size and a transparent background. Then paint the entire background in black. Now select the marquee tool and create a circle anywhere in the background. Now go to filter, click on Render and select Len Flare. Make the lens flare 105 mm prime with 141% brightness. Then go to Filter, click on Distort and select Spherize. Use normal mode and set the amount ...
In this how to video, you will learn how to create a rainbow effect in your photos with Photoshop. First, open the image you want to edit in Photoshop. Next, edit the hue and saturation. Make sure to desaturate the drawing. Next, create a new layer. Select a brush and choose a blue color. Make sure in the new layer that color is selected. Color the top part of the image. Next, select a purple or pink color and color the middle part. Choose a yellow color and color the bottom of the middle par...
In this video tutorial, viewers learn how to change the color of eyes using Adobe Photoshop. Begin by selecting the Magnetic Lasso tool and create a selection around the eye. To create a second selection without losing the first one, hold the Shift key. Now go to Image, click on Adjustments and select Hue/Saturation. Now adjust the hue and saturation of the eye to change the color. This video provides a visual demonstration for viewers to easily follow along. This video will benefit those vie...
In this video tutorial, viewers learn how to tan an image using Adobe Photoshop. Begin by opening the image in the program and create a new layer. Then select the brush tool and select the tan color. Click OK and apply the color over the areas that are wanted to be tan. Then apply another layer with the same color to darken the image. Finish by configuring the Opacity to a lighter color and blend it to the image, This video will benefit those viewers who enjoy editing images to enhance them a...
In this video you will learn how to change eye color or removing red eye in Adobe Photoshop. First, to change the eye color you must enter in Adobe Photoshop, open a photo, select the zoom tool and zoom in near the eye. We will use the first tool and make a circle of the eye. By holding shift key remove the areas you don't want to paint. Now go to layer, then new ant the layer you want to copy. Now select hue/saturation. Now slide hue until you are happy with the color, then hit ok and that's...
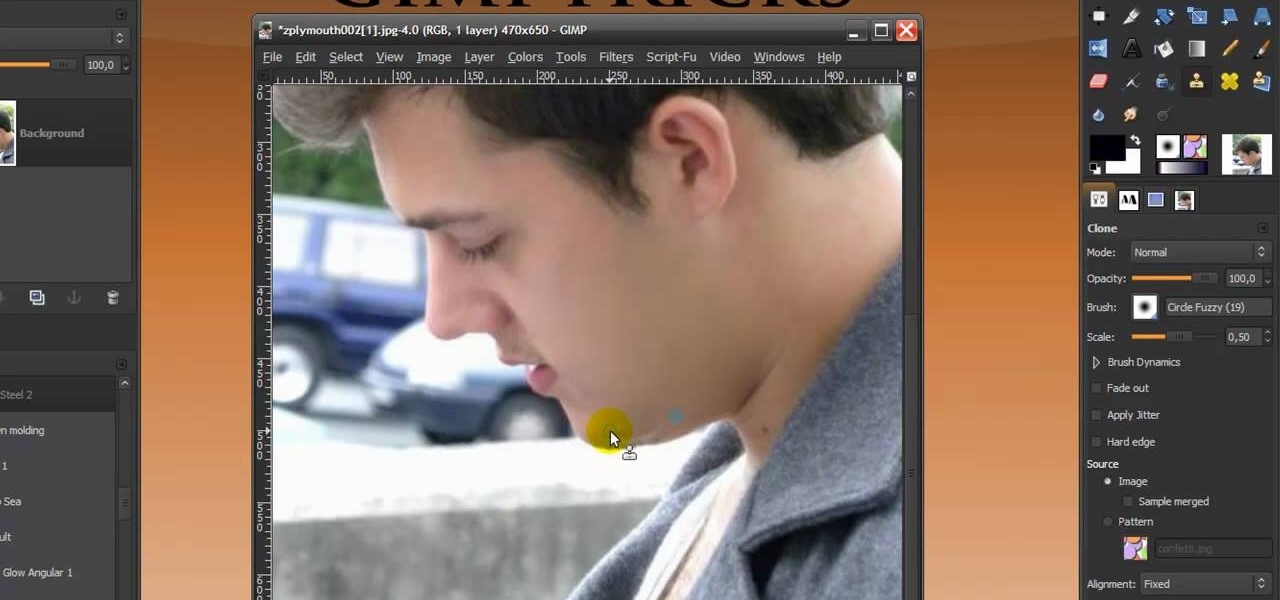
In this Software video you will see how to give someone a shave in GIMP. Learn spot removal, skin smoothening and a makeover or removing a 1 day beard. This is done using the Clone and the Healing tool. To use the Clone tool, select the tool from the right hand panel. Then to select the source skin color, you have to hold ctrl key down and click. Now when you apply it to the area you will get the same shade of the source color. So, you will need to select an area very close to the spot you ar...
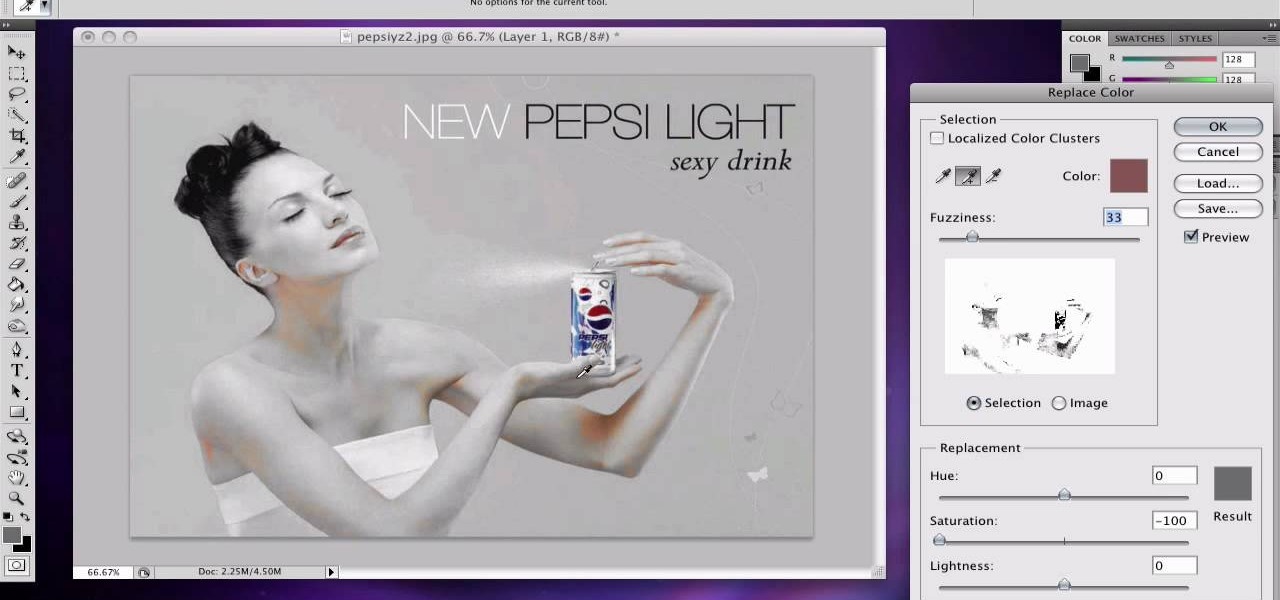
If you want to learn how to do selective desaturation in Photoshop CS4, you should watch this video. Go to File and choose Open. Open the file you want. Go to Image, select Adjustments, and then Replace Color. Select the second droplet or the droplet with a plus sign. Increase Fuzziness, say 106 but you need to decrease Saturation. Set Saturation to -100. Click on the image except for the selected part that you want to have a color. Decrease Fuzziness to know the parts that you need to click ...
This video shows you how to simulate hand coloring in Photoshop. The first step in the process of simulating hand coloring is to turn the image you have chosen into black and white. Following turning the pictures coloring to black and white you must bring up the hue color control panel. The final task includes selecting the object to color within your image as well as picking the color in hue that you wish to use. The coloring must be done manually by the users control of the mouse.
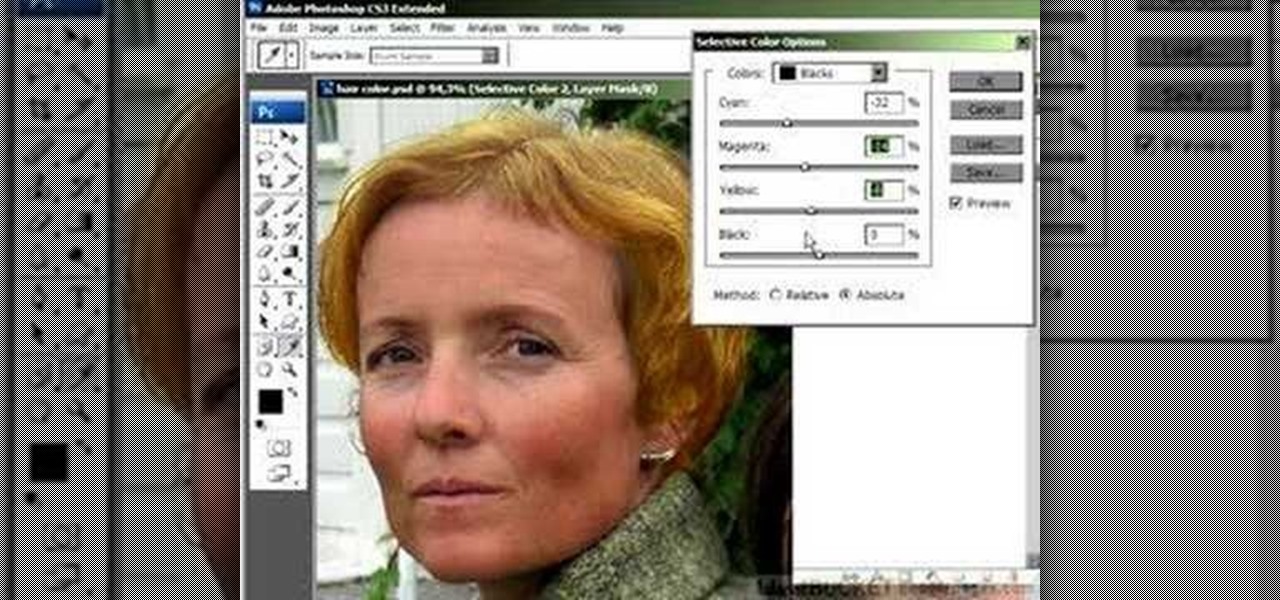
In this Photoshop tutorial the instructor shows how to change the dark hair color to blond. To get this accomplished you need to use a couple of very special techniques. First use the selective adjustment layer and select the outline of the hair. Now use the selective color option and change cyan and magenta settings to about minus forty. Now changing the other yellow color to achieve saturation and black colors to achieve the effect with shadows. Now next change the colors of black so that t...