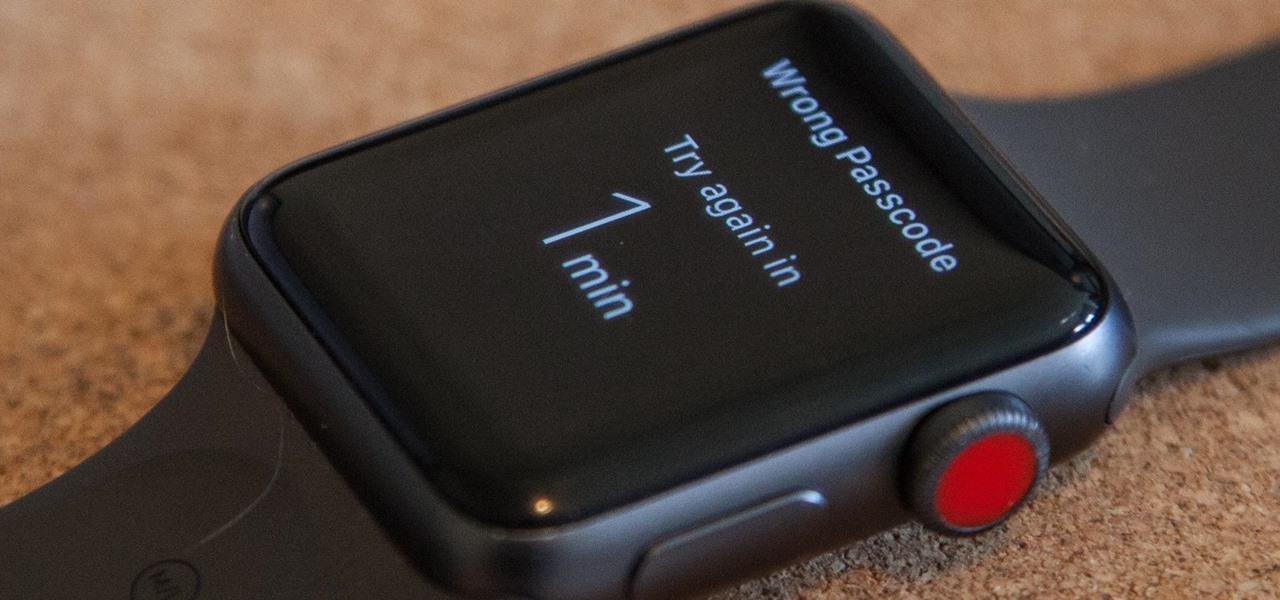
Using a passcode on your Apple Watch is a good way to keep other people out of your data, but what happens when you see that "Wrong Passcode" screen yourself? You can, of course, try again in a minute, but if you've forgotten it for good, there's still a way to get back into your Apple Watch.
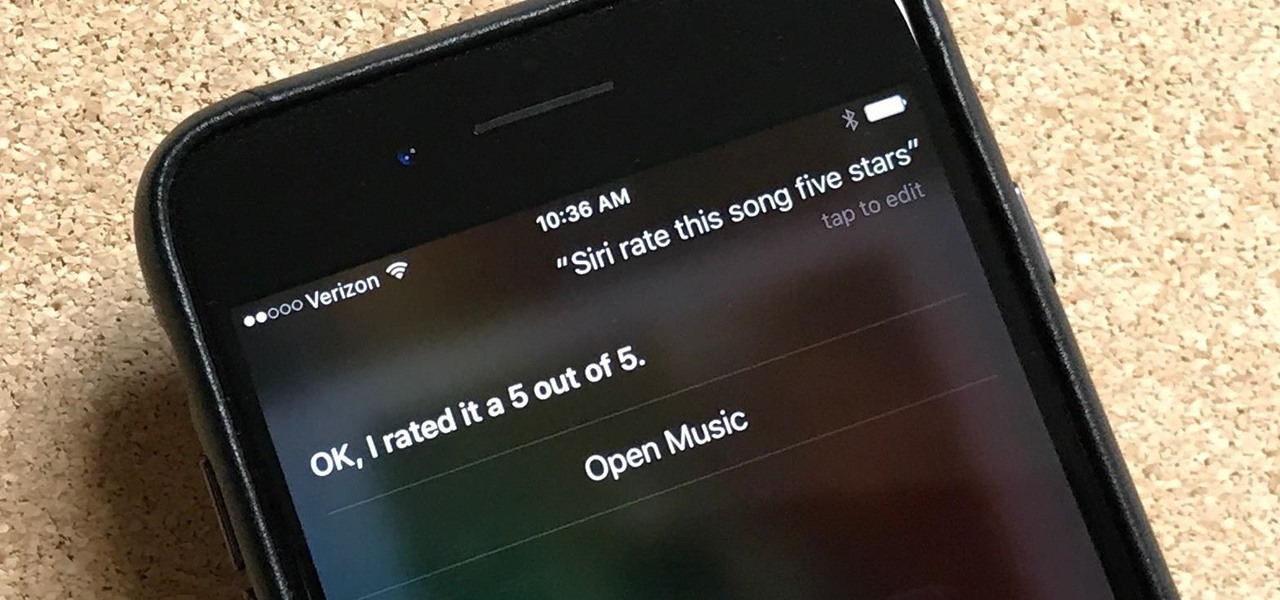
Can't figure out how to give songs star ratings anymore in your iPhone's Music app? That's because Apple removed the ability to do so from the new iOS 10 update, just as I expected they would. It's still possible to rate songs, it's just very irritating.

In this web design tutorial learn how to use the straight line tool. Although the straight line tool might seem like a useless tool I can tell you from experience it is very useful. Especially if you have ever attempted to draw a straight line with a tool other than the straight line tool. There are many ways you could use the straight line tool such as dividing content, design graphics, separating navigation menu headers and much more. My recommendation would be that you take a look at some ...

Keeping your computer screen or smartphone display clean is impossible. And those stupid little cloth cleaners that come with your device are about as useful as the new Apple Maps (yes, I am still upset about it).

If you use iCloud, you may have experienced alerts such as "Not Enough Storage" and "iCloud Storage Full," especially if you're on the free 5 GB plan. To clear up space on your iCloud account fast, you can delete large files here and there, but trashing one thing, in particular, can clear up gigabytes worth of space instantly.

In a world where mobile devices are the new norm for interacting and staying in contact with one another, it's important to make the experience as smooth as possible, and typing is the biggest problem for me.

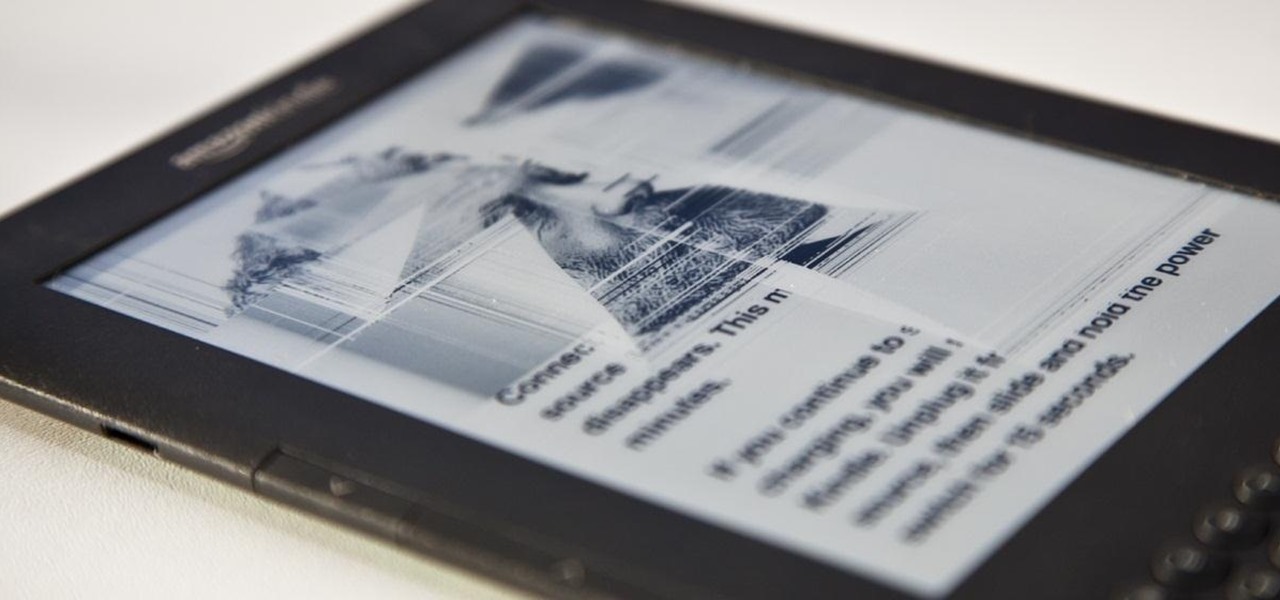
The reason Amazon's Kindle has become so popular over the past several years is due to the amount of digital books one can fit inside—over 1,000 for the smallest Kindle. Gone are the days of lugging around heavy books to school and the airport. Instead we can fit our e-readers snugly inside our bags and never worry about forgetting a book.
Watch as garage sale aficionado Ron Hubble teaches how to plan and have a multi-family garage sale. Learn where to advertise for garage sales, how to word advertisement, where to post garage sale signs, the benefit of baked goods, how to price items, how to find items, how to display items, how to organize money between families, how to negotiate prices, how to clean up, and how to prepare throughout the year for a garage sale. There is no reason why your useless junk can't become somebody el...
In this video tutorial, viewers learn how to remove the speakers on a G5 i-Mac computer. In order to remove the speakers, user will need to first remove the ambient light sensor. Remove the 2 torx 6 screws and remove the middle bracket. Now on each speaker, users will need to remove 2 torx 8 screws. Once the screws are removed, the speakers simply slide out of place. Under the right speaker, there will be a cable that will need to be unplugged from the logic board. This video will benefit tho...
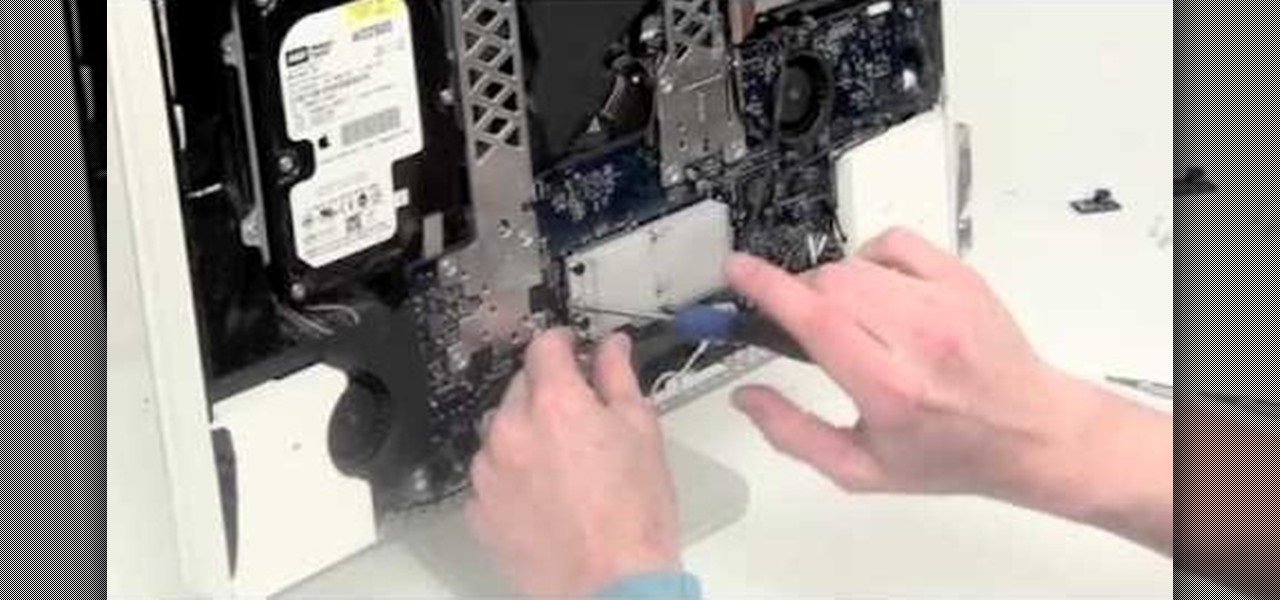
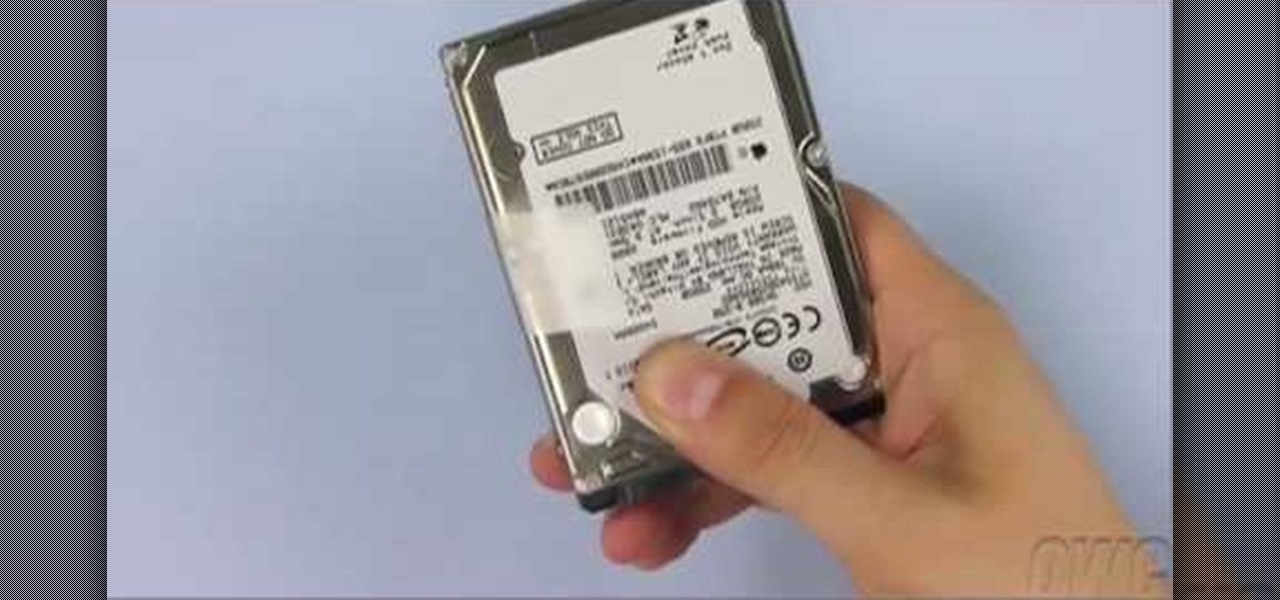
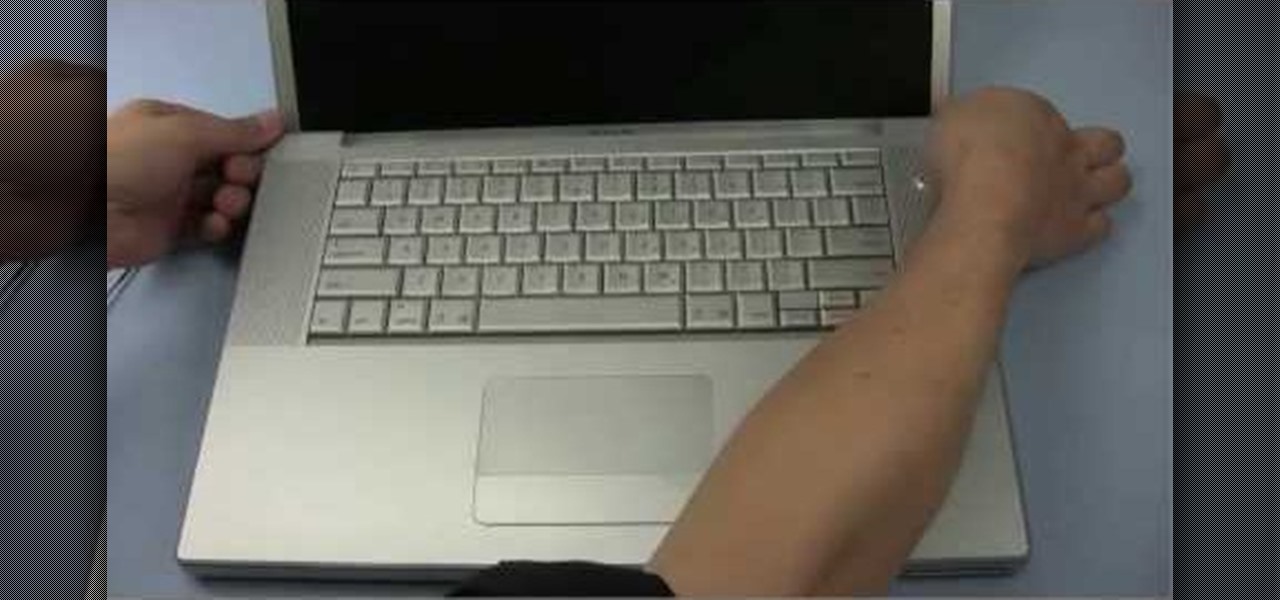
In this video from MacOSG we learn how to install a hard drive in a 15" Macbook Pro from around 2009. For this you need a #00 Phillips head screwdriver and a T6 Torx screwdriver. Make sure you use proper anti-static precautions with this. Transfer your data to the new drive before installing. To remove the hard drive, flip over your Macbook. Use your Phillips to remove the 10 screws. Remove the 3 at the right which are longer than the other screws. Then remove the left most screw which is the...
The video starts by informing about the basic safety precautions, tools needed and backing up data prior to hard drive replacement. There are a series of screws which need to be removed in the following order.1. Removing the battery from the back and then remove three screws thereby removing the RAM cover.2. Two more screws to be removed under the RAM cover.3. Two screws from inside front edge.4. Four screws from the bottom rear.5. Two screws each from the slim sides.6. Two screws near the hi...
The official release of iOS 8 was highly anticipated, but the truth is it may have been a little premature on Apple's part. Since its debut only a week ago, plenty of bugs and issues have been reported across the various compatible iPhone models.
Assuming everyone knows of the recent "String of attacks" passed between Obama and Romney, I just want to talk about how useless this entire thing is. I'll try to be as un-biased as possible.
Tired of being limited with your right-click options in Microsoft Windows? There's a program that could help you out, and it's called Right-Click Extender. Insert many different additional items to the right-click context menu.
In this how-to video, you will learn how to remove the front case of an iMac G5. First, lay the case on its back. Remove the screws in order to get the ram bay cover off. Once this is done, pull on the release tabs to remove the ram modules. Next, remove the torx screws on the bottom side of the casing. Once these are removed, work your way around the casing to remove the front from the back. Do not pull too far as you might damage the wires to the camera. Unplug the camera once you are able ...
In this how-to video, you will learn how to remove the vocals on songs using Ableton. First, open the tracks you want to remove the vocals from. Go to utility and select the preset difference. Drag it to the audio track. This will remove vocals.
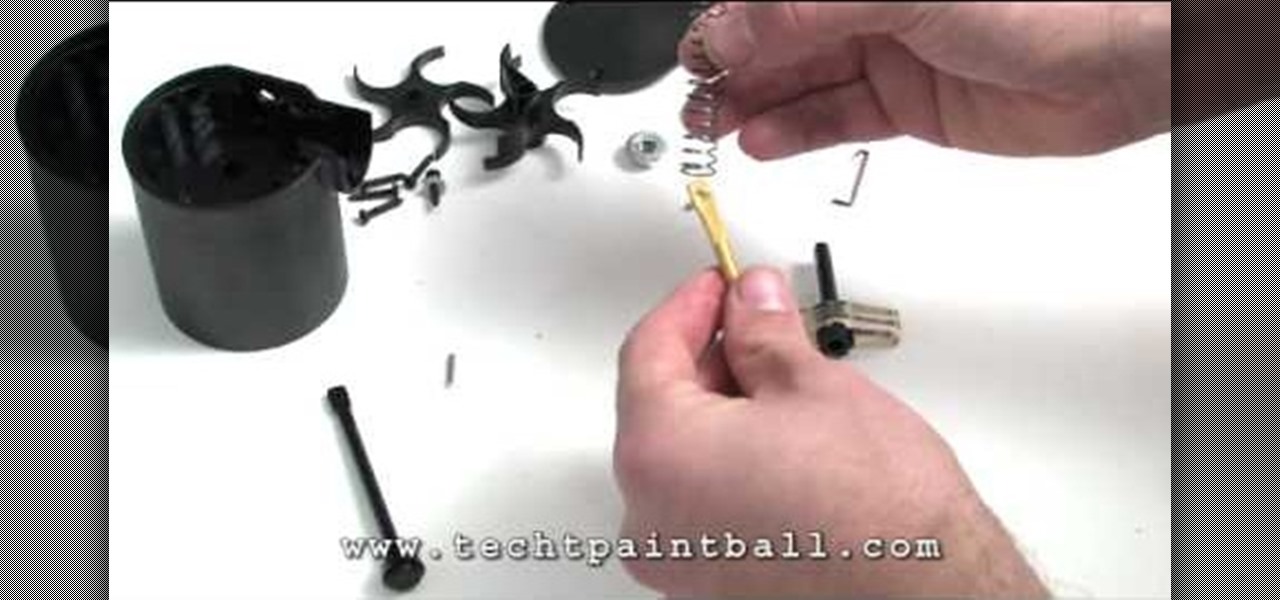
In this video, our author, KRASHARPSHOOTER, shows us how to install a TechT Lightning Rod. First we remove the screw on the underside, and turn it over and remove the four base screws. Now lift up on the piston housing and remove it. Then, remove the nut and the tension guide. Now you can remove your ratchet axle and rod. Now remove the pin that hoods the ratchet rod and axle together.
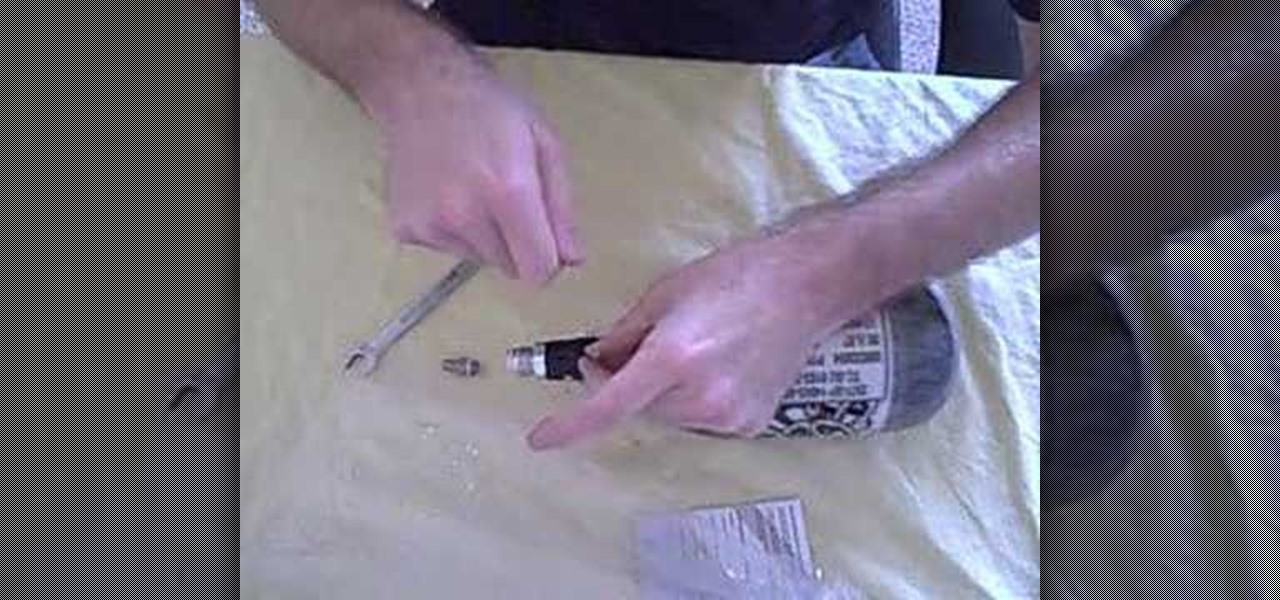
Custom Products Paintball Tanks come with a fill nipple filter. This causes the tank to fill up EXTREMELY slow. To remove the filter, simply remove your fill nipple, and tap out the filter.
When you remove the multifunction switch from your Saturn S-series car, be sure to disconnect the battery and remove the airbag fuse so that you can safely interact with the switch.
Well, Apple may not want you to do it but you just can't help yourself, you want to get inside that beautiful iPhone 4 and see what's inside. This clear, detailed guide shows how to remove the back panel, safely get inside your iPhone and remove your battery as well.
This video demonstrates how to install memory step by step in a Mac mini (2009), as it is a complicated method; it is advisable to watch through the process then attempt to do the same. First step is to remove the old memory from the Mac Mini. Shut down and unplug the Mac mini and place it on a soft cloth to prevent any scratch. Turn-over the mini to get into it using a small buddy knife. Carefully place the buddy knife between the inner and the outer case. Try to detach the inner clips using...
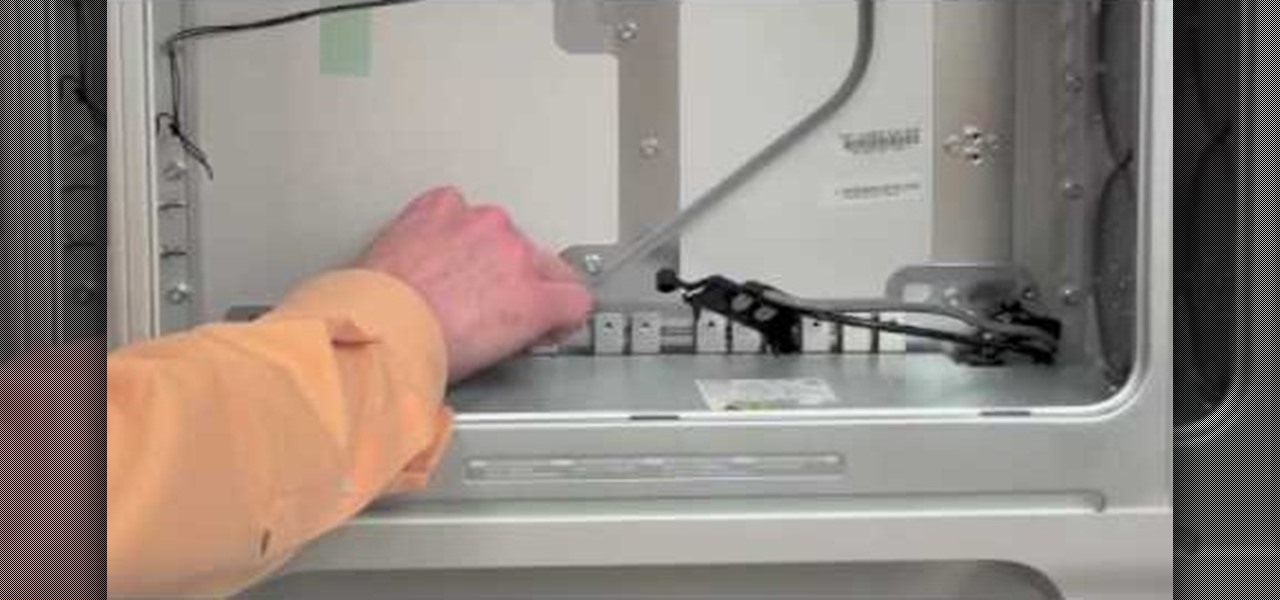
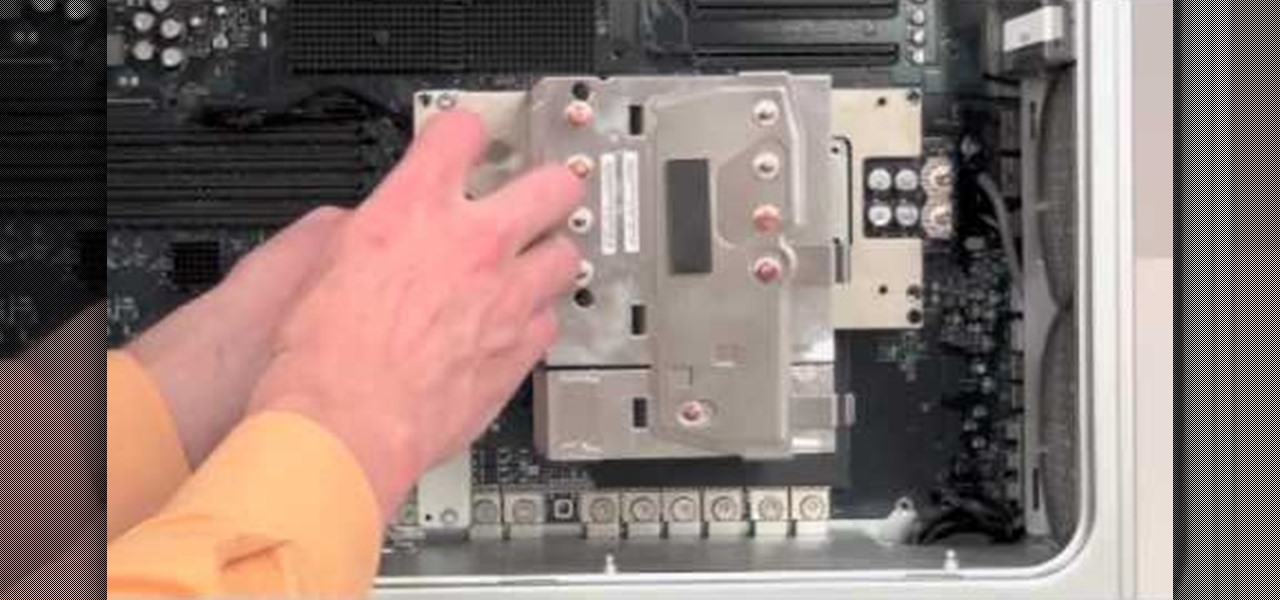
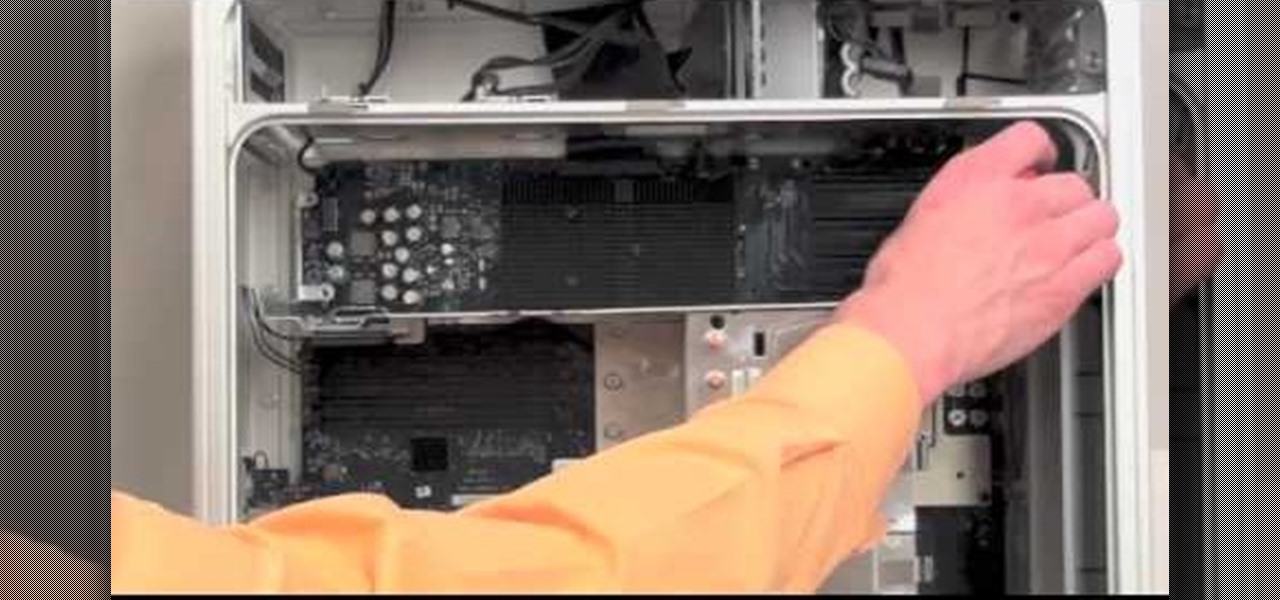
Your power supply on the bottom of your Mac may need to be replaced. If you're not sure how to remove it, no problem. See how to remove the power supply from the Power Mac desktop computer.
For some reason or another, you might have to remove the processor from your Power Mac. If you don't know how, see how to remove the processor from the Power Mac desktop computer right here.
To remove your airport card from your Power Mac, you're going to have to know what you're doing… see how to remove the airport card from the Power Mac desktop computer.
This tutorial will show you how to take something simple like brown paper bags and curl you hair with them.
This image editing software tutorial teaches you how to remove fringe left over from masking on a monster image in Photoshop CS3. Discover three distinctive ways to remove the ugly fringe that can ruin any good masking project. These Photoshop techniques are specially designed for working with detailed hair (like a monsther!), in Photoshop masking projects.
First of all you have to check the three red lights as shown because it indicates that the Xbox is broken and needs repair immediately. However if you open the Xbox the warranty is invalid and it takes six weeks to get it repaired. So go to eBay and buy the repair kit with printed manual for ten dollars. Remove the top and the bottom covers. It shall make a loud slap and it should be expected. Now use a key to unscrew the top cover and then remove it. Now remove the white color fan part. Now ...
In this video, we learn how to remove an automobile headliner on a Saturn S-series. First, you need to remove the back cushion and then take the back rest on the seat, then lay it down. After this, remove the dome light and remove all the grab handles from the vehicle. Next, remove both visors and screws, then remove the mouth on the seat belt and bolts. After this, remove the cover on the back brake light, then the trim that runs along the side of the inside of the car on both sides. Once yo...
In this video tutorial, viewers learn how to remove a BMW E46 ignition/valve cover to access ignition coils. Begin by removing the center section of the factory strut braes. Then remove the 3 twist locks, take the cover off and remove the cabin air filter. Before removing the housing, users will need to remove the plastic cover that holds the positive cable. At the bottom of the cabin air filter, users will need to remove the 4 screws. Now users will be able to remove the entire cabin air hou...
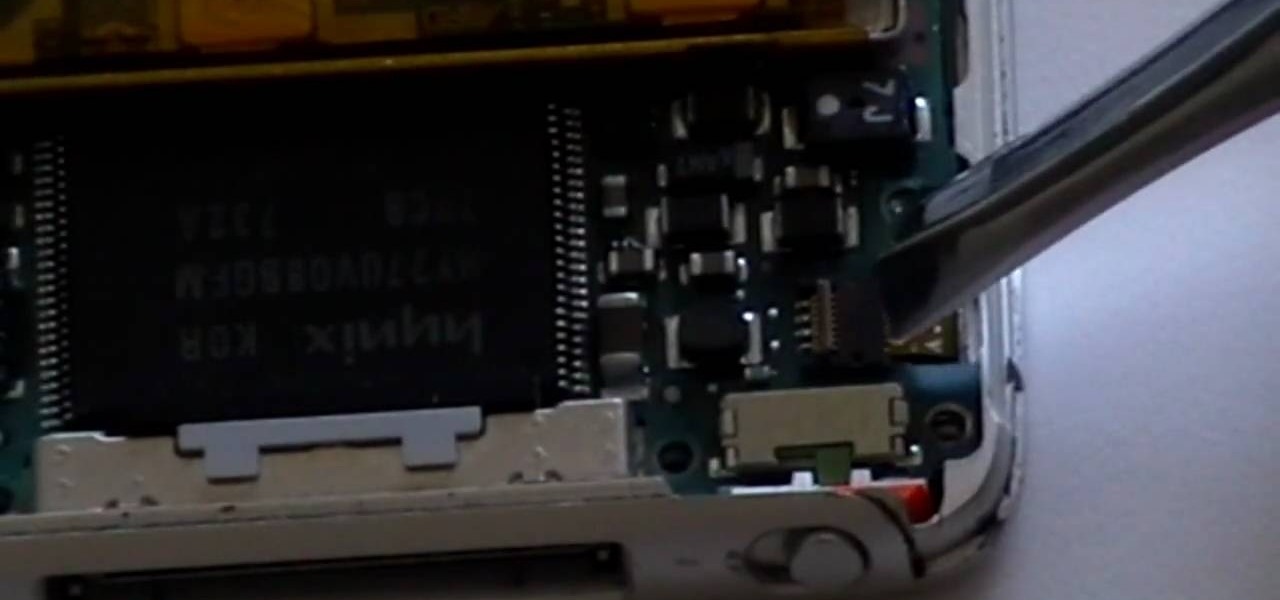
In this how-to video, you will learn how to dismantle an 80GB Microsoft Zune and remove the hard drive. You will first remove the cap at the end. Remove the screws at the bottom. Next, unclip the sides, top, and bottom of the Zune. You can use a prying tool to help you with this. Do this slowly, as you might damage the Zune. Once you can remove the back cover, you will have access to the internal parts of the mp3 player. Remove the tape holding the components together. Next, remove the screws...
Swimming season is here! Learn how to treat the water in your swimming pool when opening it for the summer season in this pool care video from our swimming pool expert.
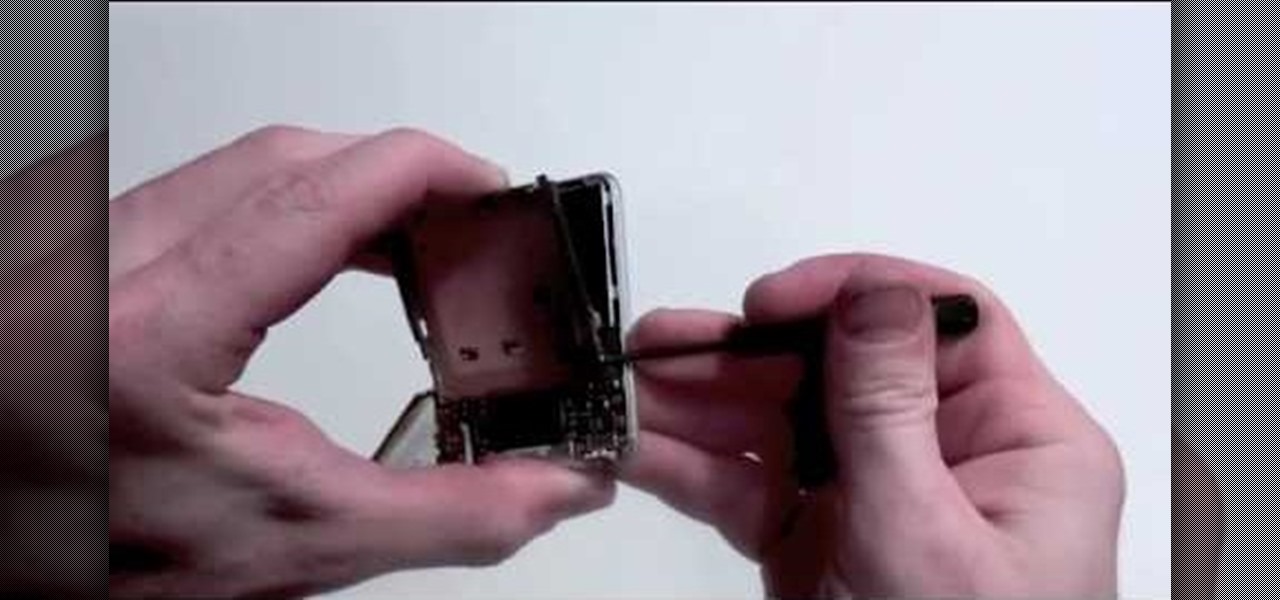
In this tutorial, we learn how to take apart an iPod Nano 3rd generation for repair. First remove the back casing using a guitar pick. Next, use a flat tool to lift up the battery carefully and remove it from the casing. You will see three wires that lead to the launch board, which are soldered into place. Now, use the flat tool to remove the back of the battery casing from the device. Now, remove the logic board by removing the 6 small screws inside of it. Next you will remove the LCD by lif...
Repairs Universe demonstrates how to replace the LCD screen on the LG Xenon GR500 cell phone. First, remove the battery and the SIM card from the phone. Then, use a small phillips head screwdriver remove six screws from the back of the phone. Next, use a safe pry tool to release the clips by running it along side of the phone. Remove the back layer. Remove the two screws on the inside of the phone. Also remove the volume key, the hold button and the camera button. Slide the phone to the side ...
This video shows you how to replace the LCD screen on a third generation iPod nano. Using a plastic safe pry tool, run it along the edges of the iPod, releasing the clips. Once the clips have been released, you should be able to remove the back cover. There are six exposed screws on the bottom of the inside back cover, remove all of them. Next remove the click wheel ribbon cable from the jaw connector. To do this, use the pry tool to lift the connector. Use a pair of tweezers to gently remove...
Clearing storage space is a constant concern for people with iPhones, especially since they don't come with expandable storage, limit the amount of free iCloud storage, and still, unfathomably, produce units with only 16 GB of space. Thankfully, Reddit user eavesdroppingyou shared this quick and easy tip you can use to wipe unnecessary files from your phone and potentially free up gigabytes worth of storage.
If you're in a show choir like the kids on "Glee," then often times you love how a song sounds but in order to sing along with it you need to remove the lyrics.
See how to remove Personal Antivirus from your Windows PC. The Personal Antivirus malicious software is a tricky malware to remove. This is the easiest way to remove Personal Antivirus from your home computer, so watch and get rid of it!
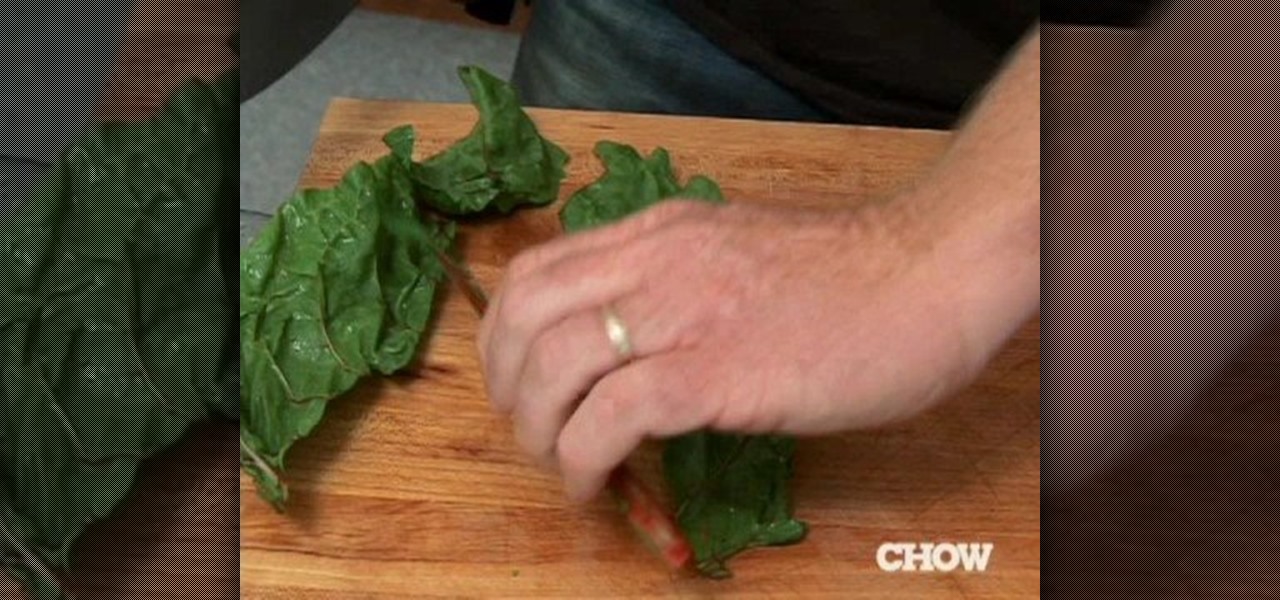
Daniel Duane removes the stalk in the fastest way possible. He shows you how to remove the ribs of leafy greens by stripping them like a zipper. Follow along with this cooking how-to video to learn how to remove the ribs of leafy greens without a knife.
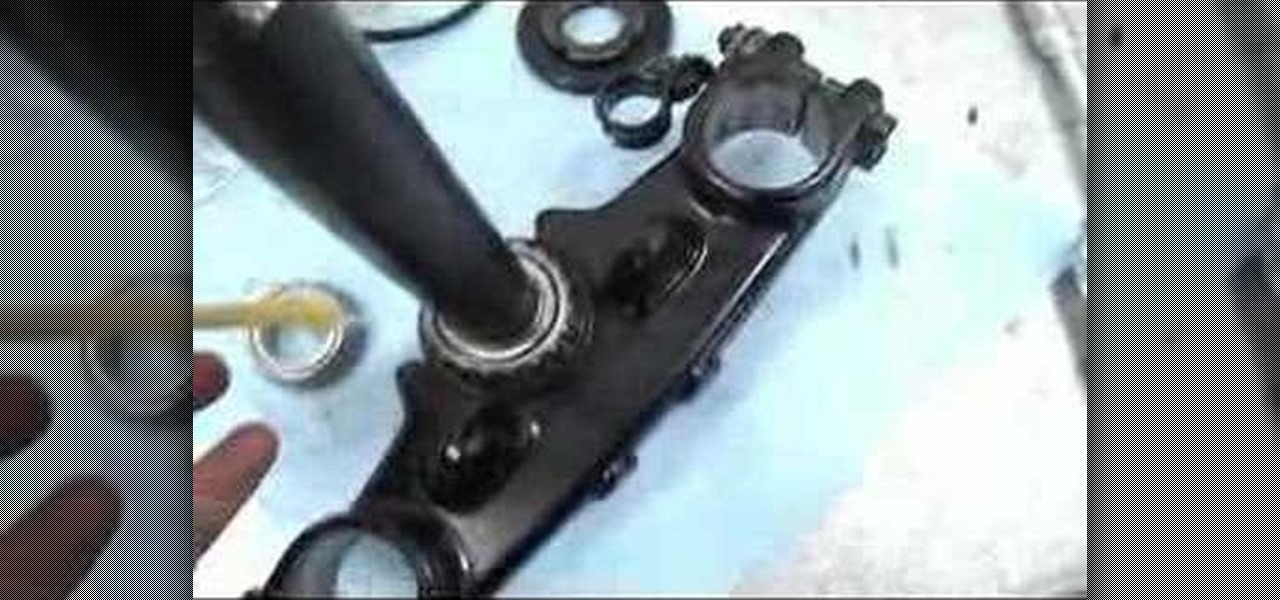
This motorcycle parts tutorial shows you how remove the steering stem (fork and triple tree) on a Kawasaki KLR650 bike. If you are replacing the steering stem or just doing work on your KLR 650 and need the steering stem off, this video will show you how to remove the steering stem. Make sure the front wheel is removed before starting.
Jordan shows us a simple way to remove the red eye created by the flash of a camera using Adobe Photoshop. No matter where the red eye came from, you can remove it easily from any picture after watching this Photoshop tutorial. There are many ways to remove red eye and some are dirtier than others, but this method will give you a nice natural looking pupil in the end.