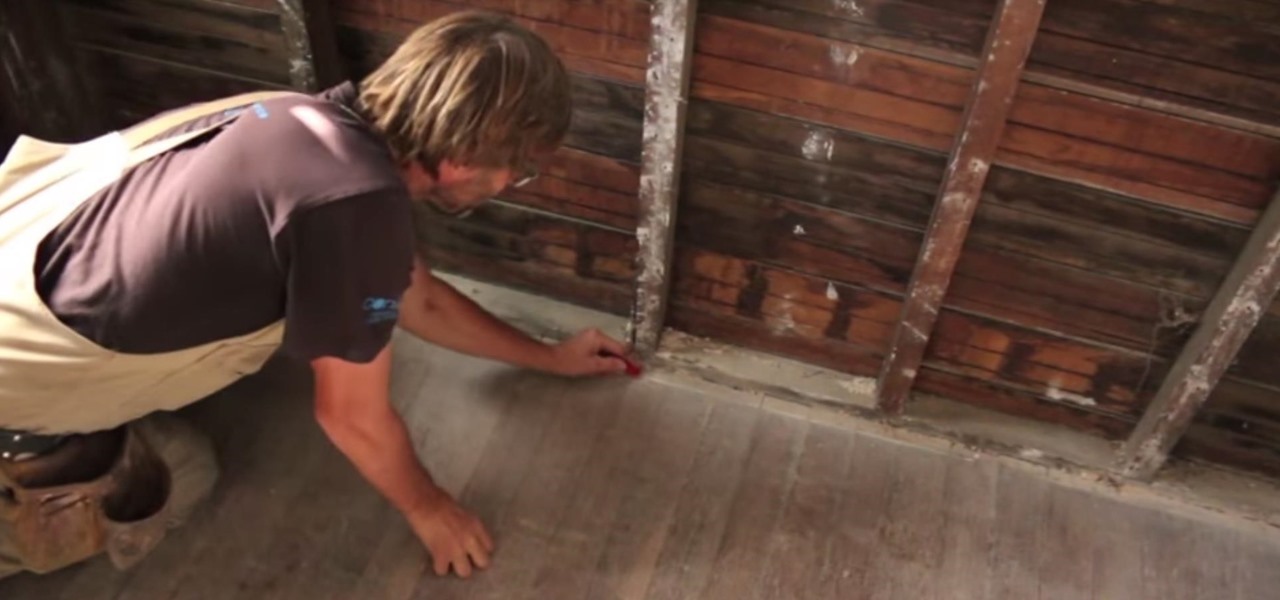
G'day Knuckleheads. Here's my latest one minute stud wall framing tip! Marking on the floor where your wall studs are located is a real handy thing to do. It makes installing your baseboard or skirting board that much easier. Give it a go. You'll be glad you did.

The HoloLens can do some pretty crazy things such as create a robot invasion in your walls, but it can also help you do simple stuff, like hanging frames, paintings, or anything else on those walls—after you repair them from the robot attack, of course.
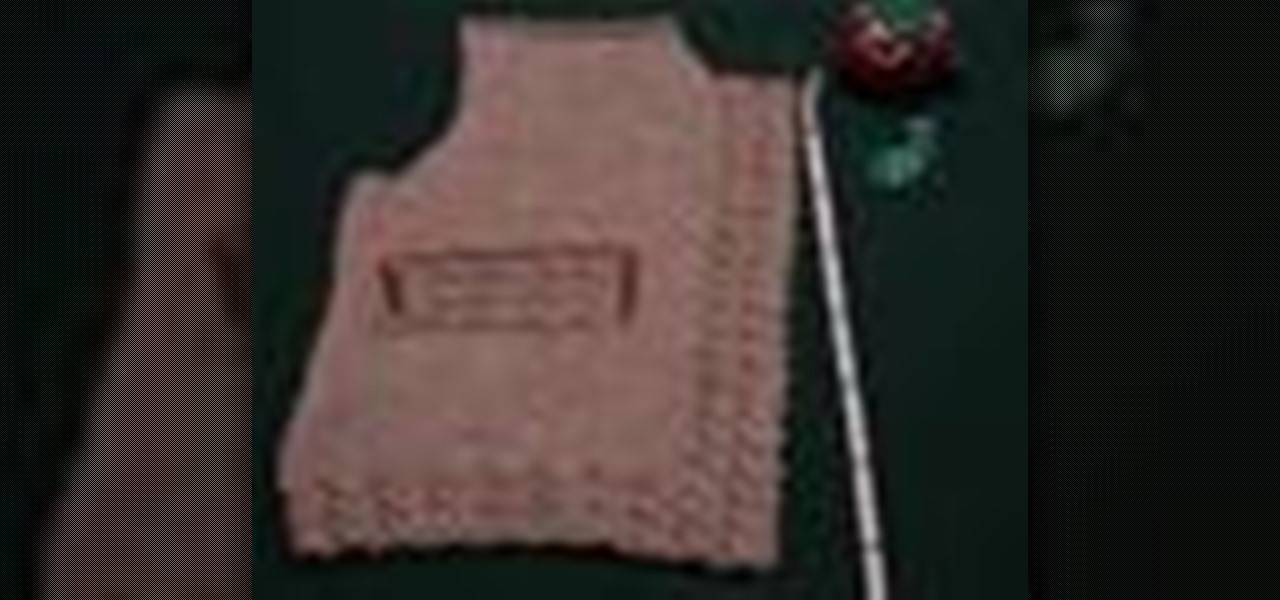
Watch this knitting instructional video on spacing and marking buttonholes for knitting projects. This knitting demonstration uses the swatch of a right sweater front to show an easy way to mark the placement of buttonholes on your knitted material. Lily Chin attributes the method to Carol Anderson of Cottage Creations. You wil be working the button bands from the right side, from the bottom up, so you'll be marking the placement of the bottom of each buttonhole. If this was a boy's or man's ...

Make a bold and beautiful statement with just one or two designs. Arrange and rearrange, repeat and repeat to carry a design up, down, and 'round and 'round a shirt, skirt, or dress. This instructional embroidery video demonstrates placement and marking techniques. A coordinated skirt and shirt are featured during the first half, while the second half shows how to dress up a camp shirt for guys with alternating palm tree and ukelele motifs. Tune in for some smart embroidery tips!
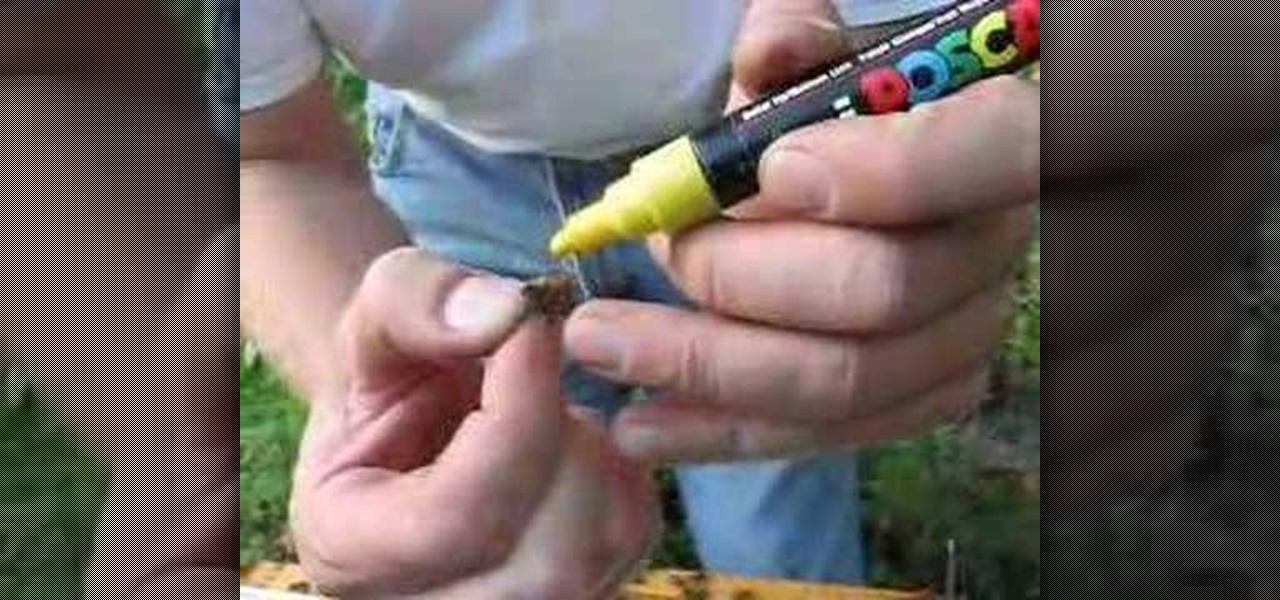
Marking a queen bee will allow the beekeeper to locate her easily by the now distinguishing spot on her back. Specialty markers can be purchased from a beekeeping supplier, but similar ink can be found more easily at a local arts and crafts store. Just make sure to let the ink dry before releasing her, otherwise her colony will clean it right off. Watch this video beekeeping tutorial and learn how to mark the queen honey bee.

This video describes the basics of marking locations in Google Earth.

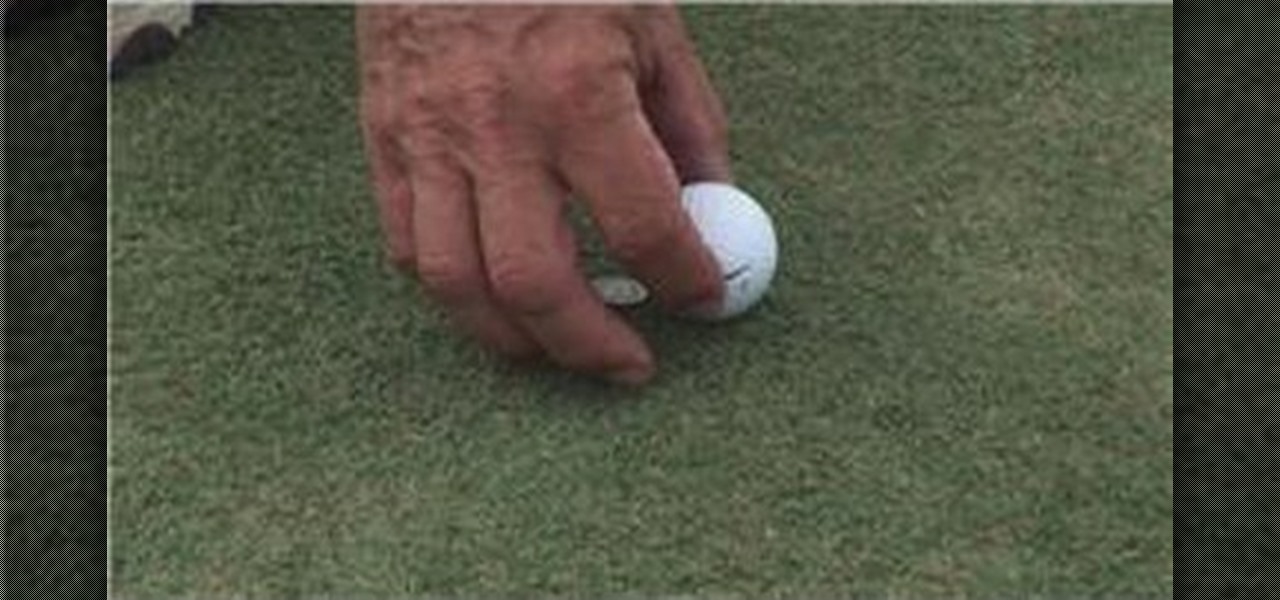
This video explains the importance of marking your ball on the putting green. If someone else is also playing golf, and theirs hits yours (and it isn't marked), its a two stroke penalty. In order to mark the ball, set a coin directly behind the ball onto the green. Then when you replace your ball, set it directly in front of the coin. It is important to always put your ball in front of the coin so you don't accidentally gain or lose advantage. When putting your marker in place, make sure to n...
G'da,y Knuckleheads, Uncle Knackers here. In this Episode, we look at marking the wall studs. Making a stud wall is pretty straight forward but you just have to know a few basics first. This stud wall framing video looks at a few basic principles that will hopefully set you up to make your first stud wall frame. Check it out!
We've been able to mark all or individual unread conversations as read in Apple's Messages app since iOS 8. Eight years later, Apple is finally letting us mark individual text and iMessage chats as unread.
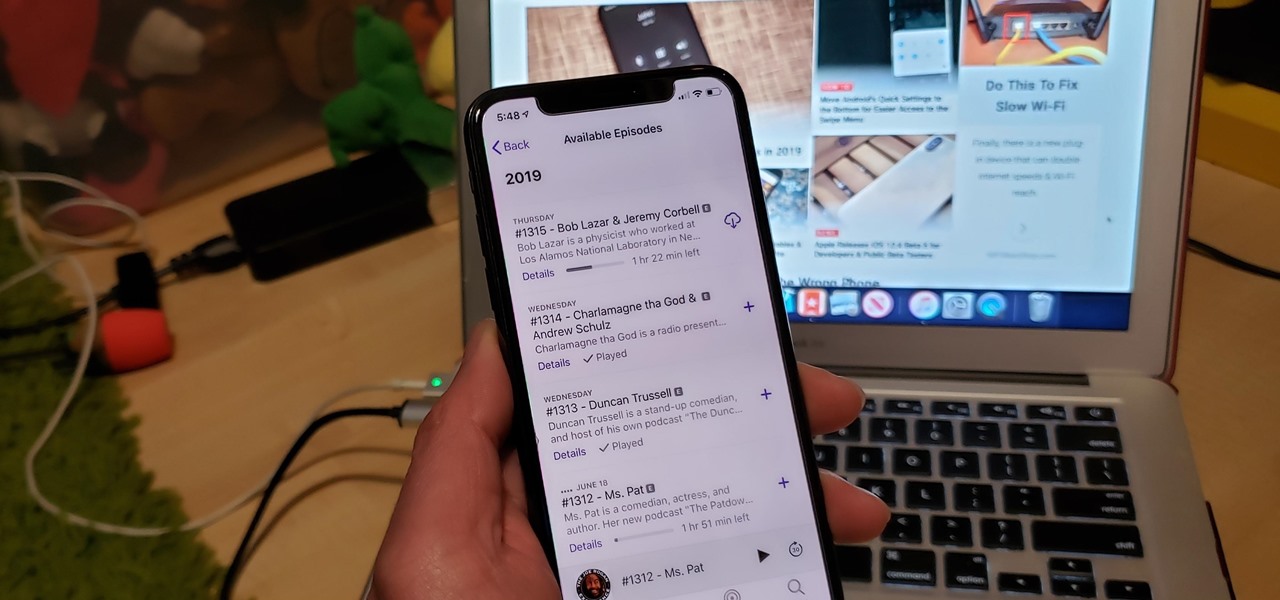
A typical hours-long podcast can cover a broad range of topics, and it's not uncommon to stop listening halfway through an episode or to skip through the parts you don't want to hear. Unfortunately, in the Apple Podcasts app, unfinished episodes remain within the app's My Episodes list and will play again automatically once you've finished a previous episode.
If you want to play Battlefield 3 like a pro, you'll want to take a look at this guide from IGN. It shows you the top 5 things you need to know while playing BF 3 multiplayer, including marking your enemy and using supply health.
Whether you're new to Adobe After Effects or a seasoned digital film professional after a general overview of CS5's most vital new features, you're sure to be well served by this official video tutorial from the folks at Adobe TV. In it, you'll learn how to turn spoken dialogue into searchable text either by synchronizing content with your Adobe Story script, or by using reference scripts that are optimized for your content. Also see how to accelerate editing by marking in and out points in t...
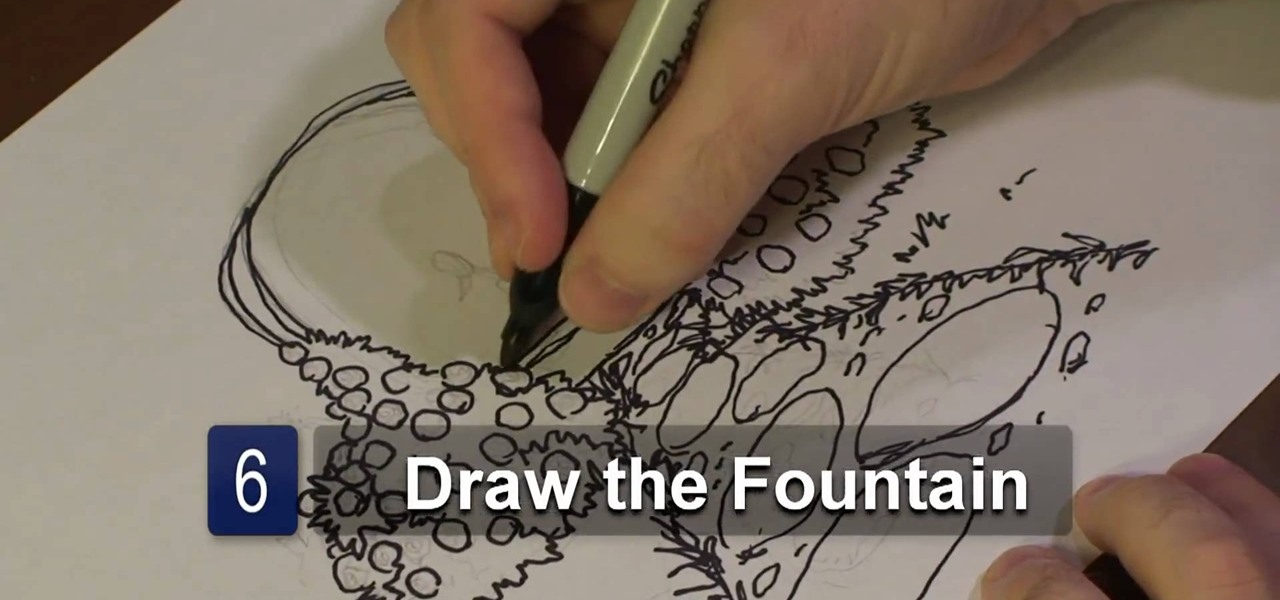
In this video tutorial, viewers learn how to draw a rose garden. Begin by marking the locations of the objects. Then draw the rose bushes around the garden pathway. Draw the lines with some cross hatching. This will give the bushes some form and feel. Add some circular boxes in the bushes to represent the roses. On the pathway, add some grass on the edges and stones on the path. In the center, draw a center piece and draw an arch over it. Finish by adding details to the roses. This video will...
Release your inner wild thing with a costume based on the classic children's book. You Will Need
Make your own armor with a weathered look out of Sintra (or expanded PVC foam). You'll need a heat gun, a padded cushion, paper towels, rub'n'buff in silver leaf, a knife, a marking pencil, water and a can of spray primer. Trace your piece onto the Sintra, then use the heat gun to shape it. Useful for costumes, Halloween or larps.
In this tutorial, we learn how to make a photo cube. This project can be done in a couple of hours and only costs a couple of dollars! To start, you will first get an exact measurement of the width of your wood. After marking these, you will cut the wood using a band saw. After the eight blocks are finished, line them up in a cube and use clear packing tape to secure them together. Use a sharp blade to trip the tape. You can then open up the cube to show six different sides and tape your phot...
This video tutorial by photoshopuniverse, is to tele-transport people in photos using Photoshop. For this you will need two photos, one with a person and another of a suitable scene. Select the image with the person and extract the person using the extract tool by marking the edges. Make sure to change the brush size so that you can mark the edges with a bit of the border to be included and a bit of the outside to be excluded. Fill in the retaining area and extract the image. Using the move t...
This video shows us how to build a garden bench out of cinder blocks. Before you get started, you need to refer to the How To sheet #320 for all your materials and make sure you have everything you need.
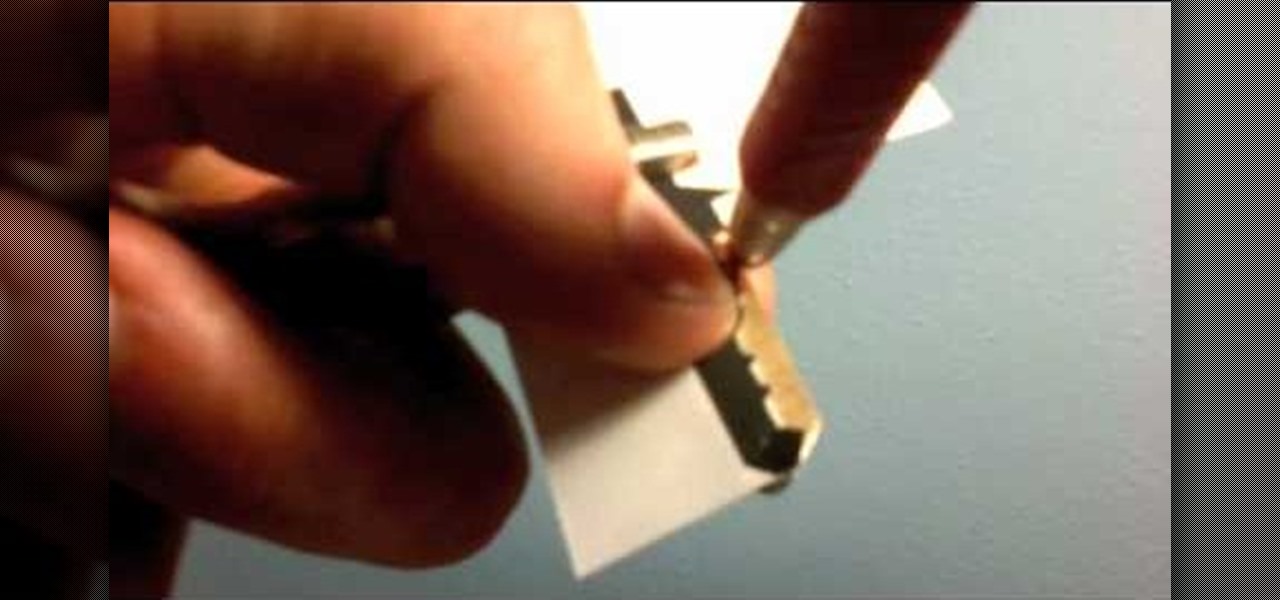
In this ten-step video tutorial, you'll learn how to quickly copy keys using a camera, printer and Dremel tool. With this ten-step process you'll learn the necessary steps to copy almost any key... even if you only have access to it for a brief period of time.
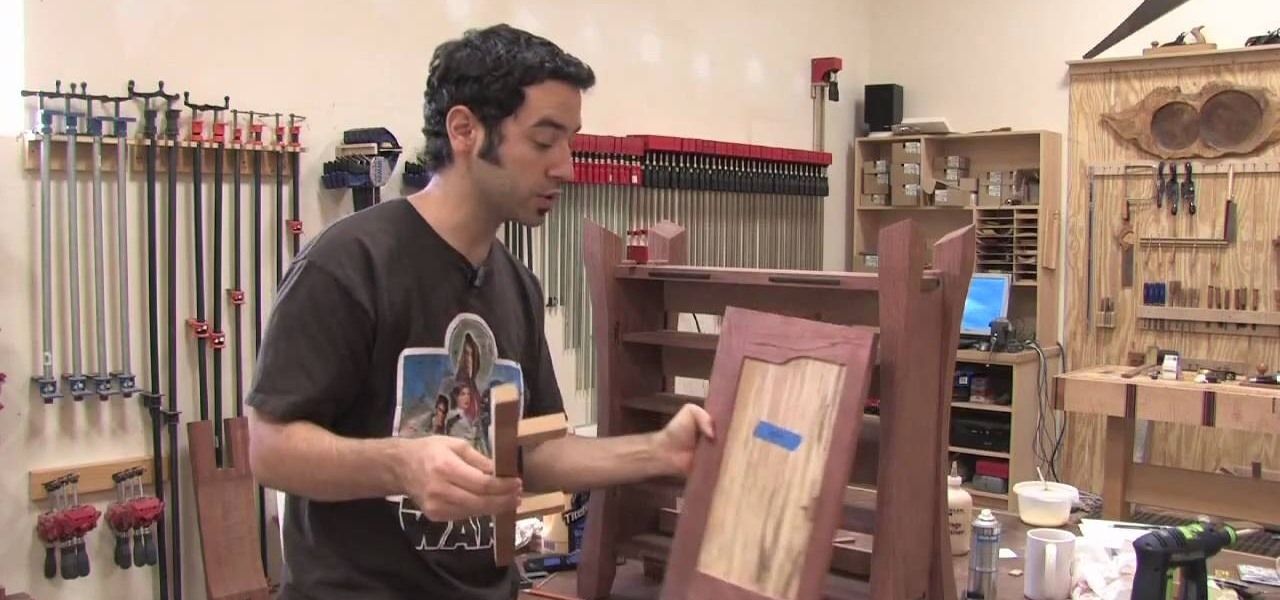
The Wood Whisperer demonstrates how we can install hinges on a cabinet without a tape measure, using relative dimensioning. In this example, we use center lines instead of marking the top and bottom of each piece that needs to line up. Using shims at the bottom and top of the door, we center the door on the cabinet to the desired spot. At this point, it's as simple as marking the center lines where you want your hinges to go on both the door and the cabinet frame. Now we can simply attach our...
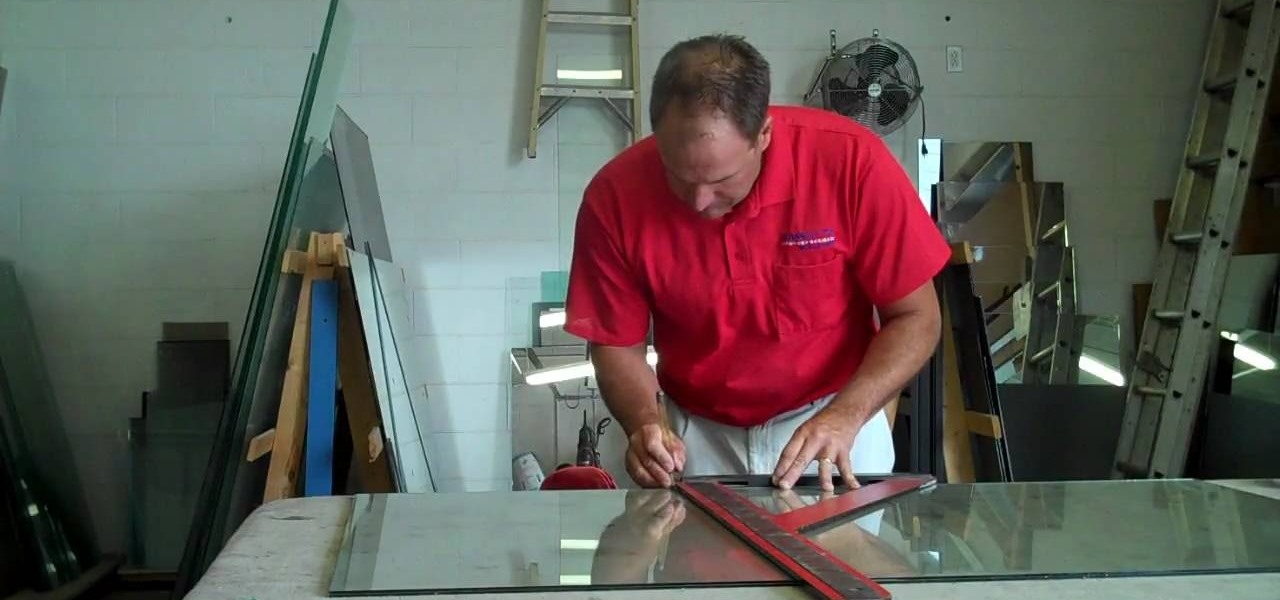
In this video tutorial, viewers learn how to cut laminated glass. Laminated glass is a safety glass that has two pieces of glass with a plastic foam in between. The materials required to cut laminated glass are: an oil glass cutter, L-square, razor blade and an optional propane torch. Begin by marking the glass to your preferred measurement. Then use the L-square to line up the marking. Then use the oil glass cutter to cut down the marked line. Flip it over do the same on the other side. Then...
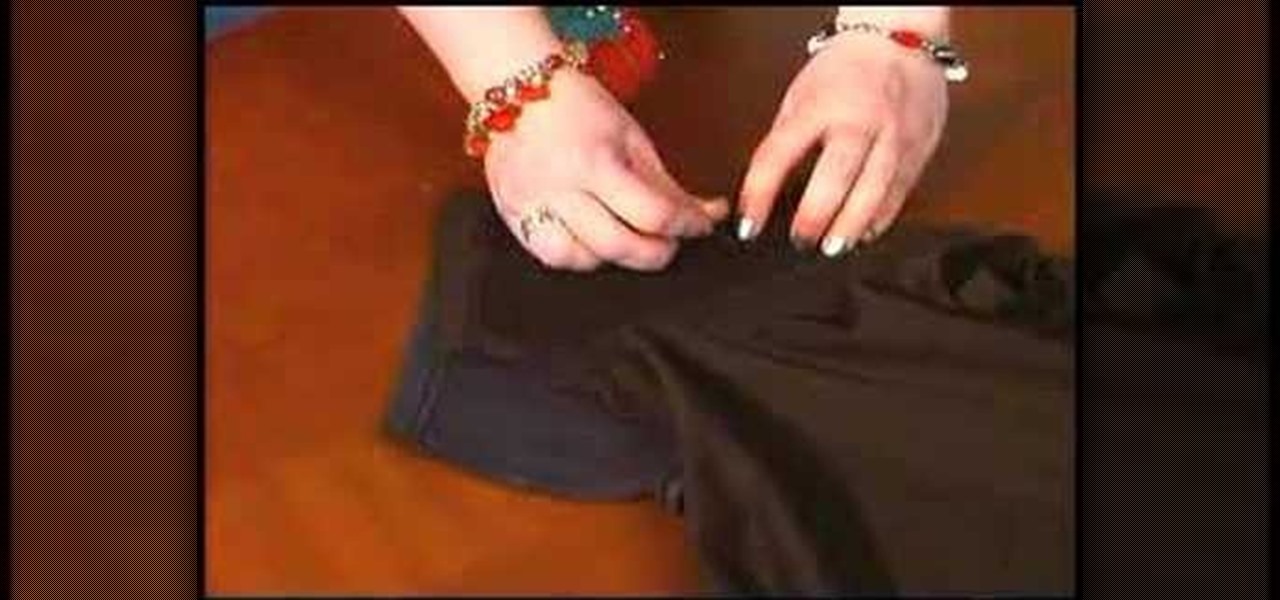
Thread Banger and their friends at Ruffeo Hearts Lil Snotty show us how to transform our old backpack into a now hip (yes, they're hip again) fanny pack in just under two hours. With a disposable backpack, pattern weights, marking chalk, a zipper, seam ripper, scissors, a buckle, some pins, a sewing machine, and a downloadable pattern courtesy of RHLS, you can make your own custom-made fanny pack in time to show off at school the next day! A definite must-try.
Basic bust drawing : Starting with the standard ball and crossed lines for the face. The artist fleshes out the chin before moving onto the eyes, giving them the general feel of the face. The nose and mouth follow suite. The tribal marking on the characters face are added next and shaded darkly.
If you've ever wondered how to resize a T-Shirt to a smaller perfect fit, then follow these simple steps presented by Stacey from Sewing Republic. To shrink down your T-Shirt, follow theses steps: You will need an oversized shirt, a smaller shirt to use as a pattern and your sewing machine. 1. Turn both shirts inside out, and lay the fitted shirt on top. 2. Fold the sleeves back and pin the shirts together. 3. Trace around the fitted shirt with a fabric marking pen. Add 1/2 inch for your seam...
After you purchase your first car in Gran Turismo 5 on the PlayStation 3, you'll unlock the National B License Tests. The first one (B-1) is a stopping challenge, and if you want to learn how to get the gold trophy, this video gives a perfect example of how to get it.
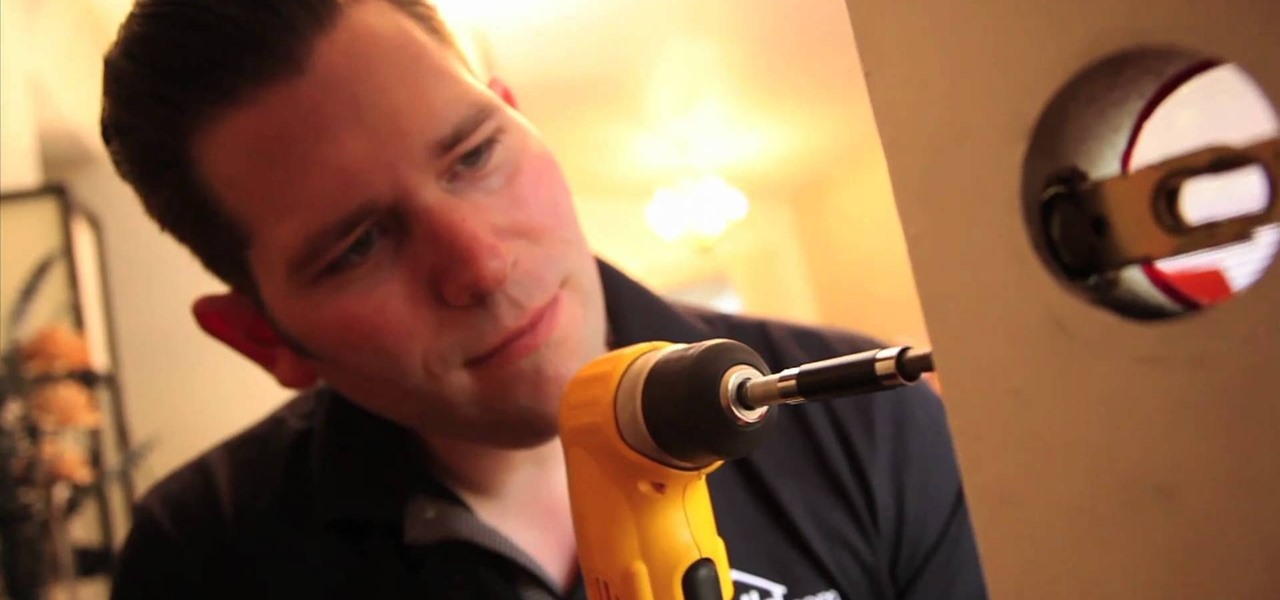
Tired of your old front entry doorknob? Get rid of it in lieu of something a little classier (and safer). A handleset is the perfect way to make your front door stand out, and this video will show you how to install one— specifically, Schlage Plymouth Handleset. You'll need a phillips head screwdriver, tape measure, battery drill, 3/8" drill bit and a Sharpie or other marking device. To see how to install the matching deadbolt, click here.
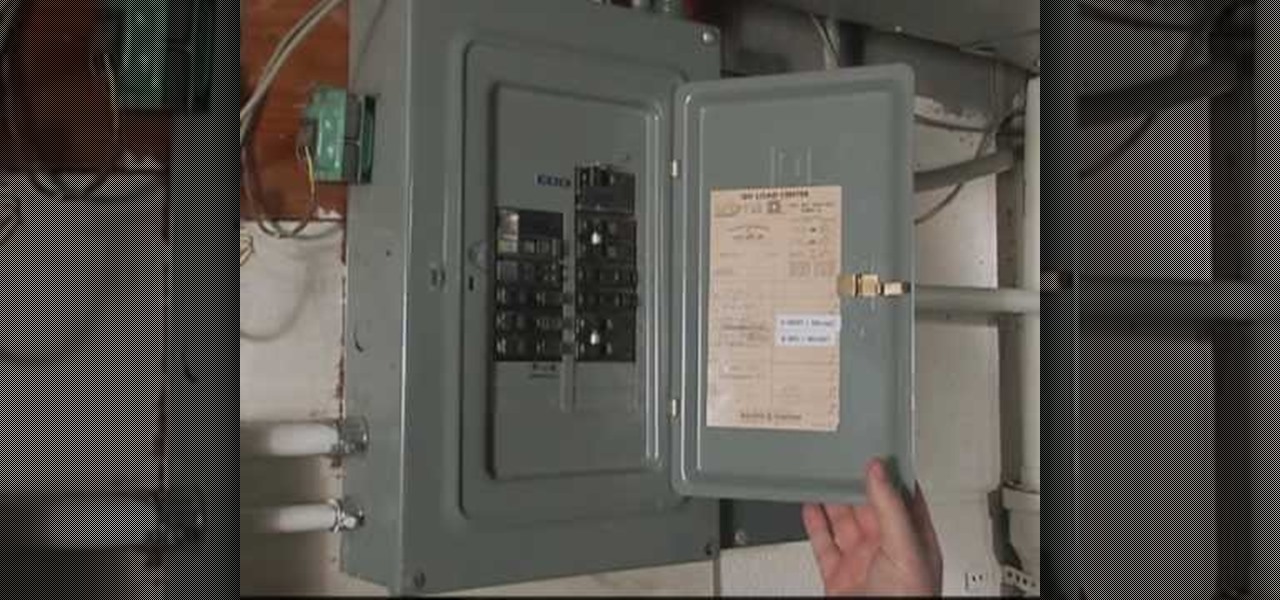
In this video tutorial, viewers learn how to replace and install a programmable thermostat. The materials required for this project are: a screwdriver, masking tape, marking pencil and batteries. Begin by turning off the power of the furnace. Then remove the face of the old thermostat and detach the labeled wires. Now remove the wall plate. Then mount the plate of the new unit and connect the wires to the corresponding codes. Finish by inserting batteries, placing the face plate on the wall p...
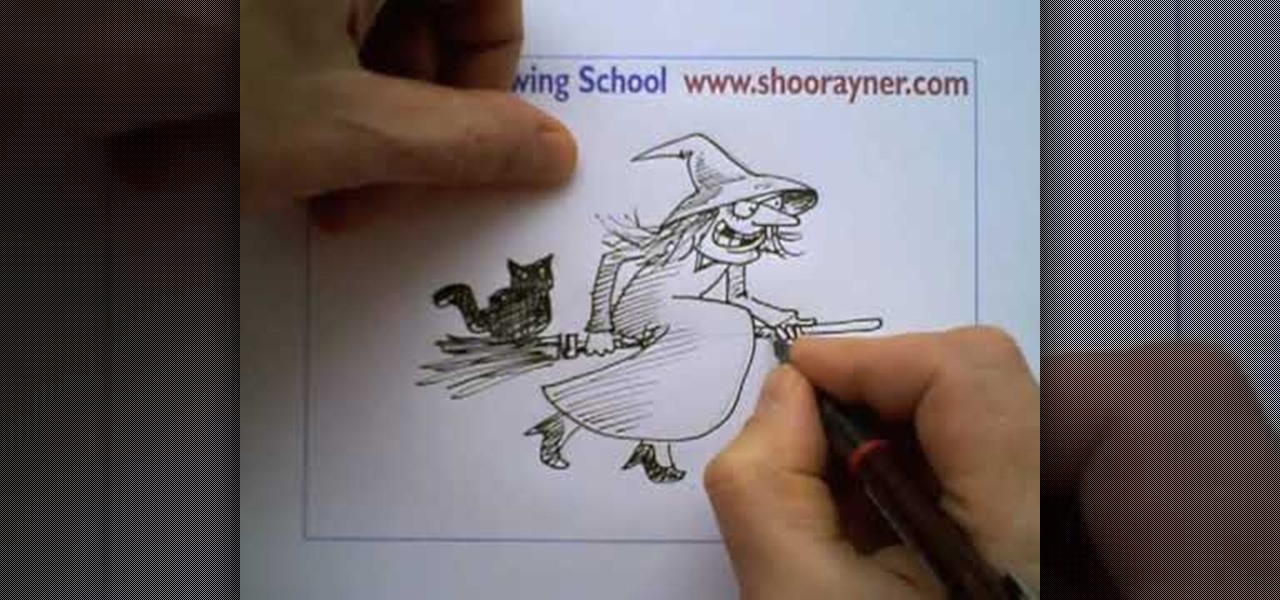
In this video, we learn how to draw a Halloween witch. There are a ton of different styles of witches you can draw, you just have to choose that one that you like best! No matter which one you choose, you will first start out by drawing the outline of the witch, using a light pencil marking. Draw the head and body, followed by the witch with the broomstick. After this, start to add in more details, such as the face and clothing. Make sure to draw in the hat and add in lines on the clothing to...
Take a square piece of paper and fold in half. Open the paper crease from the other side and mark it as previously.
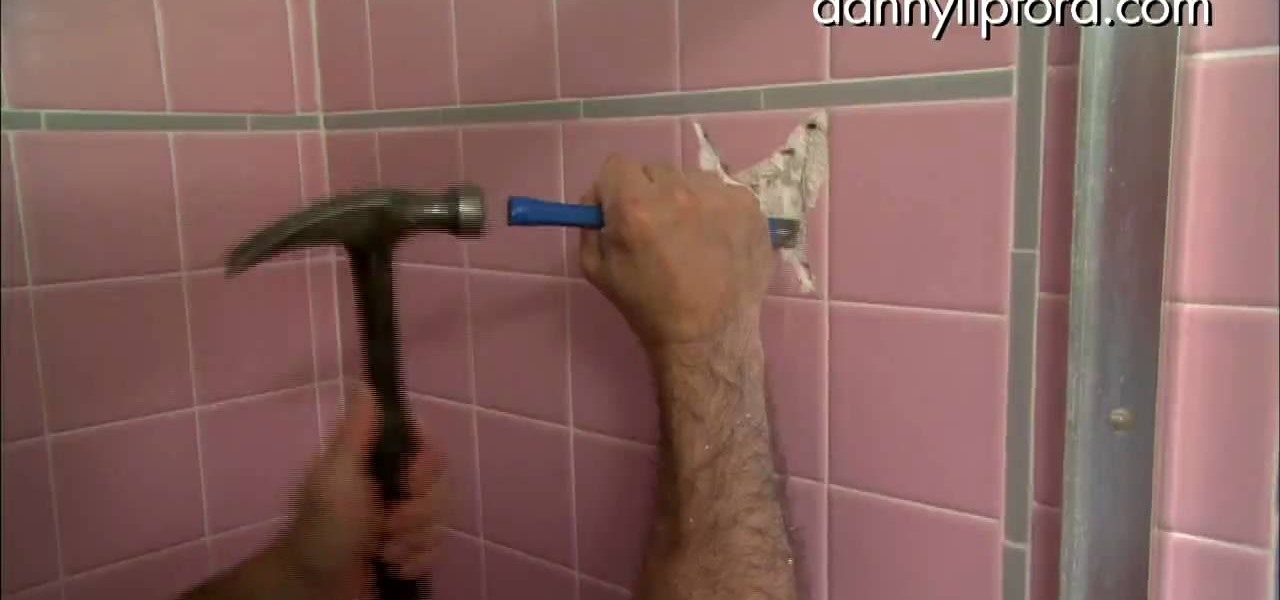
In this video tutorial, viewers learn how to remove a tile from a floor or wall. Begin by marking the tiles with a hammer and punch. These marks are used as guidelines for the drill. Create an X shape with the markings. Now use a drill to drill through the tile holes, but not through the wall. Now complete the X-shape pattern by connect the holes with a chisel and hammer. Then crack the tile into pieces and pry the pieces off the wall. This video will benefit those viewers who are doing home ...
In this video tutorial, viewers learn how to use the vanishing point filter in Adobe Photoshop. Begin by selecting the image you want with rectangular marking tool. Then hold Control and C to copy it. Now go to your 3D shape. Press on Filter and select Vanishing Point. Click on one of the corners and drag to each corner. Hold Control and drag it down to create another selection. Now paste the photo by hold Control and V. Then drag the photo to the selected shape area. This video will benefit ...
Join David Yzhaki as he makes learning piano music fundamentals fast and easy. In classical music, a measure that is in four four time (four quarter notes get the pulse) the first beat and third beat are naturally more accented than the second and fourth. Jazz, reggae, and pop music are entirely opposite because the natural accents occur on the second and fourth beat of each measure. Another type of accent is called a melodic accent. This happens when a note is accented because of its higher ...
Learn how to remove ink stains from carpet. Don’t cry over spilled ink. Get the stains out of your carpeting with this method.
March, 2047. A massive nuclear fireball explodes high in the night sky, marking the dramatic beginning to the Third Tiberium War and long-awaited return of the most groundbreaking Real-time Strategy franchise (RTS) of all time. This is Command & Conquer 3: Tiberium Wars.
It's not a real Lal Mirch cosplay costume without the goggles! This tutorial shows you how to make the goggles from one of Katekyo Hitman Reborn characters from cardboard, posterboard and some craft foam. You'll also need some glue, a marking tool, scissors, a utility knife, goggles, headphones, tape and some paint.
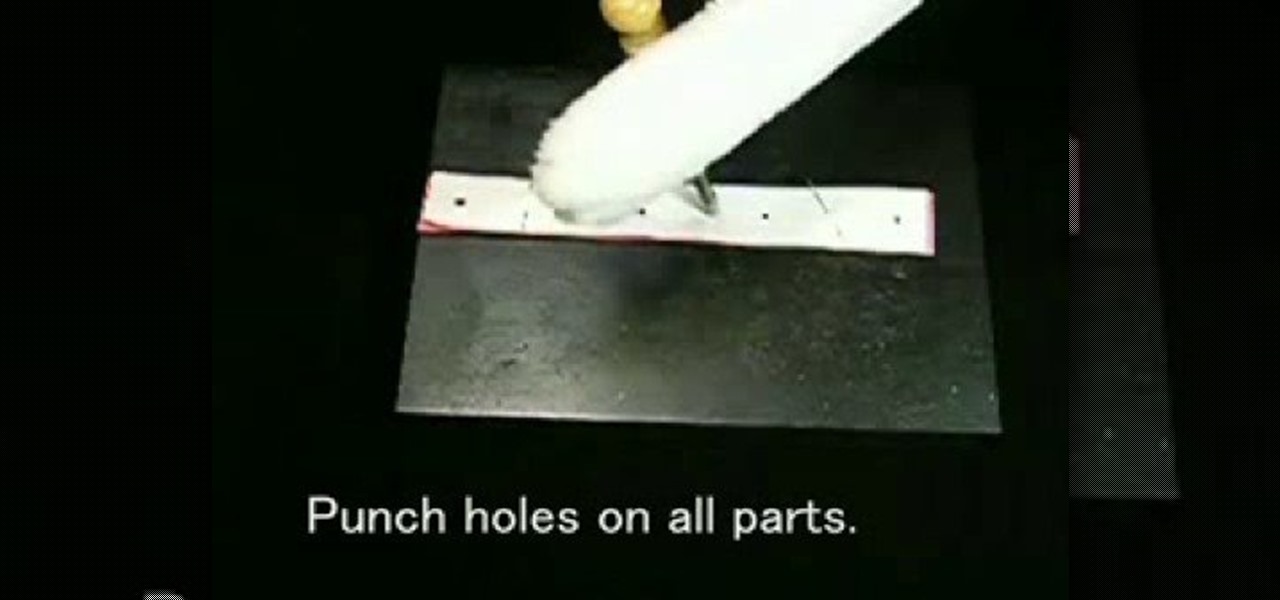
The hair scrunchie in this how-to video is so easy to make, even a cat can sew it. You will need a felt sheet of 8" x 8", an elastic string, a cutting punch, a hammer, marking pins, scissors, two big beads, and a cutting mat. Follow along with the step by step instructions in this video sewing tutorial and learn how to make a felt hair scrunchie.
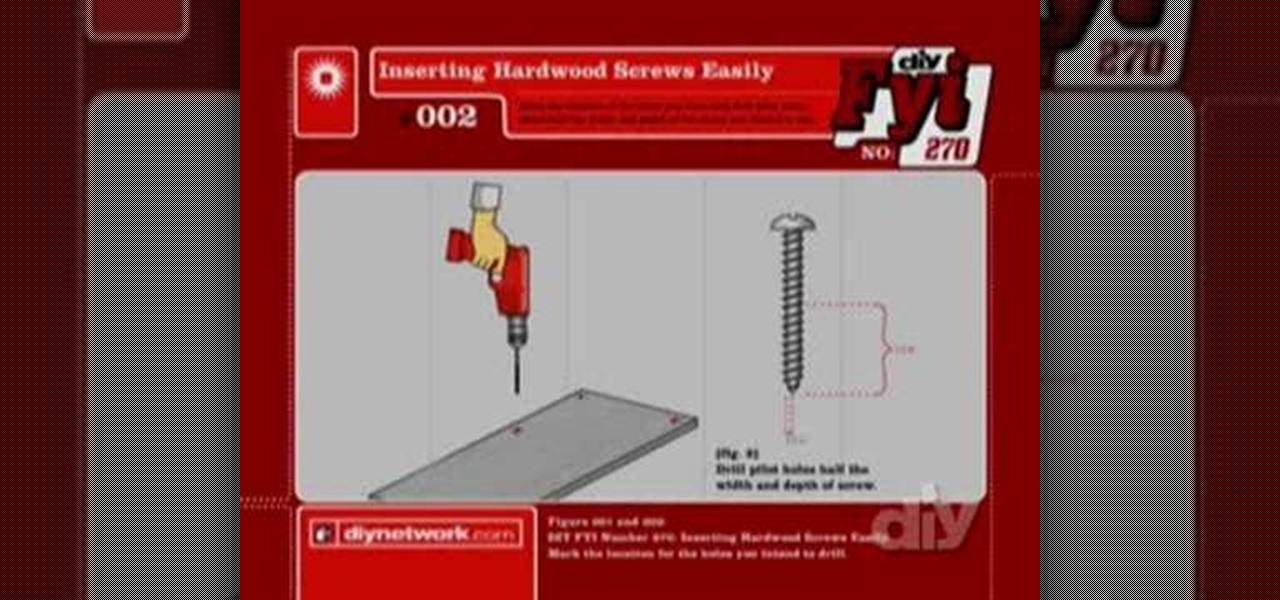
Watch this how to video to get tips and tricks on how to insert screws into hardwood. This simple soap method makes driving screws into hardwood far easier. Start my marking spot where the screw is to be inserted, draw pilot holes, run the screw across a bar of soap and finally drill it into the wood.
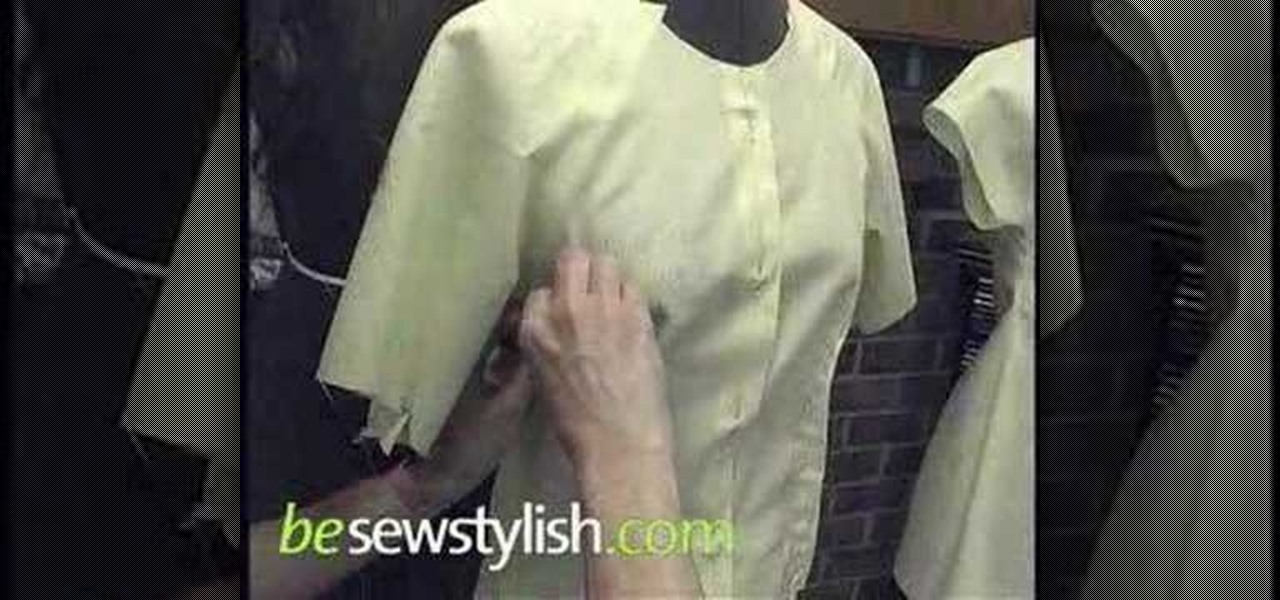
It’s called a "muslin" because a muslin material is commonly used to create this first sample of your pattern for tailoring. In this video, Sarah, a Maryland sewing instructor, fashion designer and author, demonstrates marking techniques and explains how to use a muslin to get an exact fit from any pattern. Make sure to click the RealPlayer or Quicktime link to start the video.
You will need marking pencils or chalk, scissors, seam ripper, pins and good quality matching thread. Mark desired length on each pant leg. Option 1: Stand on pants and place a pin where fabric hits the floor. Option 2: Fold pants up to desired length & pin. Take pants off; turn the leg inside out. Note original hem size after it is 1 1/4 to 1 1/2 inches. Mark pin position/finished length. Rip out original hem stitching using seam ripper or point of scissor. Find right loop to pull & it will ...
Three hundred people die every year from carbon monoxide poisoning. Don't risk being a part of that statistic.