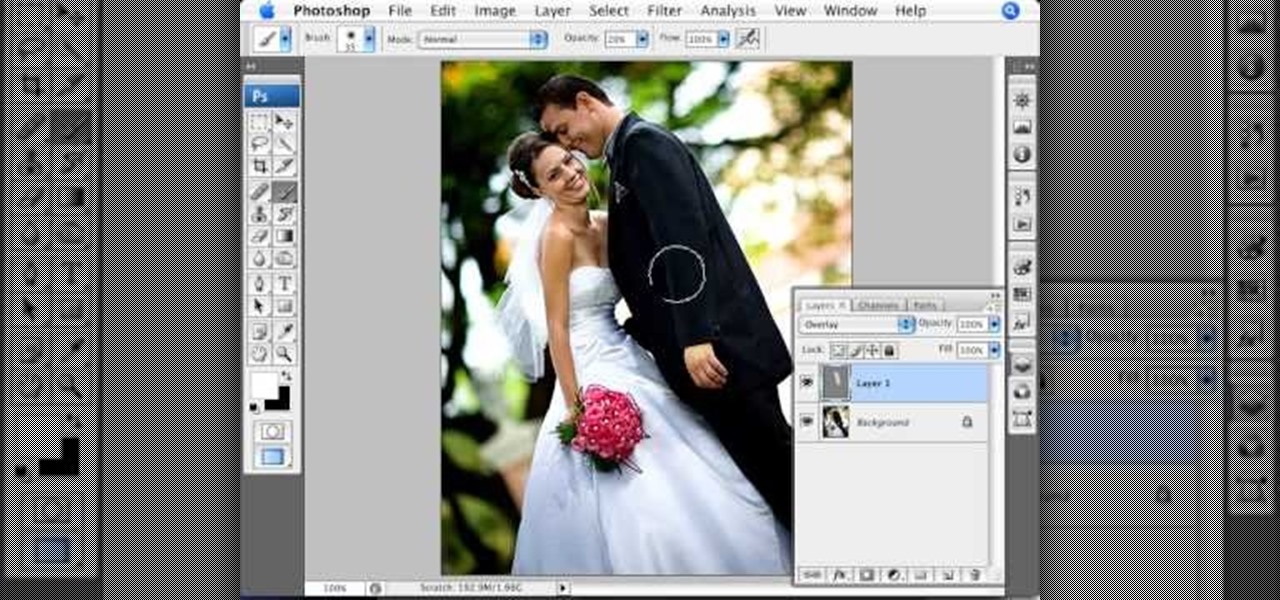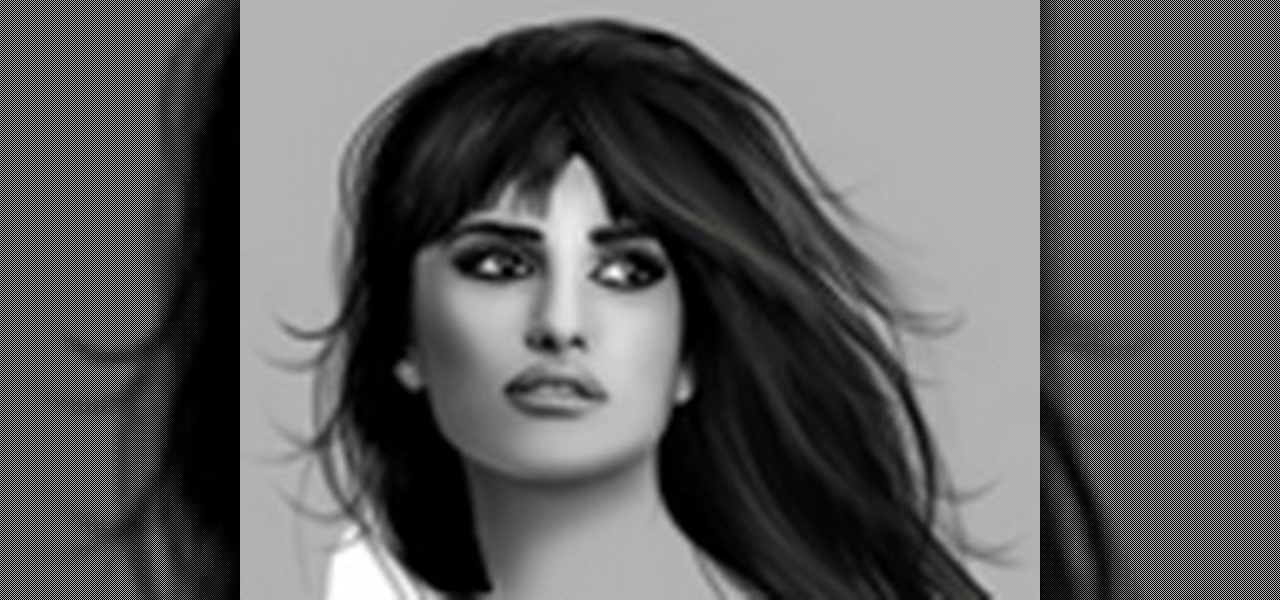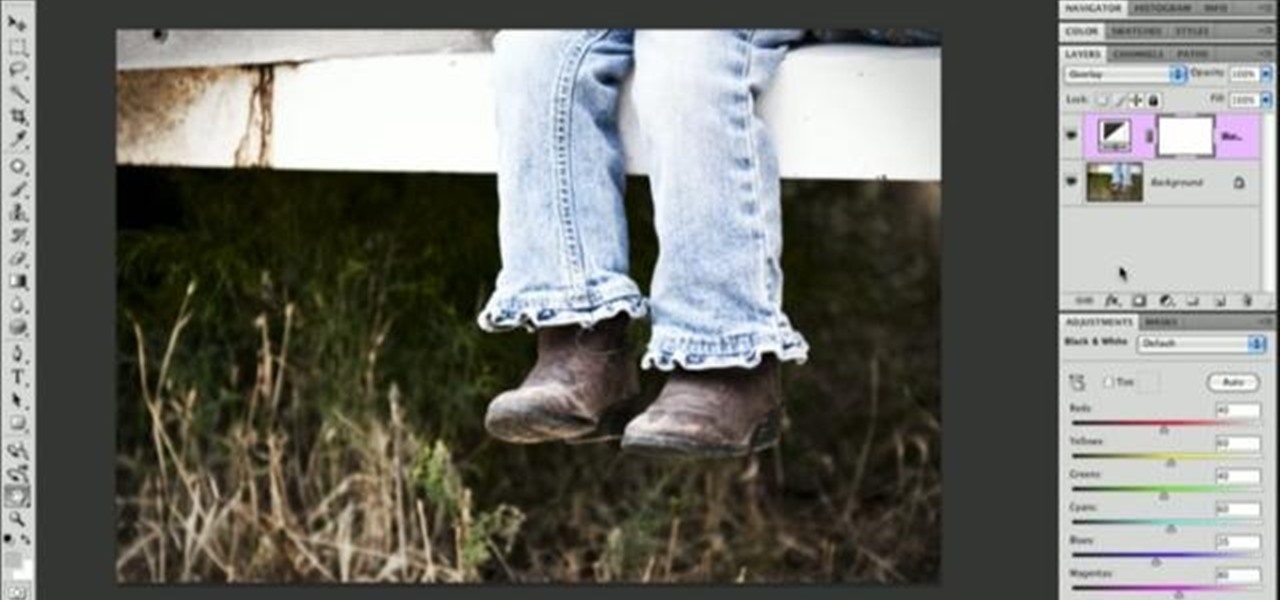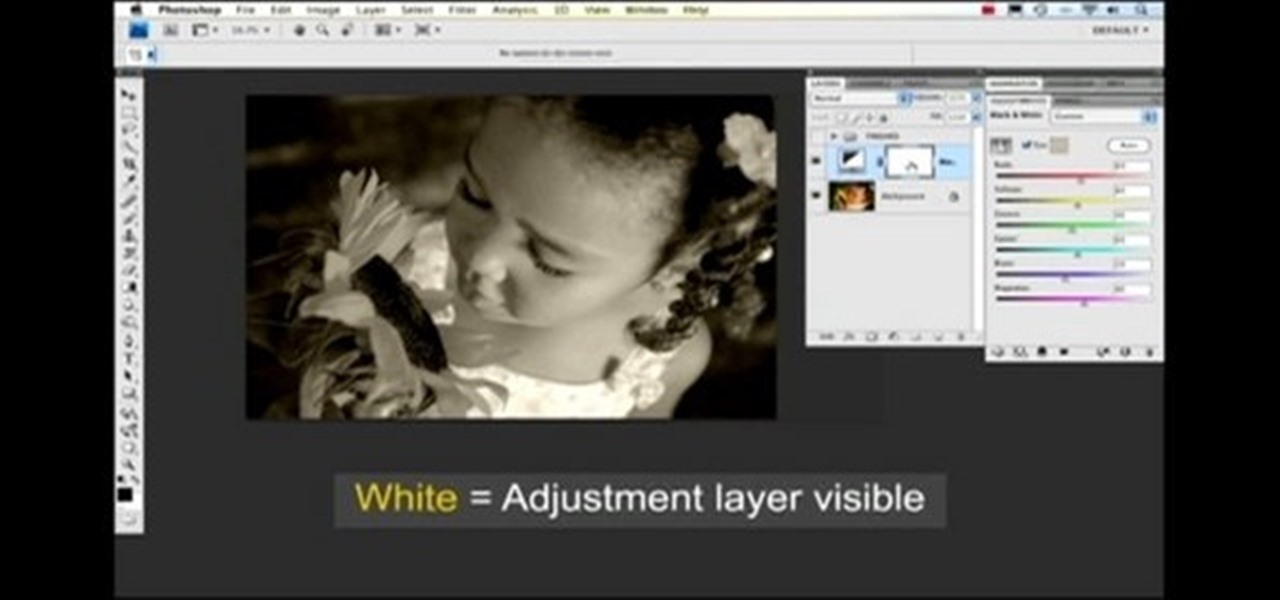
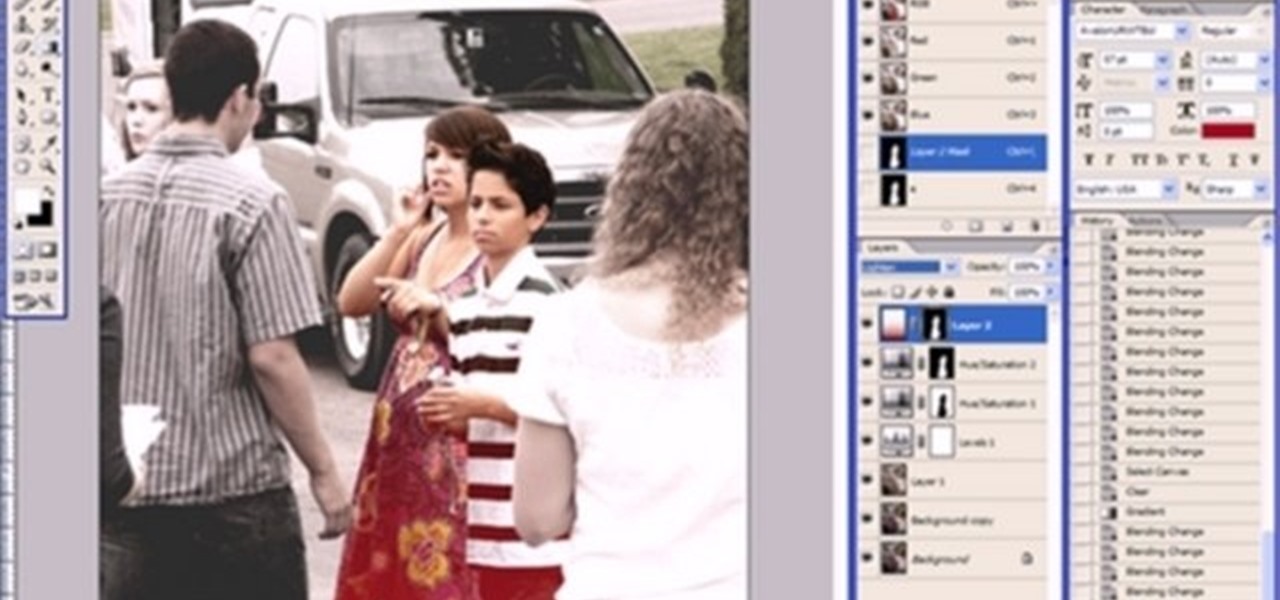
Nichole Young demonstrates how to hand color using layer masks in Photoshop CS4, which also works in Photoshop CS3. The procedure can be summarized in two stages: turning the picture you would like to edit black and white and then bringing color back into it to give it a hand-colored look. The black-and-white effect is achieved by creating a new layer over the background layer. The next step is to give the picture a warm look by adjusting the layer’s respective color balance. Then bring the c...
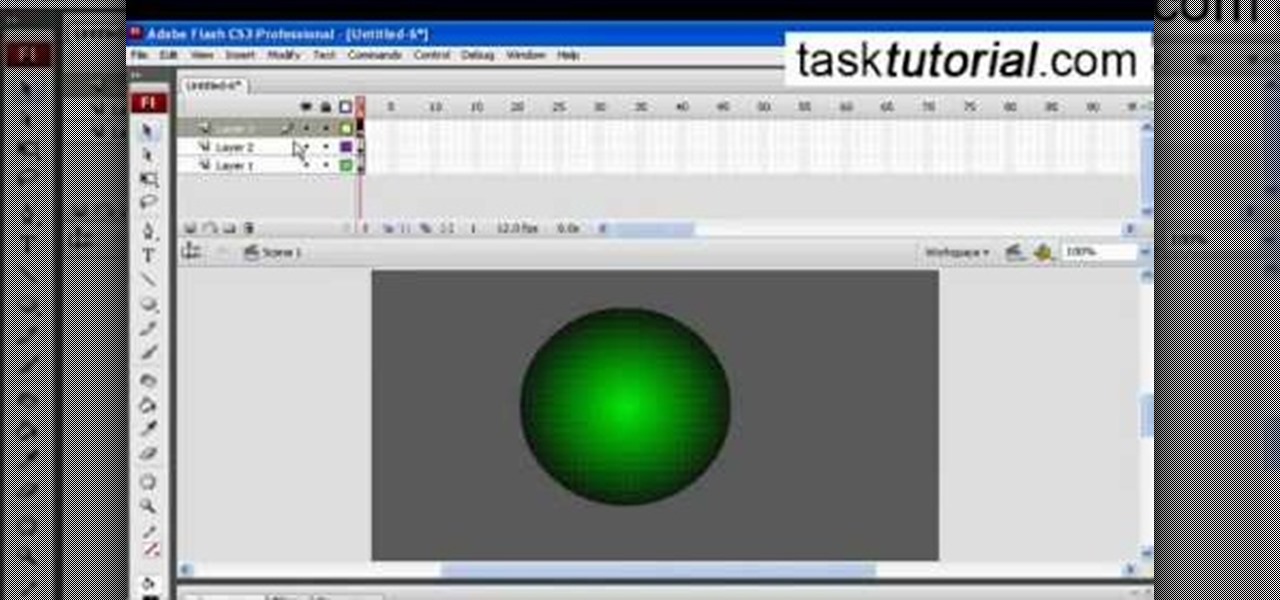
In this video tutorial the instructor shows how to create a text on a rotating sphere in Flash. To do this first create a gray background in the flash tool. Now make a new layer, select the oval tool and set the color gradient to green color and select the oval shape on the gray background. Similarly create an another sphere which will act as a mask for the text. Now create a new layer and add text to layer in white. Now move to frame 20 and make a key frame with all layers. Now drag the text...
This image editing software tutorial shows you how to separate layer styles in Photoshop CS3. Learn how to separate your layer styles from it's parenting layer in Photoshop!
This is a tutorial in Adobe Photoshop CS2 demonstrating primarily the use of the quickmask tool to make precise selections of organic shapes. Other topics covered include adjustment layers and layer masks. So watch and learn how to enhance photos using quickmasks, layer masks and adjustment layers in Photoshop CS2.
To decorate a noel cake, buy four layers of chocolate (two large sized, two small sized), two layers of spice cake (two medium sized), and a chocolate cupcake. Using a long serated knife, trim the tops of the cake to make the even. Put the one of the large chocoate cakes on your serving plater and put some frosting on top to "glue" it to the next layer. Now put the other large chocolate cake on top and gently press it into place. Frost the sides of the layer. Place a cardboard circle that is ...

This tutorial is about how to fix your nails after artificial nails have fallen off. When acrylic nails eventually come off they leave the nail uneven and soft. This video also explains what acrylic actually is and what happens to them when put under a UV lamp. The woman speaking is a nail technician and is able to give the viewer the tips and tools she will need to fix the nail problem. With the use of a nail file the nails will once again be one smooth even layer. When satisfied apply nail ...

Photoshopuniverse teaches you how to use the Dodge and Burn tools in a non destructive manner, in Adobe Photoshop. Dodge makes things lighter. Burn does the opposite. The problem is that this is destructive operation. Use the Brush tool at 20% opacity. Create a new layer with 50% grey. Change the layer's mode to Overlay. With the black color you will make things darker and with the white lighter. To view the changes, review the overlay layer. To correct a mistake on this layer, use a brush wi...
StephanieValentin teaches you how to draw a realistic ear in Adobe Photoshop. You create a new document of 1300x1900 pixels and then create 9 layers named L00, L01 and so on until L08. The first layer should be black. On Layer 01 use a soft round brush with a white color, 100 pixels width and 50% opacity. This is the base sketch of the ear. You then apply a gaussian blur of 30 pixels. For Layer 02 you use a soft round brush with a white color, 50 pixels width and 50% opacity. Apply a gaussian...
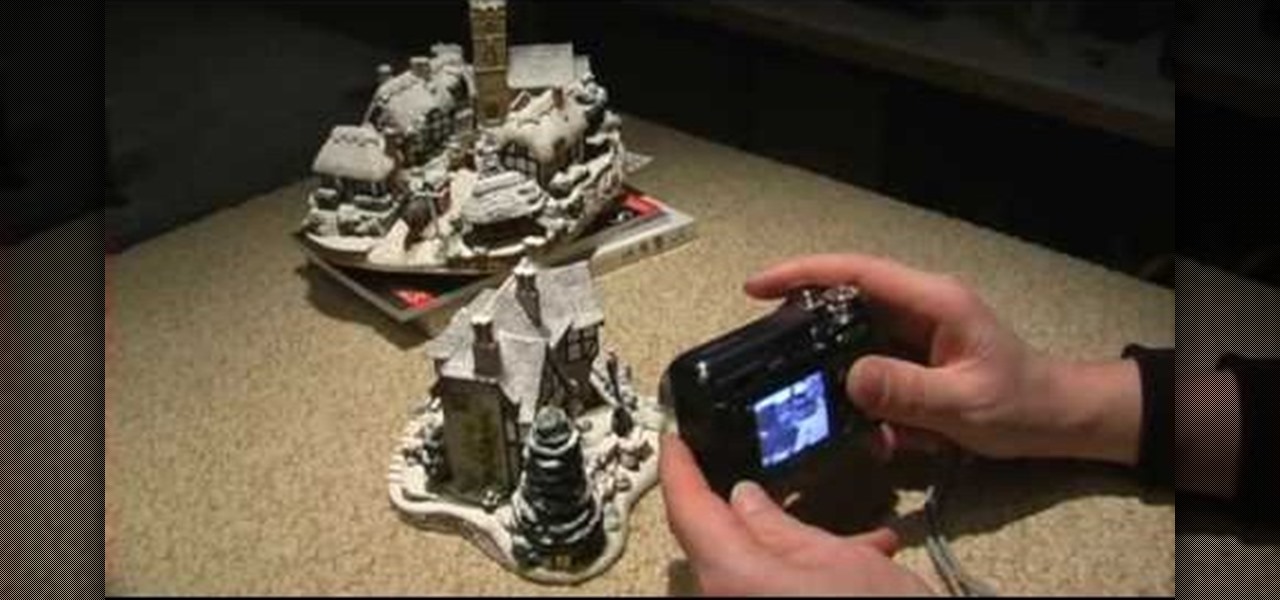
Rick Vanman reveals the secrets to professional video effects using your own computer software. Position your model houses into a setup of your liking. Take a picture of the houses with a digital camera using the macro setting. Edit your picture in Photoshop. Disguise any unwanted objects with the cloning tool. Separate the foreground and the background of the picture into 2 different layers. Film yourself in front of a green screen. Key out the green with your video editing software. Using y...
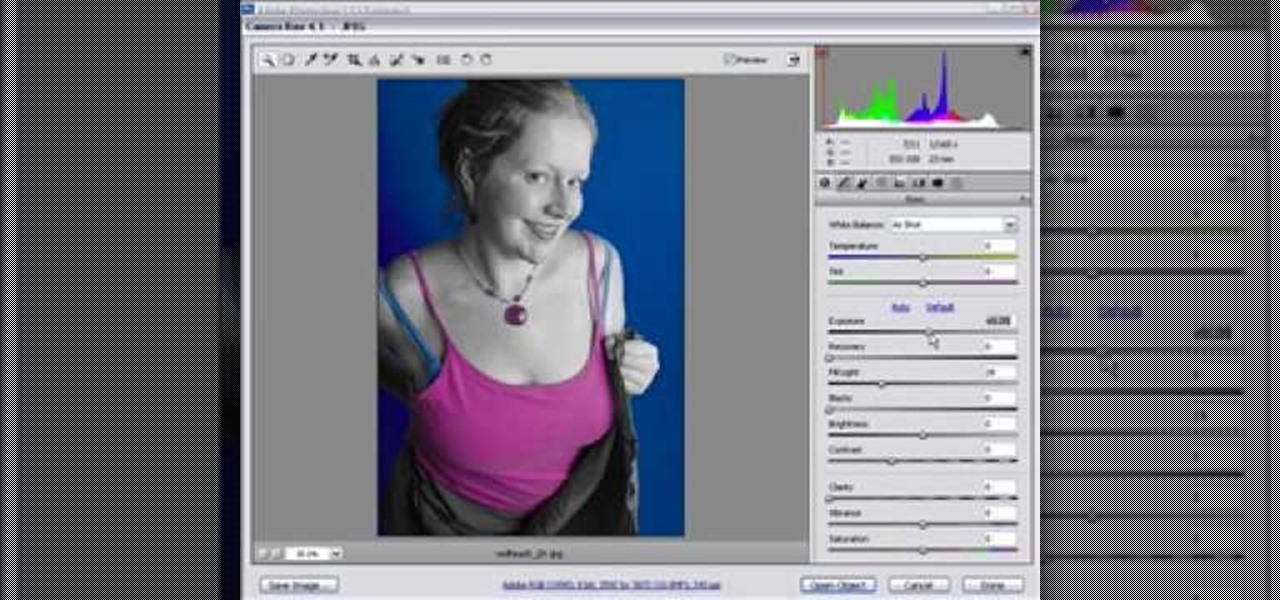
Open an image and on the layers panel add a new layer by clicking on the fifth icon below the layers panel. A new layer is created with the name 'layer 1' and your previous layer would have the name 'background'. These names can be changed by you. For now we'll leave them as they are.
In this video we learn how to make it seem like your photo is torn in half using Adobe Photoshop. The first step is to decide how you would like to have your photo "torn" up. The second step is to select the lasso tool and draw the tear line through the photo. The third step is to select the rest of the image you want to keep. The fourth step is to go into Quick Mask mode and select Filter, Brush Strokes, then Splatter. This creates the jagged edge torn effect. Finally select a smoothness bet...
This video, produced by Photoshop Universe, teaches how to reduce beard stubble or 5 o'clock shadows from male pictures. We are shown how to use the dust and scratches filter, layer mask, as well as the advanced layer style command "blend if" on the underlying layer helps us to make this possible. The first step is to duplicate the layer and then select filter, noise, and dust and scratches. The second step is to apply some dust and scratches to the beard selection. Finally we blur the layer ...
This video is about how to draw a camouflage pattern. For this project you need a paper, ruler and writing utensils. You only have to remember a few easy steps. Draw a square box. Draw out the first pattern layer. Draw out the second pattern layer. Draw out the third pattern layer. Color the first pattern layer with any color, the second pattern layer with any other color and the third pattern layer with any color except the colors you used for the first and second pattern layers.
Stephanie Valentin will show you how to draw realistic hair in Photoshop. Add a new layer of paint to shape the hair, and do it with a round brush. Create hairs all around the shape with a smudge tool. Then add a new layer and draw a line with a soft round brush and smudge tool. Repeat the last step several times drawing more hair if you want. Add a new layer and add some light with a smudge brush and a round brush. When done, adjust the layer of opacity. Again, add another layer and add ligh...
Photoshop is the perfect program to use when you want to make adjustments to photos you have taken. You can really make a sky pop in any of your pictures by using Photoshop to manipulate the color by following this tutorial.
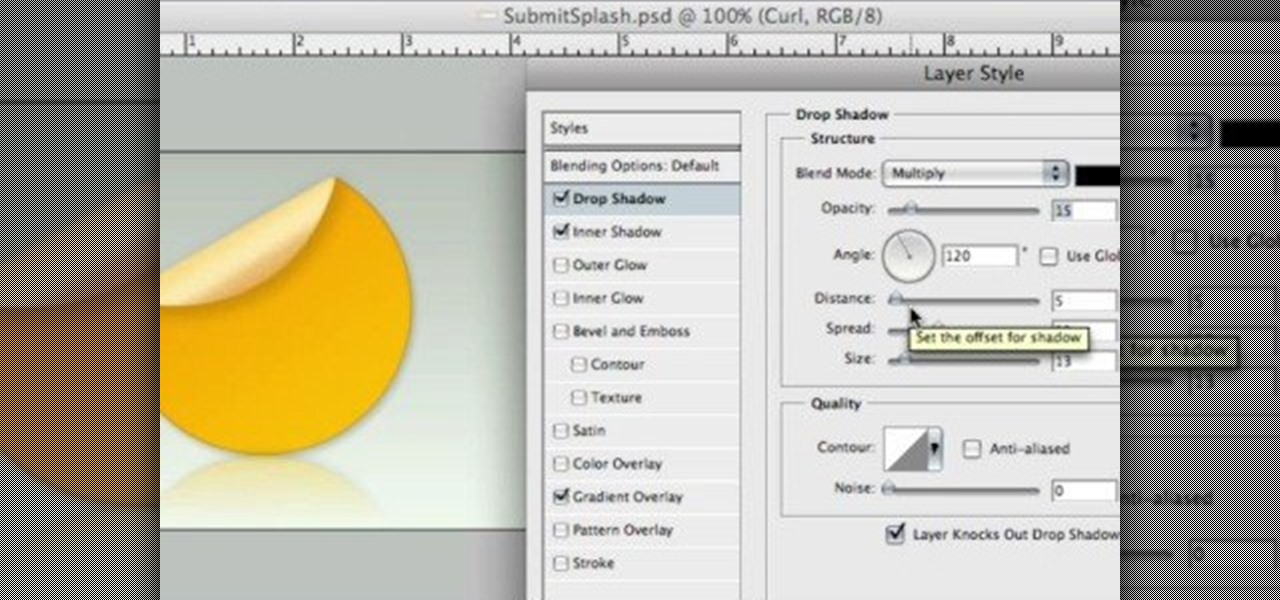
Learn to use a Layer Style, Color Overlay to create variety on a 1 layered document in Photoshop and generate a PDF slide show presentation containing 4 color variations!
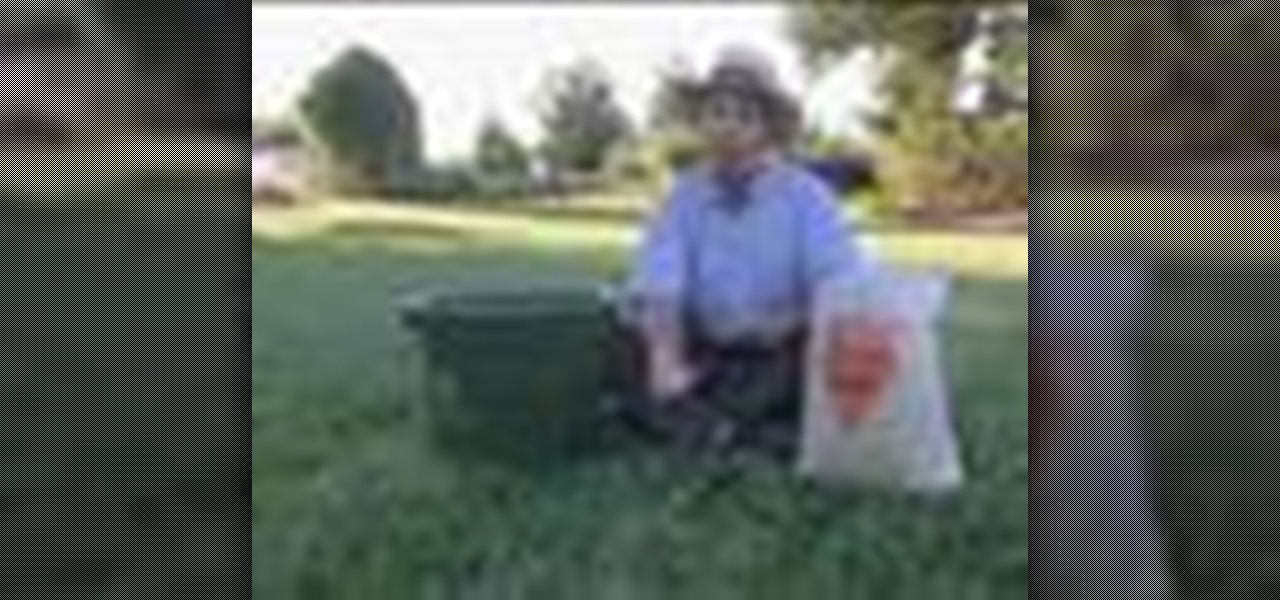
Fall is a great time to fertilize your lawn, especially cool season grasses like Bluegrass and Tall Fescue. By fertilizing in the fall you're building up the root system but because it's cool the top won't grow as well so you won't need to mow as much. Before spreading your fertilizer you want to top dress with compost. Compost is a great additive for the lawn, especially if you sprinkle a quarter to a half inch layer on top of the lawn. It will work its way down and when down there will feed...
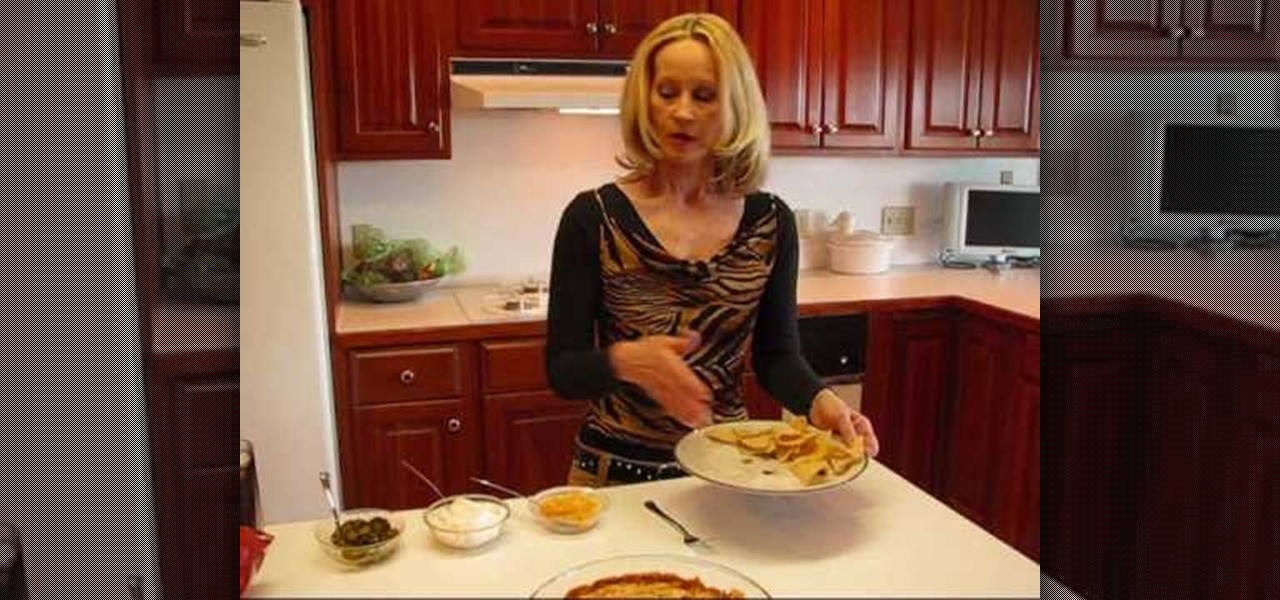
Nachos are a great snack food but did you ever think you could eat them for dinner? Well, in this tutorial, Betty shows us how to make her chili cheese nacho casserole, and it is so tasty you may never eat 'normal' nachos again! This is a great way to get rid of that stale old bag of Tostitos in your pantry and turn it into something fantastic. Ready? Vamenos!
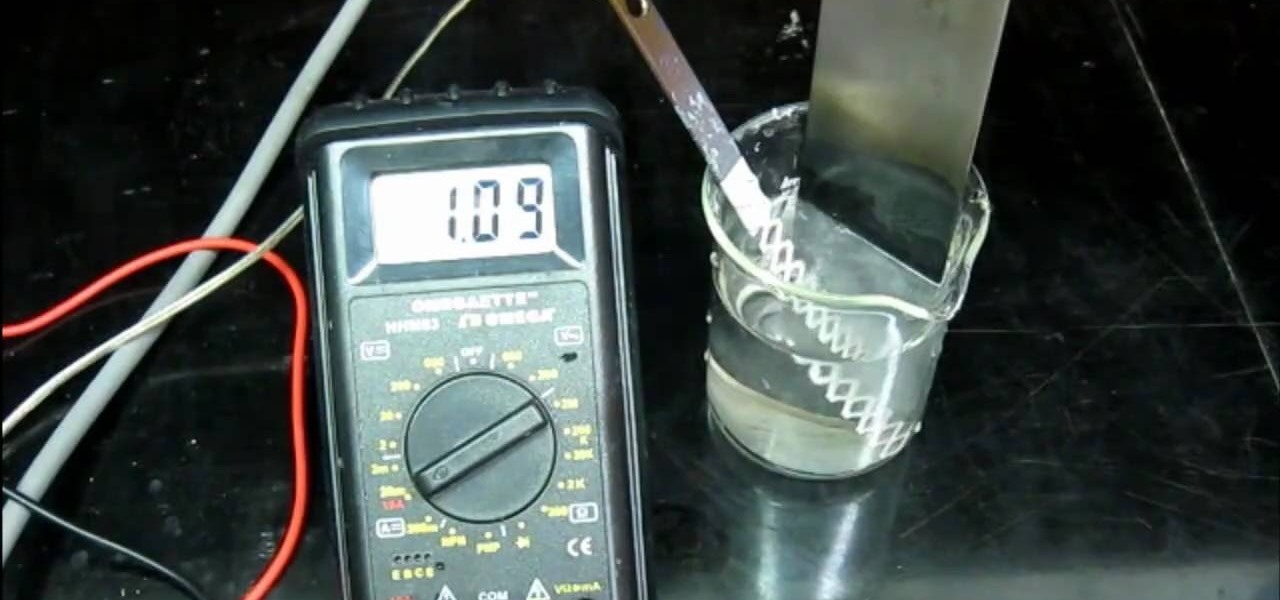
Various electrochemical reactions requires that anodes do not degrade when used. Carbon is cheap, but degrades easily and platinum is extremely expensive. In a previous video, you learned "How to make cobalt and manganese nitrates", and you saw that titanium could be used as a cathode, but not as an anode due to an effect called passivation.
Let TutVid teach you how to make metallic text is Adobe Illustrator CS3. This video shows you how to do it step by step. You only need basic knowledge of Adobe Illustrator CS3 to do this.
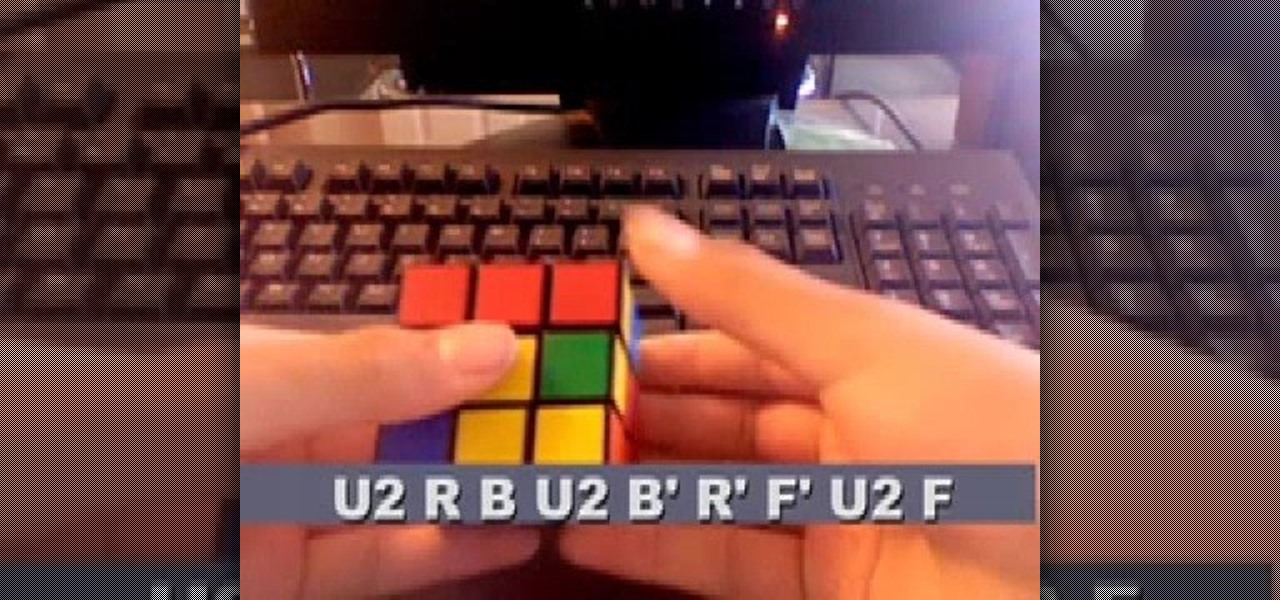
This video tutorial is for beginner puzzlers who are getting more advanced in their speedsolving of the Rubik's Cube. When solving the Rubiks Cube, there are these mathematical equations called algorithms, which I'm sure you already know. With an endless supply of them out there for this puzzle, how can you possibly remember them all? By watching videos, that's how. This one will help teach you how to use the ZBF2L algorithms to solve the Rubik's Cube. What is the ZBF2L? It's the ZB Method of...
It's very easy to get your hands on a good cake. These days, a store-bought cake or even one made from boxed cake mix will usually be pretty good. Heck, make the first simple recipe you find on the internet, and it's likely to taste fine.
Here is a quick tutorial on showing and hiding different layers when you're using the picture editing program Adobe Photoshop. Or, focus only on one specific layer so you can work on that one and nothing else. This tutorial shows you several other good tips when using Photoshop layers.
In this tutorial, we learn how to create a warm grunge background in Photoshop. First, create a large circle on a burnt orange background in Photoshop. Now, go to layer, adjustment layer, then levels. Hit "ok" then the level's adjustment layer will be masked. Now, go grab the bottom black slider and brighten up the middle. Use the overlay to create a center glow. Next, bring in texture using a brushed metal texture from this photo. Now, even the image out by going to image, then image rotatio...
Layer masks create a viewing window to the layer(s) behind it. Manipulating the mask can create certain effects or animation without editing the object or layer directly.
In this how to video, you will learn how create glowing eyes in the darkness using Photoshop. First, open your image in Photoshop. Next, duplicate the background layer. Go to hue and saturation and make the image really dark by turning down the lightness and saturation. Next, select a paintbrush for the eraser and start erasing around the eyes. Once this is done, make a selection around the pupils. Create a new layer and paint the selection red. Next, lower the flow of the paint brush and cho...
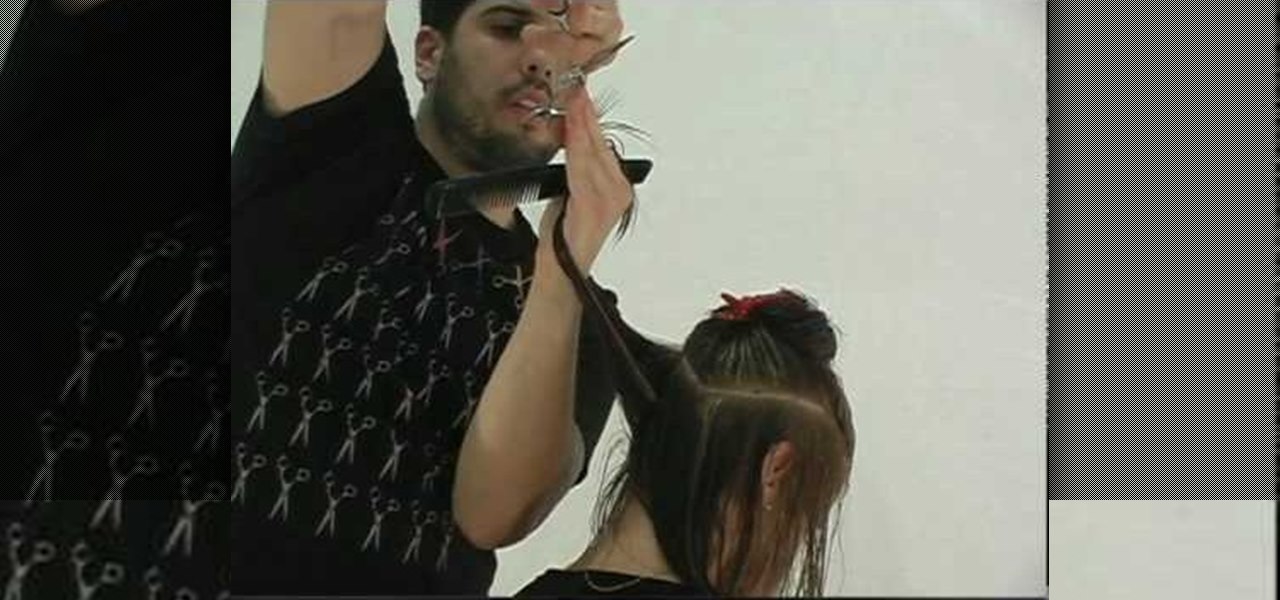
This video illustrate how to do long layered hair cut step by step. Here are the following steps:Step 1: First of all clean your hair and then take all your hair and hold them through a clip.Step 2: Now release a inch of your hair from the lower bottom and cut it.step 3: Now release the upper inch layer and cut it slightly above the lower most layer.Step 4: Similarly take the next layers and cut them so that each layer has sharp cutting and is differentiated easily.Step 5: Release hair on the...
In order to add a nice contrast punch to an image using Photoshop, go to your adjustment layer and click on the black and white adjustment layer. Then go to your "blend modes" and change it to "overlay". If you find that the effect is too harsh you can adjust your opacity settings or you can switch your blend mode to "soft lights". In "overlay" using the black and white adjustment panel you can change your settings to meet your preference. If you are using a previous version of Photoshop that...
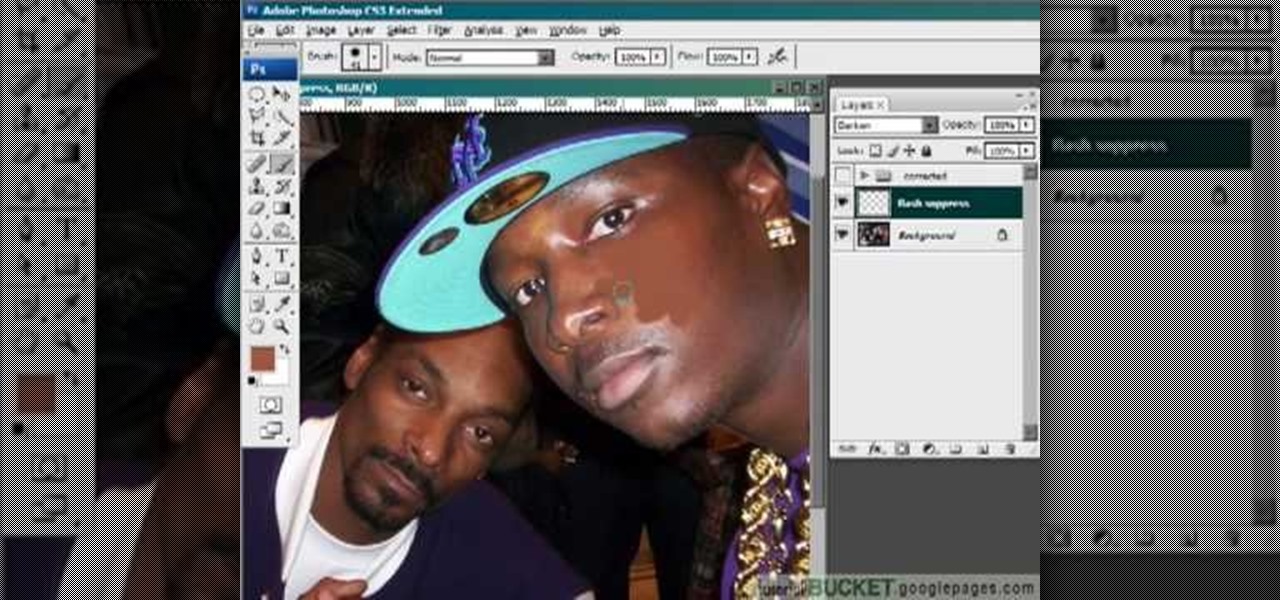
This video gives detailed instructions for removing a hotspot or flash reflection in a photo by using layers and masks. Start by adding a new blank layer and naming it something like Flash Suppress. You will use a special blending mode for this layer called darken. With your paintbrush you will loosely paint out the hotspot, having selected the color tone that you need with the eyedropper tool. Later on you can use layer masks to clean this up. Adjust the opacity of the layer until you have t...
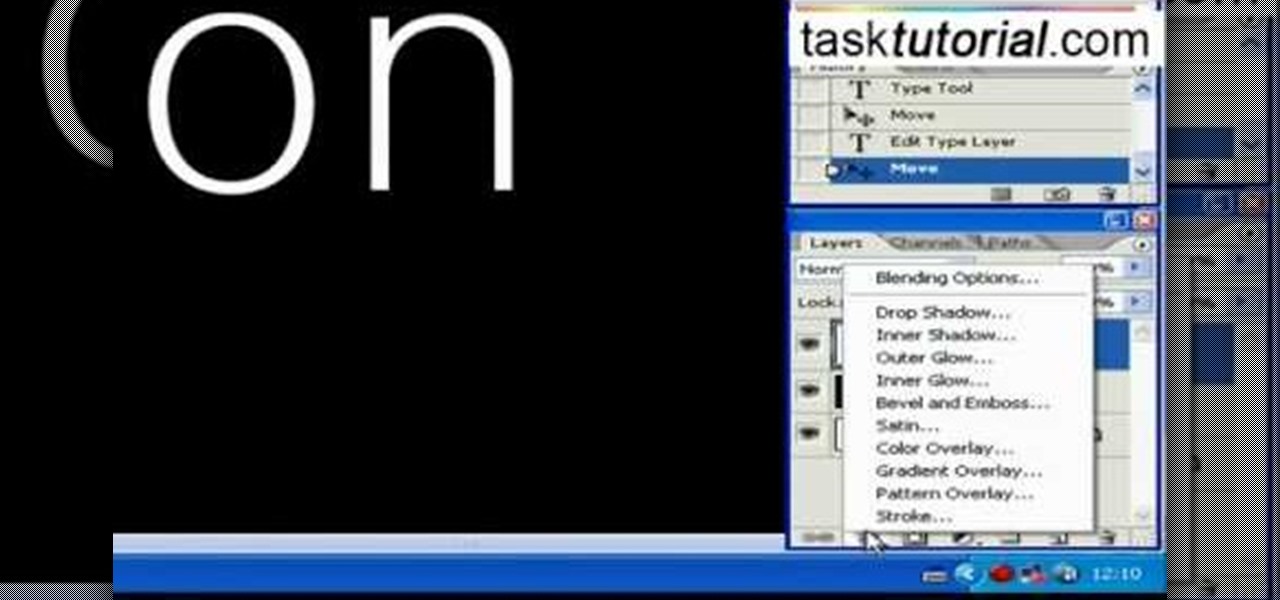
Open a document and change the background to black. Make sure the foreground color is white, now simple use the text tool and write whatever you need to.
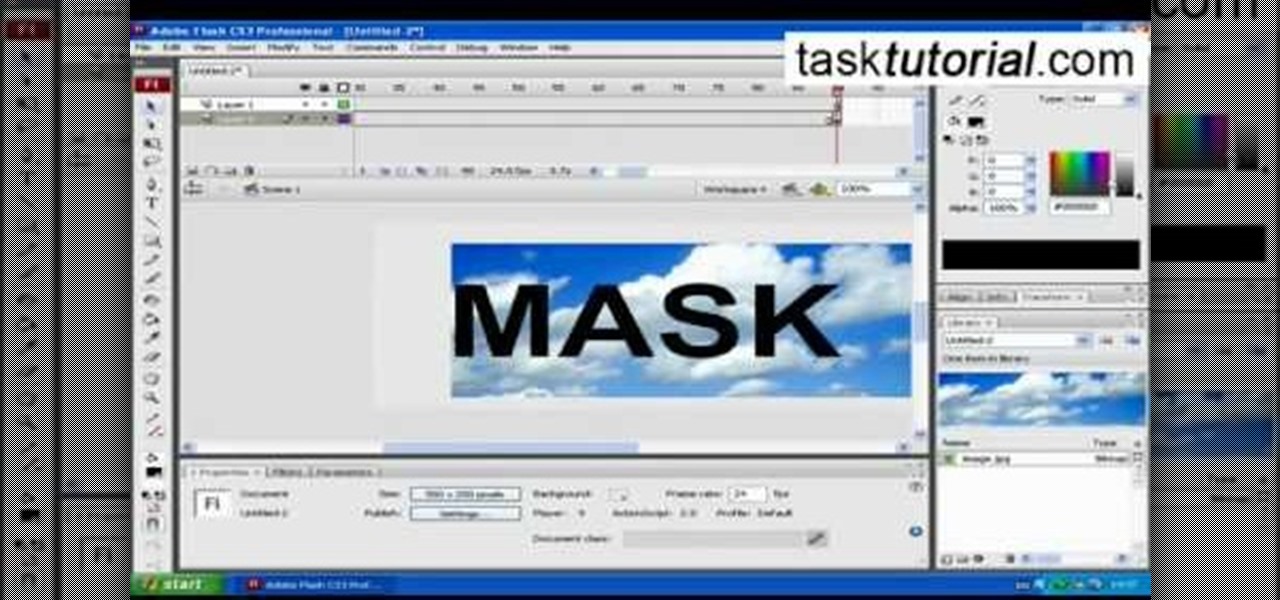
clipping mask Sponsored by SimpleRetouch.com Start by creating a task with the name Mask, then Choose a color and a font size.
Learn how to make a papier mâché mask. Make a papier-mache mask for Halloween, a masquerade party, Carnival time, or anytime!
Learn how to use layers when working in After Effects CS5. Whether you're new to Adobe's popular motion graphics and compositing software or a seasoned video professional just looking to better acquaint yourself with CS5's new features, you're sure to be well served by this video tutorial. For more information, and to get started using layers in your own AE projects, watch this free video guide.
An asphalt driveway looks good when new but over time, wear and tear will show. This video by Lowes.com shows you how to clean, repair and reseal your driveway to maintain it and make it last. Before starting the job, check the weather for a few dry days. Tools and materials needed are listed highlighting safety equipment to be used and precautions to be taken. Weeds, stains and dirt are removed and a low pressure is used to rinse the driveway clean. Crack sealant is used to repair smaller cr...
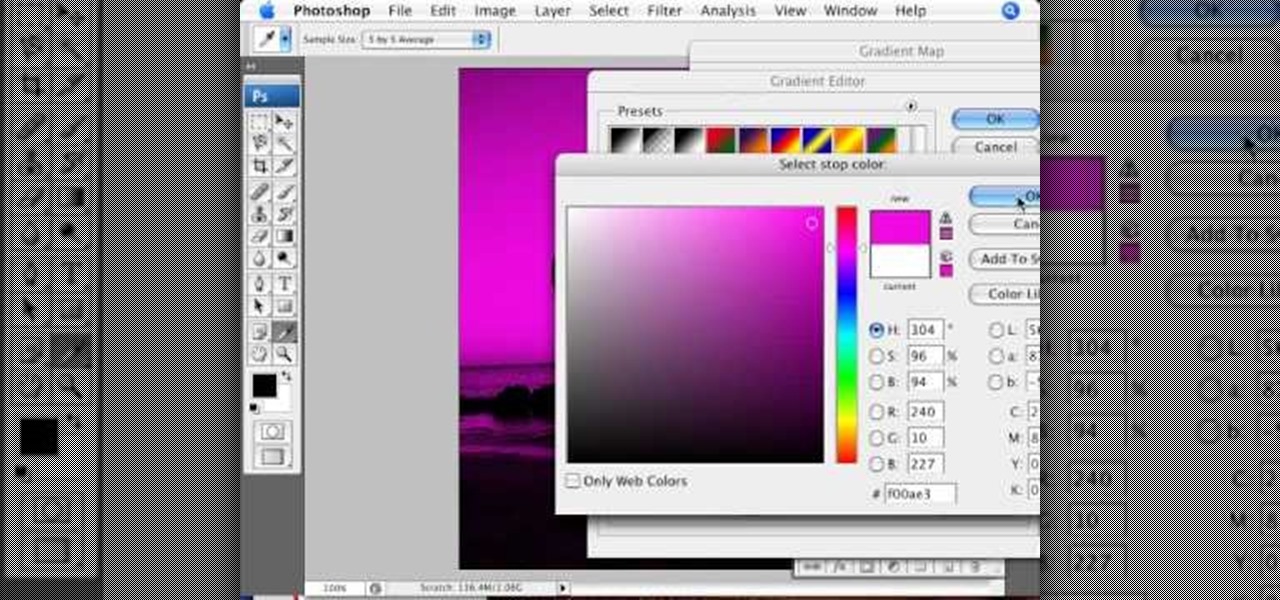
In this video tutorial brought to you by photoshopuniverse, you will learn how to apply mood lighting to images in Photoshop. This is achieved by applying an adjustment layer, called a gradient map, which allows you to adjust the color of the light in an image. You will learn how to access the gradient map from the adjustment layers menu, how to apply the gradient map, then overlay the new layer and fine tune the gradient to create more dramatic looking images.
Pixel Perfect is the "perfect" show to help you with your Photoshop skills. Be amazed and learn as master digital artist Bert Monroy takes a stylus and a digital pad and treats it as Monet and Picasso do with oil and canvas. Learn the tips and tricks you need to whip those digital pictures into shape with Adobe Photoshop and Illustrator. In this episode, Ben shows you how to build a sign in Photoshop with 3D lightbulbs.
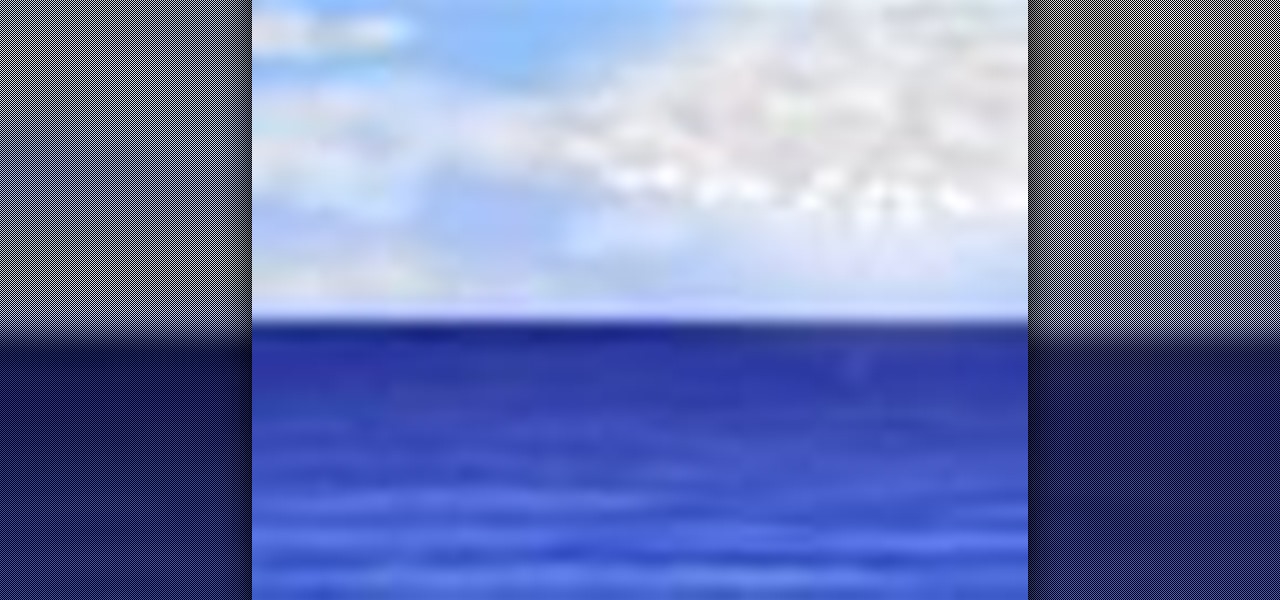
Pixel Perfect is the "perfect" show to help you with your Photoshop skills. Be amazed and learn as master digital artist Bert Monroy takes a stylus and a digital pad and treats it as Monet and Picasso do with oil and canvas. Learn the tips and tricks you need to whip those digital pictures into shape with Adobe Photoshop and Illustrator. In this episode, Ben shows you how to create cloud over a sea in Photoshop.
For this Final Cut Studio video tutorial, Zach King will teach you how to use layers in Motion. If you want to cover the basics of layers in the Motion 3 program, this is perfect video to help you out. Let the Final Cut King show you how!
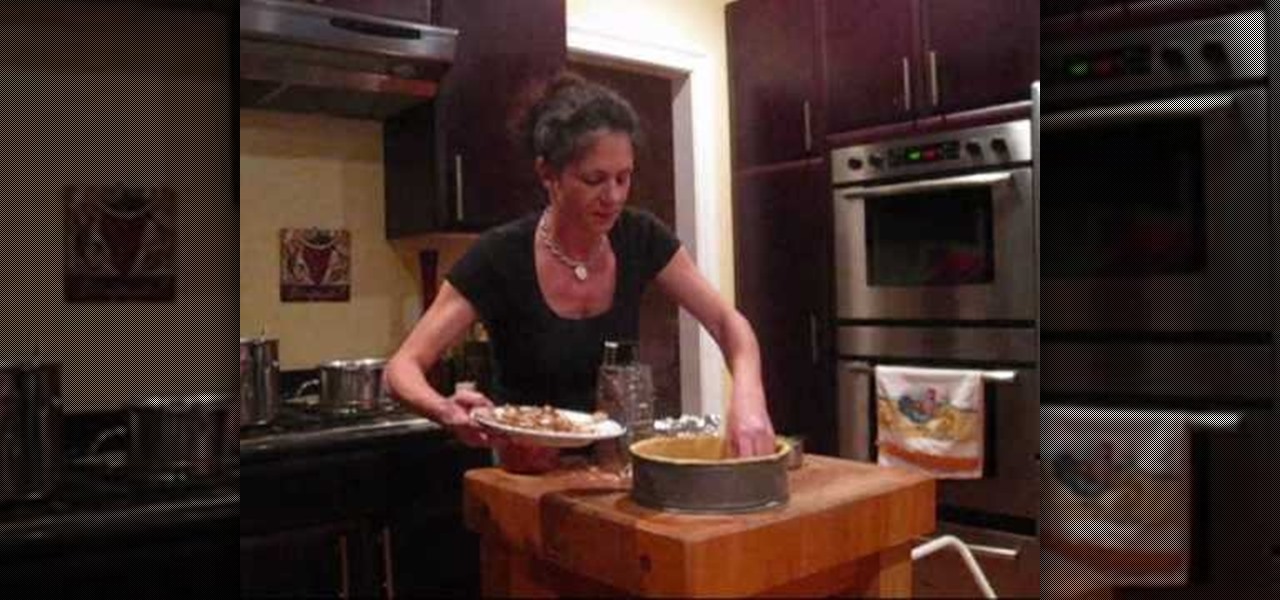
In this video, we learn how to make timpano. First, you will need meatballs, sausages, chicken, cheese, peas, pasta, and vegetables. You can prepare the dough yourself or you can purchase it from the grocery store if you don't have time. Place the dough into a large spring form pan, then prepare your meats. First, layer penne pasta into the bottom, then layer chicken breast in slices on top of that. After this, place on meatballs and frozen green peas. On top of this, add on cut up sausages, ...
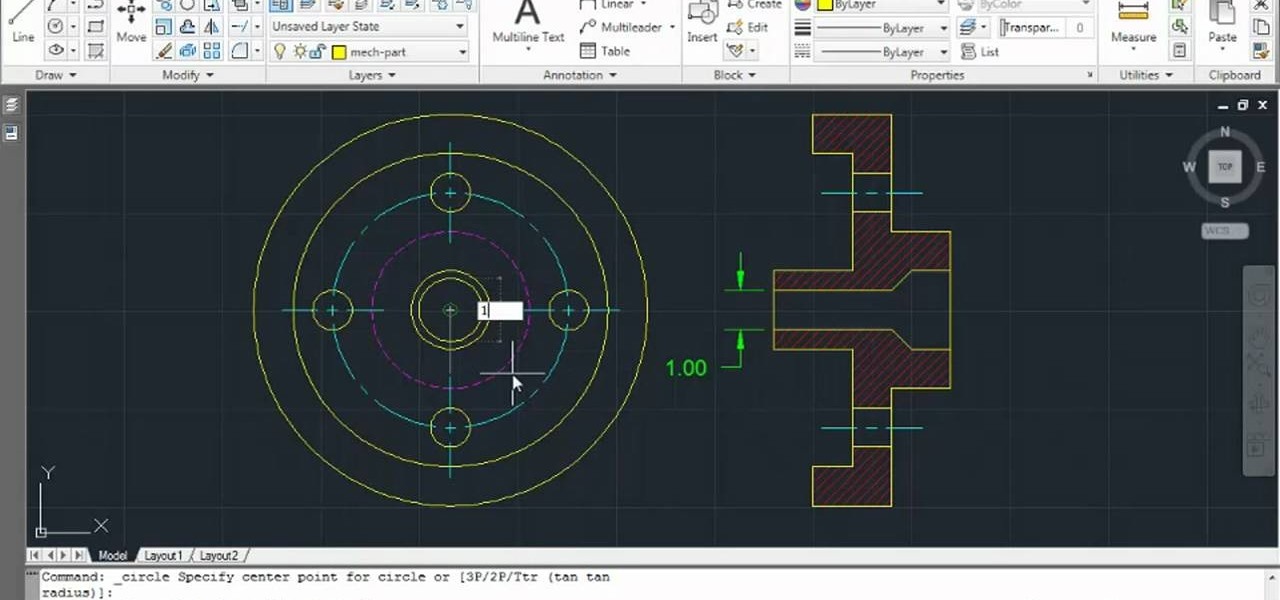
Learn how to set the current layer by selecting elements within an AutoCAD 2011 project. This clip will teach you everything you'll need to know. Whether you're new to Autodesk's popular 3D drafting application or a seasoned professional just looking to better acquaint yourself with the newest iteration of the program, you're sure to be well served by this video tutorial. For more information, including step-by-step instructions, watch this free video guide.