
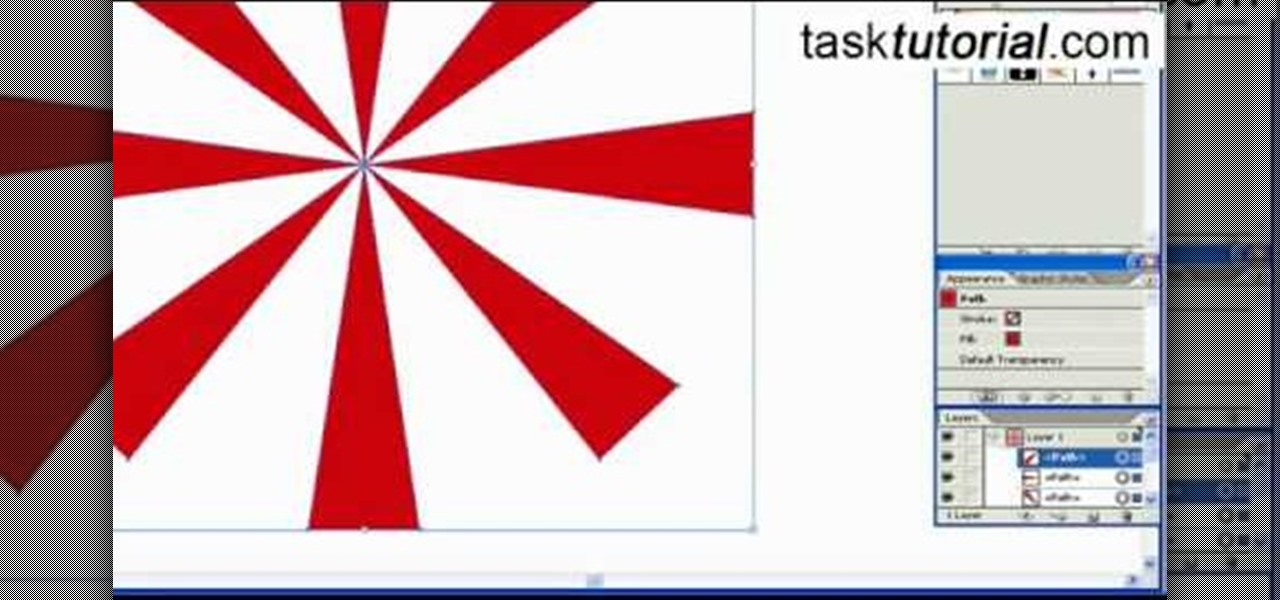
How To: Create sunbursts using symbols in Illustrator
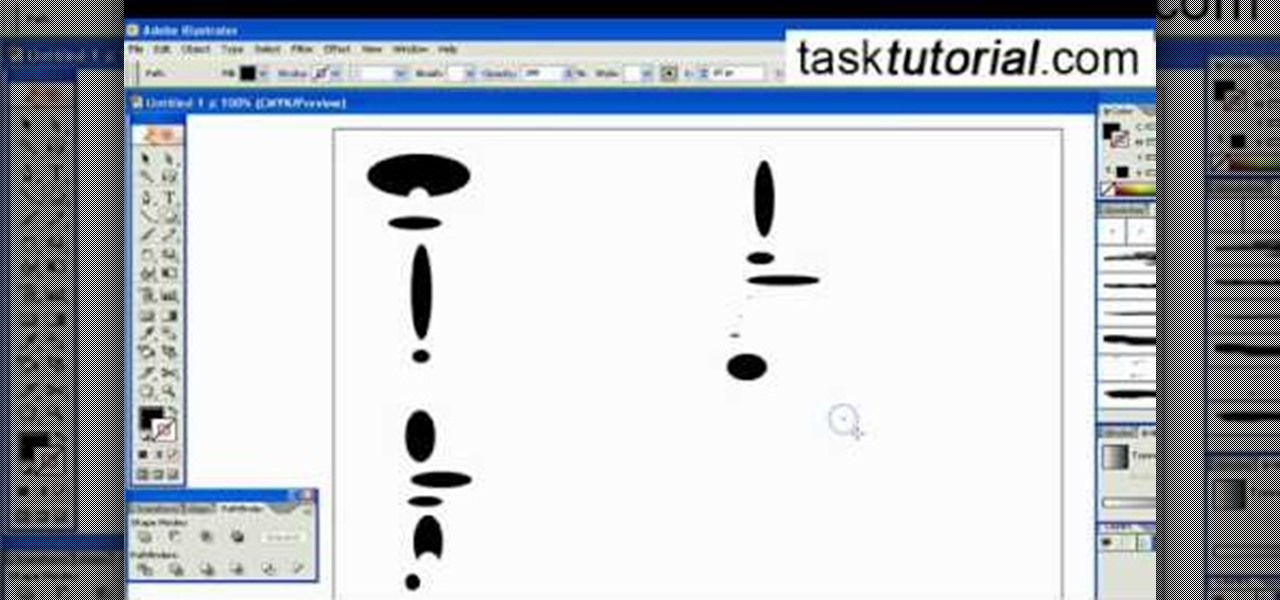
This video is about creating sunbursts using symbols in Illustrator.

This video is about creating sunbursts using symbols in Illustrator.
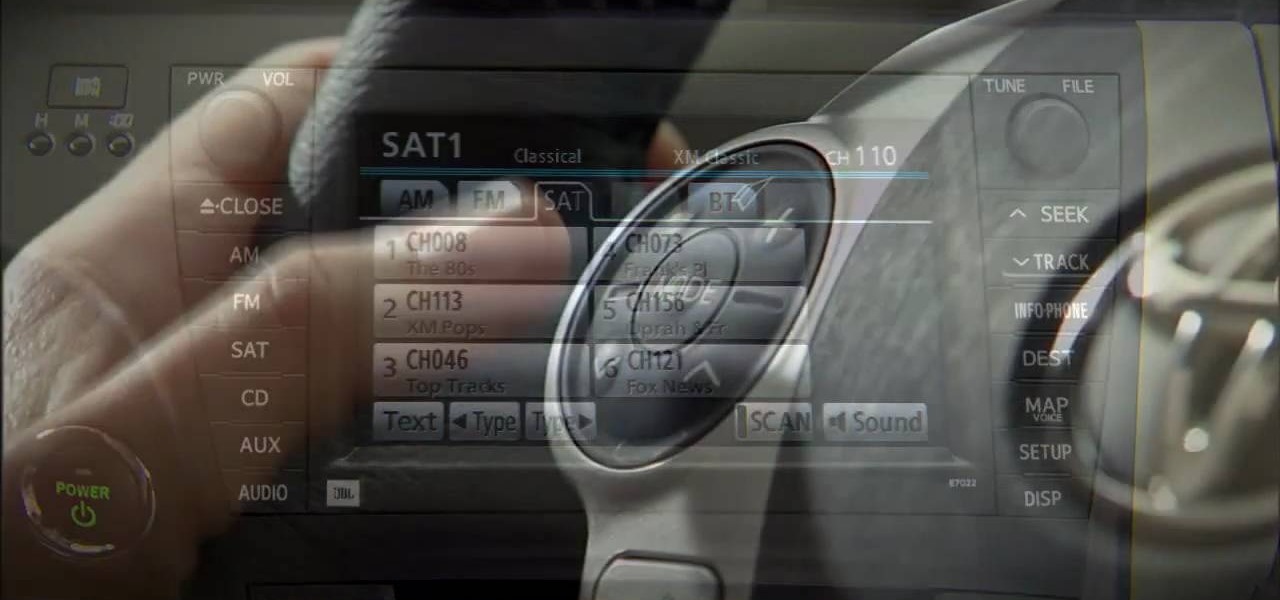
In this video, we learn how to use steering wheel controls in the 2010 Prius. The Prius has steering wheel mounted controls that come with touch tracer display. When you press these, the display produces the duplicate on the panel to see what you are doing. This is located in the driver's line of sight. You will find radio, volume, and radio channel controls on the left hand side. You will also find voice activation and phone on the left hand side. The switches on the right hand side will hel...
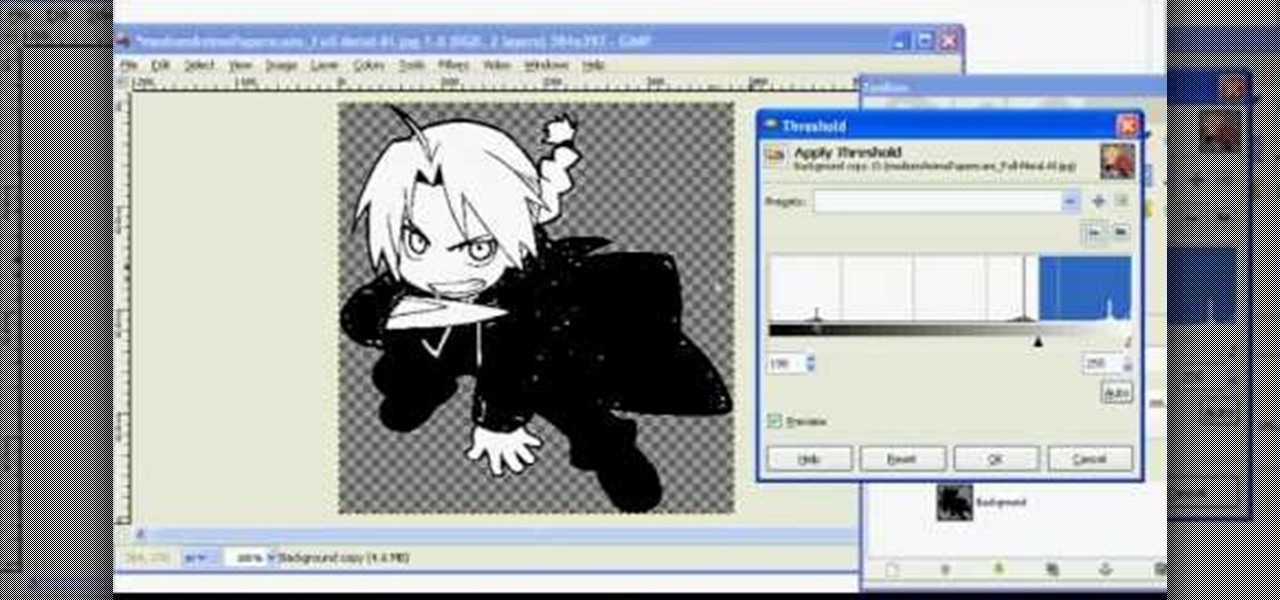
In this tutorial, we learn how to make 2-layer stencils in GIMP. First, cut out the background before you begin. Now, right click on your main layer and then select "add alpha layer". After this, select the magic wand tool and delete all the white areas on the outside of the picture. Now duplicate the layer, then hide the top layer and select the bottom layer. Now, go back to threshold and move it all the way to the right to get an outline of the image. From here, go back up to the top layer ...
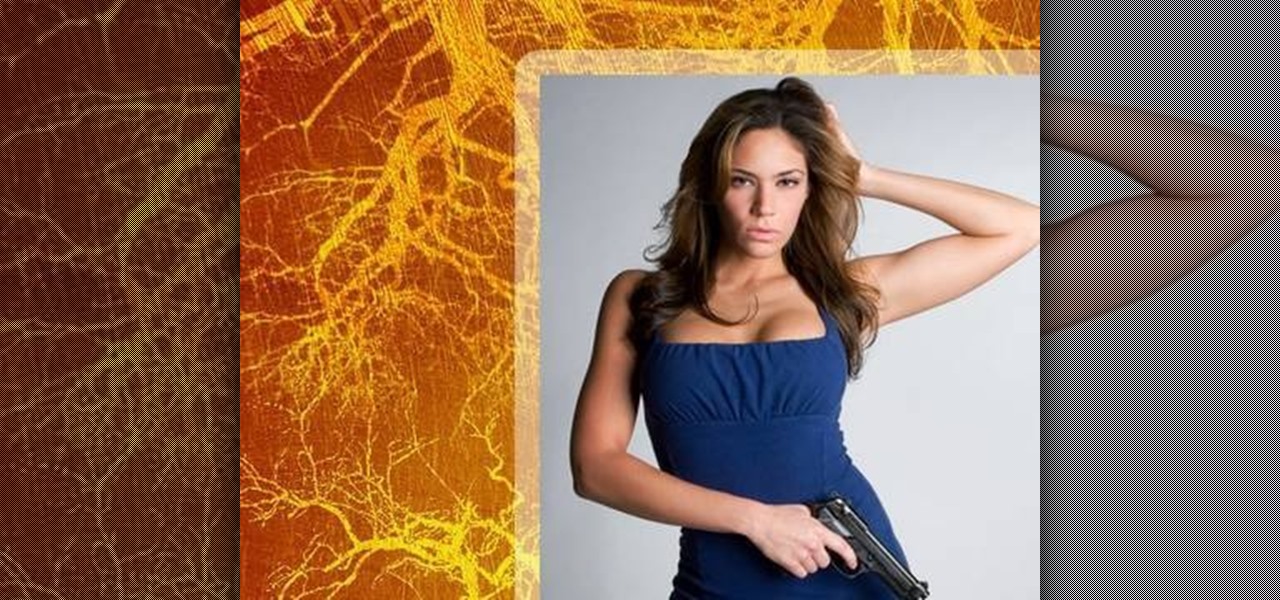
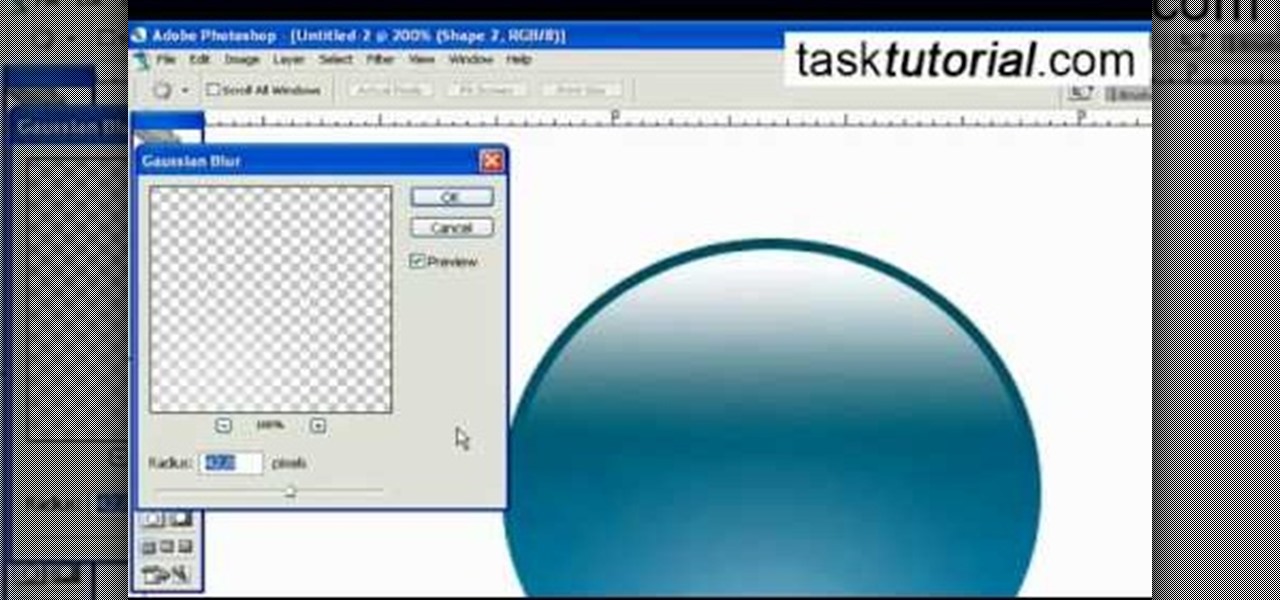
In this tutorial, we learn how to create a warm grunge background in Photoshop. First, create a large circle on a burnt orange background in Photoshop. Now, go to layer, adjustment layer, then levels. Hit "ok" then the level's adjustment layer will be masked. Now, go grab the bottom black slider and brighten up the middle. Use the overlay to create a center glow. Next, bring in texture using a brushed metal texture from this photo. Now, even the image out by going to image, then image rotatio...
In this tutorial, we learn how to create a cool blend text effect in Illustrator. First, open up Illustrator and draw a path, then change the color to black. After this, click on the line and type in your desired text. Increase the font size to 36 points, then select the red color. After this, copy your path and select the duplicate button. Now, move the duplicated path and change the background color to yellow. Now, scale the path and resize, then place on to of the red path. When finished, ...

Google is the biggest and best search engine on Earth, and if you are a webmaster and want your website to be a big success it would really behoove you to know as much about how it works as possible. The Google Webmasters series of videos and website were created to teach webmasters, SEO professionals, and others how Google works by answering their questions and giving them insights into how they can best integrate and utilize Google's functionality to improve their business. This video will ...
In this video tutorial, viewers learn how to create a tilt shift effect with Adobe Final Cut Studio. Begin by changing the video's speed to 300% and disable the Frame Blending. Now click on Effects, go to Video Filters, press on Time and select Strobe. Change the Strobe rate to 7-15 fps. Now switch to Motion and Duplicate the group. Then create a simple mask in the upper group and apply defocus to the lower group. Under Mask, increase the Feather rate up to 100%. Now add another mask around t...
This video in the Software category will show you how to remove pimples and wrinkles in Photoshop. Yanik from Yanik’s photo school presents this video. Select the photo you want to work on. First you duplicate the layer by ctrl+J or select from the dropdown menu. You start off with removing those pimples that you want to remove completely. Select the spot healing or the regular healing brush. Yanik prefers the regular healing brush. Also choose a small brush size. To select a source point, ho...
In order to add a nice contrast punch to an image using Photoshop, go to your adjustment layer and click on the black and white adjustment layer. Then go to your "blend modes" and change it to "overlay". If you find that the effect is too harsh you can adjust your opacity settings or you can switch your blend mode to "soft lights". In "overlay" using the black and white adjustment panel you can change your settings to meet your preference. If you are using a previous version of Photoshop that...
Pattern brushes in Illustrator can create additional interest and a custom look to shapes in Photoshop. Follow the steps in this tutorial to learn how to create new pattern brushes in Illustrator. In a series of steps creating different shapes aligned in different patterns, the create new brush command can duplicate those patterns as a brush stroke. The end effect allows us to create different designs quickly that can then be used for logos, art projects, and many other things.

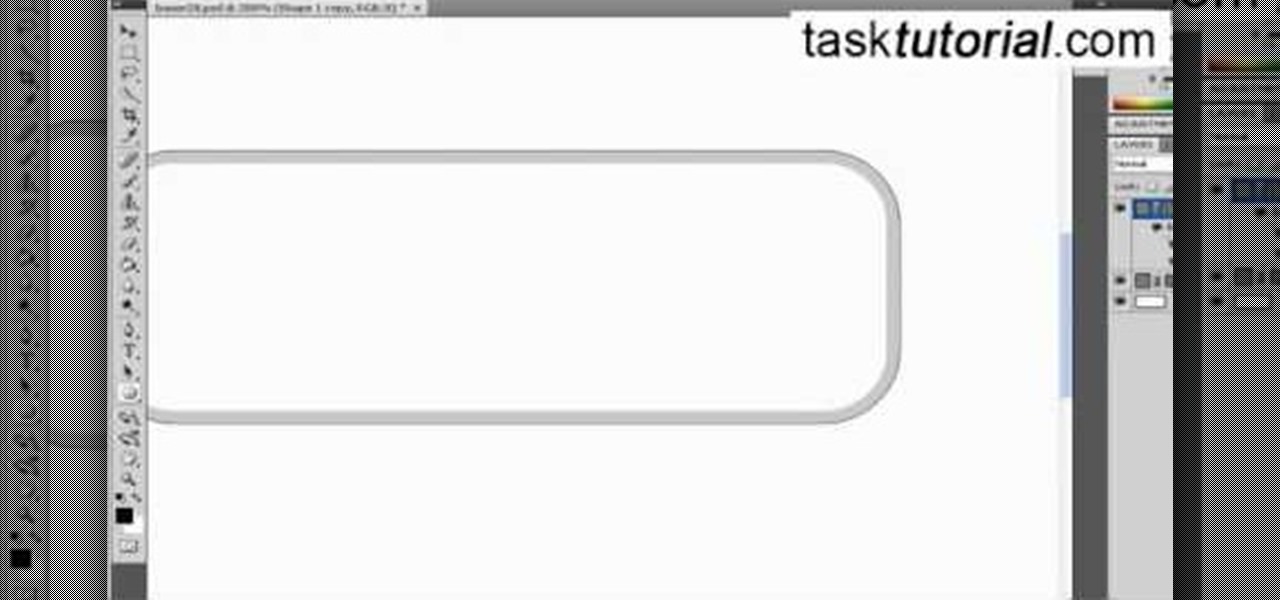
In this video tutorial by Tasktutorial, learn how to make a paper scroll in Photoahop. Select the rounded rectangle tool and draw a shape similar to the shape shown. Open layer options. Go to gradient. Select the indicated gradient and delete the marker shown. Adjust the other markers as indicated and use the control+g shortcut to duplicate the layer. Position the shape as shown and using the pen tool draw the paper outline by clicking and holding to obtain the required shape. move the paper ...
Outcomes are endless in Adobe Illustrator. You can create pretty much whatever you can think of and what you can create. This tutorial will demonstrate how to create a glass bar in Adobe Illustrator. You will need to:
Want to create some cool effects in illustrator? Create a new layer. Draw the ellipse tool and add radial gradient, then go to transparency and select screen. Then create the star tool and deselect stroke. Drag and place the star shape on ellipse and group them. Then duplicate that layer to make multiple sparkles on different layers. Resize other sparkles by holding down shift key. One can change colors of other sparkles. This will help you in making a good background.
This how-to video is about how to create a simple text effect in Photoshop.
In this Photoshop tutorial the instructor shows how to mask a photo to itself and produce a glowing effect. First open the image in the Photoshop tool and duplicate a layer and add another layer in between filling it with white. Now select and copy the whole layer. Add layer mask to it and alt click it. Now paste the copied layer on the masked layer. Now do the control+I to invert the masking. Now the images gets a glowing effect on which you can apply the glossy effect on it. Now merge all t...
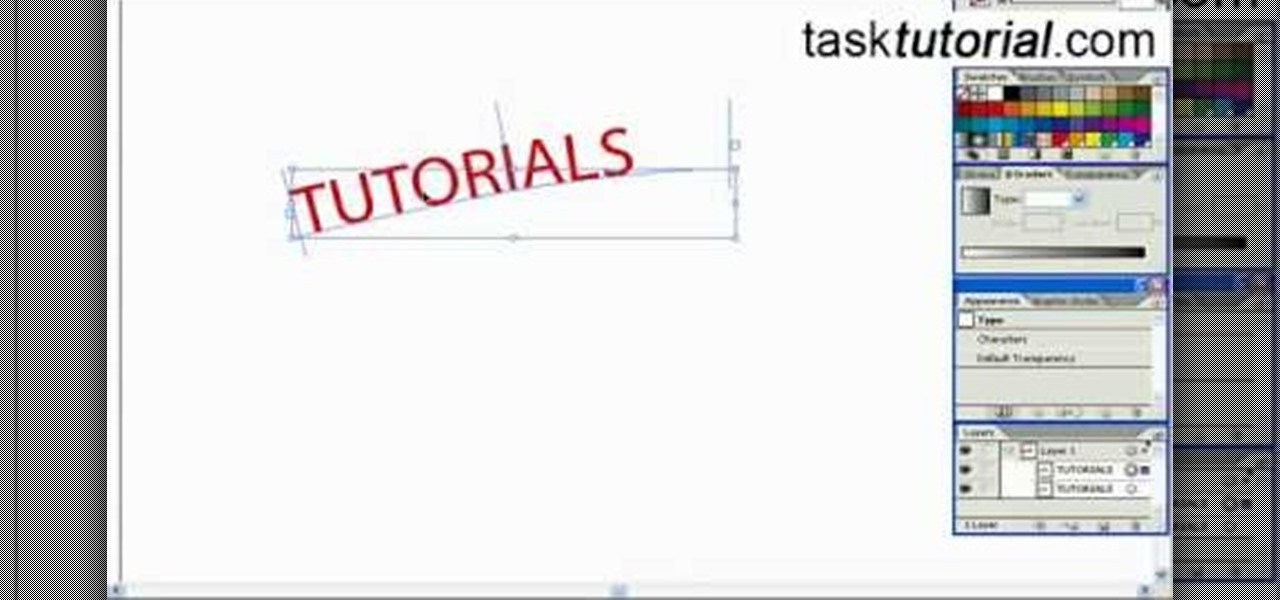
From task tutorial.com that how to create an envelope icon on illustrator. First draw a rectangle change the angle to 90 degrees then select gray color, select pen tool draw a shape and then go to layer select duplicate then rotate the shape using left mouse button by selecting the rotate tool. Now using down arrow key move the shape to down ,choose select tool and resize the shape then select the path go to gradient and change it angle to 90 degrees. Finally select the layer and go to effect...
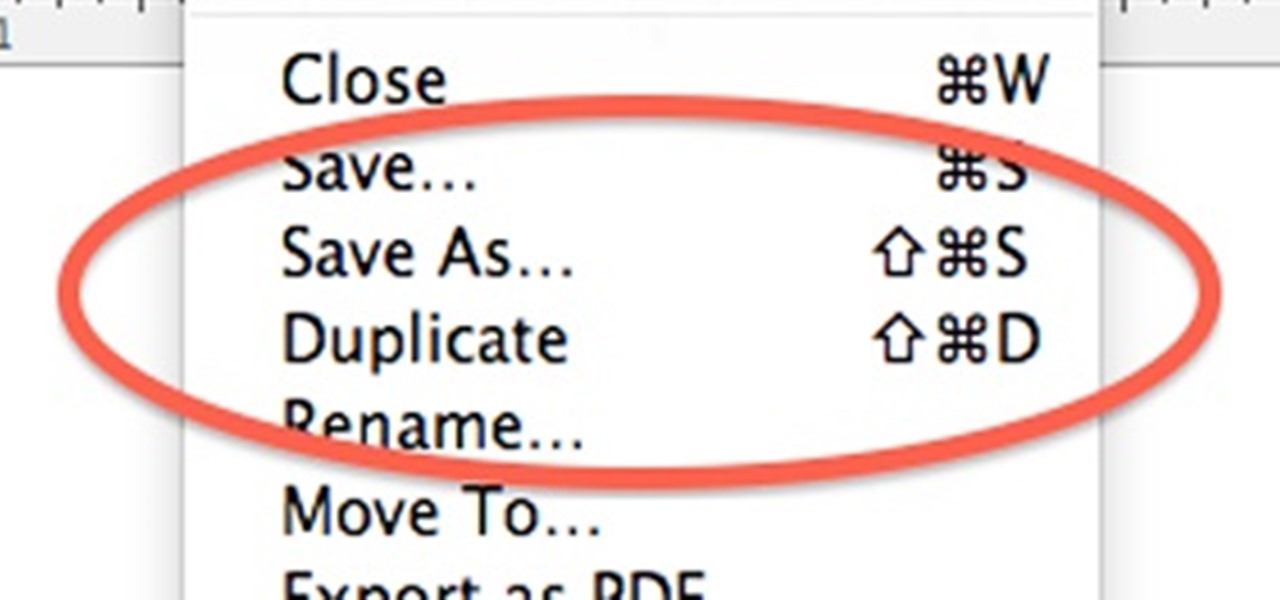
When OS X Lion (10.7) debuted last year, a lot of Apple users were dismayed that the "Save As" option had disappeared, replaced by the "Duplicate" function. Most felt that it just wasn't the same, so when Mountain Lion was released, the "Save As" option was brought back… sort of.

New to Microsoft Excel? Looking for a tip? How about a tip so mind-blowingly useful as to qualify as a magic trick? You're in luck. In this MS Excel tutorial from ExcelIsFun, the 616th installment in their series of digital spreadsheet magic tricks, you'll learn how to use the LARGE and SMALL functions to retrieve the 1st, 2nd, and 3rd largest values from a list. You'll also see how to do each of the following:
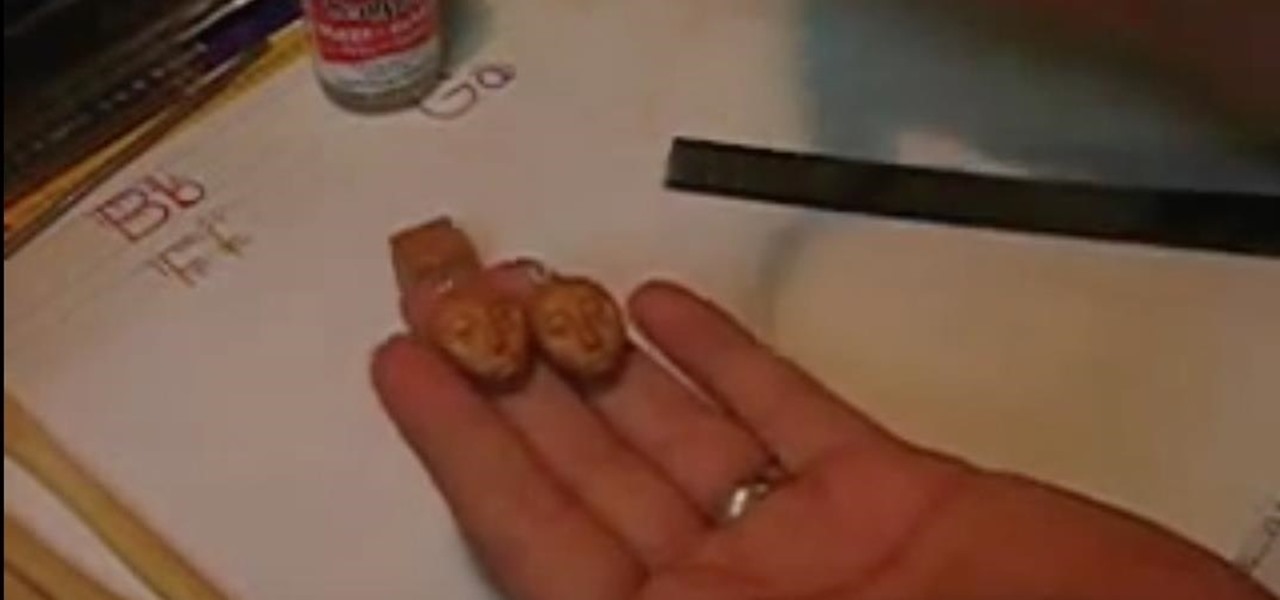
In this video, learn how to use a push mold to form your polymer clay. Molds are easier ways to make designs in your clay so that you don't have to shape the entire thing with your hands. This video will show you how to make earrings using a mold with an example that you can duplicate at home.

The Orton effect in Photoshop is acheived by combining an image with a duplicate that has been softened or blurred slightly. This will give you original image a luminescent appearance and enhance most portraits and landscapes.

Nicole Scherzinger is one pretty Pussycat Doll, and in this tutorial, you will learn how to duplicate her look for yourself. This video shows you how to create a Nicole inspired makeup look that will have you turning heads, just like she does. So, grab some supplies and get ready to head out looking like a bonafide rock star.
If you ever wondered how to create a buy now button for your website this video shows how to do it using Photoshop. To do this open Photoshop and start with a new file. First draw a rectangle which will be now modified into the buy now button. Set the radius of the rectangle to forty pixels. Fill it with gray color. Duplicate the layer. Open the layer options of the duplicated layer and set the stroke position option to inside. Set its weight to 6 pixels and set its colors to light gray. Now ...
This video describes how to create an easy glossy button in Photoshop. This is done by "simpleretouch.com" website. First select the "Ellipse Tool" from the Photoshop tool bar and then drag it on the layer; it will give the ellipse shape in the layer. Select the "Blending options" from the "Layers" Menu by double click on the layer which is right below corner. From the blending options choose only the "Gradient Overlay" and in that we can choose color and its gradient as your wish. Now take a...
Check out this Scam School video on leanring the ultimate strength tricks. Bend frying pans and horseshoes with your bare hands! Watch Brian make you think he can use his bare hands to bend a horseshoe and to roll a frying pan!

Famous food cloner Todd Wilbur wraps his head with tape and attempts to duplicate the world's most popular candy bar. You will need water, vanilla extract, peanut butter, powdered sugar, chocolate chips, caramel, and peanuts. Watch this video cooking tutorial and learn how to make a Snickers bar at home.
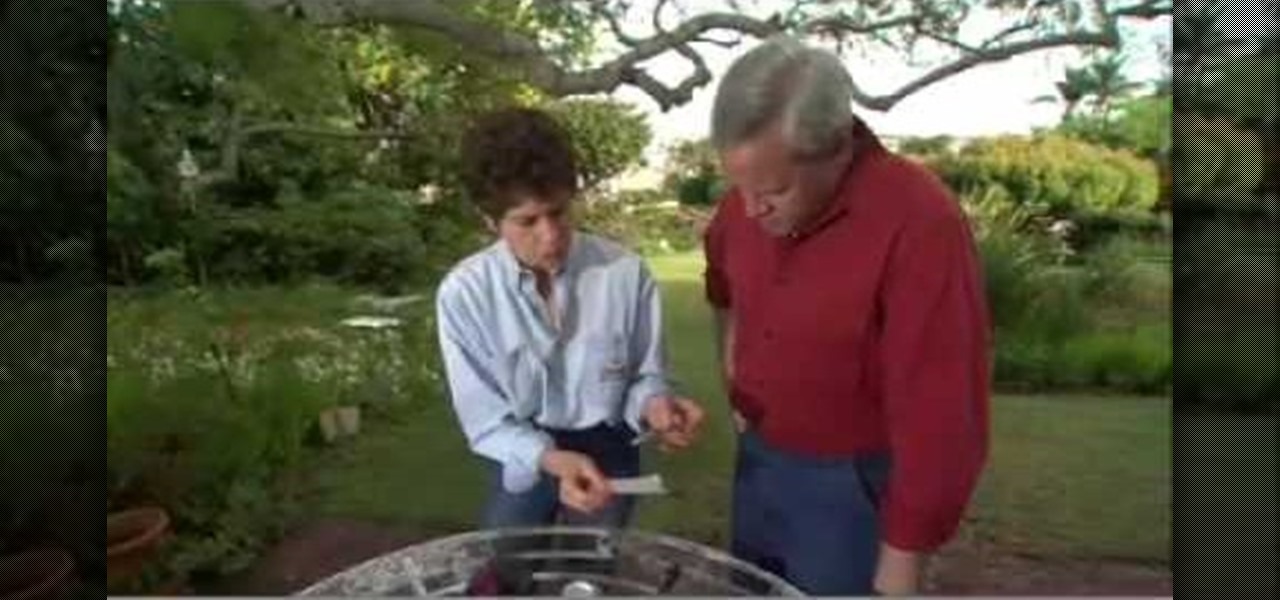
African violets are a beautiful and delicate plant. It is possible to duplicate African violets by propagating them. In this how to video, Danny Lipford talks with Trisha about propagating African Violets.
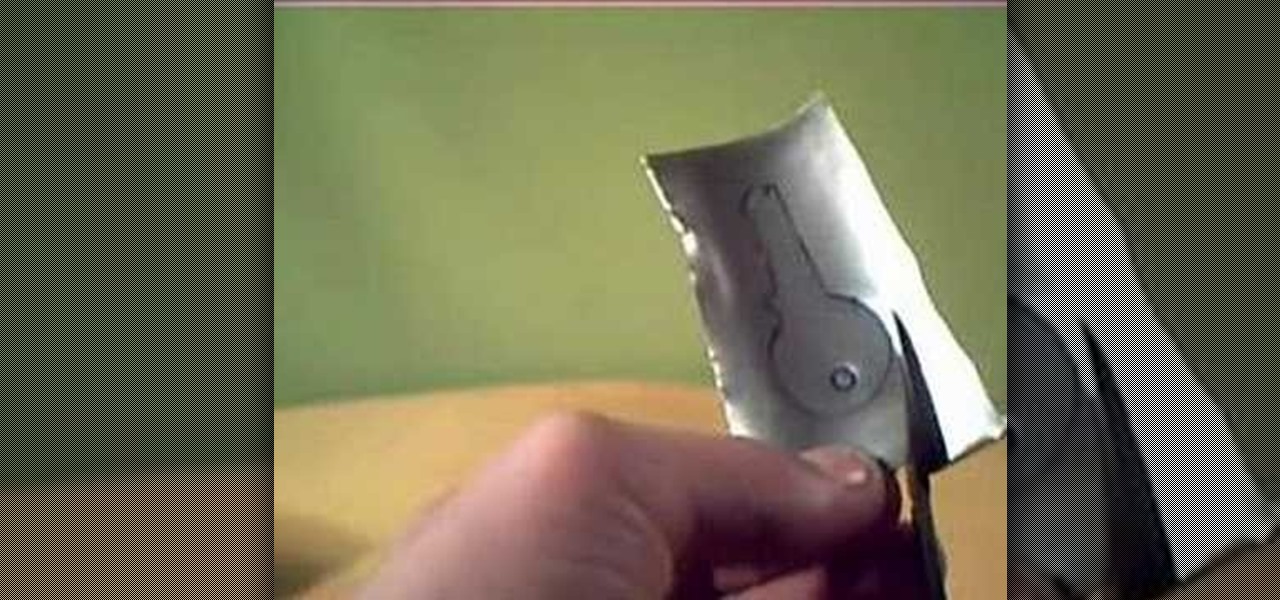
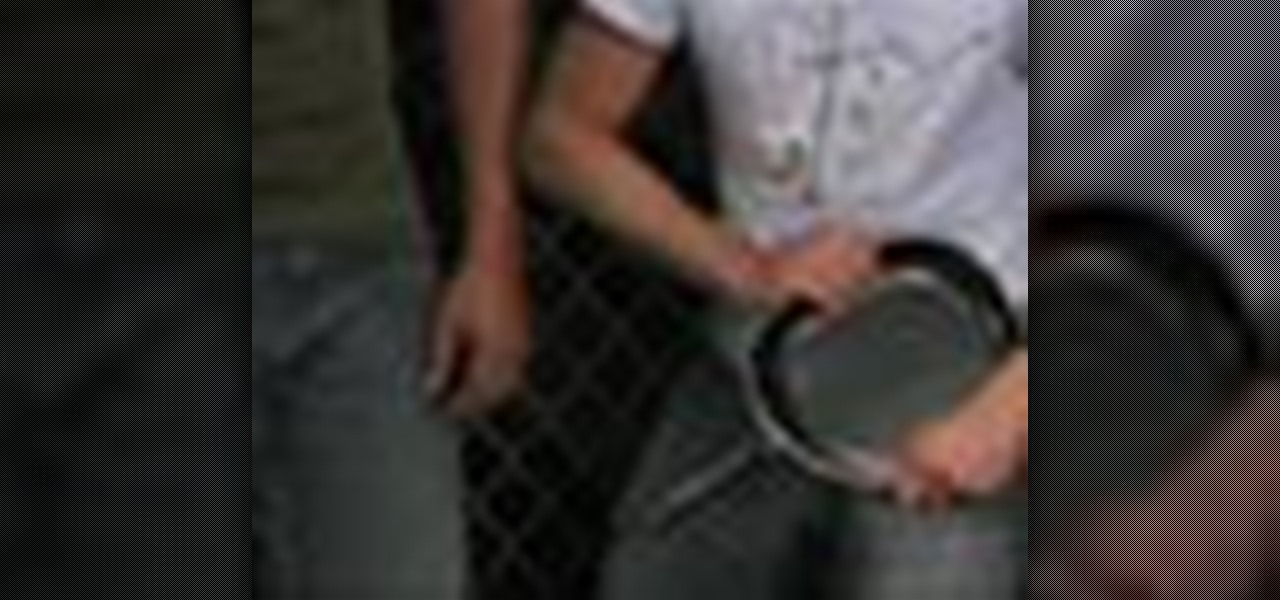
This is a how-to video explaining how to copy a key with a can of cola. All you need is an aluminum soda or beer can. To make it come out better, add a additional side to the one piece. This technique works well when you don't have time to get a new key cut. Watch this video tutorial and learn how to duplicate a key with a Coke can.
This instructional video shows the simple steps for how to cast a cavity pour mold with Mold Max 30 RTV Silicone Rubber. Learn how to make the mold and make duplicate models of statues, sculptures, or figures, with this casting technique.
If you think you have all the essential tools figured out in Autodesk Maya 8.5, you probably don't. So, if you want to create awesome 3D animated characters, then maybe you should watch this Maya video to make sure you know how to keep faces together after you already know how to merge, merge duplicate, average vertices, and bridge.

Duplicate the OS X's CoverFlow effect inside Windows and say goodbye to ugly thumbnail views! This tip from Tekzilla only works for image files.

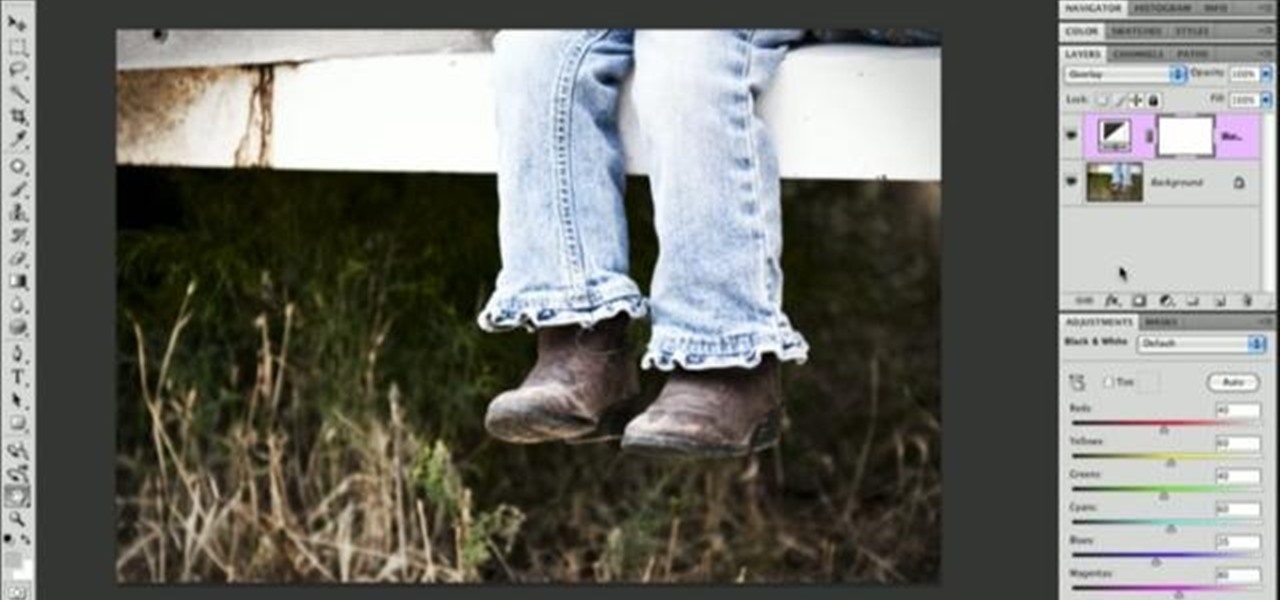
You can learn how to color adjust in photoshop. You can select one color and let the rest of your picture be black and white. First, you select the picture and make a duplicate layer for the background.

Yanik Chauvin shows viewers how to add a reflection using Photoshop. This tutorial focuses on how to do a reflection on a white background. You can do this with objects as well as people. Bring up your image with a white background to add the reflection to. First, you should press ctrl+j to add a second layer. In order to do a reflection, you need room, so you need to increase your canvas size. To do this click image, click canvas size, and click the bottom arrow so it can expand downward. Yo...
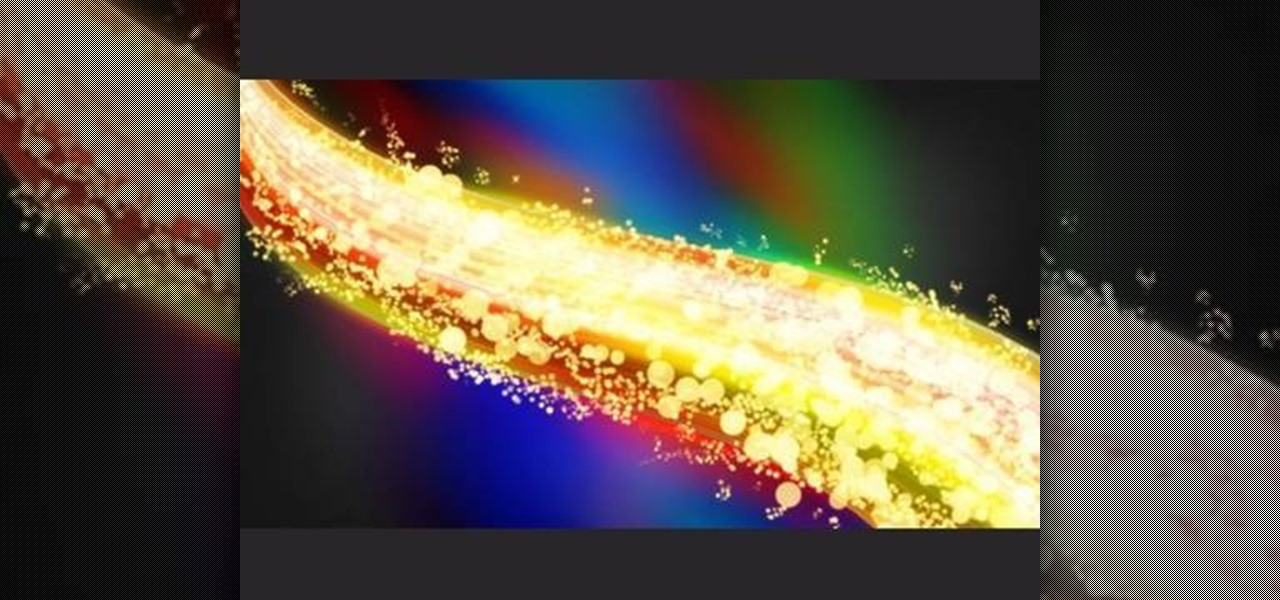
This video will help you learn how to create an Explosive rainbow color swath in Photoshop. First open a new file, keep the width 845, height 475, RGB color mode and white background.

In this tutorial, we learn how to create amazing 3D text in GIMP. First, start a new image with the width and height that you want. From here, select the text editor and then type in your text. After this, change the font to what you want and then change the size and color as well. From here, you will duplicate the layer and then go to layer, and then filter. Select the map button and then map the object. Select the text and then show the preview to make sure it's what you want. Change the or...
In this video, we learn how to join lines in Xara Xtreme. All the lines in this are independent, but they can be joined together to make an object. First, open up the object gallery and then duplicate the layer. After this, copy the image and increase the line size by four pixels. Then, go to "arrange" and "combine shapes". From here, the shapes will all combine together to make one total image. Make a rectangle around this and then select "subtract shapes". Combine the layers to finish, then...

In this tutorial, we learn how to make a Duct tape hat. First, grab a hat that you want to duplicate and measure it out with a piece of paper. Then use this piece of paper as reference to how you will cut your pieces of duct tape. Now, cut the duct tape and stick them together to create the top of the hat. After this, you will connect the other areas of the hat together and make the bill of the hat. This will need to be thicker than the other areas and you will also have to cut it into a curv...
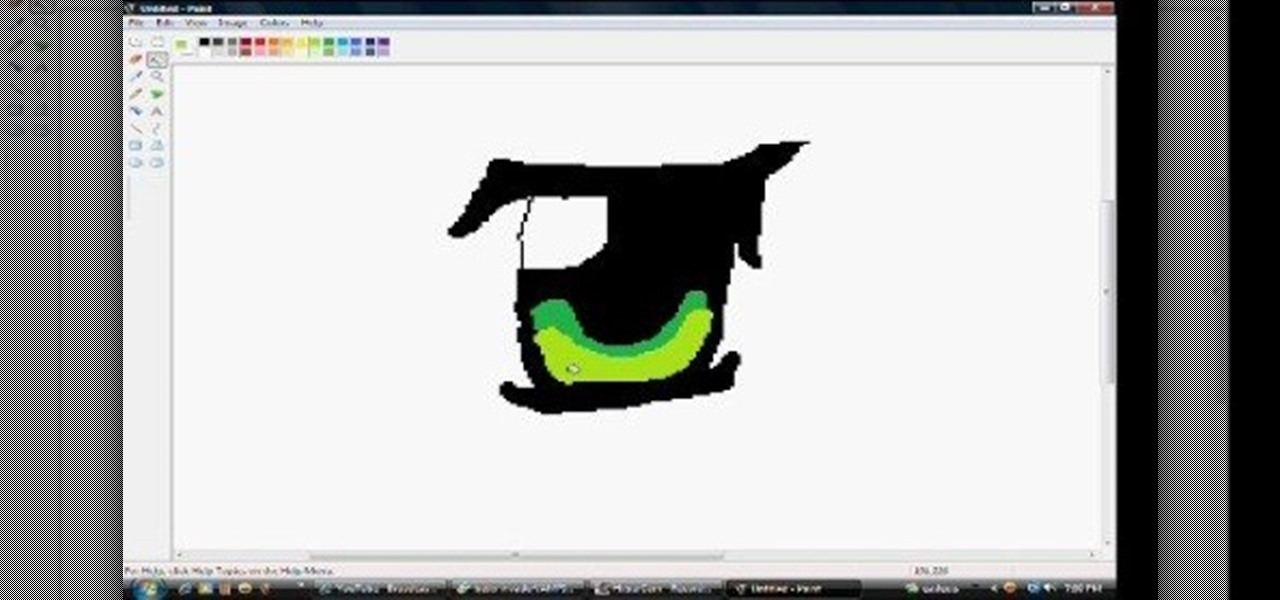
In this tutorial, we learn how to draw anime eyes in MS Paint. First, open up MS Paint and then grab a marker that is thick. From here, draw in a thick line that will be the top of the eye. Then, draw in the round area underneath the eye and the pupil inside of this. Draw in the bottom lash line of the eye, then start to add detail to the middle of the eye. Use the dark line to create a thicker line around the pupil, then fill the eye in with black. Leave a white part to make the eye look glo...

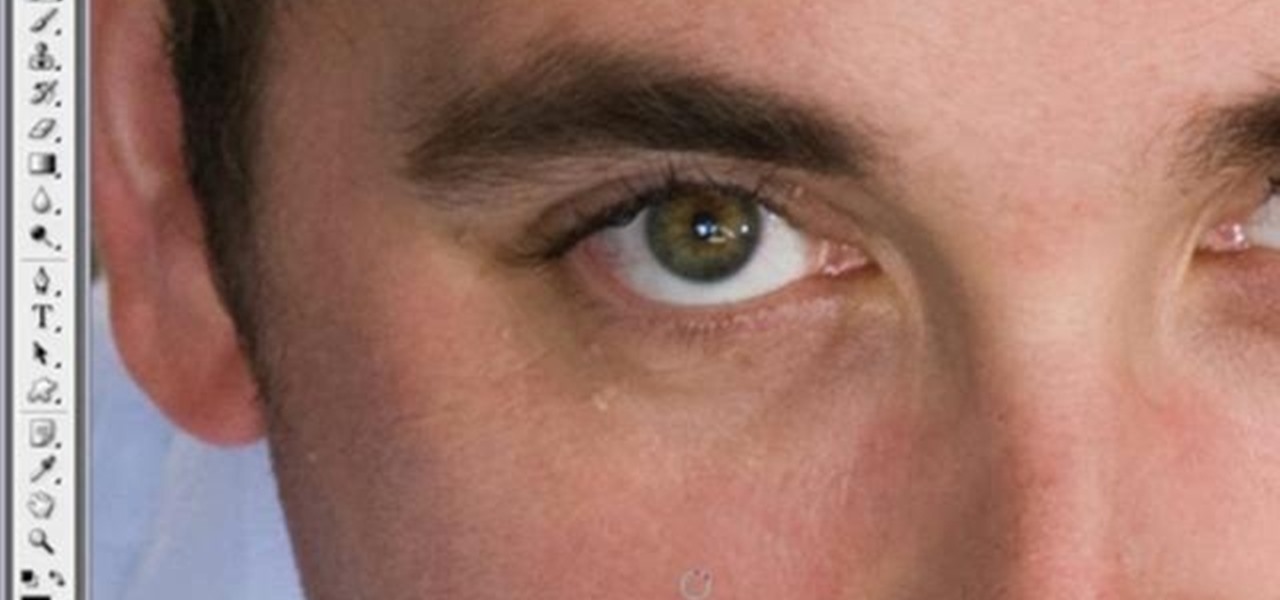
In this video, we learn how to remove acne spots with Photoshop. First, open up the picture and zoom in on the acne you want to remove. Now, unlock the layer by right clicking and unlocking it. Next, use the clone stamp tool while pressing alt to clear the skin where the blemishes are at. Click constantly on the acne until all of it is done. You want to click as many times as possible to get the best effect in removing this. When you are finished with this, duplicate the layer, then change th...

In this video, we learn how to convert an image into a sketch in Photoshop. First, open up Photoshop and open the picture you want to convert. Now, click the layer and unlock the background. After this, go to "image", "adjustments", and remove all the saturation from the photo so it's black and white. Then, duplicate this and invert it by going back to the adjustments section. Now, go on the top of the layers tab and select "color dodge" from the drop down menu. Now, go to "filter", "other", ...

In this tutorial, we learn how to use the soft light layer mode in Photoshop with Yanik Chauvin. This will reduce gray in the picture. First, duplicate the layer and then click on the blending mode menu. Click on the soft light option, then your photo will adjust and have saturation in it. The flatness will be removed from the image and the gamma will be increased. If you find this too strong, you can go into the opacity slider and adjust this to what you think fits your picture. When finishe...