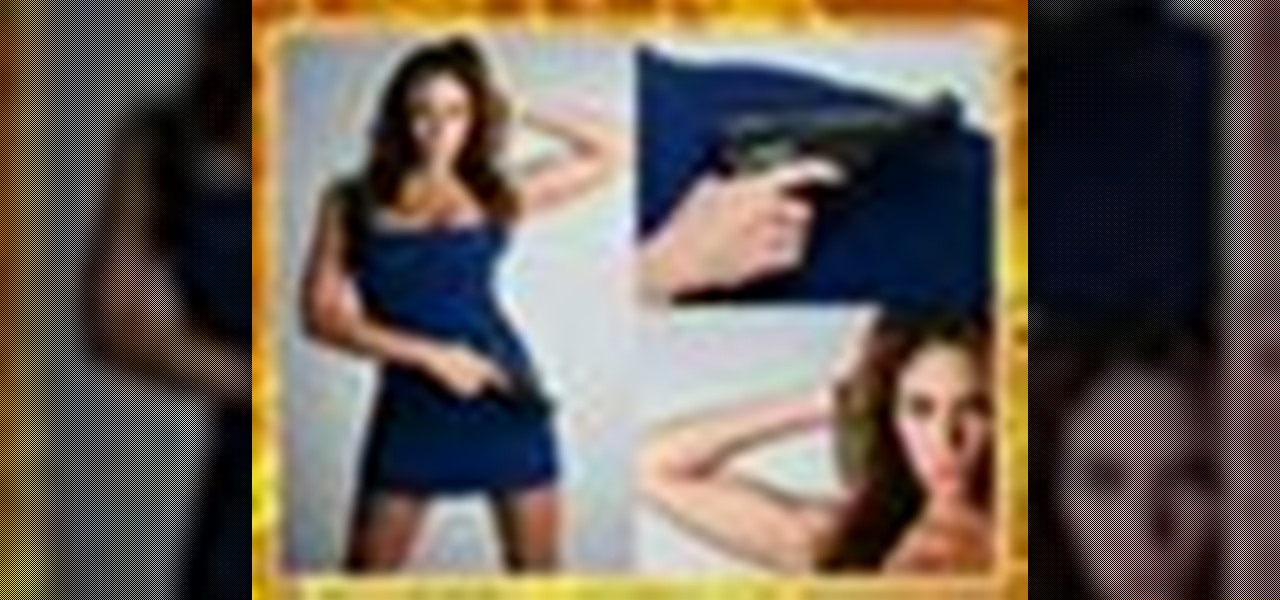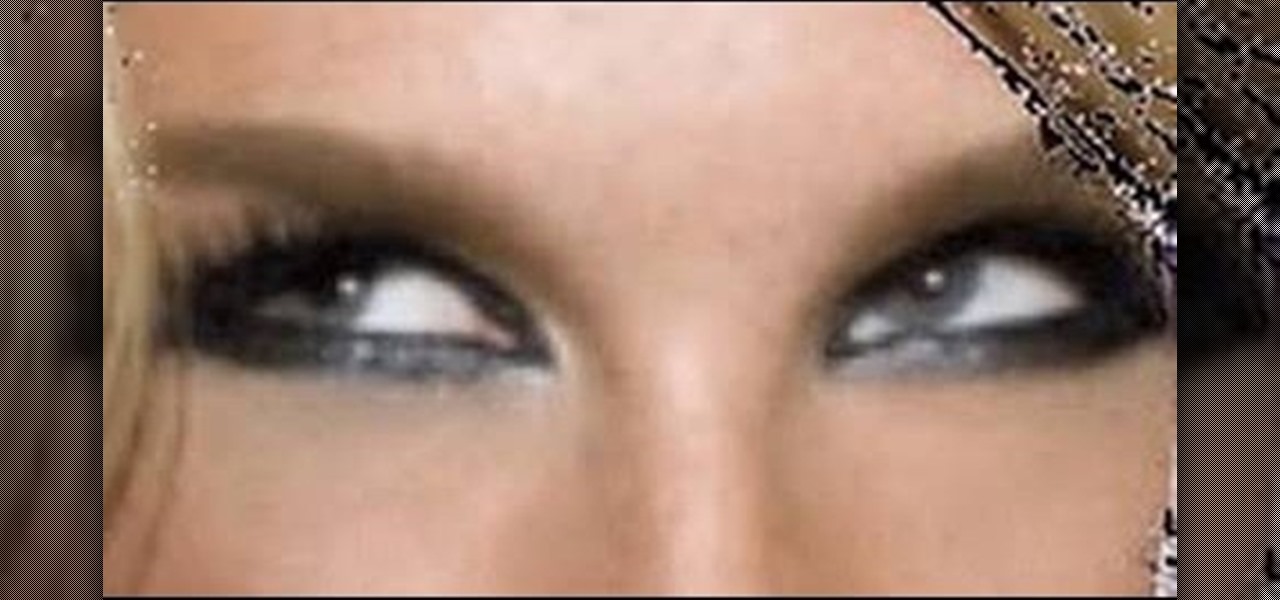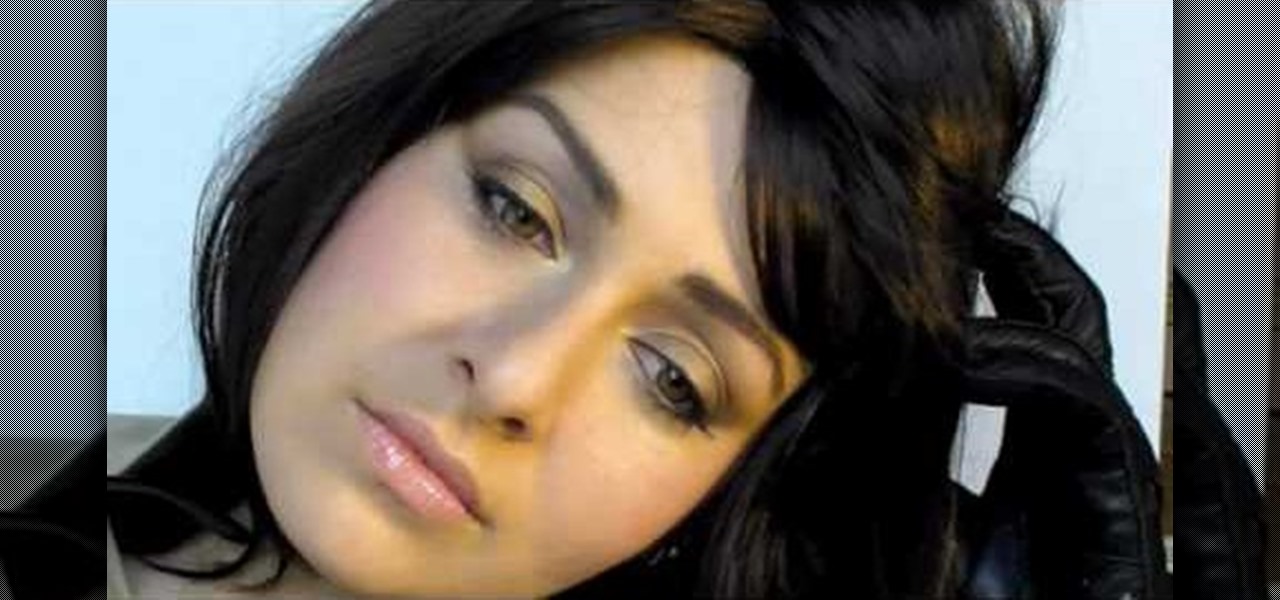
In this tutorial, learn how to duplicate Selena Gomez's makeup look from the new music video "Round and Round" by Selena and the Scene. This look is perfect for a beautiful spy who fights crime by day and plays with men's hearts by night. Follow along with this fantastic tutorial and you will look just like a starlet.
A lot of people use Flash for 2D cartoon animation, but Adobe After Effects is another great tool to create some very cool cartoon animation. This how to gives you a clear idea of the steps to take to use AE as a cartoon creation device. This short video tutorial will demonstrate how to properly export character animation from Flash and import it into After Effects to combine with background and foreground elements. It also gives a handy trick of how to duplicate a character animation clip to...
In this tutorial, we learn how to animate pictures using Fireworks 8. First, open up Fireworks 8, then open up your picture and zoom in to make it a full screen. You can also draw your picture inside of a blank document on the page. After you have drawn your image onto the screen, go to the frames panel. From here, go to options, then duplicate the pictures. After this, change your picture in the second frame to make the arm in a different position. Now, move from the different frames and it ...

In this video tutorial, viewers learn how to split their browser. This can only be done on the Mozilla Firefox web browser. Begin by going to the Firefox add-on website and search for "split browser". Then click on "Add to Firefox" to install the add-on. Once installed, users are able to right-click on any tab, go to "Split Tab to" and select the direction (up, down, left or right). Now click on the arrow and it will duplicate the tab in that space. This video will benefit hose viewers who us...
Change object colors via ActionScript in Flash 8
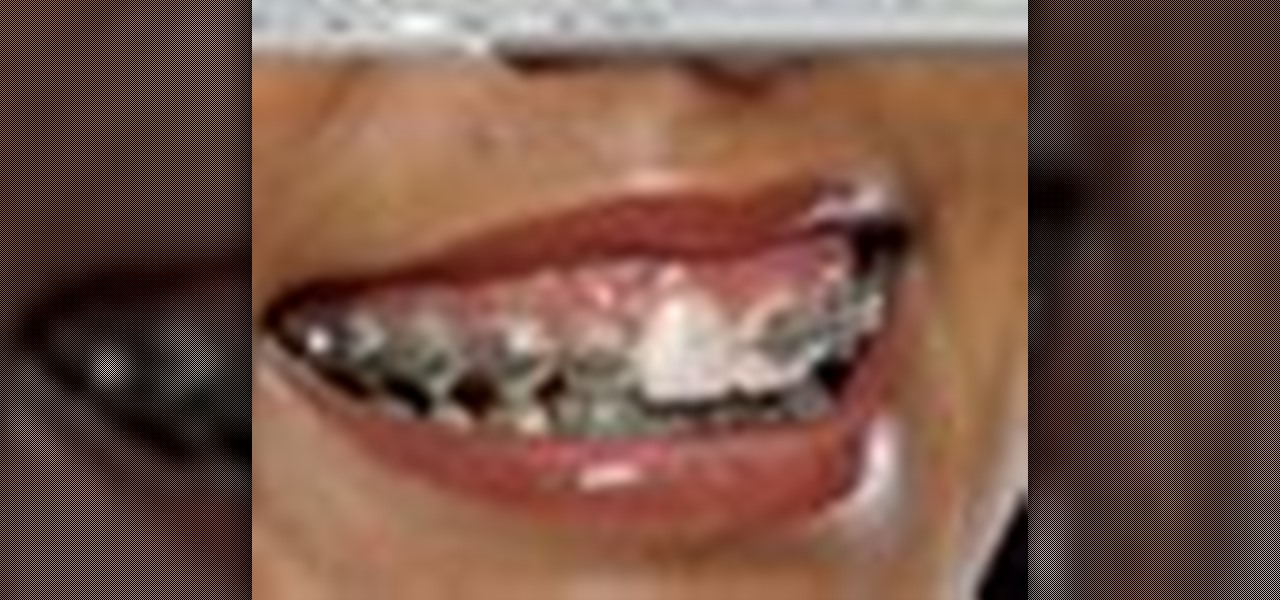
Learn how to remove braces with Photoshop. First find a photo with some visible teeth; you don’t want a picture with no visible teeth because you would need to redraw an entire set of teeth. Now select the first layer and duplicate it (command control J). Grab the patch tool from the toolbar and set it to "source". Zoom in on the teeth and make sure you are working on the new layer. Select around one part of the braces and drag it to a skin area. Now grab the clone tool and begin cloning the ...

Learn how to create a warm, grungy background in Photoshop. - Open up a brand new document at 1280 x 720.
Destroying crowds of little people has been a favorite passtime of dictators since time immemorial, but also a colossal waste of manpower. Now you can get some of the same thrill without all the needless death using 3D Studio MAX. This video will show you how to model, animate, and duplicate with particle flow a series of small robots. Then it will show you how to use a collision object (here a meteor) to destroy them all in fiery glory.
Learn how to simulate snow in your photograph in this video tutorial by photoshopuniverse. For this you'll need a photo depicting winter scenery. Add a new layer, fill it in with black, go to filer noise and add noise as shown using the given amounts. Go to filter effects and add blur to the layer. Go to images and adjust the levels to reduce the snow-flakes as shown. And add some motion blur to it. Change the blend mode to screen, duplicate the layer, rotate the new layer, apply the filter c...
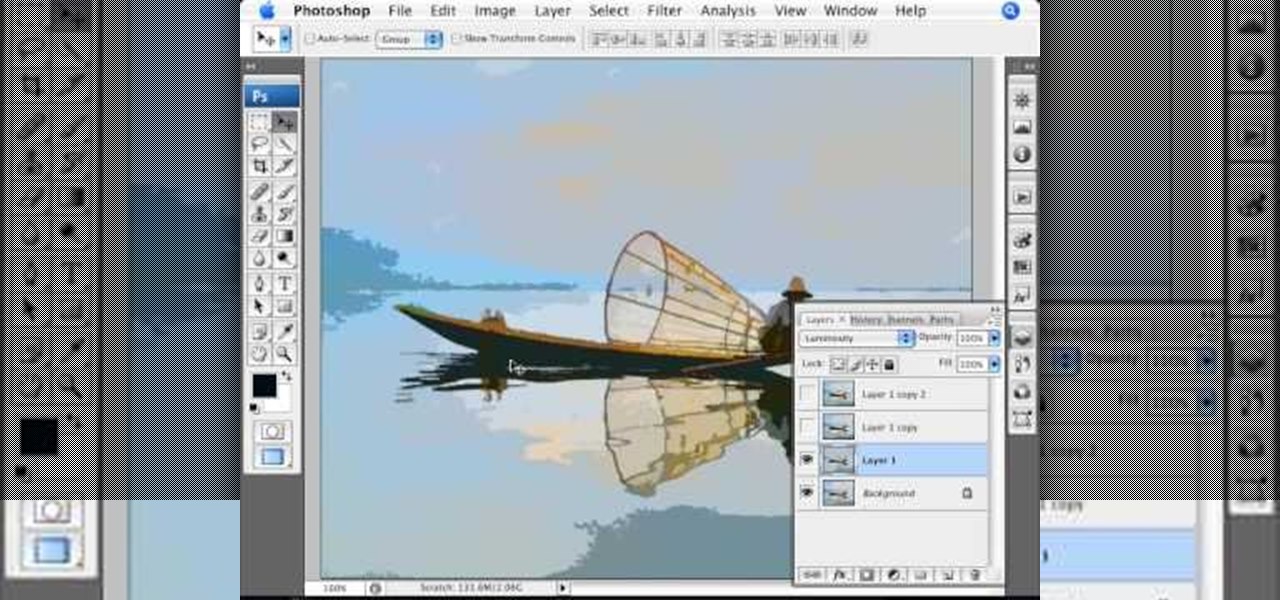
This video from photoshopuniverse shows us how to make your picture look like it's a puzzle by using Photoshop! First you want to open up the layers palette and duplicate the layer. Now add a new layer and bring it down to the middle and fill it in with black. Now to get the puzzle into place, go to Filter---Show Menu Items---Texture---Texturizer. Click the arrow to load texture. Load in puzzle texture. Now you can set the scaling to however many puzzle pieces you want. He put it at 75% and t...
In this video, we learn how to add ray so flight through trees in Photoshop. First, open up Photoshop and open up your picture. Now, go to your channels and choose the one with the most contrast by looking at all of the options. Now, duplicate the layer and go to "image", "adjustments", and then "levels". Now, make the image a lot darker, looking at the image preview as you go. When finished, click "ok", then select this layer and press "control", then click". Go back to the regular image, th...
This video tutorial is about adding an infrared effect to an image using Photoshop. First of all, open the image to which you wish to add the effect. After that, create a duplicate layer. Then go to the image option and click on it. A drop down menu appears. From that menu, click on adjustments and from that, select the option channel mixer. In the small window that appears, first tick the monochrome option. The idea of the channel mixer is that the total percentage of the colors must add up ...
An enharmonic equivalent doesn't sound like fun, but in fact the term is fancy jargon for a rather simple concept: it is the duplicate of a note, key signature, or interval that is spelled differently. So two notes are enharmonic if they have the same pitch but are named differently. At least, this is the basis for enharmonic equivalents.
It is quite common for imported models to come into Blender with duplicate vertices and triangulated faces. This quick tip demonstrates how to very easily fix these two issues, leaving you with a model that is ready to go. Whether you're new to the Blender Foundation's popular open-source 3D computer graphics application or are a seasoned digital artist merely on the lookout for new tips and tricks, you're sure to be well served by this free video software tutorial from the folks at CG Cookie...
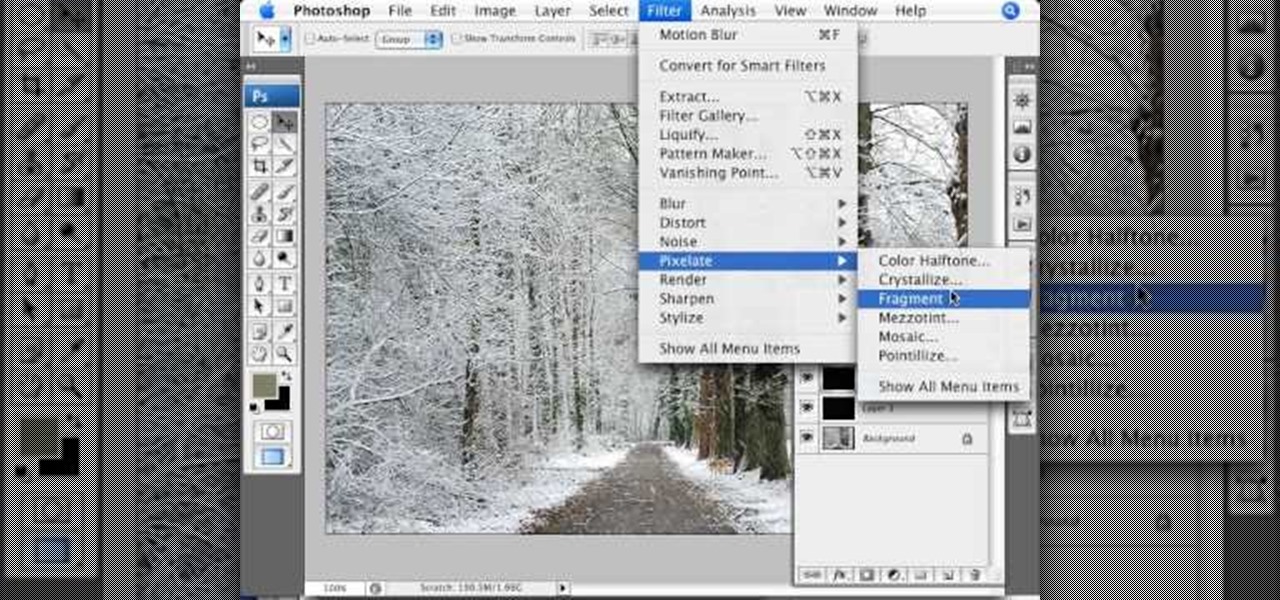
Ever wondered about those digital effects in advertisements having some parts in pixels? Let's try it. Open Photoshop and take a picture. Duplicate its layer and on the new layer,select it and go to filters->pixelate->mosaic. Then you can mask the new layer with having some parts in blur and the other one's in focus or can use gradient. You can lighten or darken the mask layer for better output. This helps in creating unique styles and digitize your world.
Photoshopuniverse teaches you how to enhance the colors of photos using Adobe Photoshop. You get a photo and duplicate that layer. Set the blending mode to Soft Light. You repeat that step, only the blend mode should be Lighten. The shadows are now darker. You can change the blend mode opacities to 60%-70%, but both layers should have about the same opacity. Also make sure that the white values are not to white and that details, like faces, are still OK to see.
Photoshopuniverse shows you how to simulate a watercolor painting on Photoshop. With this you can take any photo and make it look like it was a water color painting. Take any photo and then duplicate the layer 3 times including original. Focus on the first layer go to cut out. You want a high edge fidelity, and add the number of levels no more than 5. Add some simplicity and the change mode too luminosity. Go to the second copy layer do a dry brush increase size to maximum. add just a little ...
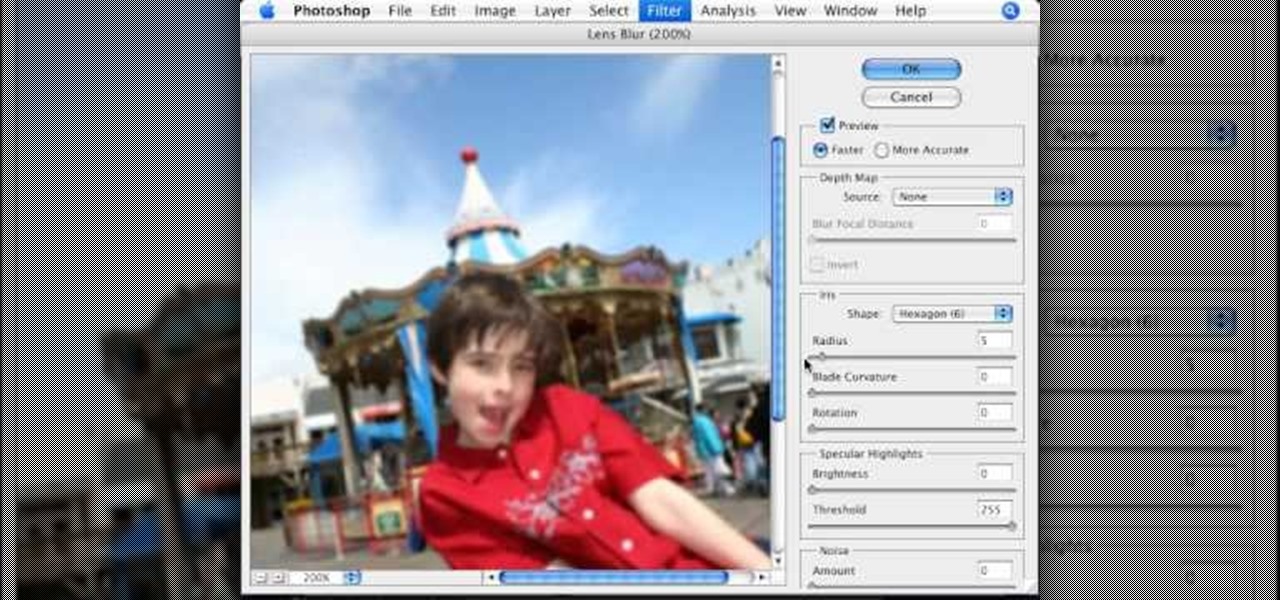
This video tutorial, by photoshopuniverse, shows you how to reduce the depth of field after a photo is taken using Photoshop. This enables you to ensure that your main subject is clearly in focus while the background is out of focus or blurry. First duplicate the layer using the short cut that was mentioned and apply the filter lens blur to the new layer and adjust the radius so that an adequate amount of blurring is achieved. Add a layer mask and bring the subject to focus by selecting the b...
This video, produced by Photoshop Universe, teaches how to reduce beard stubble or 5 o'clock shadows from male pictures. We are shown how to use the dust and scratches filter, layer mask, as well as the advanced layer style command "blend if" on the underlying layer helps us to make this possible. The first step is to duplicate the layer and then select filter, noise, and dust and scratches. The second step is to apply some dust and scratches to the beard selection. Finally we blur the layer ...
Tutorial on how to create realistic reflections on Photoshop with the objects. Take a base ball image then open layer pallet and duplicate the base ball layer its shortcut is Ctrl j. Go to image menu adjust the canvas size change height to 200 and anchor to the top then click OK then go to edit select transform change to flip vertical, select move tool then move the base ball vertically down change opacity to four percent. Finally go to filter select blur then motion blur with an angle 90 deg...
Instead of using Photoshop, why not give Apple's Aperture a try? Aperture is designed more for post-production work for professional photographers, letting you cull through shoots, enhance images, manage massive libraries, and deliver stunning photos.
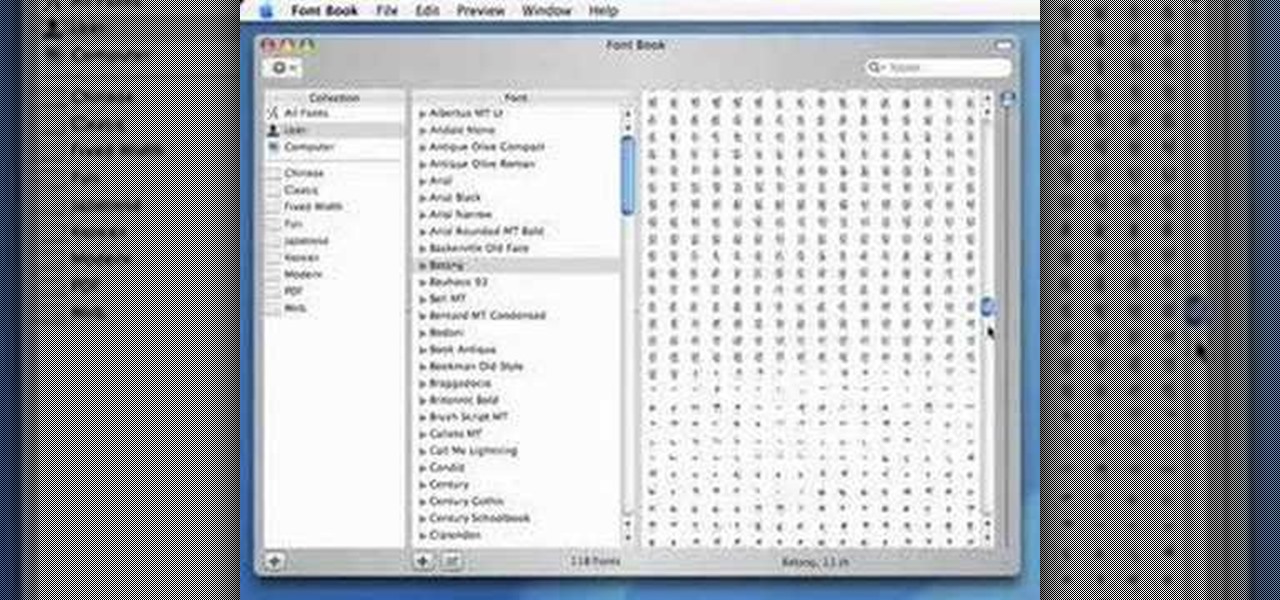
Apple Font book is a utility included with Mac OS X. Font Book is a utility for managing and maintaining your fonts on your Mac computer. It allows you to enable or disable fonts. It also helps you in creating font collections. Using it you can create libraries consisting of different collections and also validate font files for fonts or inconsistency. You can also remove duplicate fonts using it. The font book display consists of three columns. The collection column, the font column, and the...
Pixel Perfect is the "perfect" show to help you with your Photoshop skills. Be amazed and learn as master digital artist Bert Monroy takes a stylus and a digital pad and treats it as Monet and Picasso do with oil and canvas. Learn the tips and tricks you need to whip those digital pictures into shape with Adobe Photoshop and Illustrator. In this episode, Ben shows you how to create fabrics in Photoshop.
Pixel Perfect is the "perfect" show to help you with your Photoshop skills. Be amazed and learn as master digital artist Bert Monroy takes a stylus and a digital pad and treats it as Monet and Picasso do with oil and canvas. Learn the tips and tricks you need to whip those digital pictures into shape with Adobe Photoshop and Illustrator. In this episode, Ben shows you how to build a sign in Photoshop with 3D lightbulbs.
Pixel Perfect is the "perfect" show to help you with your Photoshop skills. Be amazed and learn as master digital artist Bert Monroy takes a stylus and a digital pad and treats it as Monet and Picasso do with oil and canvas. Learn the tips and tricks you need to whip those digital pictures into shape with Adobe Photoshop and Illustrator. In this episode, Ben shows you how to work with layers in Photoshop.
Pixel Perfect is the "perfect" show to help you with your Photoshop skills. Be amazed and learn as master digital artist Bert Monroy takes a stylus and a digital pad and treats it as Monet and Picasso do with oil and canvas. Learn the tips and tricks you need to whip those digital pictures into shape with Adobe Photoshop and Illustrator. In this episode, Ben shows you how to transform a photo into a flashy poster in Photoshop.
1)Open image, go to channel. Look for the channel that gives the most contrast by going through them one by one.
In this how to video, you will learn how create glowing eyes in the darkness using Photoshop. First, open your image in Photoshop. Next, duplicate the background layer. Go to hue and saturation and make the image really dark by turning down the lightness and saturation. Next, select a paintbrush for the eraser and start erasing around the eyes. Once this is done, make a selection around the pupils. Create a new layer and paint the selection red. Next, lower the flow of the paint brush and cho...
In this video, we learn how to created a chilled look on a photo using PhotoShop. First open up PhotoShop and open up the picture you want to change. First, duplicate the layer on the photo. Then press "control" then "u" and make the picture blue. Now, click "filter" then "blur" and add a small amount of blur to the photo. Now you can click on "overlay" and you can see the photo change. If you want to make it look more blue, duplicate the layer again and you will see more of a chill factor on...
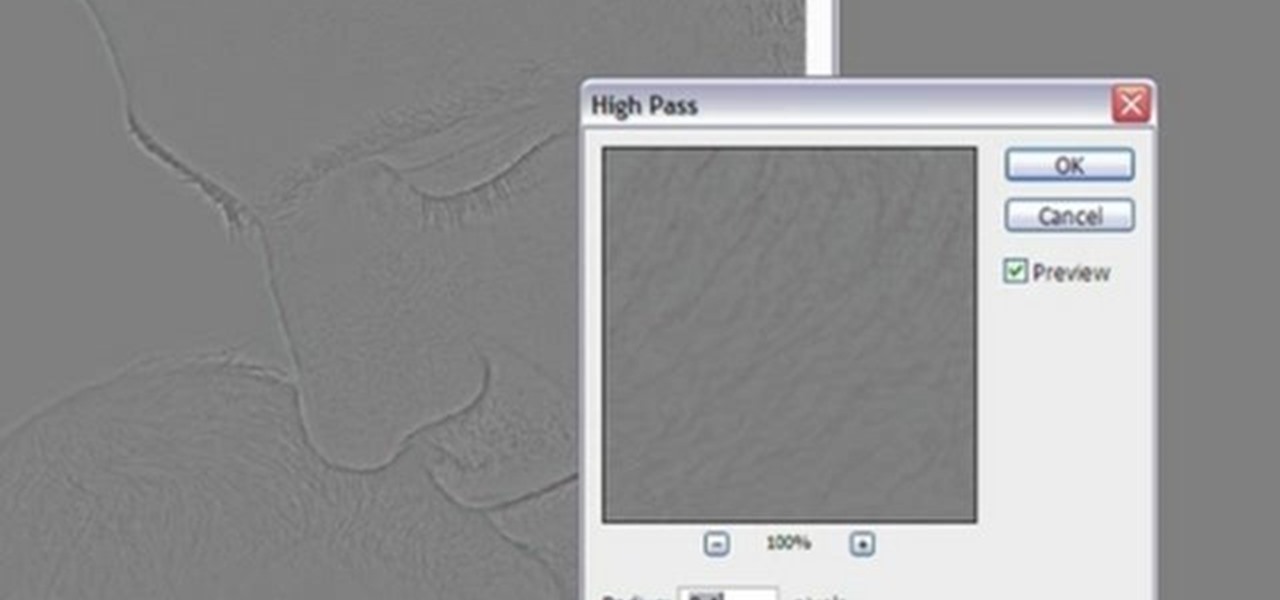
In this video tutorial, viewers learn how to sharpen photos in Adobe Photoshop CS3. Begin by opening the image in the program and duplicate the image layer. To duplicate, press the control and J button. With that images, go to Filter, choose Other and select High Pass. The images will now be covered entirely of gray. It is recommended to set the radius as 5-6 pixels and then press OK. Change the layer blending mode to overlay, soft light, hard light, vivid light or linear light. This video wi...
Using this tutorial, you will learn how to make a comic book style cloud in Adobe Illustrator. 1. First, select the ellipsis tool and draw a few shapes. 2. After drawing some shapes, select them and go to window and choose pathfinder. 3. Click to merge the shapes together. 4. Next, go to the layers window. Choose layer 3 and highlight the compound shape. Then select duplicate compound shape. After create one more duplicate. 5. Hide the first duplicate layer and choose the third one. Change th...
In this tutorial, style your hair like "Harry Potter" star, Emma Watson. Emma is known for her adorable, yet sophisticated, looks and in this video you will learn exactly how to duplicate one of her most famous red carpet styles. This look is quite easy to achieve and you can wear it to school, work, parties or just everyday. Have fun!
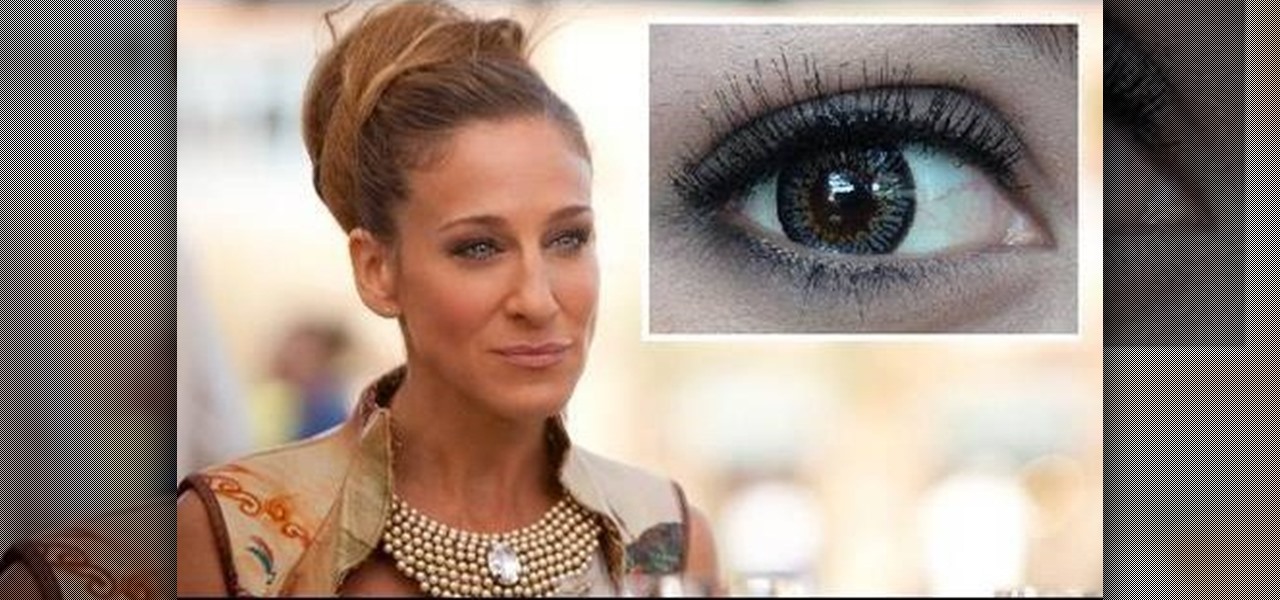
Before you rush out of the house to see "Sex and the City 2" this weekend, why not really get into the part? In this video, learn how to duplicate one of Carrie's Middle Eastern inspired makeup looks from the film and look fabulous in the theatre. This flick is a great time to have an old fashioned girls night out, so why not do your makeup, have a cosmo and get the full SATC experience?
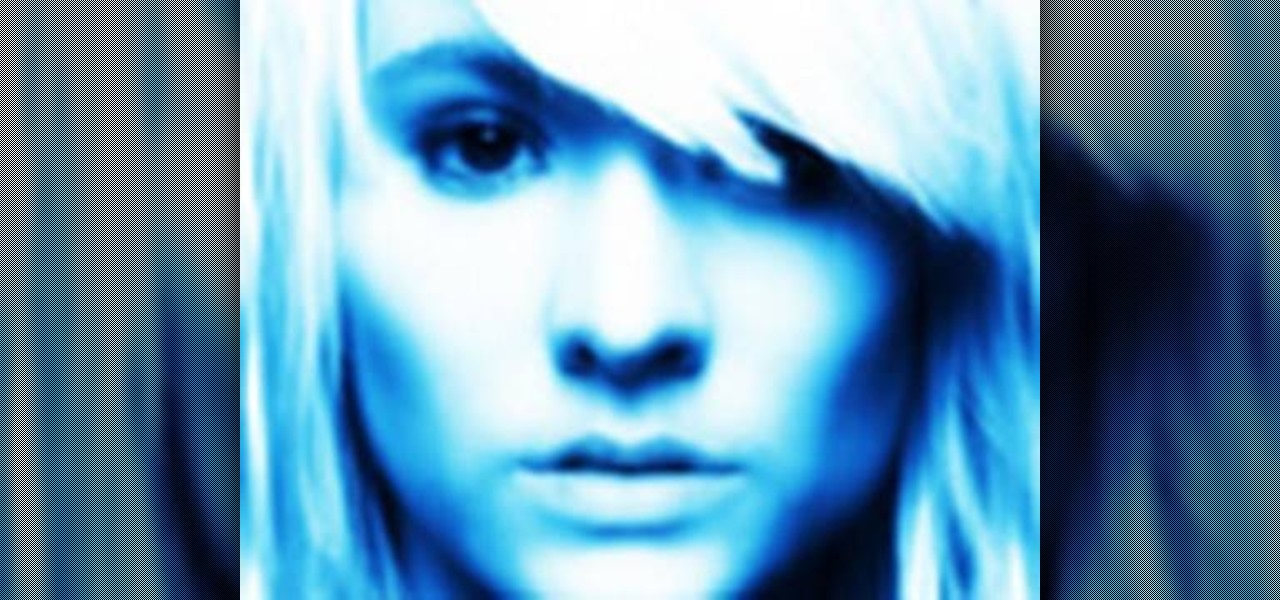
Ke$ha has some funky looks. She has captured the ultimate party girl image with a lot of her videos and album covers. If you are looking to get a great club style like Ke$ha, check out this tutorial. In it, you will learn how to duplicate her album cover for "Blah Blah Blah" and make the look your own.
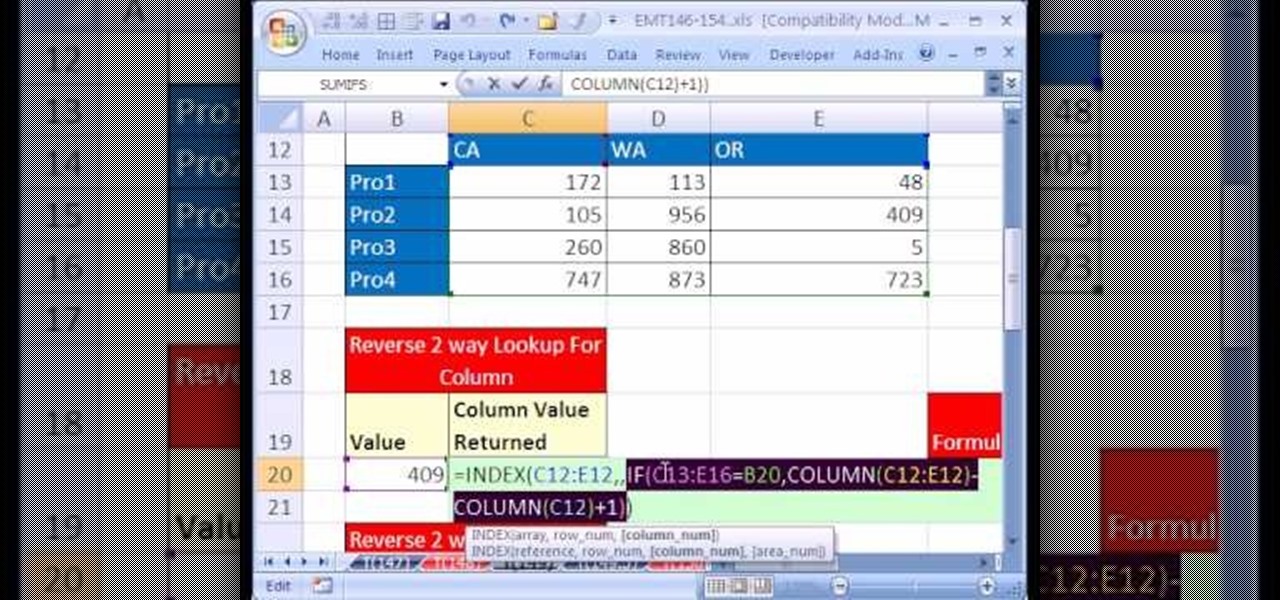
New to Microsoft Excel? Looking for a tip? How about a tip so mind-blowingly useful as to qualify as a magic trick? You're in luck. In this MS Excel tutorial from ExcelIsFun, the 149th installment in their series of digital spreadsheet magic tricks, you'll learn how to take a value in a table and then return the row or column value when there are no duplicate values.
This video will walk you through the process of creating your very own icon to use for your email by using Adobe Photoshop. Photoshop is a great tool to use for a variety of purposes and in this instance can make the perfect icon in just minutes.
This software tutorial shows you how to mirror geometry when modeling in Zbrush. This is a more non-organic method of sculpting in Zbrush but it allows you to duplicate details on both sides of an object without having to redo the details. Learn how to mirror geometry in sections using masks, and how to make sure the seams line up and keep your scuply accurate in Zbrush.
You don’t have to be a psychic to read someone’s mind – or, at least, to make them think you’re reading their mind, as shown in this how-to video. You will need one card with an "X" on back, an envelope with "you will choose (blank card)," a duplicate of the third card, and a flat surface. Watch this video magic tutorial and create the illusion of reading someone's mind while performing a card trick.
Open the picture you want to edit. Right-click on the main picture layer in the box and then select "Duplicate Layer". Then, in the same box, go to the drop-down menu that says normal, and change it to "Overlay". Then, select Filter>Other>High Pass. In the box that comes up, set the radius to 7.4 pixels. Next, go to Layer>New Adjustment Layer>Gradient Map. Then, when the box comes up, click OK. Then click on the main gradient in the Gradient Map. In the new box, there is a bar that goes from ...
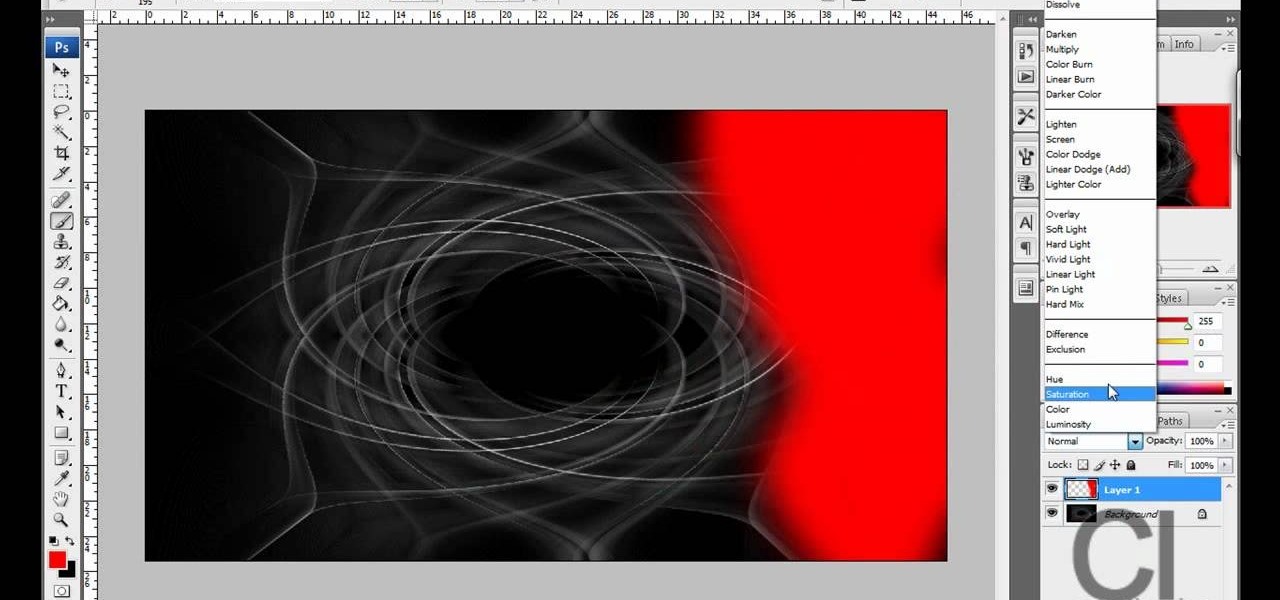
CreativeIceDesigns teaches you how to make a colorful abstract background using Adobe Photoshop. Go to File - New and make it 1280 x 720 pixels. Make the background black. Use the Lasso tool to make a star shape and fill it with white. Go to Filter - Blur - Radial Blur, amount 100%, zoom best. Go to Filter - Radial Blur. Then Filter - Stylize - Find Edges. Press CTRL + I to invert. Go to Filter - Distort - Twirl - 300 and press OK Duplicate this layer. Go to Filter - Distort - Twirl and choos...