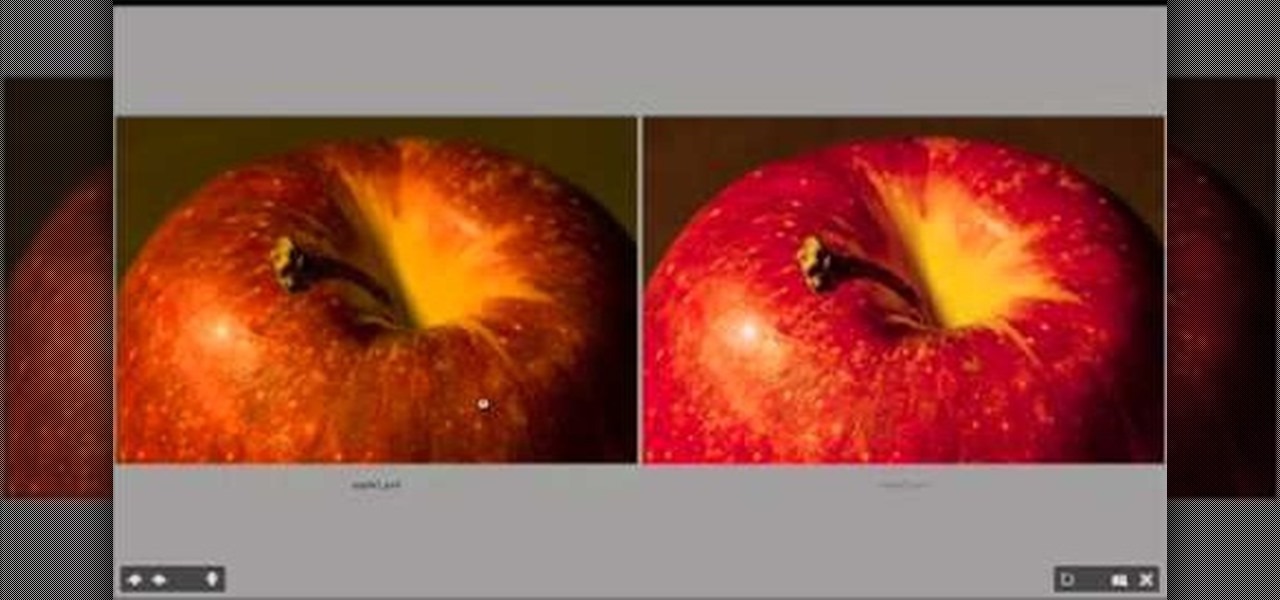
Color correction is a color adjustment you can take advantage of in Adobe Photoshop to alter the balance and contrast of color in a photo or other image. This tutorial shows you how you can take a shaded image and bring out the color and detail in your project.
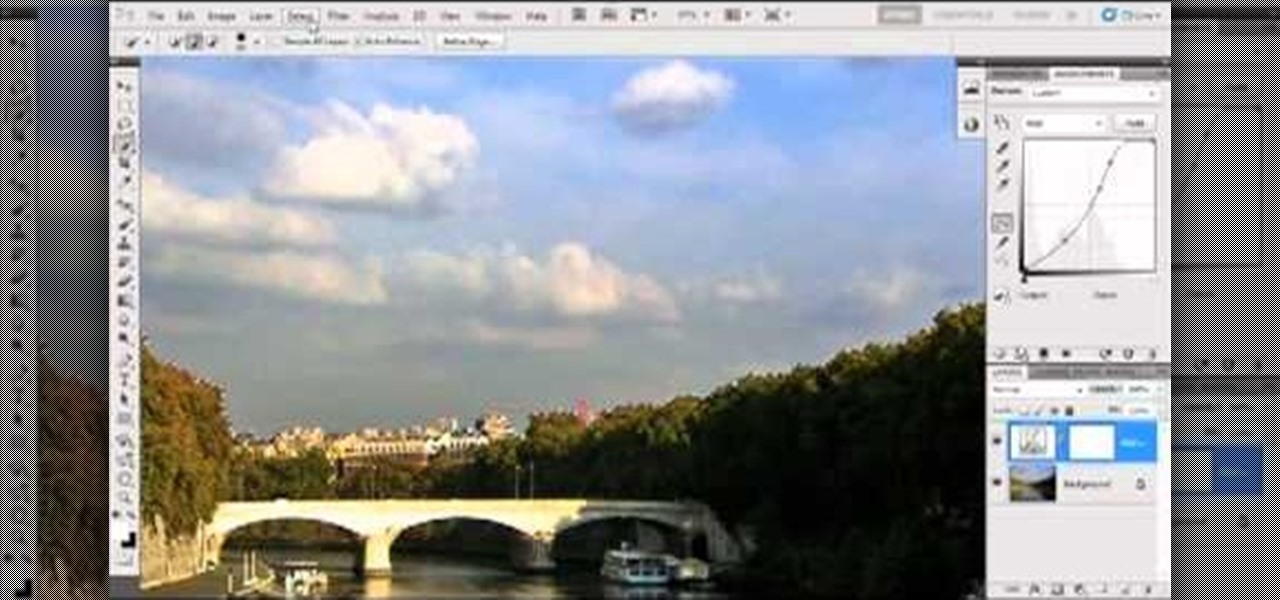
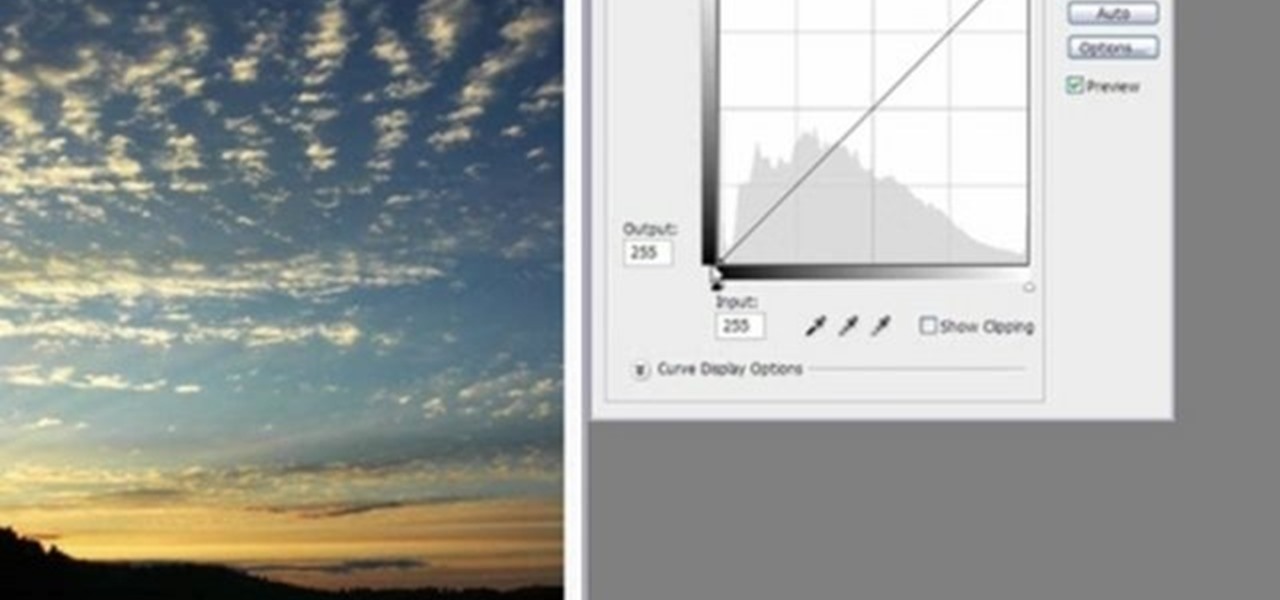
Bring out the colors in your clouds and sky images - or any other picture you want to retouch. This short tutorial shows you how to use the gradient tool in Adobe Photoshop and s-curves to adjust the color and contrast in your image.
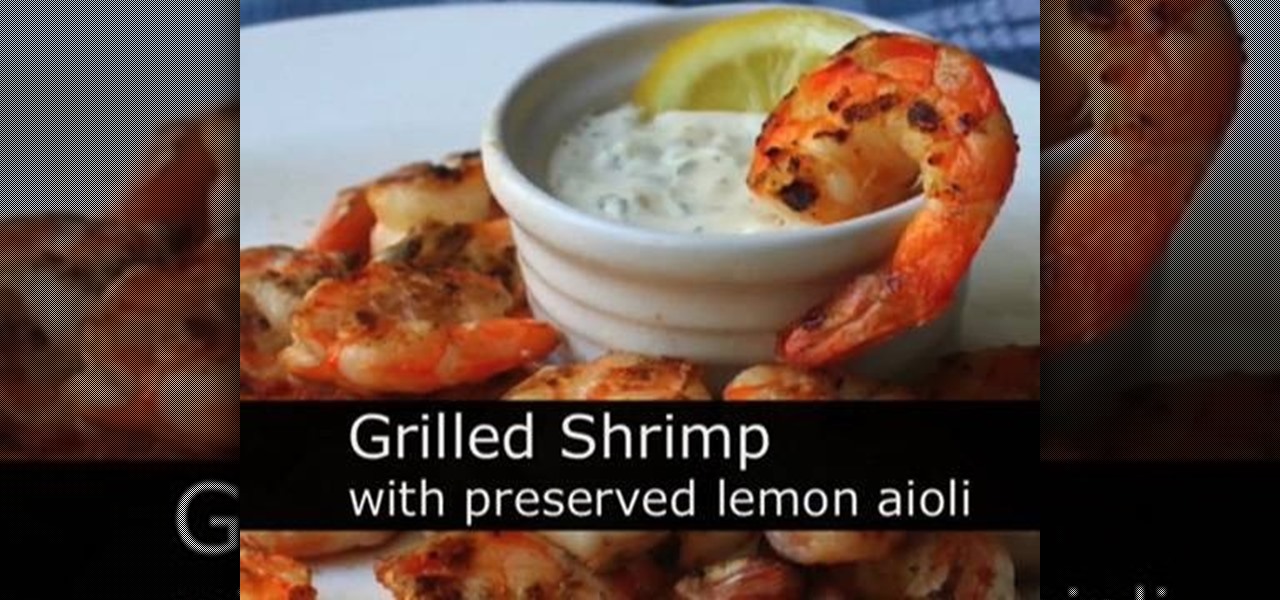
Yum yum, FoodWishes does it again. This recipe is perfect for a summer evening. Learn how to cook grilled shrimp with lemon aioli. The lemon aioli in this recipe is cured, which adds a nice sour touch to contrast with the freshness of the shrimp. Make sure you use quality ingredients so that everything stands out!
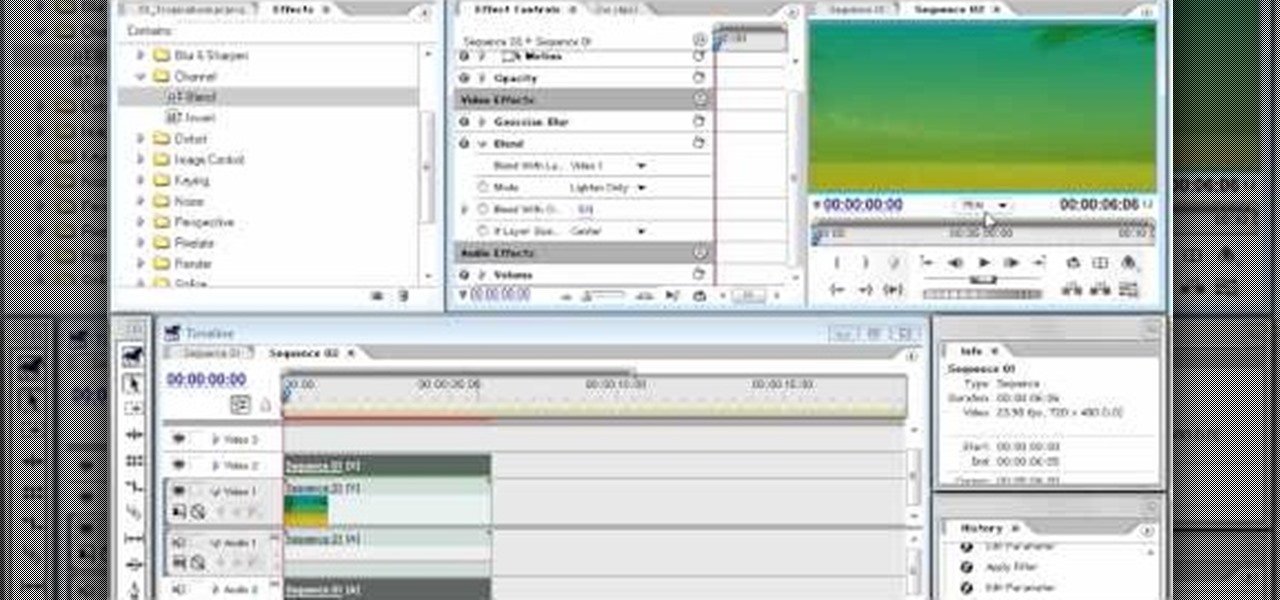
You might think that an idyllic shot like the one of the Bahamas in the thumbnail for this video doesn't need any modification to make it look tropical. You would be wrong! This video will teach you how to use Adobe Premiere Pro to give a tropical photo a more tropical look by adjusting the colors, the brightness and contrast.
If you want to paint shadow lines on a model care you should first realize that you can pair this technique up with any other technique you want to for different effects. Shadow lines occur when the out lines get thick and it provides a contrast to make something pop out. Shadow lines will focus on the light source. You want your shadow to be realistic so you want to think about where you light source will be. To paint on shadows lines, focus on where the light source is coming from and darke...
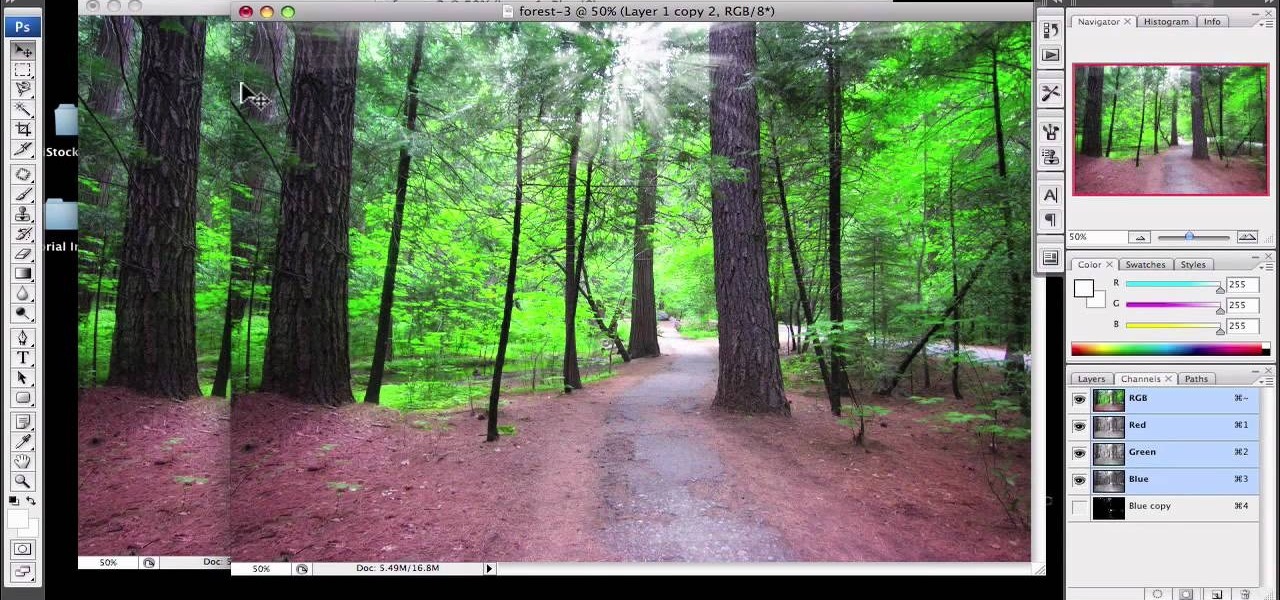
1)Open image, go to channel. Look for the channel that gives the most contrast by going through them one by one.

Yanik Chauvin shows you how to do basic curve manipulations in both Photoshop and Lightroom. The curves are the simple adjustments for changing contrast, exposure, and color curves.
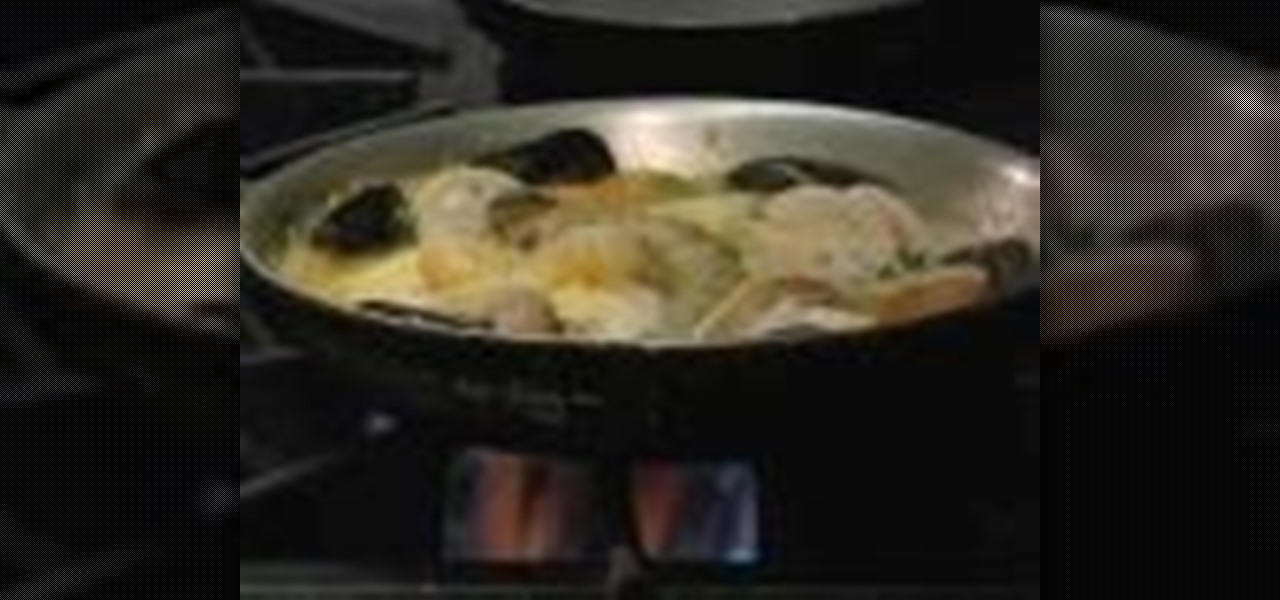
Spice up your seafood stew with some Irish flair. The Irish aren't just good for producing good beer (Guinness), but they can cook, too. See how to make some delicious Irish seafood stew.
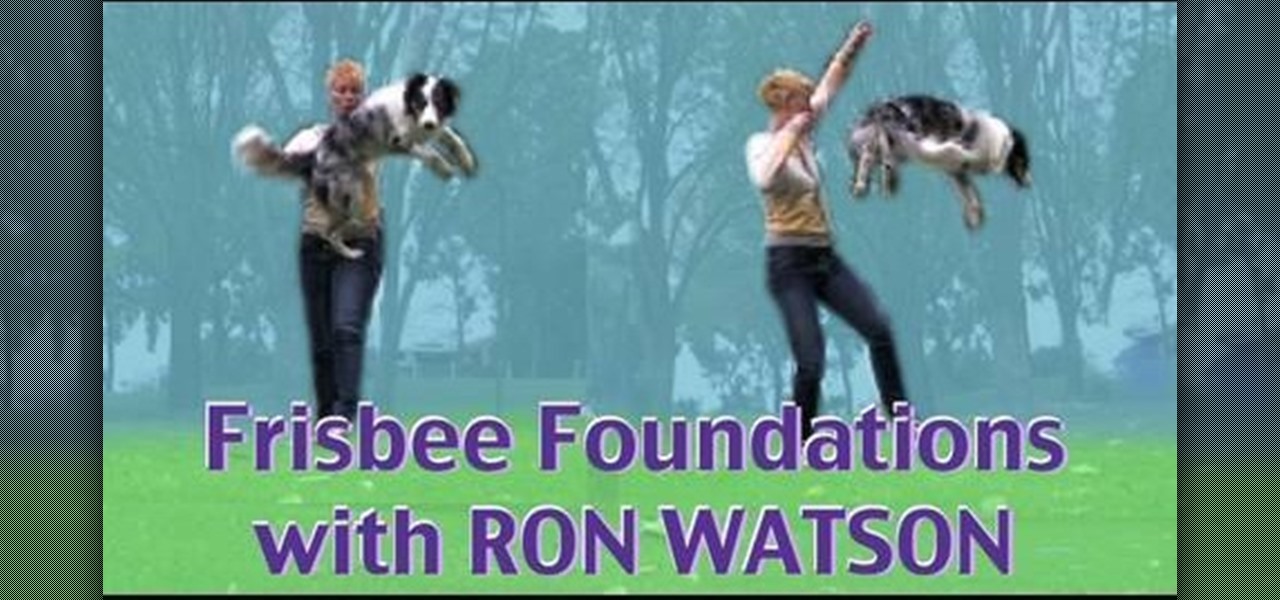
Ron Watson of Positive Vibe dog training studio in western Michigan with Frisbee Foundations and Dog mantic Dog Training TV explains how to do vault, stall, and rebound discrimination dog training. First, add value to a barrel by using eye contact. When the dog goes to where the reinforcement happens, feed it treats. Then order the dog off the barrel. When the dog jumps up by its own volition, then you know the technique is working. Then, set a linear vault by saying, top, and tossing the tre...
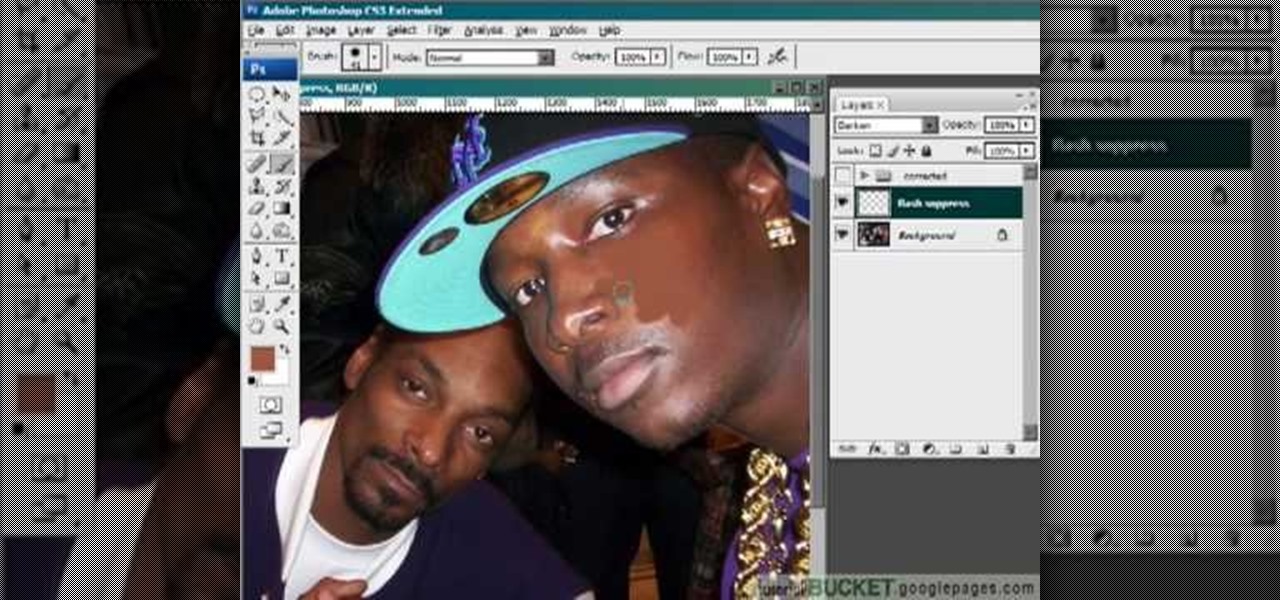
This video gives detailed instructions for removing a hotspot or flash reflection in a photo by using layers and masks. Start by adding a new blank layer and naming it something like Flash Suppress. You will use a special blending mode for this layer called darken. With your paintbrush you will loosely paint out the hotspot, having selected the color tone that you need with the eyedropper tool. Later on you can use layer masks to clean this up. Adjust the opacity of the layer until you have t...
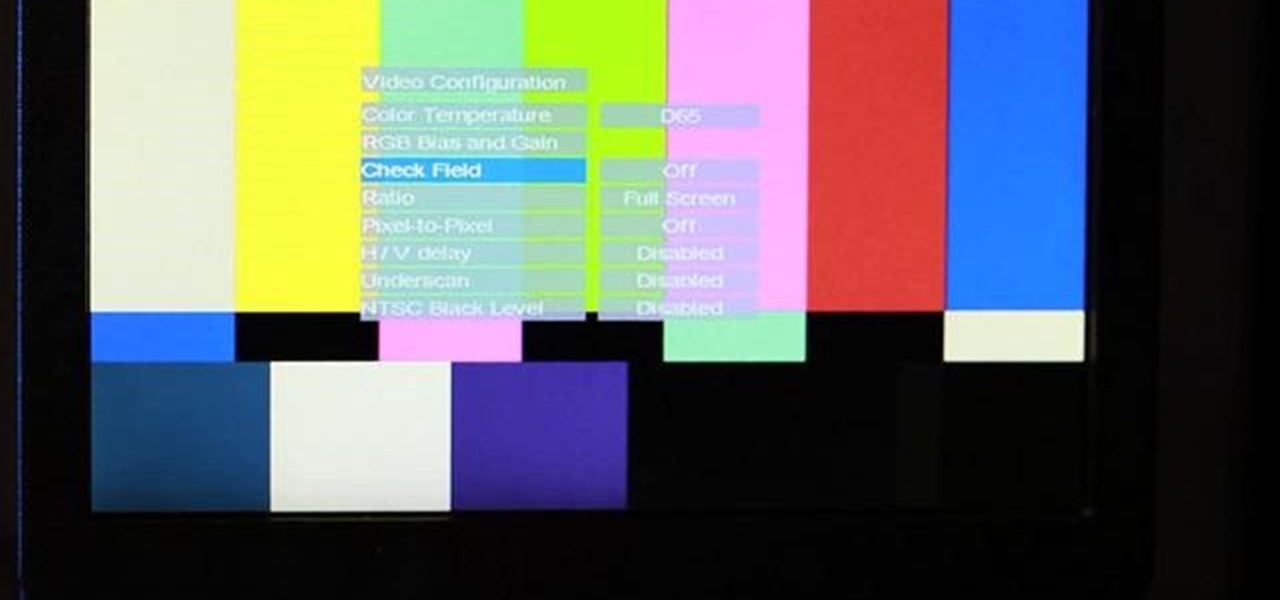
Check out this cinematography video tutorial on how to use calibrate an NTSC camera monitor, specifically a Marshall monitor.
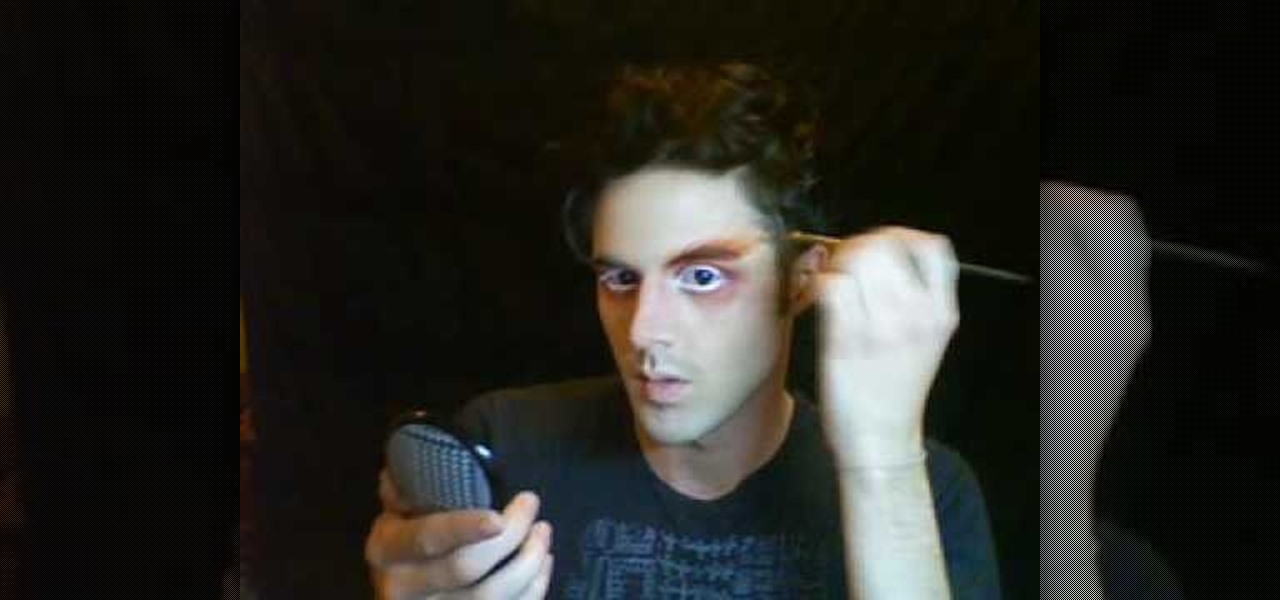
Learn how to create a beautiful Halloween Greek Goddess look. This Halloween makeup tutorial demonstrates how to create the Greek Goddess with at home makeup. For products used for this Halloween look, see below.
Earth, sky, and water tones contrast with dramatic liquid liner in this Pocahontas inspired eye look. The cosmetic products used to create this look are from E.L.F., NYX, MAC, Loreal, Pure Luxe, and Lancome. Watch this video makeup application tutorial and learn how to do a wild eye makeup look inspired by Disney's Pocahontas.
Photocopy art transfers are created using high-contrast photos and acrylic medium. Make a photocopy transfer with this free arts and crafts video series.
Unsharp mask in Paint Shop Pro is the preferred method in sharpening. What this tool does, is increase the contrast between light and dark. In other words, it makes lines darker, giving the illusion of being sharpened. This tutorial shows you how to use it.
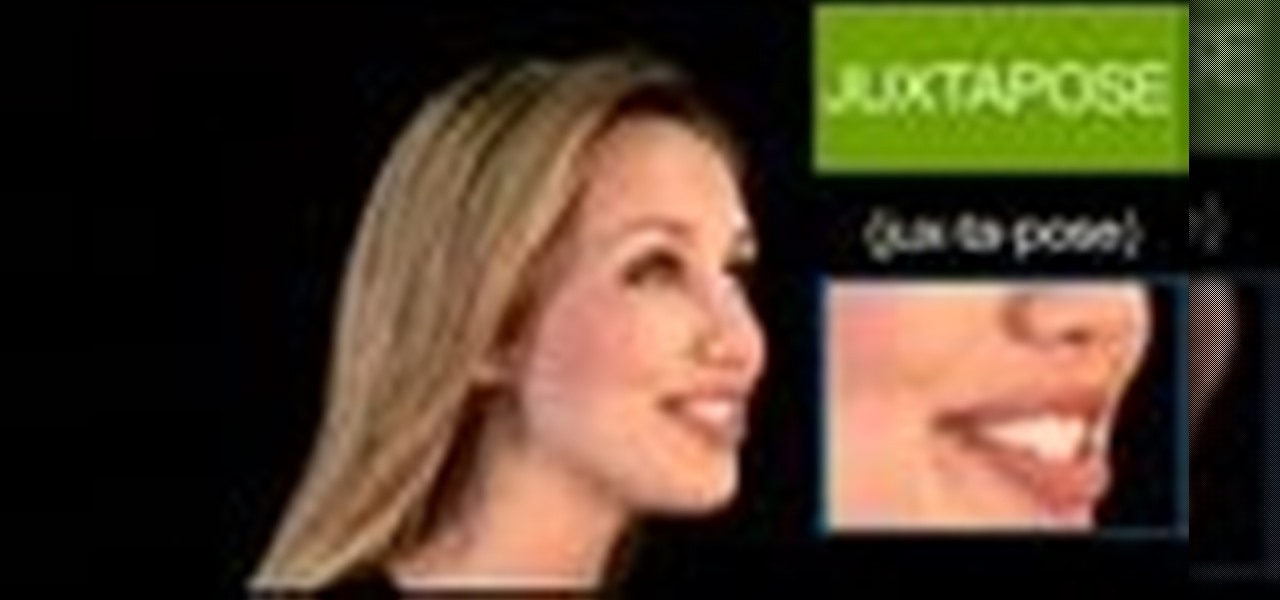
Today's word is "juxtapose". This is a verb which means to put things side by side, often for comparison or contrast.
The firm and fatty flesh of Chilean sea bass makes it an ideal choice for the grill. A hot-sweet grilled mango and red pepper salsa provides delicious contrast to the rich fish. When shopping for seafood, make sure it bears the Marine Stewardship Council (MSC) label to ensure it was harvested in an environmentally sustainable manner.
This tutorial will help if you need to blur either a person or section out of the screen using Vegas Video. You may want to adjust the blur options to make it more or less blurred in your section -the more contrast there is the better this will work.
This Photoshop tutorial shows you how to brighten an image using levels and brightness/contrast.
Some tricks which you can play to your coworkers in the office including: turning Windows on to high contrast mode, creating a fake desktop, and pulling a fake delete prank.
The "Plattsburgh" knot is named after the small town in up-state New York where Thomas Fink, inventor of the knot and co-author of the book "The 85 ways to tie a tie", is born. In contrast to its narrow close relative the "St. Andrew", the "Plattsburgh" produces a symmetric knot characterized by a broad cone with a narrow opening.
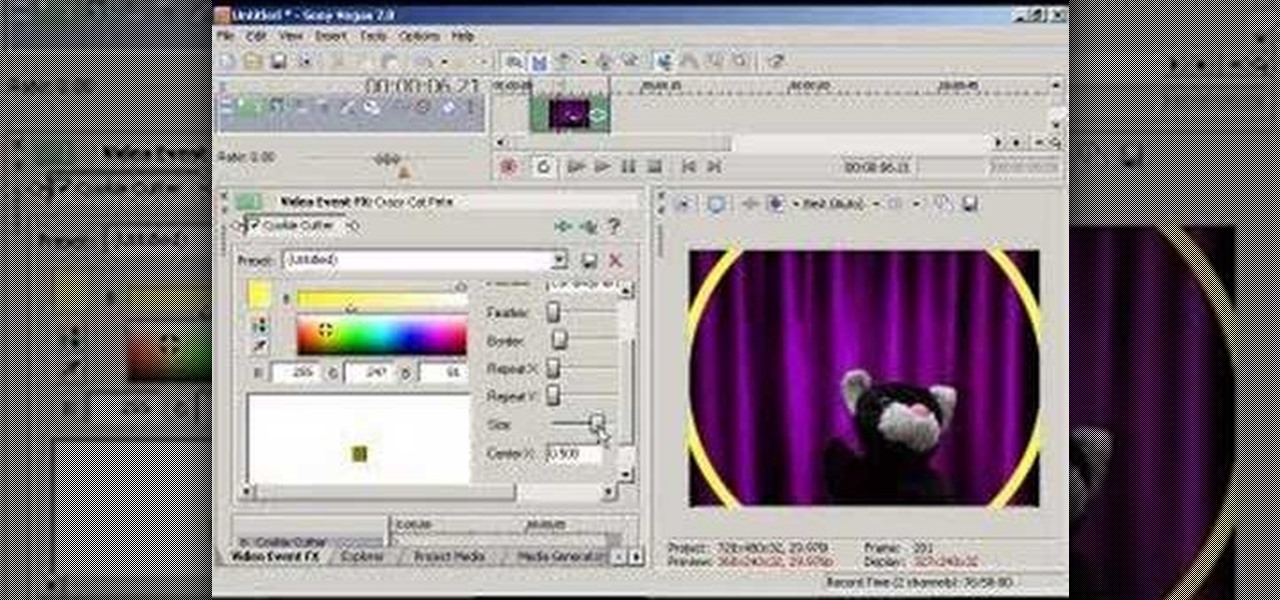
Sometimes we need to create grayscale images for better contrast effect in our designs. In this Photoshop tutorial you will learn to convert a color image to grayscale mode. You will also be introduced to the concept of channels.
Here are some general tips for using text in your project, including why you should keep things simple and how to contrast text from video. You need to avoid fonts with really thin lines and for the most part, you should try to keep everything simple.
In this video, Logan Salter teaches us how to apply Mad Hatter makeup for Halloween. Start out by applying white eyeliner to the tops and bottoms of the eye, then apply it to your eyelashes until they are white. From here, apply orange eyeshadow underneath your eyes and to the tops of the lids. Blend this outward from your face and then add in a darker orange to create a contrast. Next, apply a pink shadow into the crease and under the eyes. Apply the orange shadow to the brows, then brush it...
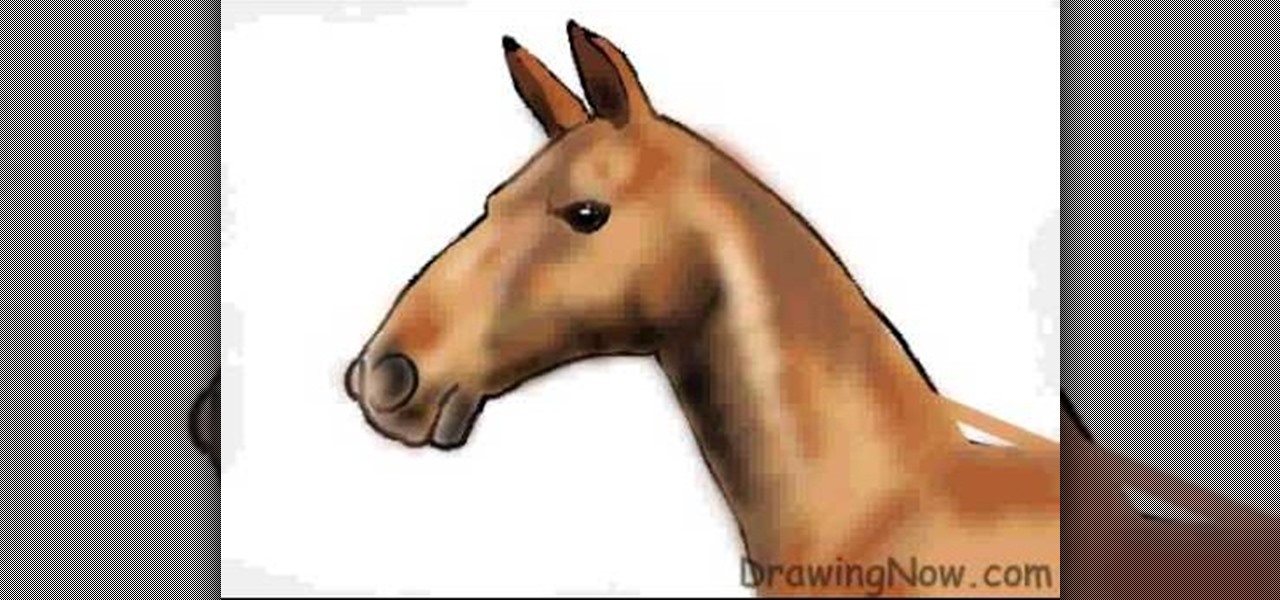
In this tutorial, we learn how to draw the head of a horse. Start out by drawing the outline of the horse's head and the neck. Then, draw in the ears and the details for the nose and the face. Next, color in the horse and then add shading along the sides of the horse and fill in the features with black. Use different colors of brown to show a contrast between the colors on the horse. After this, you will use small lines to create hair on the horse, then add in additional features. Clean up an...
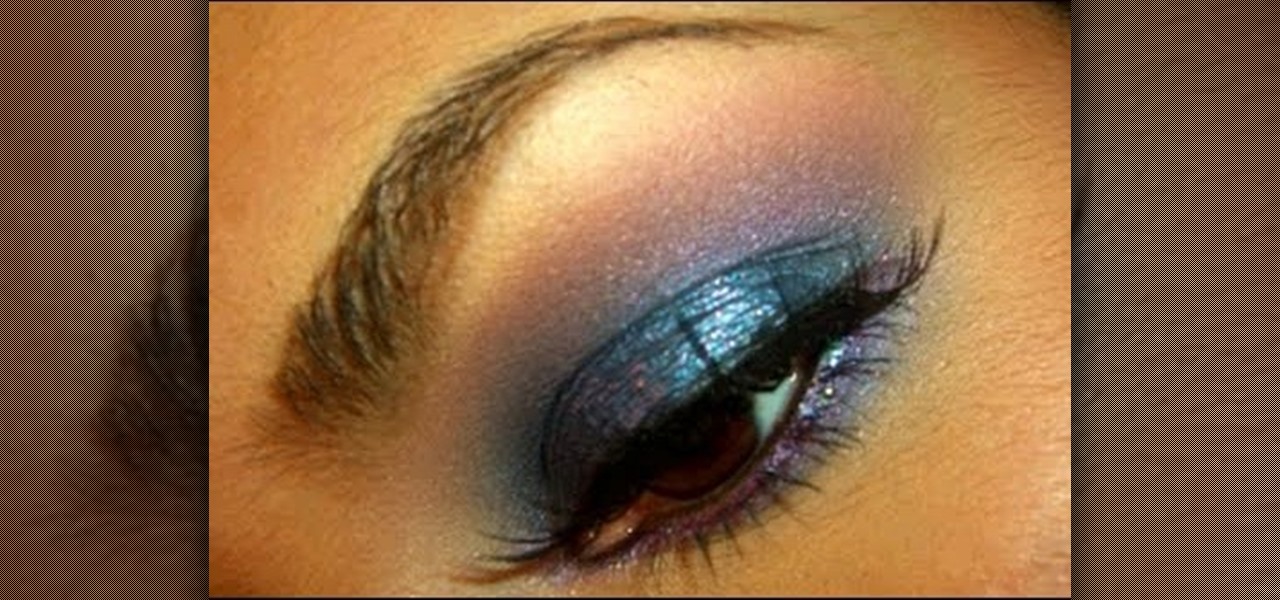
Though it may not seem like it, blue eye makeup is one of the most universally flattering shades out there. We're not talking robin's egg blue or any of the lighter shades of blue; rather, we're thinking a deep, dark navy or an electric, sparkly teal.
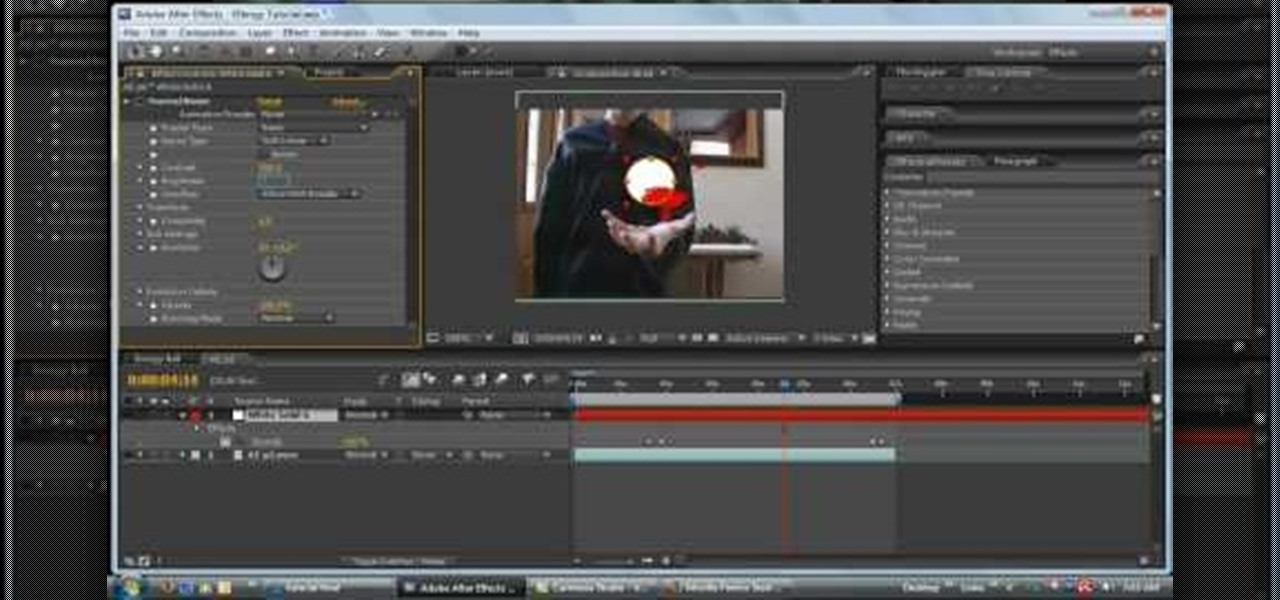
In this tutorial, we learn how to make an energy ball in Adobe After Effects. First, load a movie of someone pretending to hold an energy ball in their hands. After you do this, you will select a new setting and change the color. From here, you will select a round circle tool and add it where the hand looks like it's holding it. Then, change the effect to make the ball move around with the hand. After this, add the tracker to the hand and position it with the hand. After this, change the cont...
In this tutorial, we learn how to create a Lomo effect in Photoshop. This is a contrast that gives the photo a "cool" vibe and change up the effect that you see. First, load up your picture into Photoshop and then go to adjustments, then curve. From here, add a slight s-curve and then add a green channel with the same s-curve that you just created. Go to the blue channel and create the opposite s-channel from the others, then click "ok". Now, go to layer, new adjustment layer, then gradient m...
Bass players definitely don't get as much love as guitar players when it comes to glory and mainstream music popularity. After all, the base is the low-sounding, harmonizing complement to the lead guitar's riffs, offering a nice contrast but getting obscured in the process.
In this tutorial, we learn how to draw an eye in GIMP. First, open up the GIMP software and set up a circle, then color it dark blue. Next, add in light to the middle of the eye, so it looks like a light is shining onto it. After this, make a small circle in the middle of the eye, coloring it black. When done with this, create a new layer and then add brightness to the pupil of the eye. Continue to play around with the contrast and colors of the eye, so it looks more realistic and life like. ...
This video tutorial is in the Software category which will show you how to "Photoshop' someone into an image. It is like cutting and pasting one image over another. First open both the images. Ctrl and click the person's image that you want to move over. Drag the cut out image over the other picture where you want to superimpose it. Then click "edit', resize, rotate and position the image where you desire. Then go to "Image Adjustments' and adjust the brightness and contrast to match with the...
In this video, we learn how to change the color of clothing in Photoshop. First, click "enhance", then "adjust color", then "saturation". Now place a magnetic lasso around the shirt color you want to change. You can now use a slider to go through all the different colors, and pick that one that you want to use in the picture. Play around with the saturation, hue, and brightness to change what the color looks like in the picture. If you want to add more contrast, it will look more real like it...
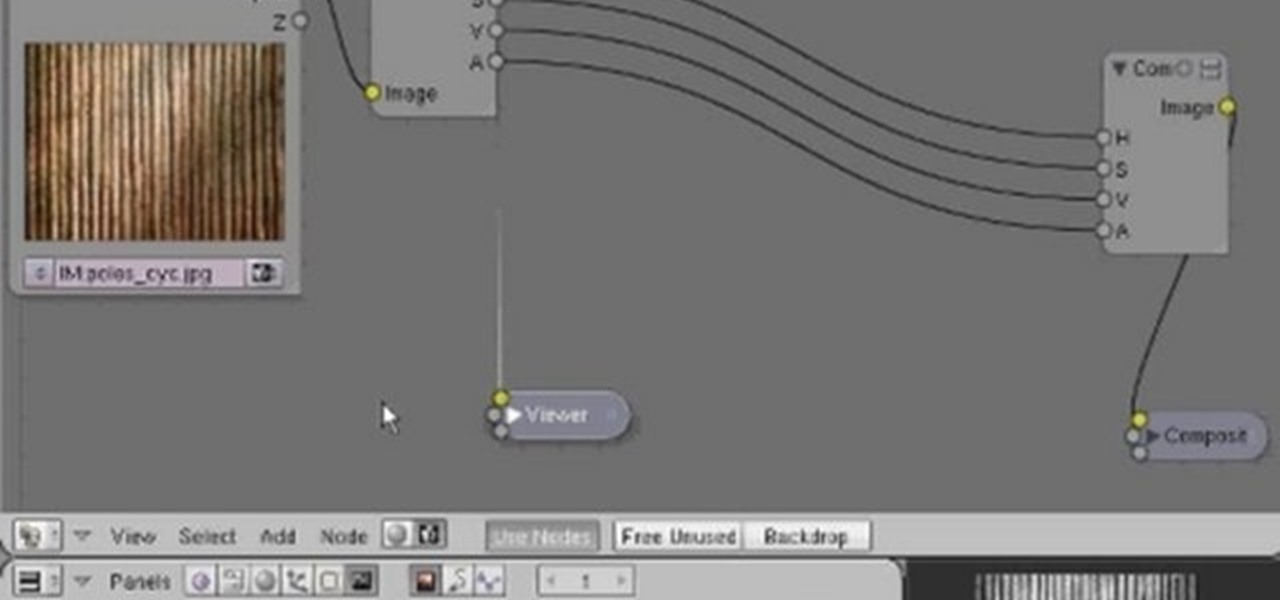
In this clip, you'll see how to construct a pass filter, commonly called a high-gain or band-pass filter. To do this, you'll use the HSV channels to identify what to do, the RGB curve to make an inversion mask, or negative, so that the image is added to itself, thus evening out the contrast and making a very flat image. This image can then be tiled and used as a seamless texture. Whether you're new to the Blender Foundation's popular 3D modeling program or a seasoned graphic artist just inter...
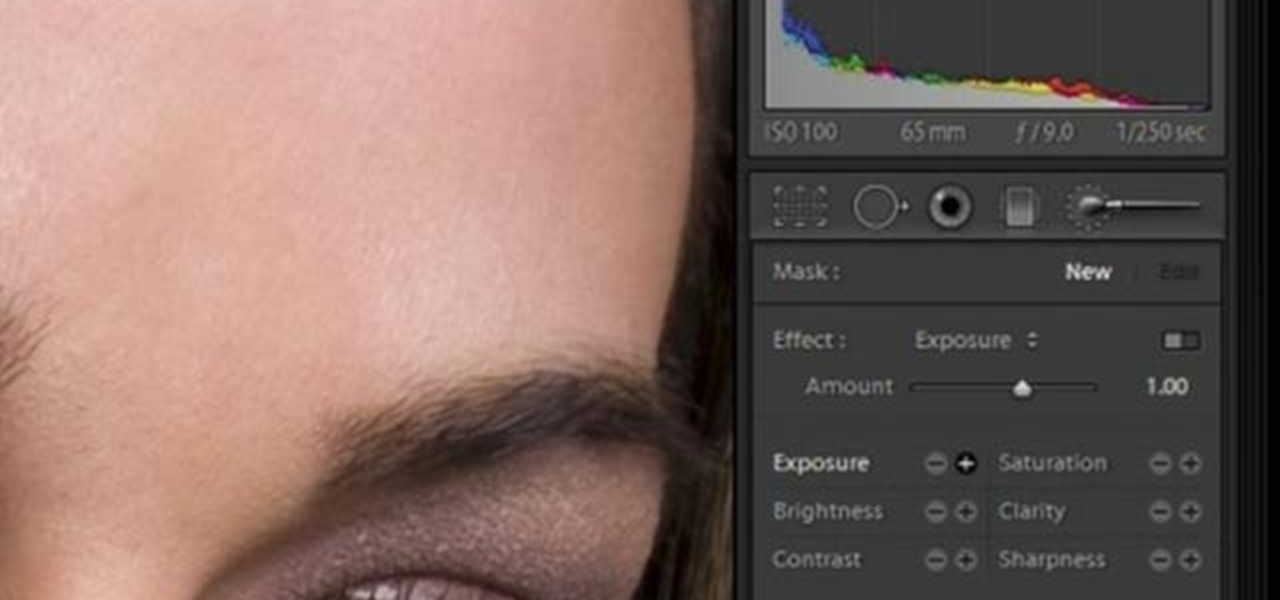
In this software video tutorial you will learn how to soften skin feature in Lightroom 2 in Yanik's Photo School. Select a photo and zoom in to the skin area. Click on the adjustment brush, or ctrl K. Here you can adjust 7 features; exposure, brightness, contrast, saturation, clarity, sharpness and color. But, if you click on the other 'exposure' dropdown menu, you will get these 7 options and additionally a 'soften skin' option. Click on 'soften skin' and it gives you the options to add nega...
The first step is to select a photo of a black, glossy car. Using the Lasso- polygonal tool, select the outline of the car. Once the image outline is complete, the dots animate around the image. The next step is to deselect the areas on the car where the chrome paint is not required. To do this, follow the same procedure as above holding the ‘Alt’ key (a minus sign appears next to the cursor). Once the selections are done, go to ‘Image’ menu, select ‘Adjustments’ and click on ‘B...
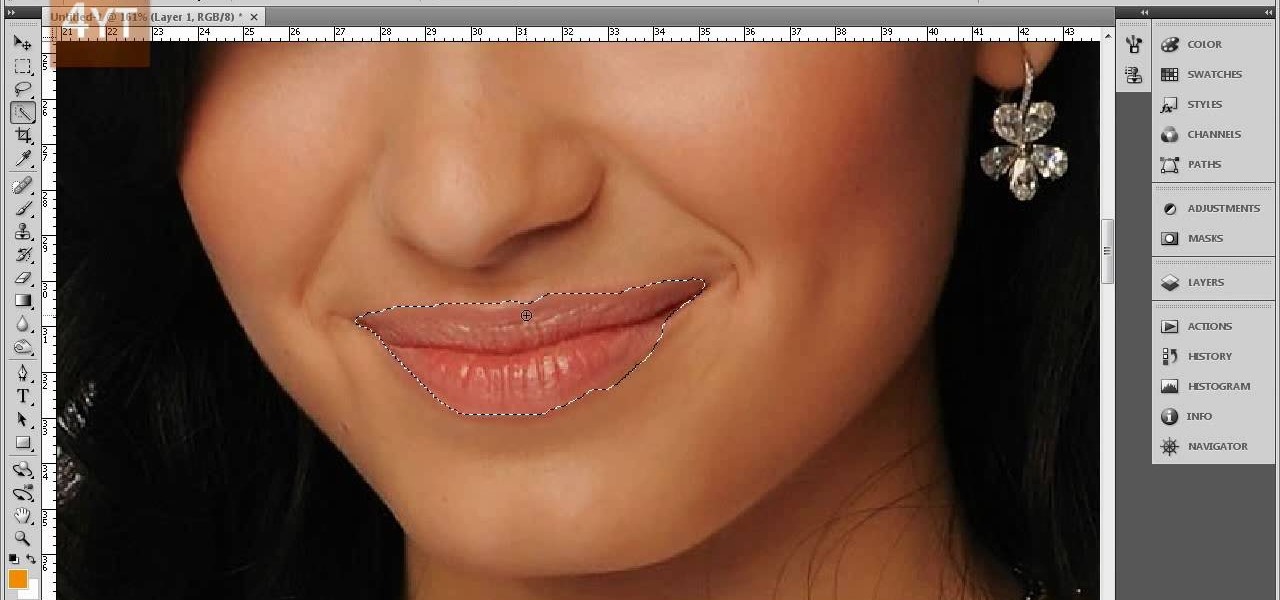
Forget to put on lipstick before a photo? Or perhaps you want to spice up an old photo of someone you love. Well their is a way, as 4YouTutorial demonstrates step by step using Photoshop CS4. First upload a photo or image into Photoshop. Next access your Photoshop layers and delete the default locked layer. After, activate the zoom tool and zoom in on the photo where the lips are located. Next choose the quick selection tool (make sure it's on plus) and drag it over her lips. This process can...
In this two-part tutorial, learn how to use a stencil on a shirt to create a screen printing effect. Although this does not show you how to do real screenprinting, by using a stencil you will create the look of a screenprinted shirt and be able to transfer your image. Materials you will need include: A blank t-shirt, a high contrast image, acetate, Scotch tape, a sponge, a Sharpie, Exacto knife, some acrylic paint, and glue adhesive. Get your favorite image on a t-shirt you can wear with help...
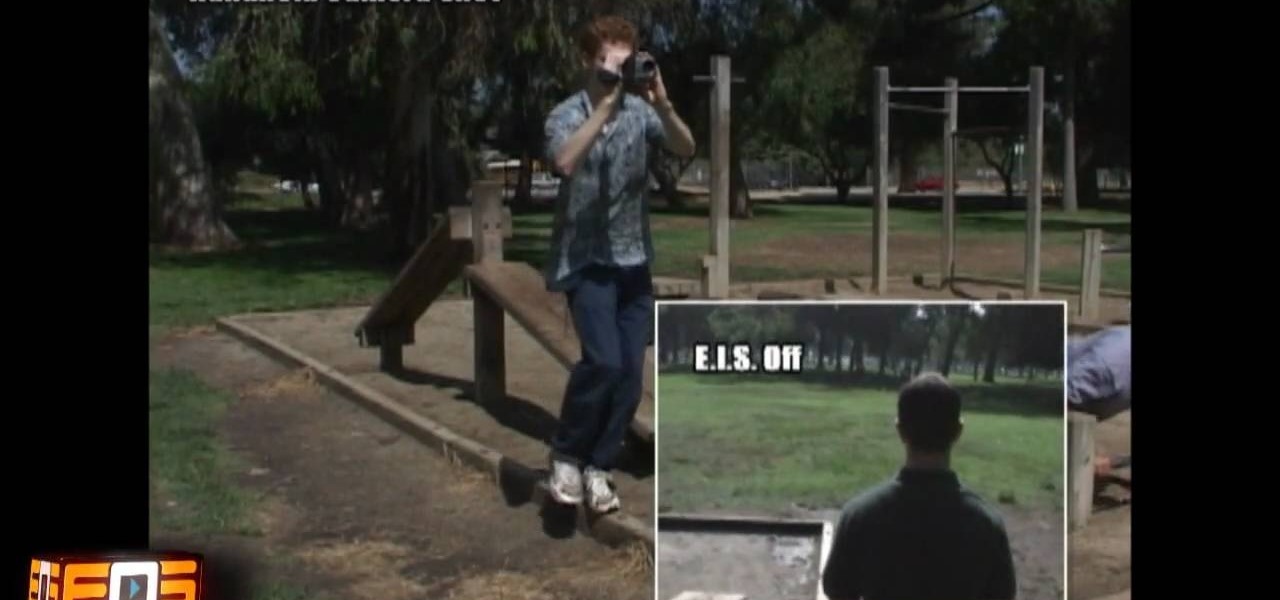
This is a video that is showing its audience how to use the electronic image stabilization or digital image stabilization on their digital cameras. Image stabilization is a good function to have on when movement is involved while taking a photo. The video goes over terms such as image stabilization, shutter speed, and contrast. It adequately defines image stabilization and digital stabilization and goes over the problems that consumers might have with the image stabilization mode on their cam...
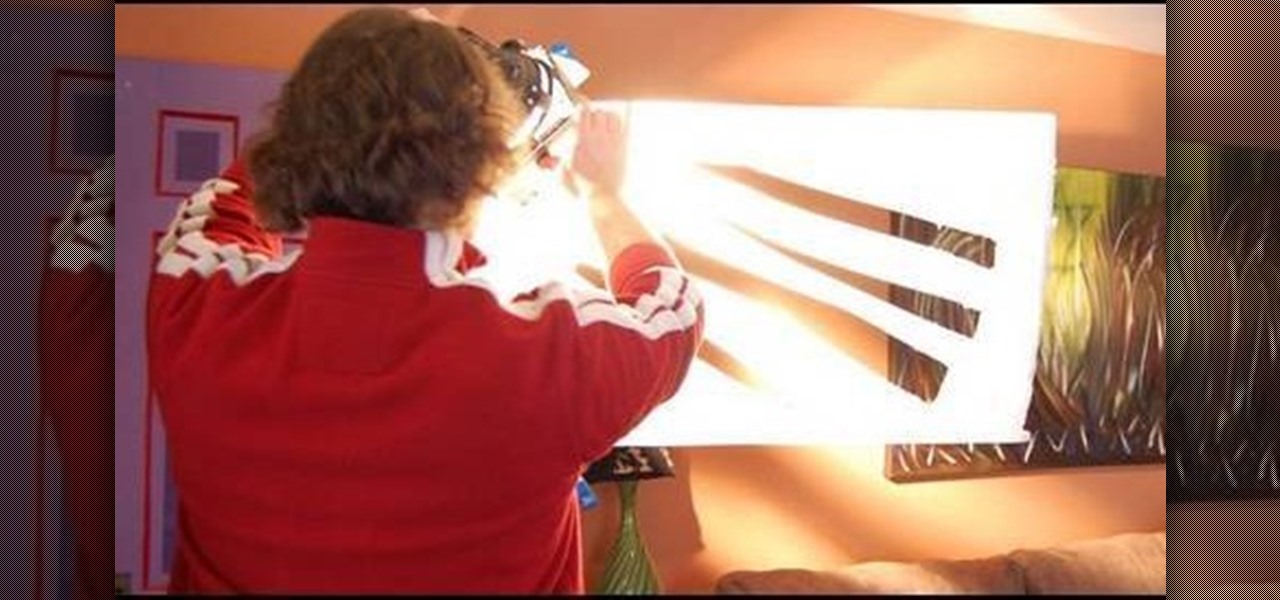
The video producer in this instructional lighting video shows the contrast of how to produce a well lit scene. He first makes a cut out of a piece of foam board, then mounts it, placing it just so. He then position the lighting at an angle that appeals to the viewers and compliments the subject at hand. He also shows the difference between the angle of the camera and how the lighting is positioned. He takes us through the process of how to angle the camera and set up the lighting with minimal...
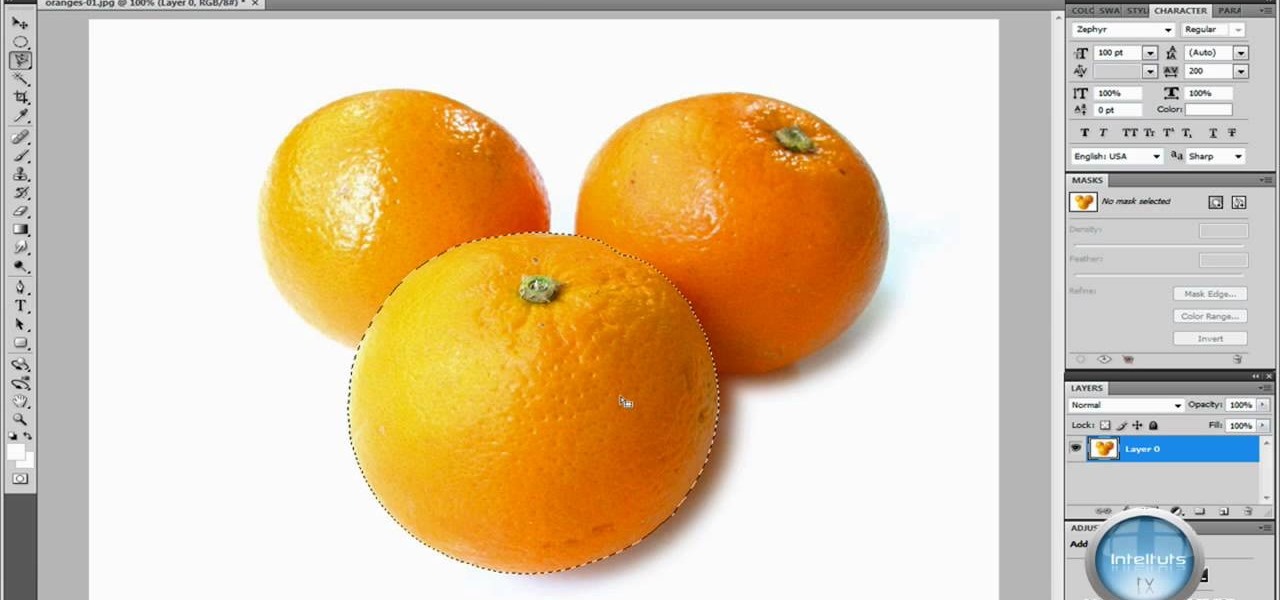
In this Software video you will see how to extract and apply color correction in Photoshop CS4. First select the object and extract it. The tool that you use to extract will depend on the type of image. For example, for oranges, select the Magnetic Lasso Tool from the left hand panel. Take the cursor, click on the outer line of an orange and drag the cursor along the outline of the orange. The tool automatically creates anchor points. You don’t have to click. But, if you want to create an anc...