This video tutorial is in the Software category which will show you how to "Photoshop' someone into an image. It is like cutting and pasting one image over another. First open both the images. Ctrl and click the person's image that you want to move over. Drag the cut out image over the other picture where you want to superimpose it. Then click "edit', resize, rotate and position the image where you desire. Then go to "Image Adjustments' and adjust the brightness and contrast to match with the...
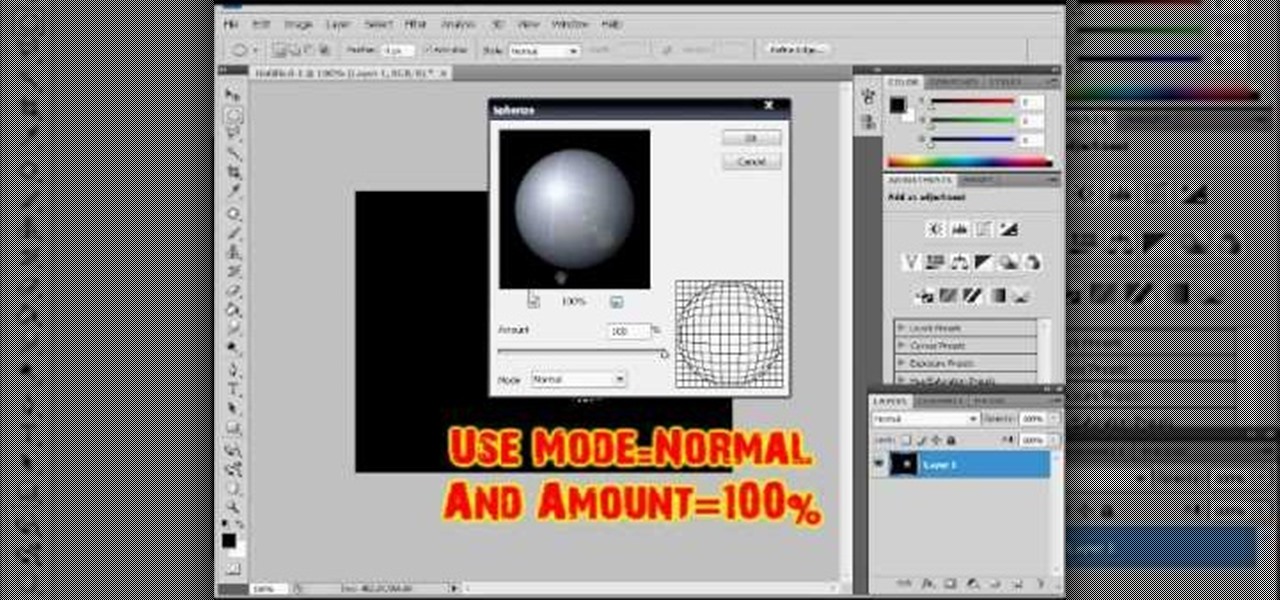
In this video tutorial, viewers learn how to make a shiny glass ball in Adobe Photo-shop. Begin by creating a new document with the default size and a transparent background. Then paint the entire background in black. Now select the marquee tool and create a circle anywhere in the background. Now go to filter, click on Render and select Len Flare. Make the lens flare 105 mm prime with 141% brightness. Then go to Filter, click on Distort and select Spherize. Use normal mode and set the amount ...
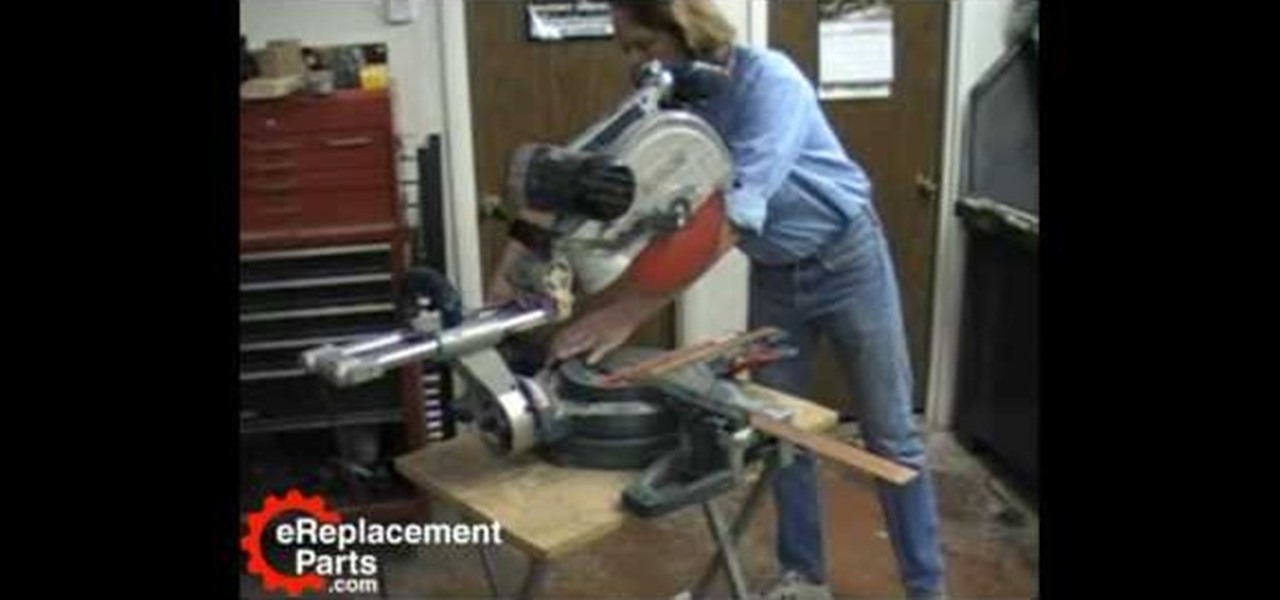
A miter saw is a handy portable tool that almost every carpenter or handyman has available. It makes clean cuts to thin pieces of wood in various angles and makes quick cuts. So in this tutorial, you'll find out how to make adjustments to a Bosch 4412 and 5412 miter saw. Knowing how to adjust certain parts of the machine is important, because certain parts may need to be moved in order to get the right cut for the occasion. So good luck, be careful, and enjoy!

In this video, we learn how to turn a photo partially black and white using PhotoShop. First, open up the program and open up the picture you'd like to change. Now, click with the right key above the layer and choose duplicate "layer". Now click above the eye icon to hide the layer, then select the layer. Now you can go to image, adjustments, then black and white. Now make the second layer visible and select the eraser tool. Wave your brush over everything but what you want to keep colorful. ...
In this how-to video, you will learn how to single out a color in an image with Photoshop. First, go to select and click Color Range. Select all the color of the image by clicking around the object while holding shift. Once it is selected, click okay. Your selection will be made. Go to the magic wand tool. Hold shift and select the color areas that you have missed. Now, go to select and press inverse. This will select everything but the object. Go to image and adjustments. Now, drag the satur...

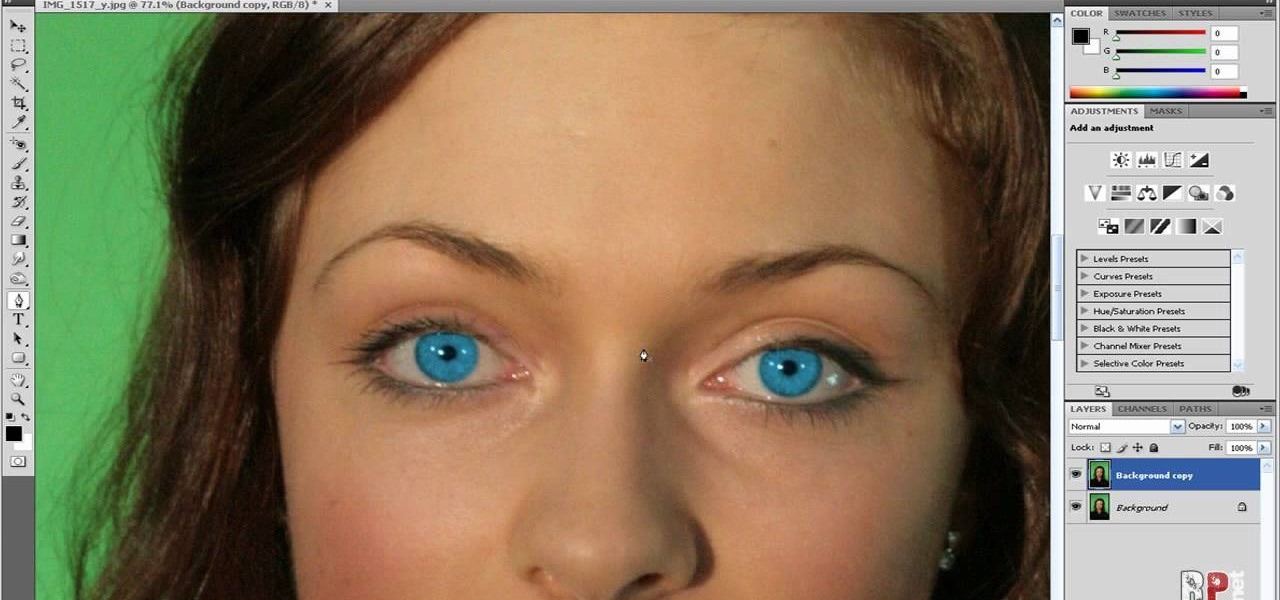
In this video tutorial, viewers learn how to change the color of eyes using Adobe Photoshop. Begin by selecting the Magnetic Lasso tool and create a selection around the eye. To create a second selection without losing the first one, hold the Shift key. Now go to Image, click on Adjustments and select Hue/Saturation. Now adjust the hue and saturation of the eye to change the color. This video provides a visual demonstration for viewers to easily follow along. This video will benefit those vie...

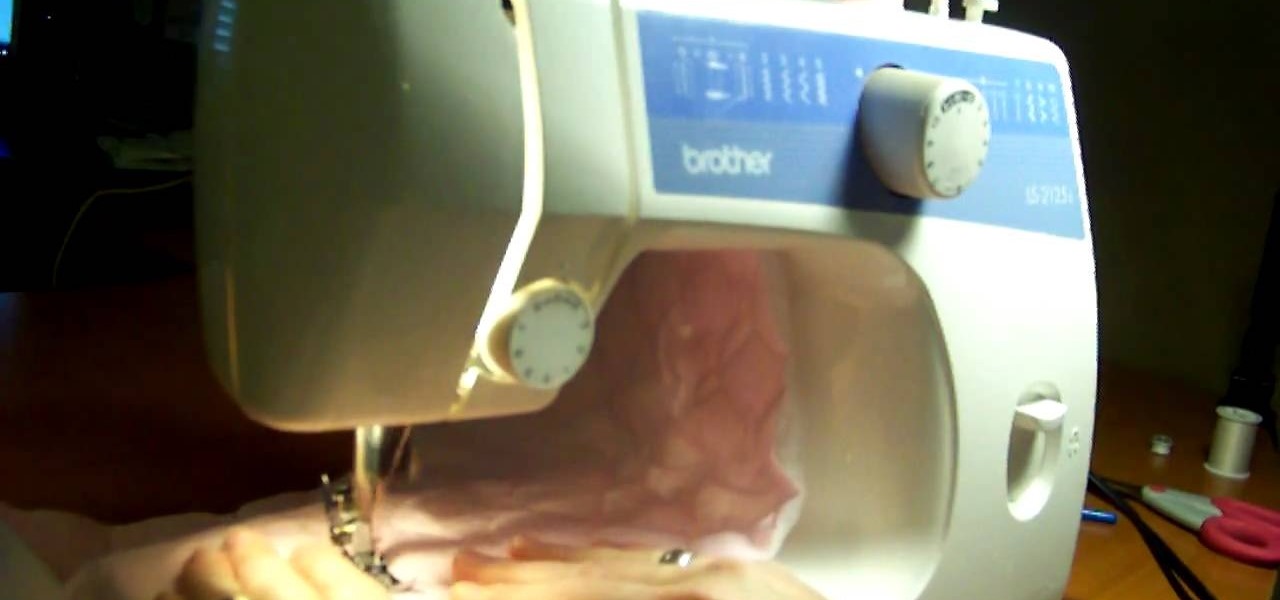
This video will show you how to use your sewing machine to create a buttonhole stitch. The buttonhole patter is very useful when making clothing because it does exactly what it’s name implies. It is the stitching used to sew a hole for your button. The pattern is not as hard as it looks. You follow an ABC sewing pattern to create the four sides of your buttonhole and if you go slowly and follow the pattern with appropriate height adjustments your will be butting stuff up in no time. To finish...
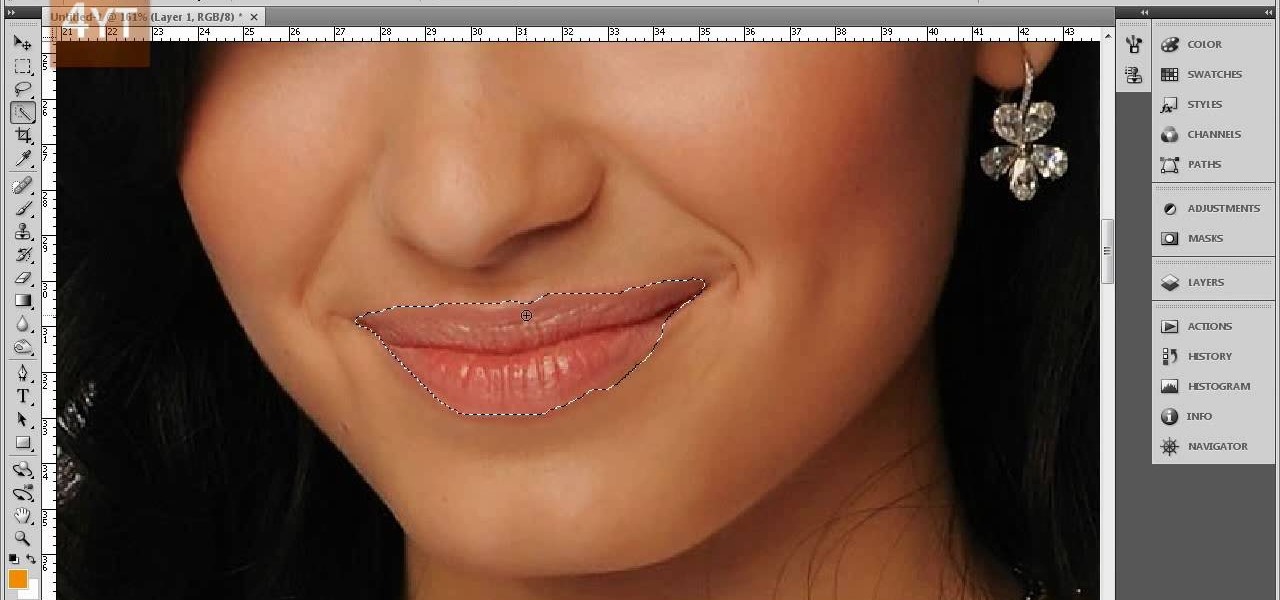
Forget to put on lipstick before a photo? Or perhaps you want to spice up an old photo of someone you love. Well their is a way, as 4YouTutorial demonstrates step by step using Photoshop CS4. First upload a photo or image into Photoshop. Next access your Photoshop layers and delete the default locked layer. After, activate the zoom tool and zoom in on the photo where the lips are located. Next choose the quick selection tool (make sure it's on plus) and drag it over her lips. This process can...
Ike, from Ike's Outdoors.com gives basic information on Sighting a Bow. He explains a few things he does before he even goes out and shoots. He explains how to line up the site with your arrow whether you are left handed or right handed and then gives pointers on "following the arrow" with the site to get the best results. He recommends shooting at a closer range and with 2-3 arrows before making any adjustments in case of error on your part, and adjusting the site accordingly before moving b...
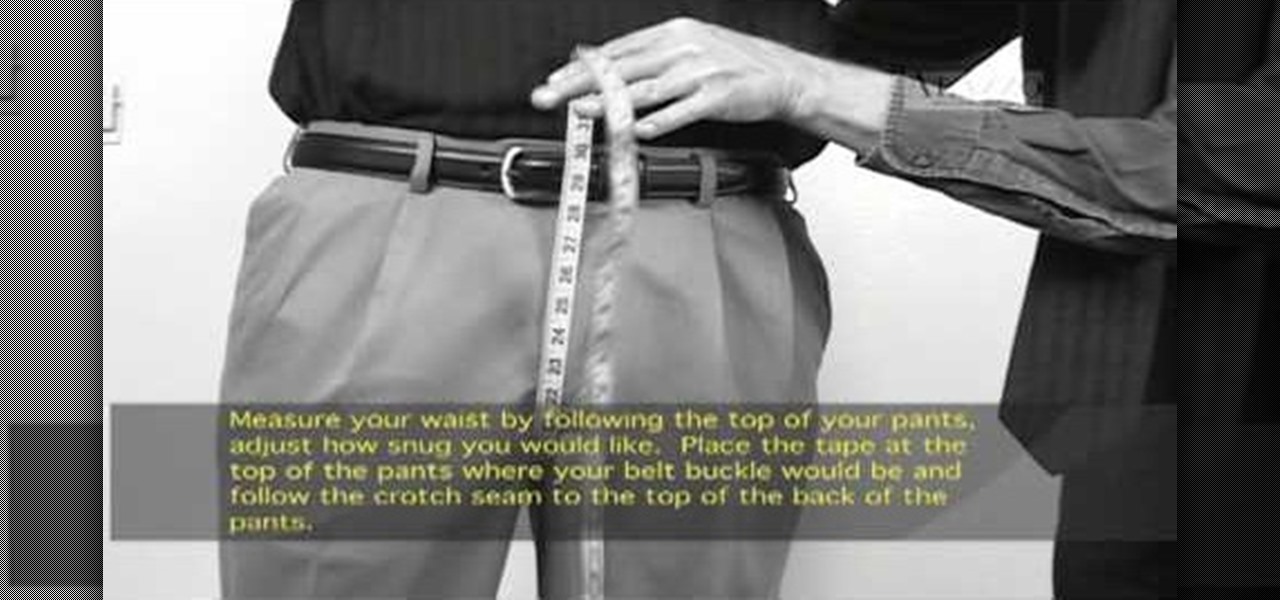
Alazzo Men's Custom Clothing demonstrates how to measure the crotch area of your pants. To measure the crotch area of your pants first, measure your waist by following the top of your pants down to your inseam. Make adjustments to fit your desired snugness. Place the tape measure at the top of the pants, approximately where the belt buckle would sit, and then follow the crotch seam to the top back of your pants. Utilizing this measurement technique will give you both an accurate and comfortab...
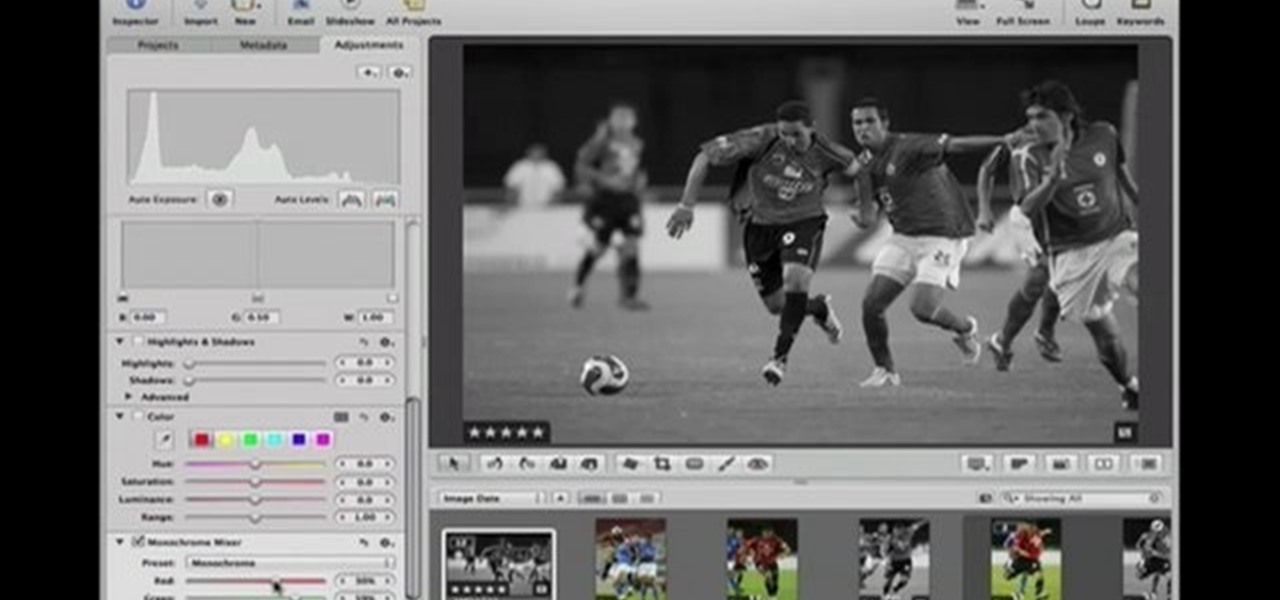
This Software video tutorial shows how to convert color images to black and white in Aperture. Scott Bourne presents this video. Open up ‘aperture’ program and select a color photo that you want to convert to black and white. Now move from the ‘projects’ page to the ‘adjustments’ page by clicking on it. Then click on the ‘+’ sign and select ‘Monochrome Mixer’. When you do this, the picture instantly turns to black and white. It’s as simple and easy as that. For editing the picture further, on...
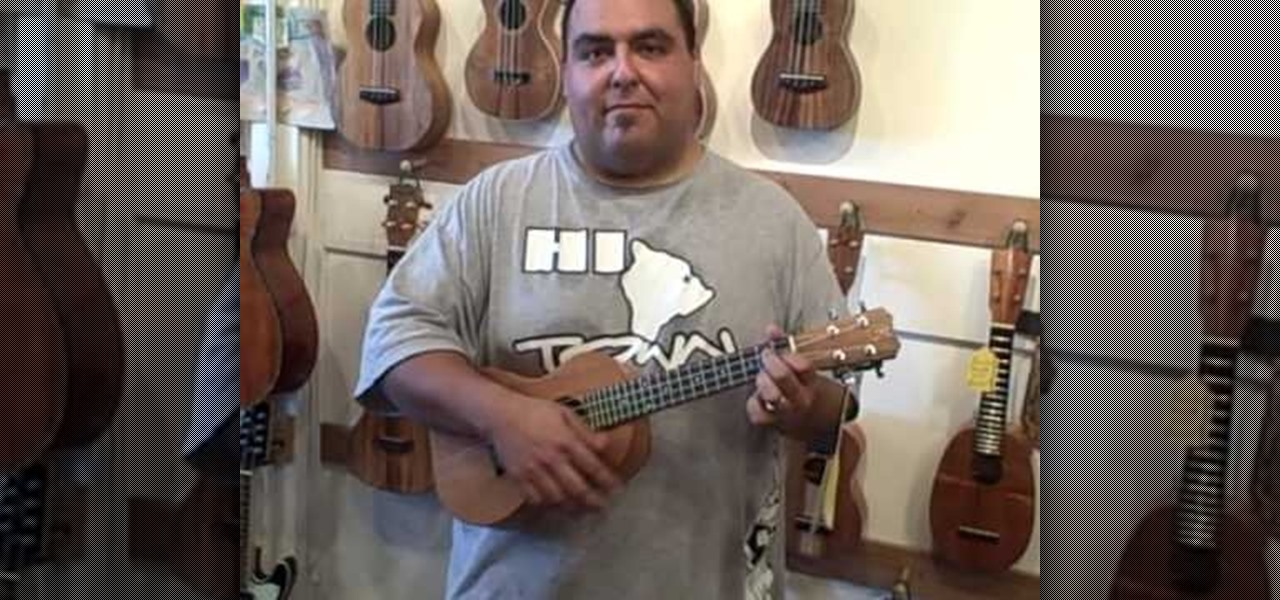
Brian Padilla from Hilo Guitars demonstrates how to tune a ukulele without a tuner. To tune a ukulele without a tuner, first pluck the G string and compare it to the seventh fret of the C string and match the pitch. On the same C string drop down to the fourth fret and match the E string to it. Go to the fifth fret on the E string and match the A string to it. Make adjustments as necessary. If your tuner runs out of batteries or you're stranded in an area without electricity, use the fret mat...
In this video from RawRadiantHealth Natasha talks to us about getting back to basics and not getting overwhelmed. A lot of times we can feel like we have too many responsibilities and we can get burnt out. Having a strong foundation and basics like getting enough sleep, eating your meals, your home is clean, you're taking care of yourself can really help you. When the foundation is a bit shaky these things can overwhelm us. If the basics are not taken care of the rest of your life can be a me...
You start off with a printed design on your doll. Use regular paper, but you have to print the doll in individual pieces - body, hands, legs, head. You stick those on the front of hard materials like thick card stock or some thick fabric. Now you can putt the doll together and make adjustments. You put the doll together by using small thumb tacks. It's even better if you have ones that have a rhinestone on them. Once you've done the joints, you can also add a little tutu or some fairy wings. ...
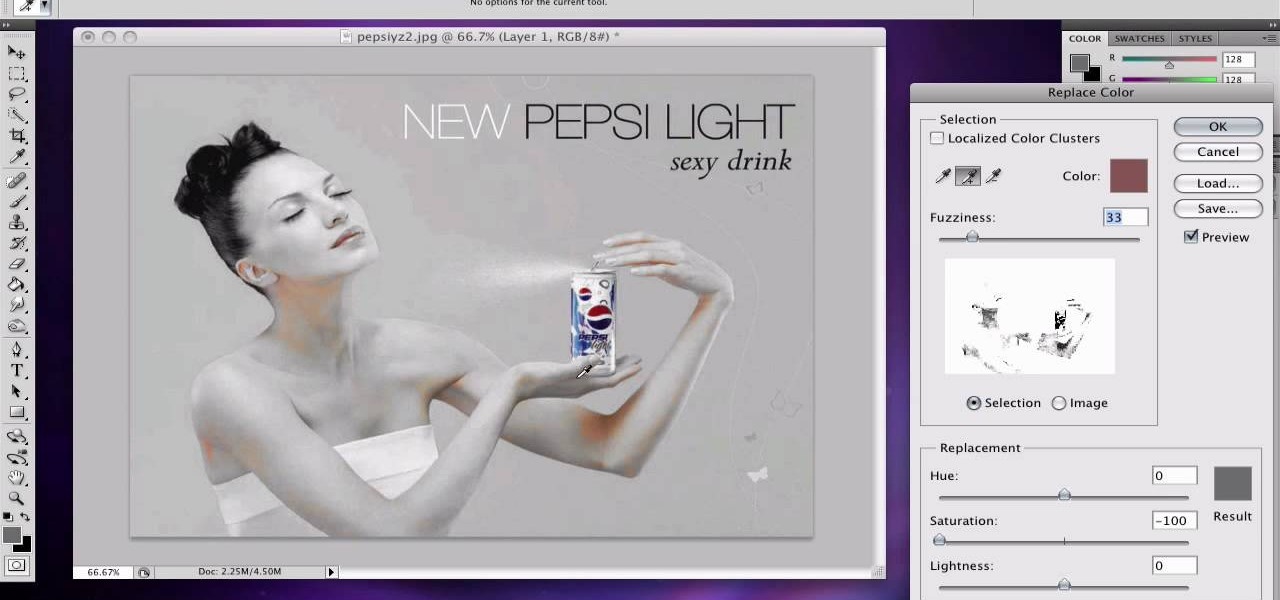
If you want to learn how to do selective desaturation in Photoshop CS4, you should watch this video. Go to File and choose Open. Open the file you want. Go to Image, select Adjustments, and then Replace Color. Select the second droplet or the droplet with a plus sign. Increase Fuzziness, say 106 but you need to decrease Saturation. Set Saturation to -100. Click on the image except for the selected part that you want to have a color. Decrease Fuzziness to know the parts that you need to click ...
This video will show you how your text can be the best using Fireworks! Your design will grab your viewers attention with these simple steps! Proper text size is very important. Using a thick font can make the biggest impression. Filling it with the gradient color with the right light adjustments will make it shine. Don't forget to texture it as well, a nice metallic galvanized finish is featured in the text. Sharp edges and shadowing will make it stand out to any internet surfer.
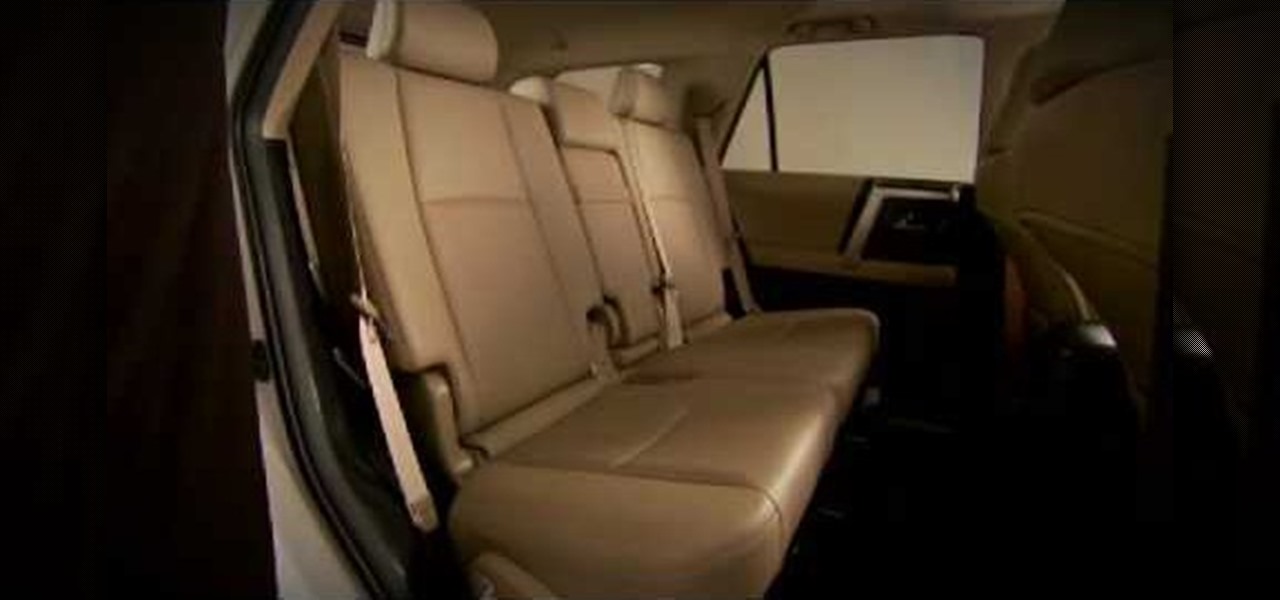
This video displays a 2010 Toyota 4Runner, modeled with seating for seven passengers. In the tutorial it shows a few of the basic adjustments that can be made to the seating. You can adjust the seat to recline to your comfort level and move to seat forward and backward. Unlike most 4Runner model this one comes with an additional back row of seating. This can be accessed simply by pulling the bottom lever of the backseat and pushing the seat forward.
If you're looking to do a cool photo with some special old effect then you should make it white an black.
In this Photoshop tutorial the instructor shows how to fix colors. It looks bad to have dull colors in your images. Now open the image in the Photoshop and go to image adjustments. Go to curves and start playing around with the curves in the RGB mode. When you change the curve you can see the change in the original images. Now adjusting the colors in the curves tool play around with the colors and this will get the colors brightened up. There are no stead fast rules but you need to play aroun...
Creative Ice Design describes how to change the color of a car in photoshop. The tutorial shows an easy and quick method to change the color.
Learn how to whiten your teeth using Photoshop with this video tutorial. 1. First thing you will want to do is remove the padlock if your image has one. You should be able to find this in the top right hand corner of your screen or in the background layers option.
Chris Barnes, Sean Rash and Kim Terrell make adjustments for changing lane conditions. This bowling lesson demonstrates lane play.
Do you own the Canon XH-A1 Digital Camcorder? If so, you might want to check out this lengthy video tutorial that shows you the ins and outs to the Canon XH-A1, the High Definition digital camera for the professional and serious non-pro alike. Learn how to make manual adjustments to fine-tune your audio by setting the mic mode with the onboard microphone or an external mic, along with alternative microphones. This shows a bunch of tips and tricks for you cameramen and sound pros.
Do you own the Canon XH-A1 Digital Camcorder? If so, you might want to check out this lengthy video tutorial that shows you the ins and outs to the Canon XH-A1, the High Definition digital camera for the professional and serious non-pro alike. Learn how to make manual adjustments to fine-tune your video by adjusting the Shutter Priority Mode (Tv), the Manual and Auto Focus, the Exposure, and much, much more. This shows a bunch of tips and tricks for you cameramen.
Fractured ribs can be painful injuries treated by a doctor and requiring pain management and adjustments in daily activities. Learn how to treat a fractured rib and stay fit in this sports medicine how to video. Watch and see how to use rib support to prevent further injury.
This how-to video tutorial looks at the effects of Tadasana (the mountain) on some simple and well known yoga poses like triangle pose.
Despite having the UltraPixel branding, the M7's camera can leave you feeling a little let down. The picture quality is clear and the low-light shots are decent, but when looking at the same shots taken on a friend's iPhone, you may feel a little inadequate.
In this video tutorial, viewers learn how to change the color of lips in Adobe Photoshop. Begin by importing the image into the program. Select the quick mask tool and then select the brush tool. Now color the part that you want to retouch. This will allow the mask to create a selection. No click on the masking tool to create a selection. Then select the marquee tool. Right-click the selection and click on Select Inverse. Right-click the selection again and select Feather. Make it 1 pixel and...
This tutorial guides you through the process of making a mennorade star with origami. It begins with a square of paper that is folded in half and then folded from the corners to make guides on the paper. The paper is then cut in half to make two rectangles. Each rectangle is then folded and trimmed to form a 'Z' shape. It is necessary to complete these steps for ten more pieces of paper. The next step is to take to of the 'Z' shapes, perhaps of complimentary colours, and link them together so...
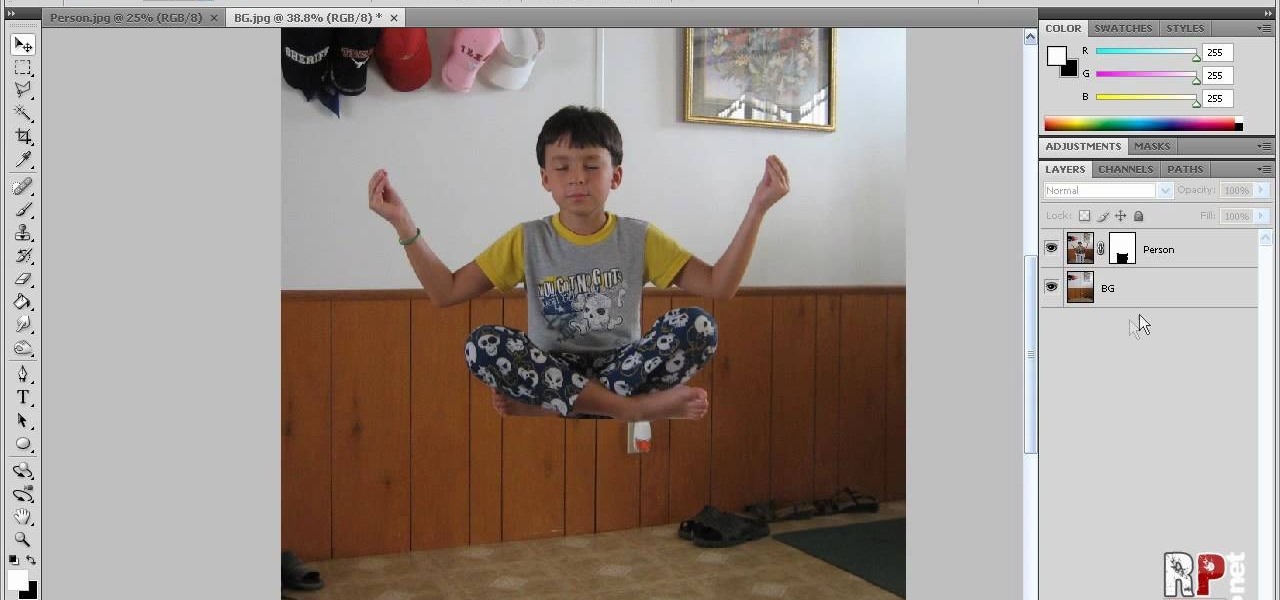
This video tells us the method to perform a simple levitation trick using Photoshop. Take the photo of the background and the person sitting on some object posing as if he or she is levitating. Select the 'Move Tool' and hold the 'Shift' key down. Drag the picture on to the background and release the shift key. Select the layer containing the person and go to the mask tool. Select the foreground color to black. Go to brush tool and set the 'Master Diameter' to 70 pixels and the 'Hardness' to ...
This how to video will show you how to remove blemishes and do other touch ups in Photoshop. First, open the image you want to touch up in the program. Now, choose the polygon tool and select the background of the image. Now, go to adjustments and change the brightness and contrast. You can also add a blur in the filters. Use the smudge tool to touch up any errors from using the blur filter. To fix blemishes, use the patch tool. Select the area you want to fix and drag it to an area of simila...
This how to video shows you how to create wallpaper for your computer desktop. Open Photoshop and create a new file. Change the dimensions to the size of your desktop. Click okay and go to edit and fill. Choose color and select black. Click okay to fill the screen with black. Duplicate the layer. Once this is done, go to filter, render, and lens flare. Make sure the lens flare is in the center. Edit the settings to your liking. Click okay to add the effect on to the image. Go to filter, disto...
This video teaches us to make a photo black and white with coloured parts in Photoshop. This procedure consists of many steps. In the first step, we choose the magnetic lasso tool from the application. This is followed by the second step. In the second step, we draw the contours of the places we want to stay colored in the photo. Press the 'Shift' key to keep the contours selected while drawing contours across multiple places in the image. After drawing the contours, go to step three. Right c...
In this how-to video, you will learn how to make grain textures in Photoshop. First, click add layer mask to an open image. Add a filter to this mask and by going to the texturizer option. Adjust the settings to your liking. Click okay to continue. The mask will make the texture transparent. Go to image adjustments and levels to adjust the intensity of the grain. Click okay to save the settings. Select the layer and then choose the color you want the grain to be. Make sure to lock transparent...
In this how to video, you will learn how to make a reflection in water using Photoshop. First, open the image in Photoshop. Select the crop tool and select the whole photo. Click and drag the lower part down. Select the rectangular marquee tool and select the picture. Click on the selection and select layer via copy. Click the move tool and drag the upper point in the picture to the bottom of the document. Go to filter, blur, and select motion blur. Choose a -90 degree angle with a 35 pixel d...
This how to video shows you how to create a nebula star scene in Photoshop. First, create a new image in Photoshop. Fill the background with black. Next, create a new layer and call it stars. Go to filter and select noise. Choose Gaussian and click monochromatic. Click okay to add the noise. Once that is done, go to adjustments and levels. Change the settings so that you have less clutter. Next, make a selection in the middle. Copy and paste it as a new layer. Go to edit and select free trans...
Make light saber glow effects in lsmakerThe author found freeware that helps create light sabers. The freeware is not as good as adobe after effects, but it will serve the purpose. Download the software from the website http://www.lsmaker.uw.hulpage.php?main=lsmaker.html. Extract the folder. Open lsmaker.exe. Save the extracted file to the desktop. Select import. Add either picture or video file. Change the saber color to red. Click ok. The blade needs to be white. In the dialog box change pi...
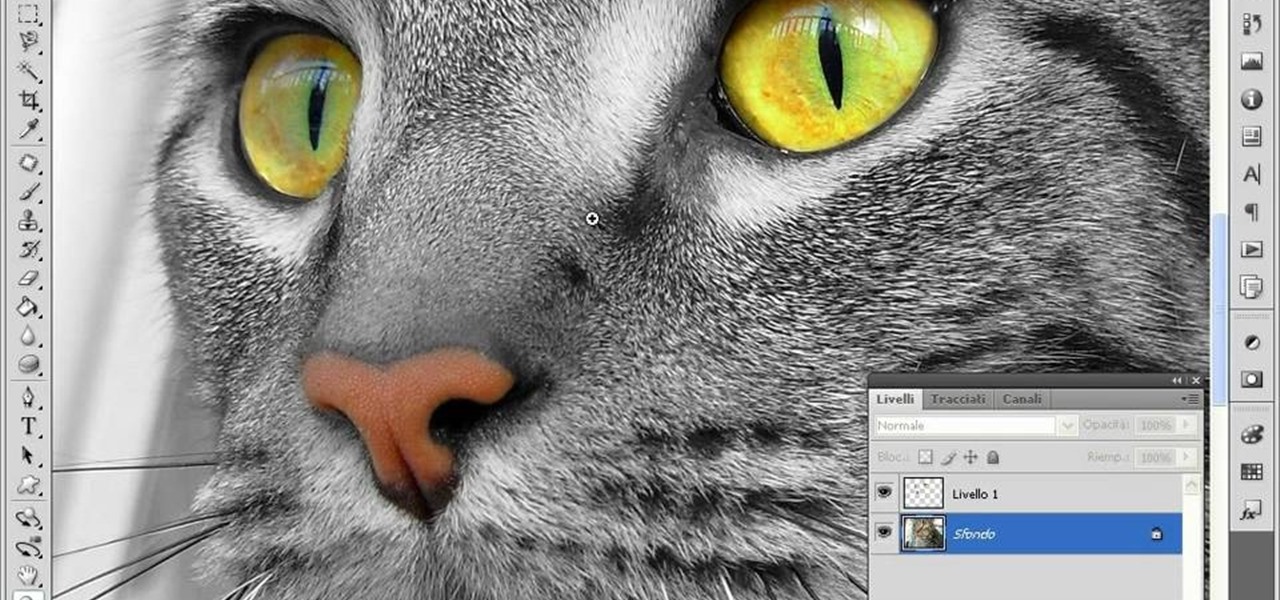
In this how-to video, you will learn how to change eye colors using Adobe Photoshop. First, open the image, Duplicate the background image. Zoom in to one of the eyes and select the pen tool. Set it to paths. Now, go around the iris of the eye. This does not have to be perfect. Click and drag to the other eye and select the other iris as well. Once these are both selected, right click into one of the selections and set the feather radius to about three pixels. Go to Image and Adjustments and ...
It seems like its hard to get as much sleep as we need, doesn't it? Sleep is important and effects how you function throughout the entire day. Follow these tips and you will be on your way to a good night's rest.
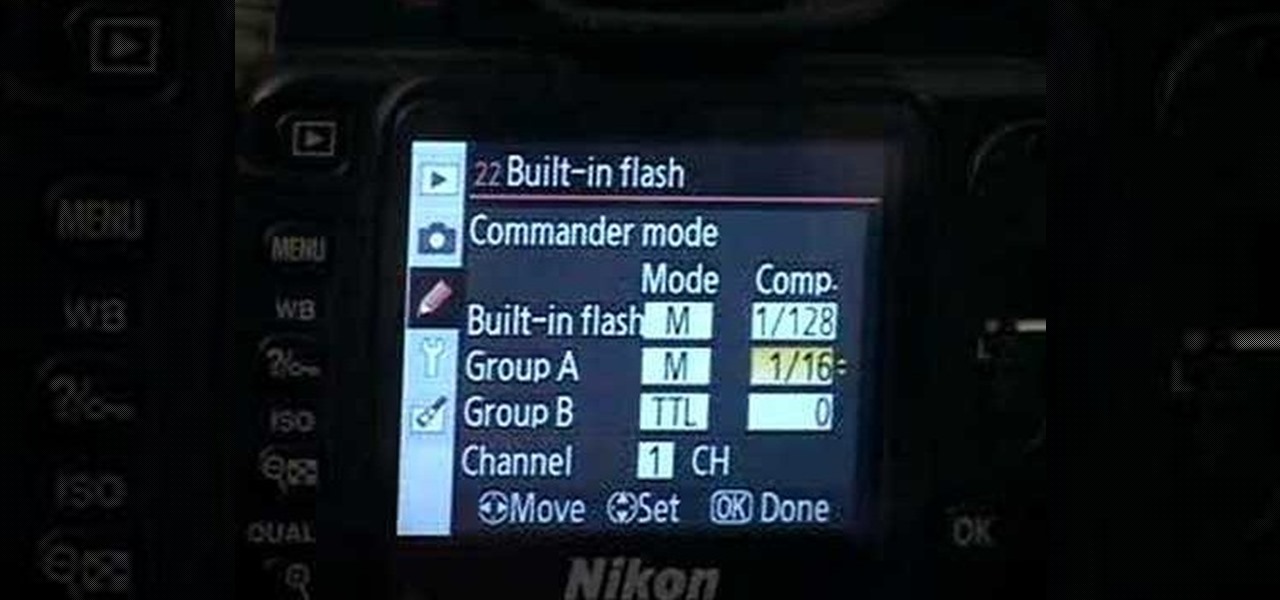
These are the steps required to set your D80's pop-up flash. First, go to the "Custom Shooting Menu." Then you choose #22 on the screen: "Built in Flash." Choose the "Commander Mode" option. The modes that are available for the pop-up flash include TTL, AA (Auto Aperture) M (Manual) and Off (no flash). If you are using an external flash unit, you use either group A or B. The light frequencies and proper settings are related to how much light compensation is needed. +3. 0 is high power, 1. 1 i...