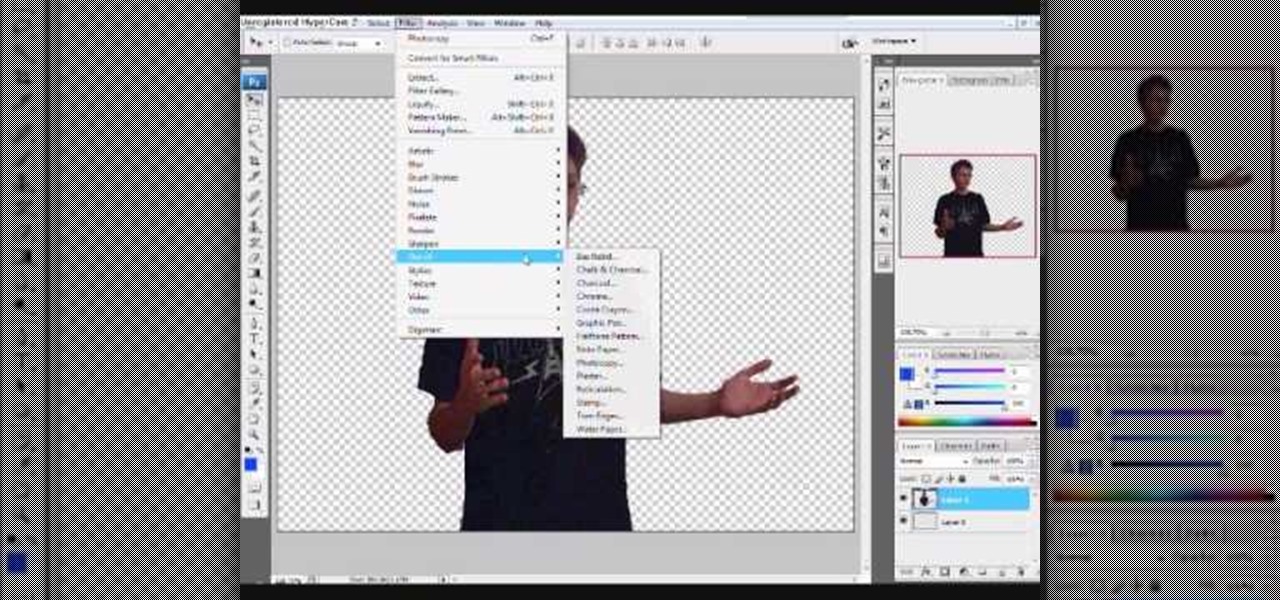
Tutorial/demonstration showing how to use Calligraphic Brushes in Illustrator to do line drawings (inking) and then import them into Photoshop as a Smart Object to retain the vector quality of the line art. By using clipping masks, we can change the color of the line art without rasterizing.
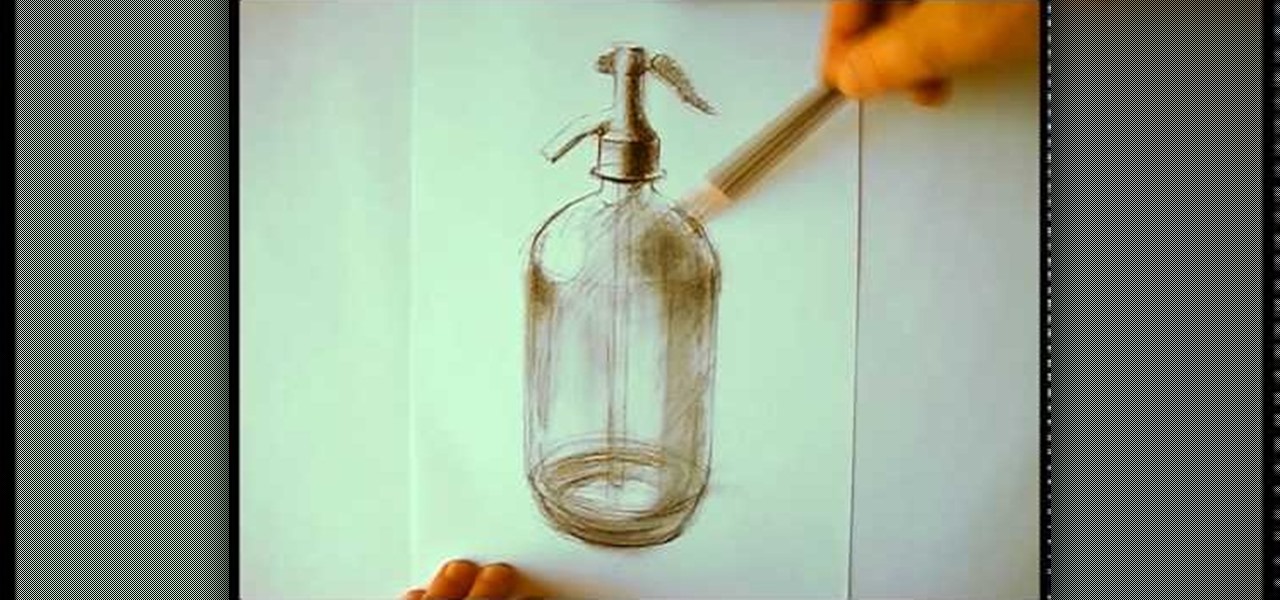
In this tutorial we learn how to draw a glass bottle. To start the bottle, you will draw the outline of the bottle starting with the cap to the base. After this, start to shade in the top and around the sides of the bottle. Small lines will create the effect of the bottle seeming to be transparent. After this, start to shade in around the sides of the bottle and on the bottom. Draw the inside lines and the other side as well so you can see that it is clear. Then, use the eraser to smear the c...
In this tutorial, we learn how to cheat on any test by wearing a fake bandage. You will need: a phone, ear buds for your phone, bandages, and transparent tape. First you will need to use your phone to record yourself saying the information you need to hear. Read this off your book or notes so all the information is perfectly correct. Now, plug the ear phone into your phone and then slip it through your sleeve before school. Now place it in your hand and wrap the bandage around it. When you ne...
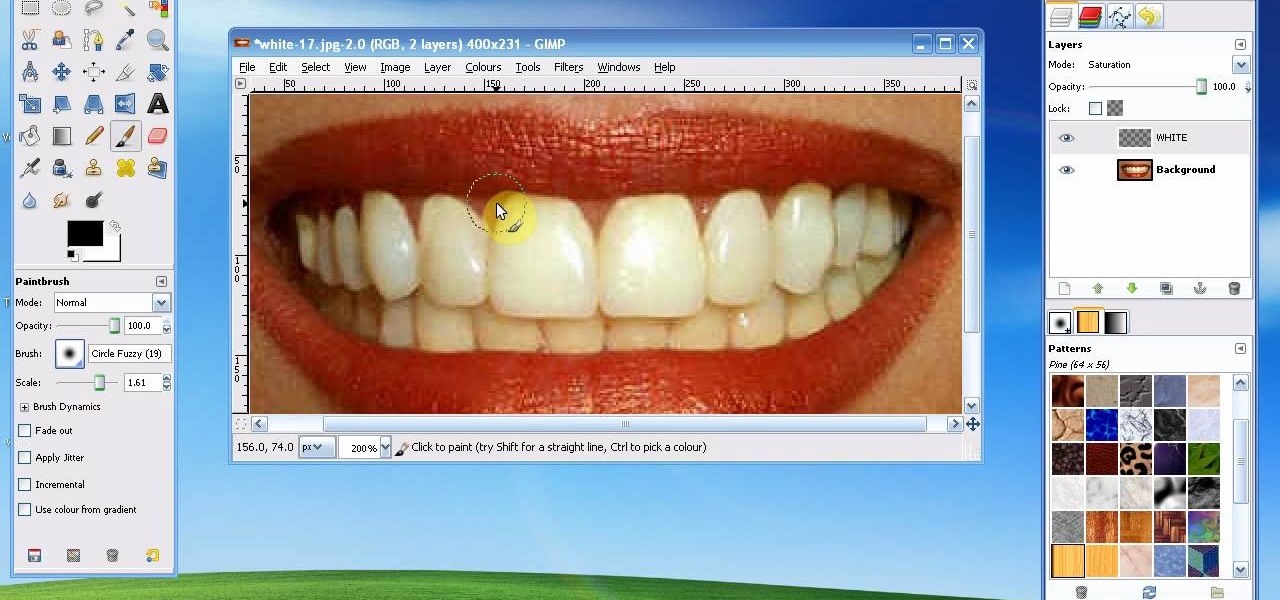
In this tutorial, we learn how to whiten teeth in the Gimp image editor. First, open up GIMP and zoom in on the teeth of your image. From here, create a new layer named "white", making sure it's transparent. Now, make sure the white tab is on the top and go to "mode" then "saturation". Select the brush named "circle fuzzy 19". Put the scale around 1.5 or 1.6 and then draw on the teeth, which will make them white! Do this for all of the teeth, then when you save you can use this as your image ...
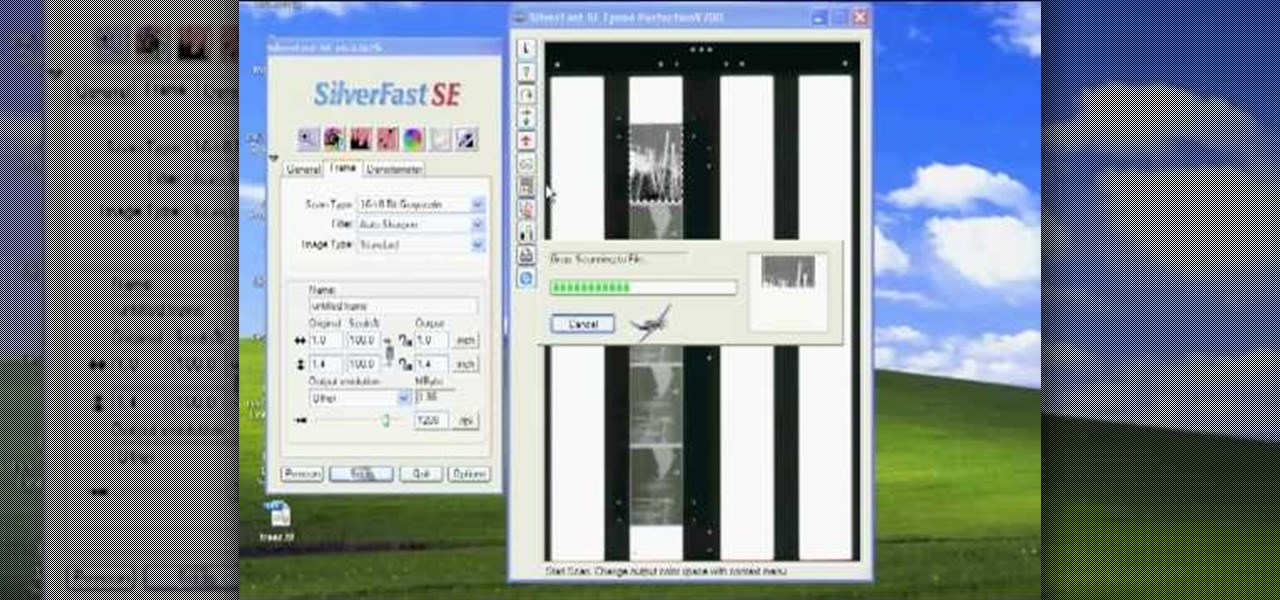
In this tutorial, we learn how to scan and edit negatives with SilverFast and Photoshop. First, open up the software and lay your negative in the scanner. Make sure you have selected the correct settings when you go to scan it, and click that it's transparent. Also, you will need to increase the size of it and make sure the lighting is correct. Now, scan the image and load it onto the software. Once it's loaded, you will be able edit it by zooming in and then rotating the image so it's the co...

In this video tutorial, viewers learn how to draw a vampire. Begin by using the paint bucket tool to fill the entire background in black. Then start drawing the vampire in transparent blue. Sketch the outlines of the face and draw curves for the guidelines of eyes, nose and mouth. Now erase half of the face and fill it in black. The other half of the face is filled with tints of blue and purple airbrush. Finish by adding the details with opaque shades of blue, purple and white pencil lines. T...

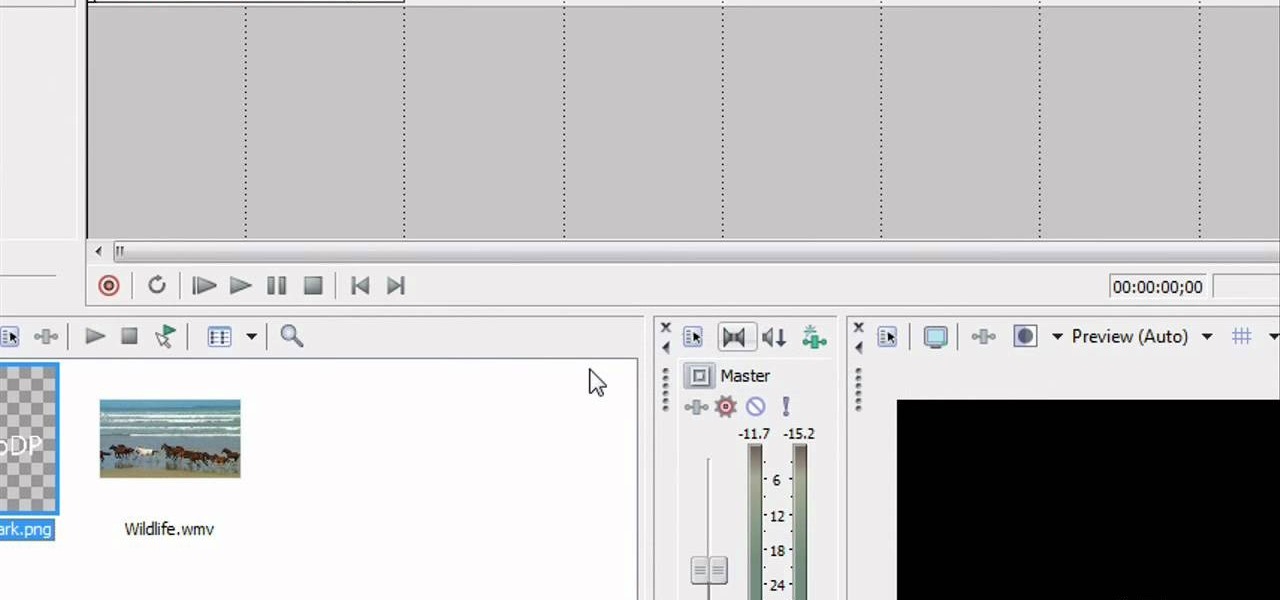
In this video tutorial, viewers learn how to add watermarks to videos in Sony Vegas. Users will need to begin by creating the watermark image in a photo editing software. Once created, make the image into a transparent background and save it as .PNG format. Now load the video into Sony Vegas and place it into the time-line. Then open the image in Sony Vegas and add it into the video time-line. Finish by panning the watermark image to a smaller size in the corner and extend the play time. This...
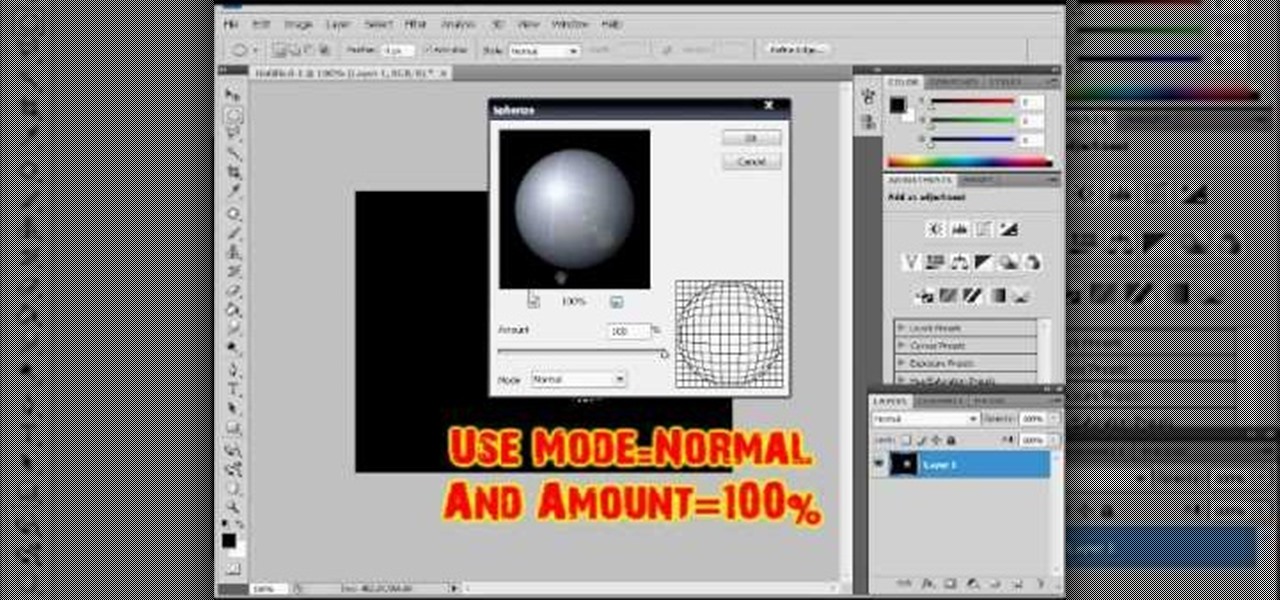
In this video tutorial, viewers learn how to make a shiny glass ball in Adobe Photo-shop. Begin by creating a new document with the default size and a transparent background. Then paint the entire background in black. Now select the marquee tool and create a circle anywhere in the background. Now go to filter, click on Render and select Len Flare. Make the lens flare 105 mm prime with 141% brightness. Then go to Filter, click on Distort and select Spherize. Use normal mode and set the amount ...
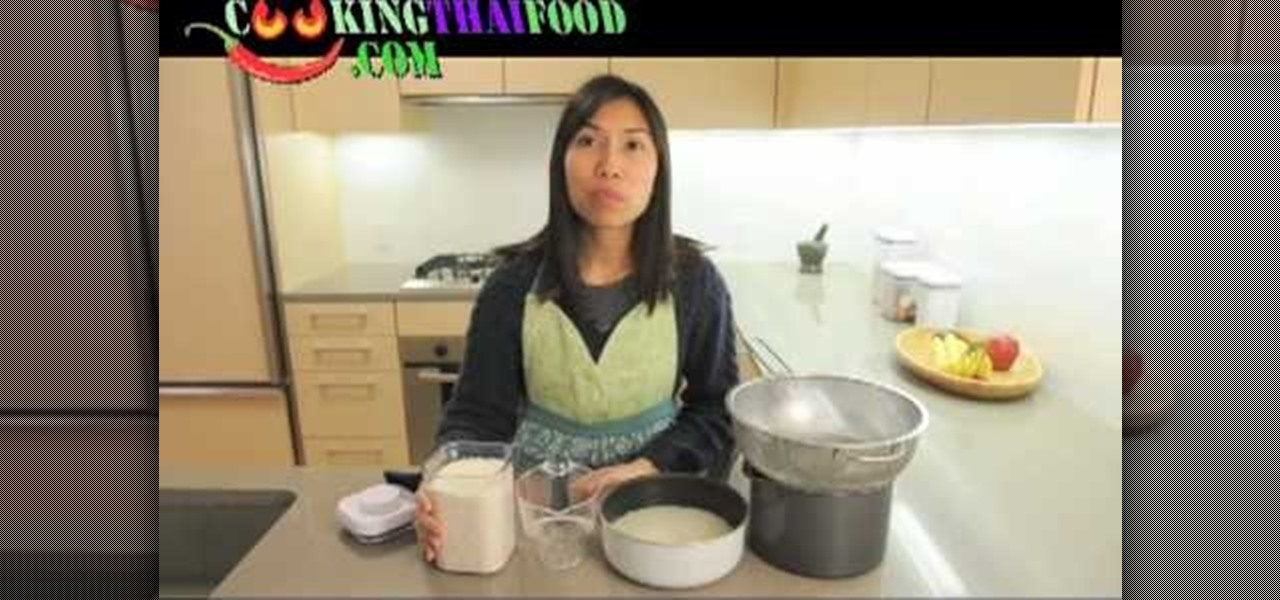
In order to make Sticky Rice, for your favorite Thai recipes, you will need the following: a strainer, a medium sized pot, sticky rice,
An animated GIF is a great addition to any website. By animating your image, you will draw someone's eye to it almost immediately. This is especially useful if you are creating an advertisement or a logo.
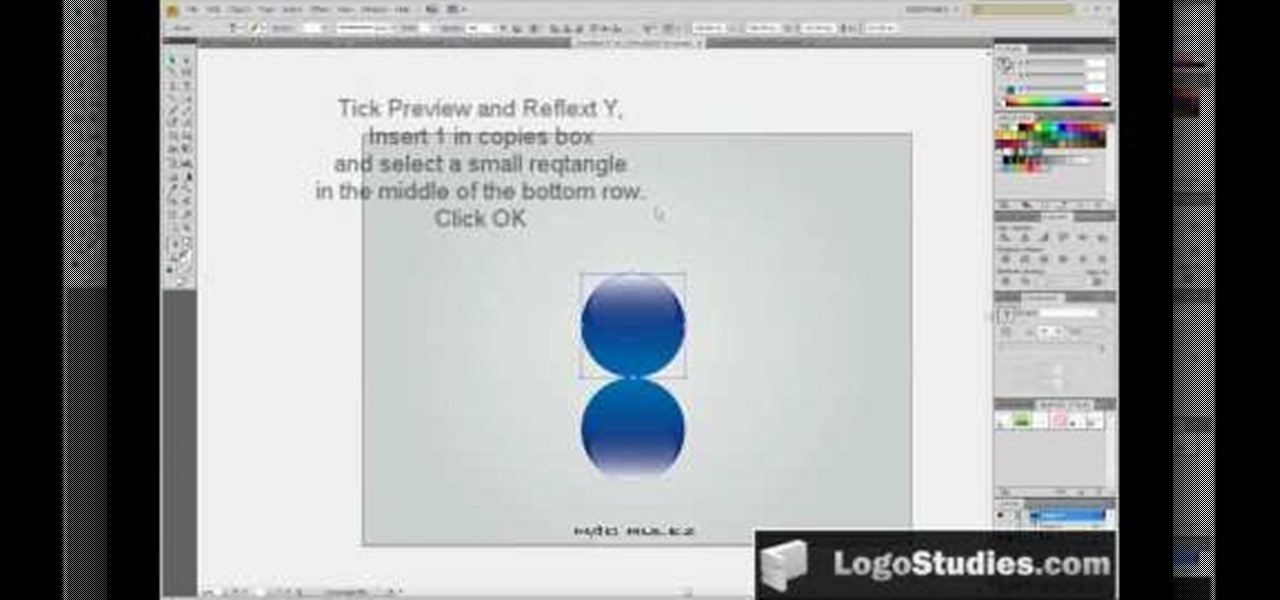
In this video tutorial, viewers learn how to create a 3D sphere and reflection in Adobe Illustrator. Begin by using the ellipse tool and create a circle. Select the black and white gradient, and drag the colors that you want into the gradient panel. Now hold the Alt key and draw a smaller circle inside. Fill it with white/transparent gradient. Select the sphere and go to Object/Group. Now go to Effect/Distort and Transform/Transform. Tick the Preview and Reflect Y, insert 1 copies box and sel...
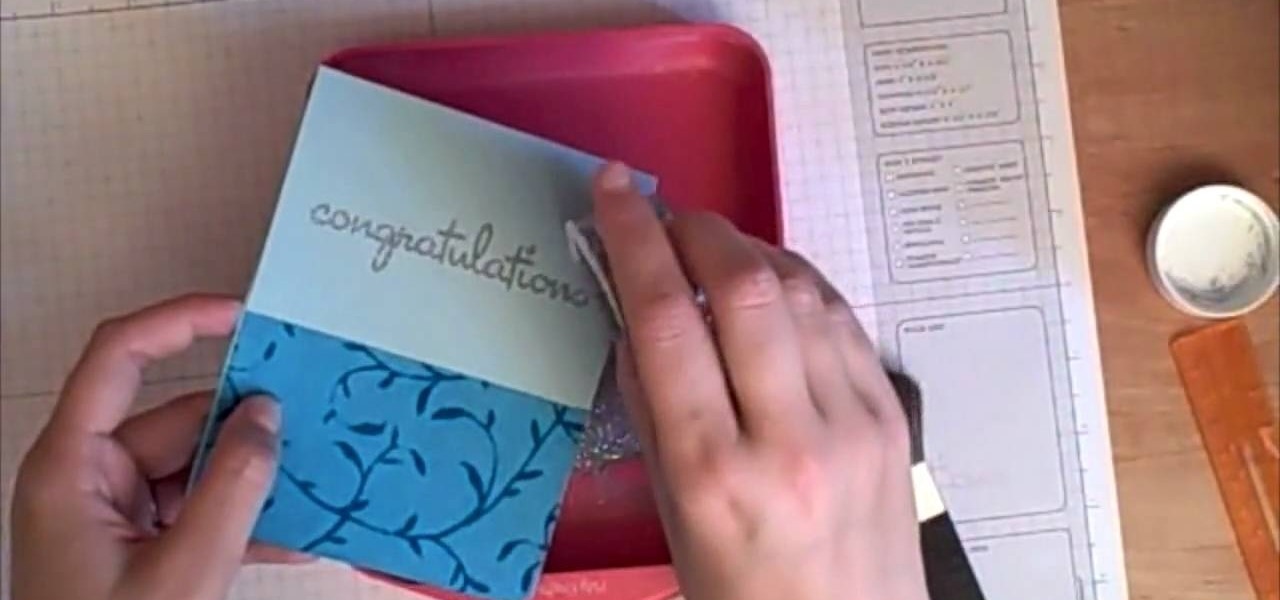
In this Arts & Crafts video tutorial you will learn how to stamp & heat emboss on a card. First you rub in a powder on the paper on which you are going to emboss, because embossing powder is really sticky. Then you select the stamp that you want to emboss and apply sticky transparent ink on the stamp. Make sure you do a through job of this. This will make the embossing powder stick to it. Now stamp the card and press it evenly to ensure that the impression is complete. Then pour embossing pow...
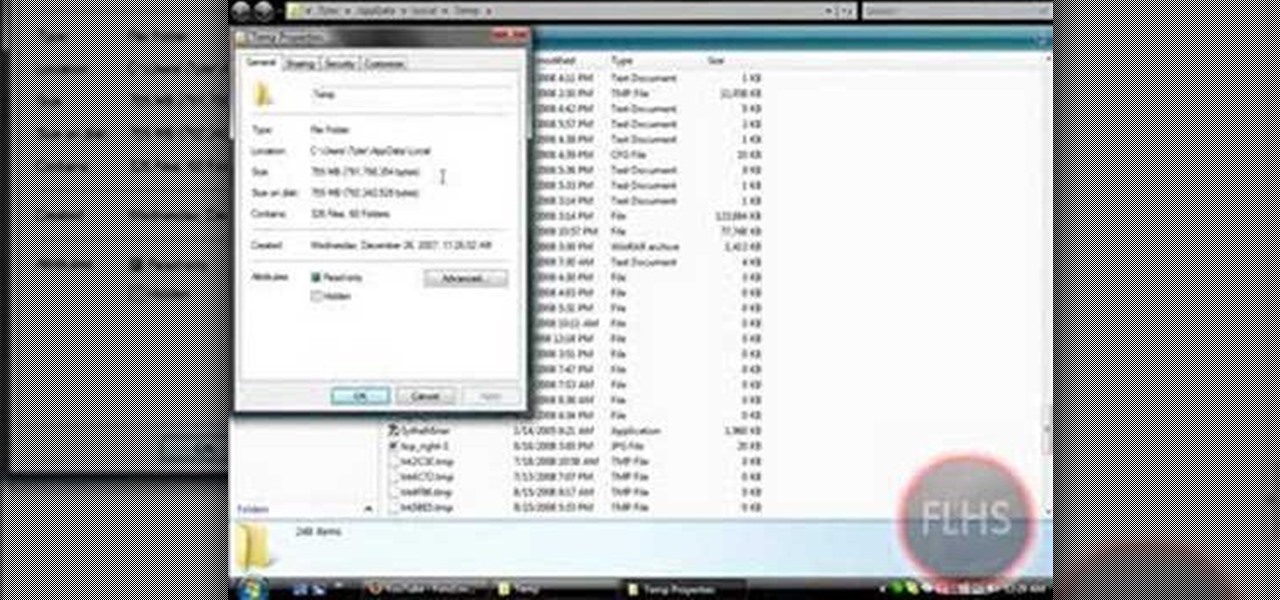
In this Computers & Programming video tutorial you are going to learn how to remove temp files from your hard disk in Windows Vista. Go to search, type ‘%TEMP%’ and click ‘enter’. The search result will show all temp files that are in your computer. These have come from all the sites you have visited. Normally each of these will be small files of a few KB in size. Now scroll down the bottom of the page and draw a transparent box to encompass all the files. Then right click and click on ‘delet...
This Software video tutorial shows how to create a glass text effect in Photoshop CS3/CS4. Download a free trial version of Photoshop CS4 from Adobe. Open Photoshop, go to ‘file’ and click ‘open’. In the next box, give it a name, select width and height at 90 pixels, background contents to ‘transparent’ and click OK. Select the color palette and choose the background color and click OK. Now open ‘paint bucket tool’ and fill in the color. Then go to ‘text tool’, select the font, size and posit...
The tutorial shows you how to make a professionally looking Google Chrome logo in Photoshop CS4. To start, download the Google Chrome logo, as well as an Earth picture, in a Zip file from Inteltuts. Next, open the logo file in Photoshop CS4, turn the white background layer into transparent, and transform the logo by de-saturating the picture, but make sure you leave the blue center area untouched. The last step is to transform the Earth picture so that it fits right into the center of the des...
The clay dries by air and you don't have to put it into the oven. The clay isn't brittle and doesn't crack like some of the other clays. The clay bends really easily and is very transparent. Consider that this air dry clay shrinks. The moisture is premixed in the clay. The shrinkage is handy for someone making larger projects. You can use pigment inks, powdered pigments and paints on the air dry clay just like you would use with regular polymer clay. You can also use cutters and findings on t...
This is an animation style which takes real pictures and outlines it to make you look almost cartoon-like. To start with you want to take a picture and get a cut out of the subject with the background transparent. Then get yourself a nice color for the outline and go to filter, sketch, and photocopy. This will look roughly like a colored outline of the subject but then you want to add some more touches by adding detail (usually around 3) and darkness (around 35 is nice).
First, prep the nails. Apply the white tips to the end of your nail. Use a nail clipper to clip the edges and a nail file to round the edges so they are not pointy. Next, apply primer to the bed of the nail. Then apply white acrylic with a brush to the tips that you put on earlier. Use the brush to make sure it fits the shape you want. Next, apply nail polish on the nail bed until it is the same height as the acrylic. File the edges down again if needed. Coat with transparent pink mix (a mixt...
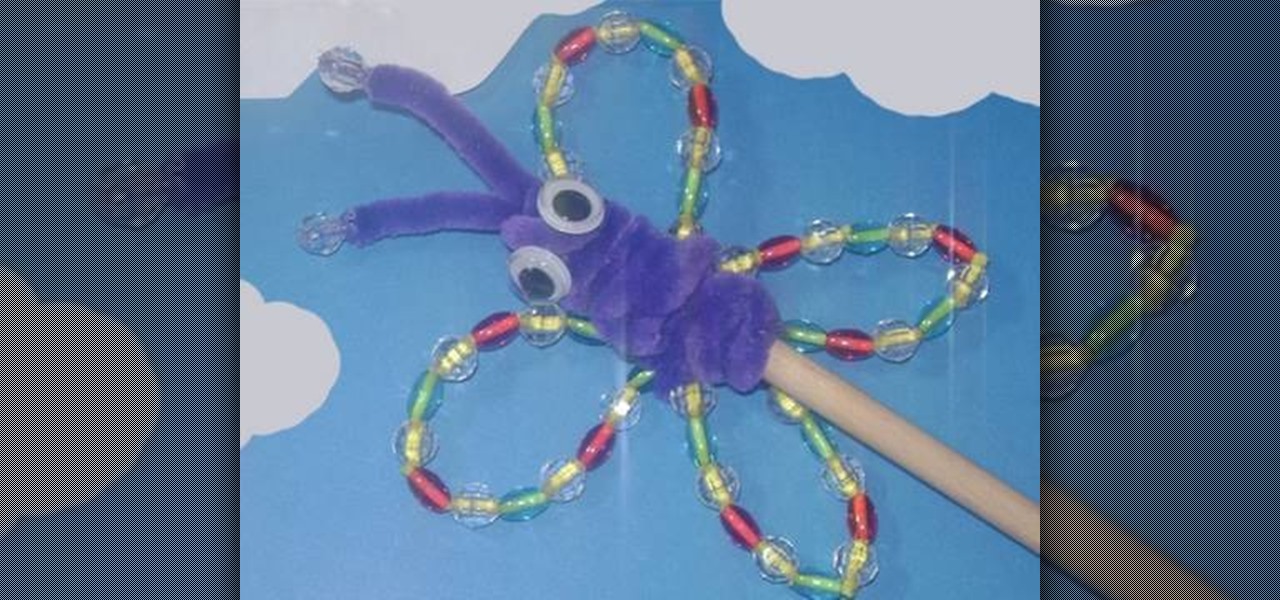
In this video tutorial, viewers learn how to make a garden rainbow butterfly puppet. This video describes all the materials that are required to make the butterfly puppet. The materials required include: beads (blue, red and transparent), 5 pipe cleaners (2 yellow and 3 purple), 2 googly eyes, a stick and one glue stick. This video provides a visual demonstration for viewers to easily follow along. The video is at a step-by-step pace and allows viewers to pause or rewind the video. This video...
HelpTube1 teaches you how to create a watermark for your videos using Adobe Fireworks CS3. Create a new 100x100 pixels file, with a transparent canvas. Create the custom shape that you want. You can add borders and colors, but make sure you don't overcomplicate your design, as people seeing your video will not be able to decipher it. You can also add a short piece of text, preferably in the middle of your watermark. Go to file and save it as Fireworks png. You can then bring up this file in "...
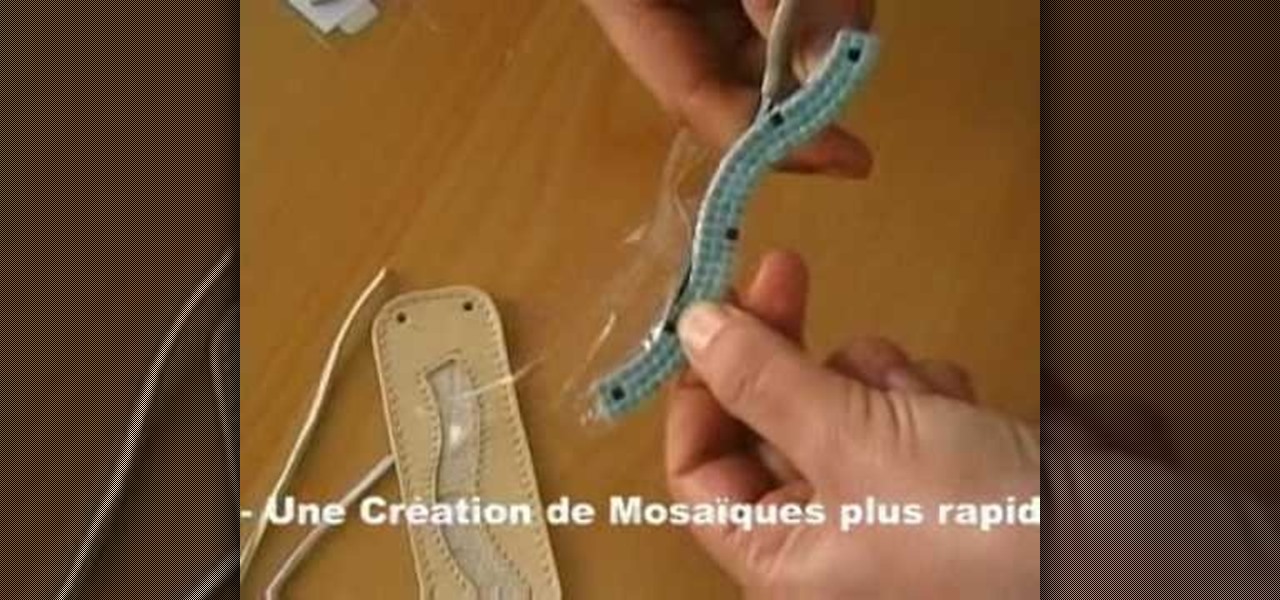
Alea Mosaic shows you how create a beautiful stone-inlaid jewelry bracelet. This video clearly and concisely lays out the steps. First, you affix a pattern underneath clear adhesive foil. Next, you peel the the cover off to expose the adhesive. You then place the stones according to the pattern, and fix a transparent foil on top. Once that is done, trim the plastic from around the stones. Then, you apply glue to the bracelet base, then place the stones inside.
EggBram walks you though changing background colors in Xara3D and shows where to find the transparency setting. This is a simple walk through in high detail, very visible. Xara has been a part of internet development from the very beginning. Xara one of the original Internet service providers when it came about in the 1990s. Xara does most of its work online and has millions of customers online around the world. Xara Online is a leading edge online web service that gives you solutions for a m...
Egg Bram teaches you how to create a cut text effect in Xara Extreme. Create a simple colored rectangle and add some text on top. Then select these two objects and go to Arrange - Combine Shapes - Subtract Shapes. Now the two objects have combined into one. Although the text appears to be white now, if you move another object underneath you will notice that the text is transparent. You can also add effects to this new objects, like a contour or a shadow.
How to resize the background image in Xara3D6? First go to windows>frame size. Go in Sara and change the size of the image to the frame size. Make the image transparent. Then export the image as a PNG format. Now go back to Xara3D6 and go to view>background texture and open the previous image which was saved. That’s it; the image is resized to that particular document properly. It will help in resizing photos to be uploaded on the net.
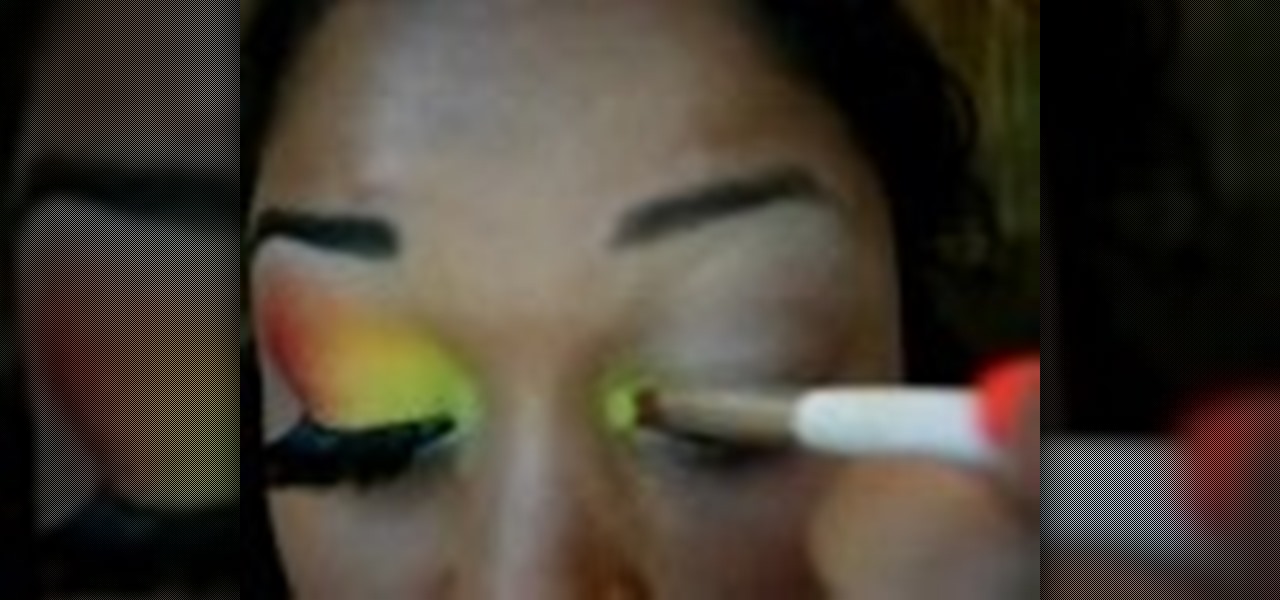
This how-to video shows a colorful rainbow look, for high drama or even just for cheer and kicks. Use these cosmetics or similar colors and textures for comparable results: MAC shade stick beige-ing, MAC pro pigments: true chartreuse, primary yellow, chrome yellow, genuine orange, marine ultra, and clear sky blue, La Femme red blush, MAC orange e/s, MAC grape pigment, MAC parfait amour e/s, MAC ricepaper e/s, Make up for ever glitter, MAC mixing medium for face and body, MAC pro gloss in viol...
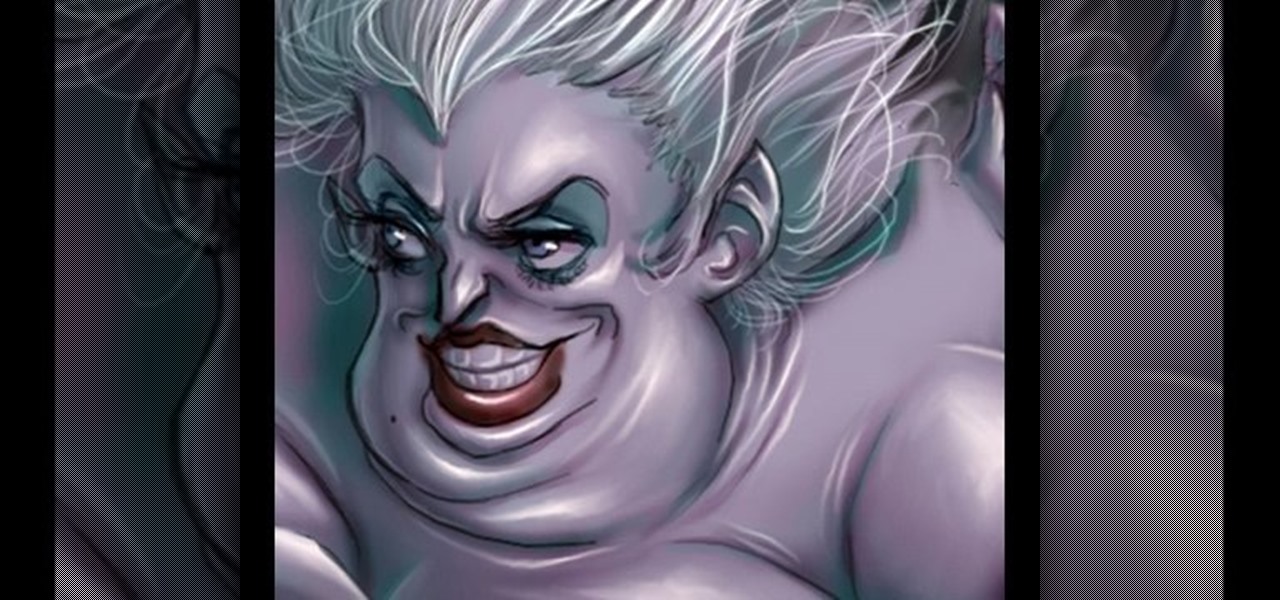
Sometimes, it's more fun to be bad. This how-to video demonstrates how good makeup for a villainess can really be, at least as far as this Ursula from Disney's Little Mermain look is concerned. The cosmetic products used are MAC's Graphito Paint, Nehru Eye Shadow, Carbon Eye Shadow, Oceanique Eye Shadow, Vanilla Pigment, Reflects Transparent Teal Glitter, Smolder Eye Kohl, Posey Blushcreme, and 4N Lipstick. Watch this video makeup application tutorial and learn how to create a makeup look ins...
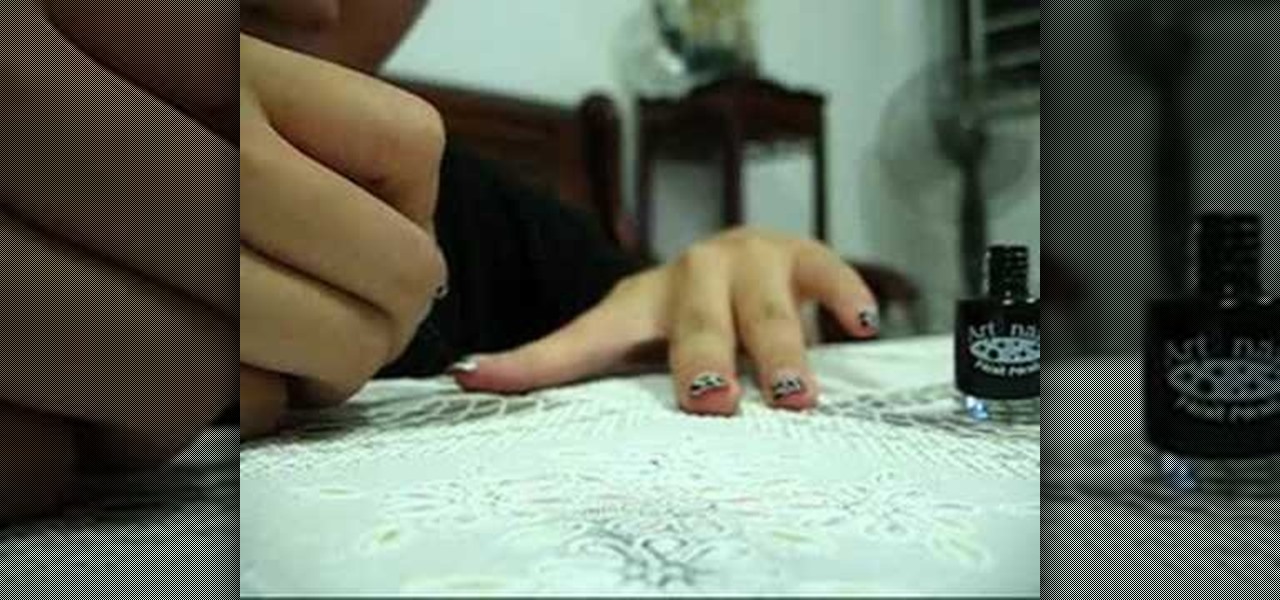
Need a change from your boring French manicure? Learn how you can paint this glittery leopard print nail art with this tutorial. You will need a base coat (Orly calcium base coat,) normal plain transparent tape or you can use those premade french manicure nail stickers, white nail polish, black nail art polish
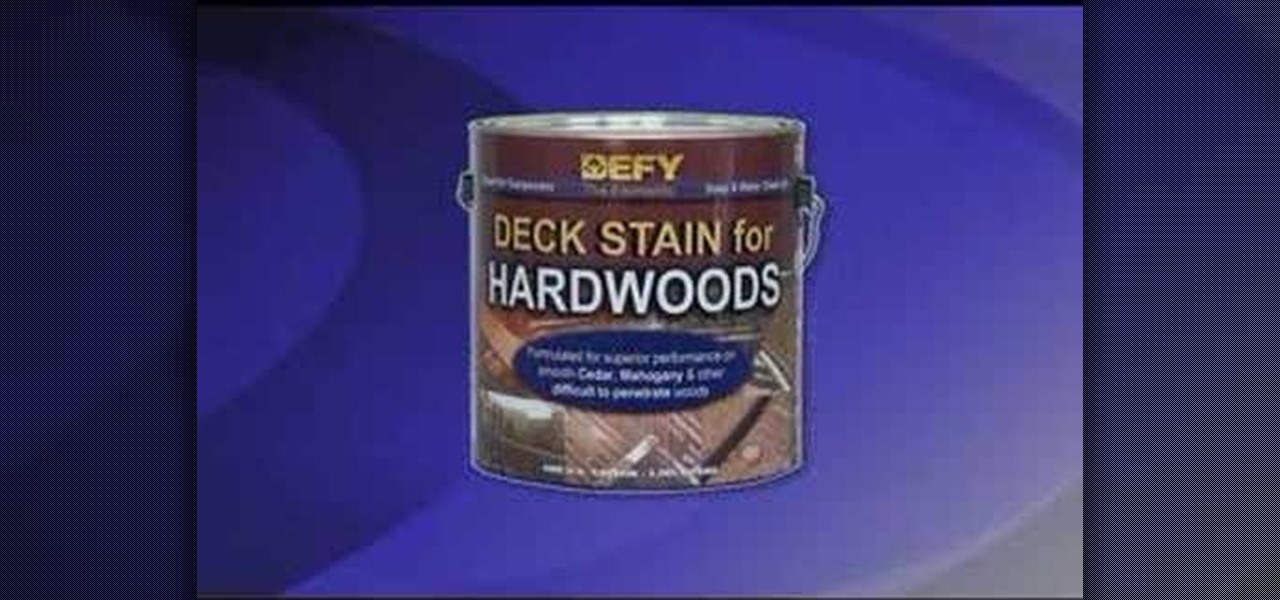
Watch this six part Home & Garden how to video sequence to get tips and tricks for properly staining an outdoor wood deck. Learn how to clean, strip, brighten and stain your wood deck with a semi-transparent finish that will last for years and protect it from the weather and UV rays of the sun.
It's not the additions Apple brought to iOS 8 that irk me, but what they didn't add that breaks my heart. We did get some cool new features, like battery stats and interactive notifications, but what about a simple customization feature that most—the option to have a transparent dock background?
While change is good, it isn't always welcomed. All software updates with radical redesigns and brand-new features bring at least a few complaints from those accustomed to previous versions. iOS 7 got a lot of flak from iOS 6 users, as did iOS 8 from iOS 7 users.
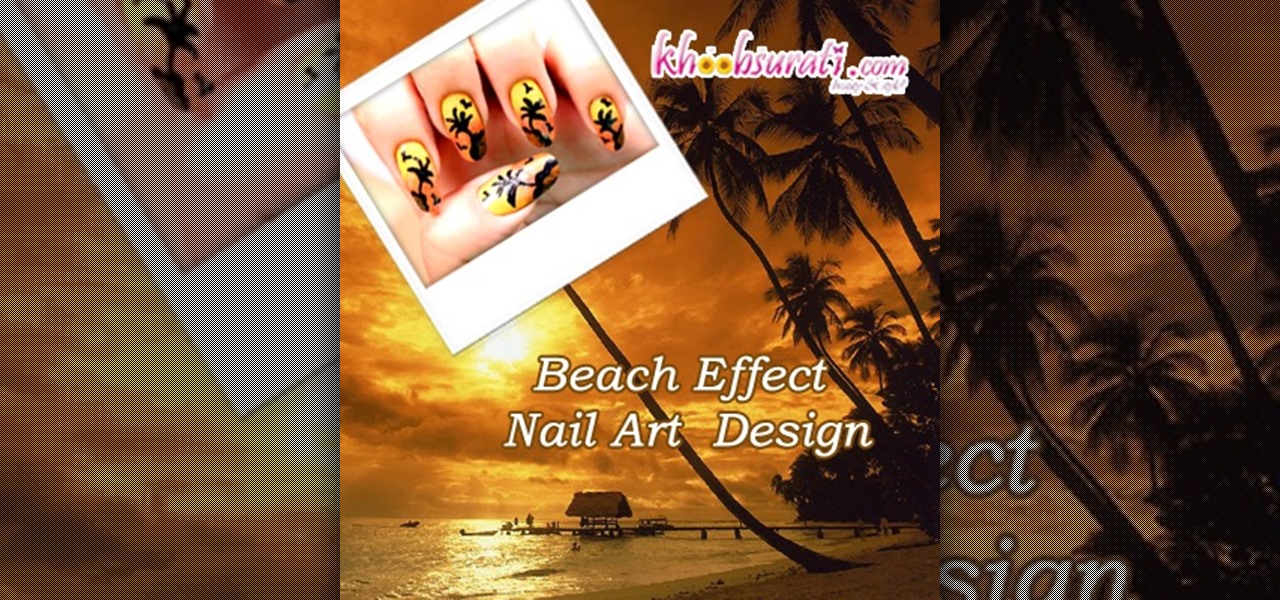
Beach Effect Nail Art Design Tutorial For Beginners!!!!! Sunset the palm trees and the birds..perfect for canvas. Well why not to try it out on nails. This perfect picture has been produce on the nails in a very simple and easy way. Just watch the tutorial to know about this !! Step 1: Apply Base Color
Having the ability to decipher any song that plays over the radio or during a commercial is a must for any music-loving fiend. That's what made Shazam so popular.
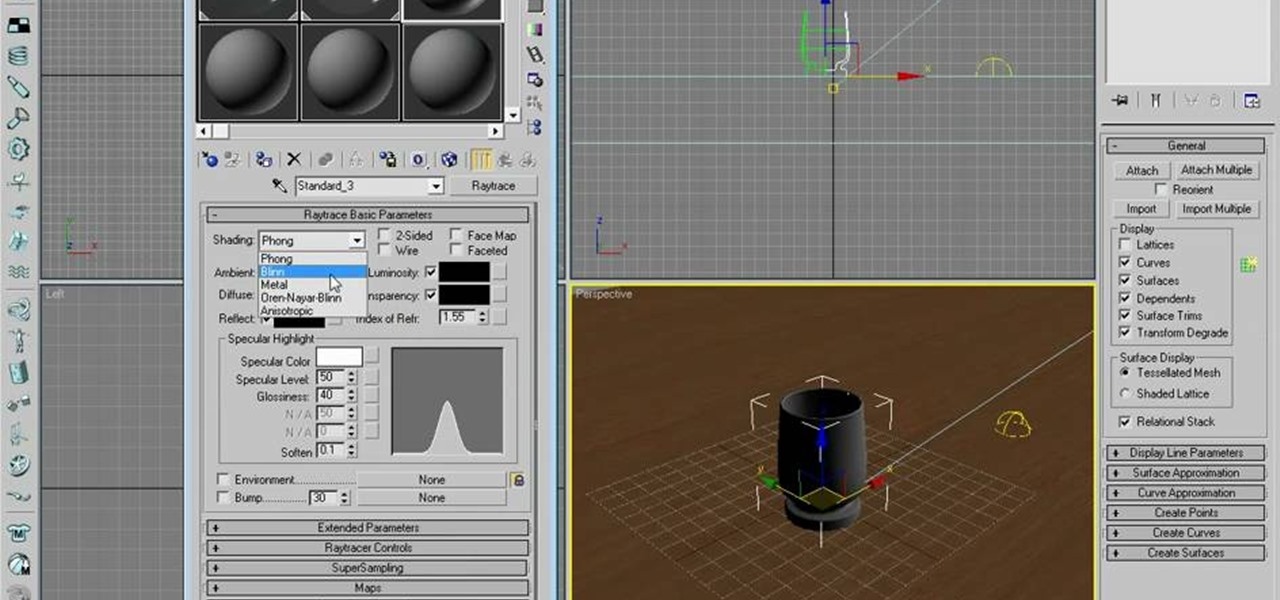
Dave shows you how to produce a glass three different ways in 3ds Max in the video tutorial. Put two panels away, then concentrating on sensor one press m on the keyboard to bring up the materials editor. On the material editor go to the first sphere, choosing a slight blue color, bring up the specter level, bring up the glossy level, click on two sided and bring down the last two to about four. Look to see it is fairly transparent, in a test window. This is glass one, put on hide. Go to glas...
Despite the perception that Zilean is only a support champion, if you build him properly, he can hold his own, even an 1v2 battle. Here are some good insights into how to use Zilean effectively on the Fields of Justice.
In this video tutorial, viewers learn how to draw a cartoon bird. Using the gray pencil tool, draw an oval shape for the body of the bird. Then create the lines for the wing and tail. Now add the details with black outlines. Then use transparent colors to fill the body, tail and wing with different shades of color. Add details to the wing by drawing some lines. The beak should be short and sharp, and the eyes should be highlighted in white. Color the branch with the brown paint tool and the l...
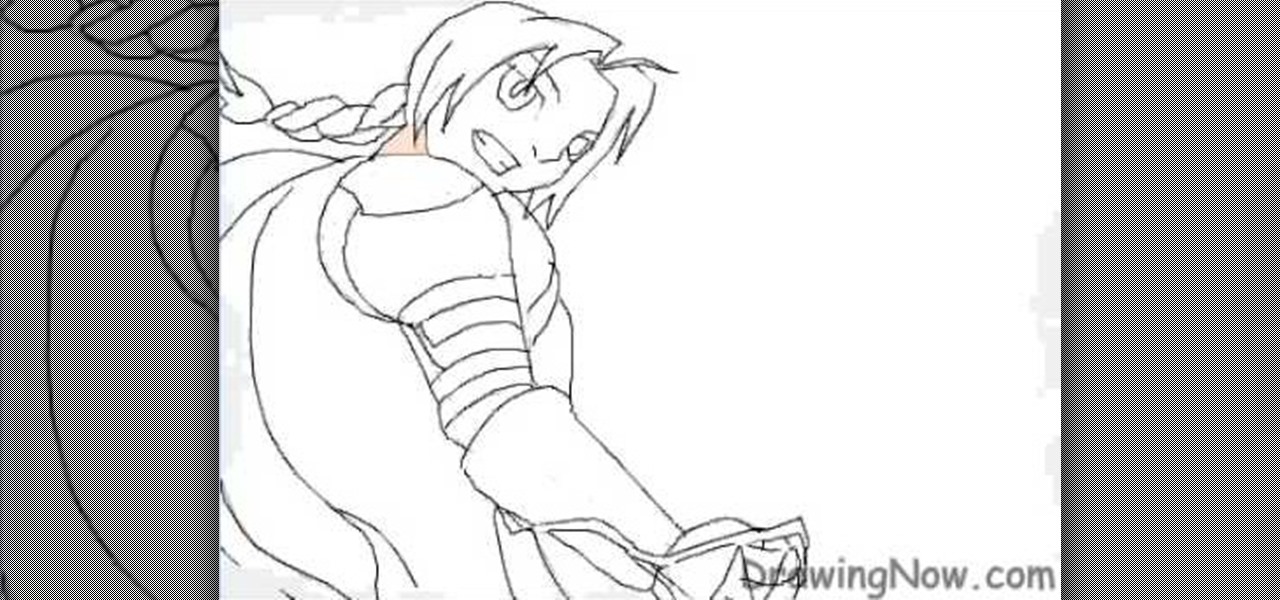
In this video tutorial, viewers learn how to draw the animated character, Edward Elric. Begin by drawing the guidelines of the character in 30% black pencil lines. The head is drawn as an oval shape. The shoulder is guided by a large circle and the elbow by a smaller circle. Connect the shoulder and elbow together with a stick line. Add details with the opaque pencil and erase the guidelines. To color, start with a mid-tone and add shading. Use some transparent tones on the mechanical arm. Hi...
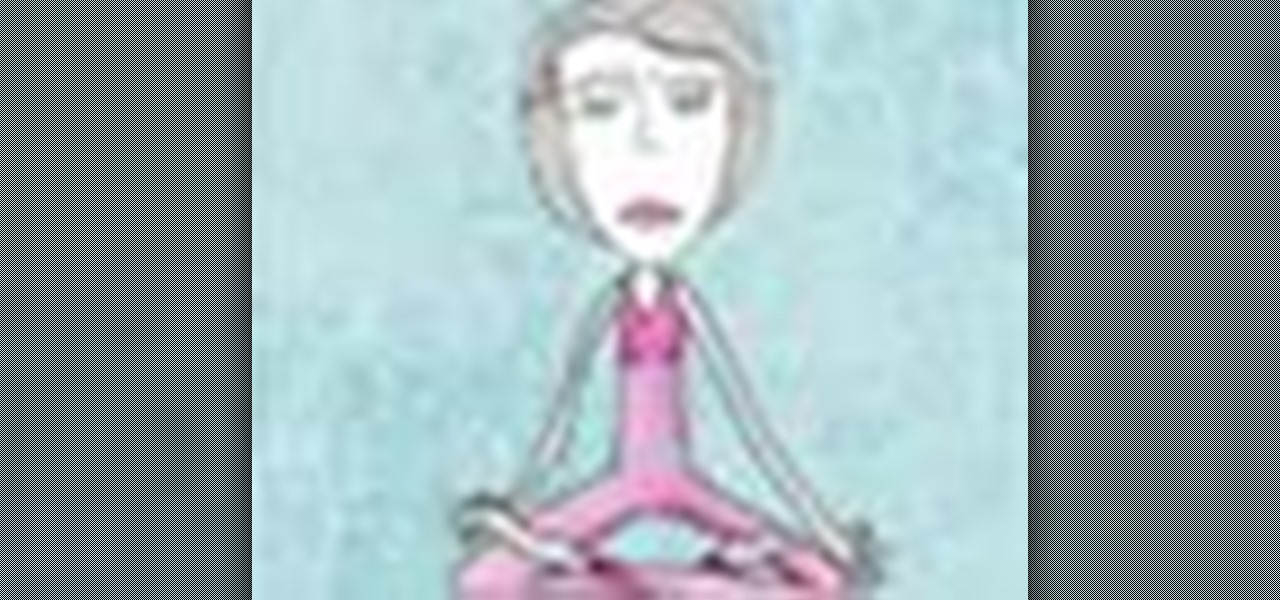
Awakening the sixth chakra – known as the third eye – also awakens your sixth sense, and unlocks psychic potential. In this tutorial, learn how to harness your spirituality and get in touch with your third eye.
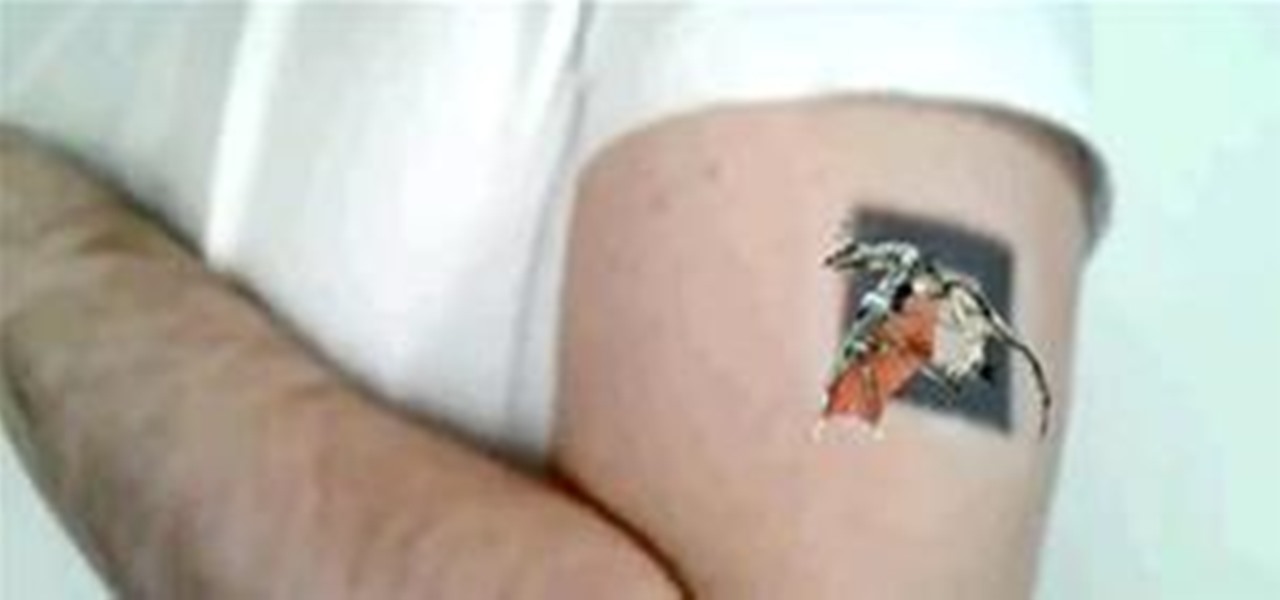
Another innovative use of augmented reality - we've seen transparent walls, t-shirts that play Rock, Paper, Scissors, an iPhone operated video game drone; and now, a tattoo that comes to life. Just tattoo a simple "barcode", point a webcam at it, and a flying animated dragon will appear, hovering.
Every Friday, Next Reality reviews the latest headlines from the financial side of augmented and mixed reality. This Market Reality column covers funding announcements, mergers and acquisitions, market analysis, and the like. This week's column is led by two companies cashing in on visual inputs.