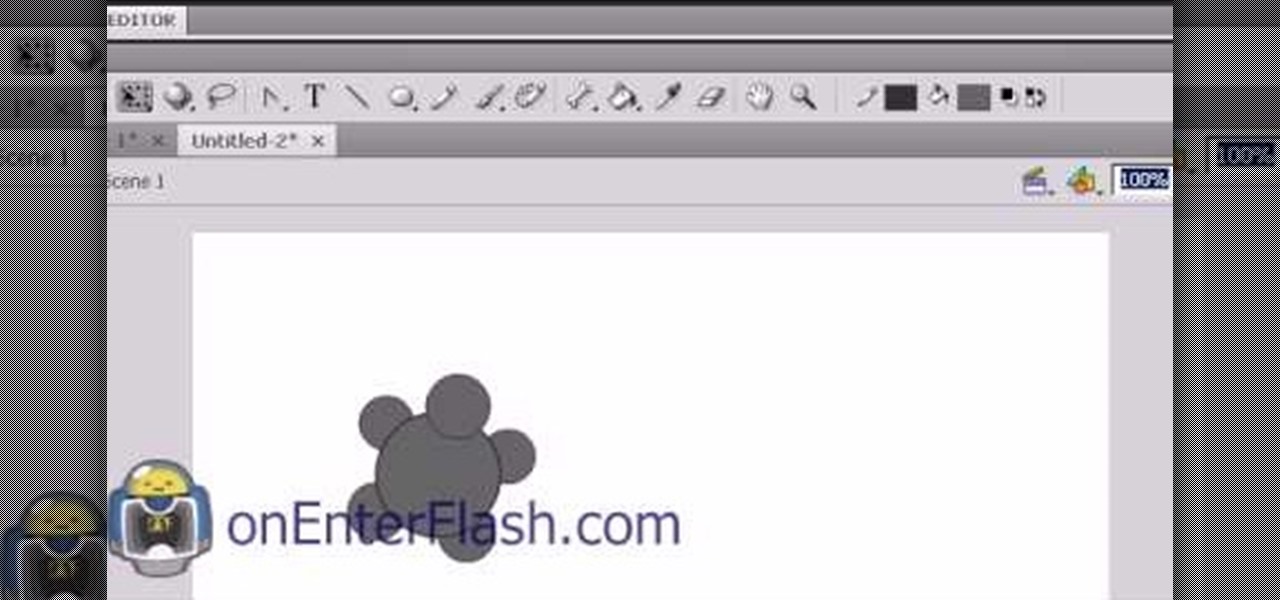
Creating cool animations is the bread and butter of Flash. This video will help you get started making them yourself for your website, video game, or movie. It explains how to animate objects, making them move around however you wish and form the basis of your animation. No source files needed, just make some circles and get started!
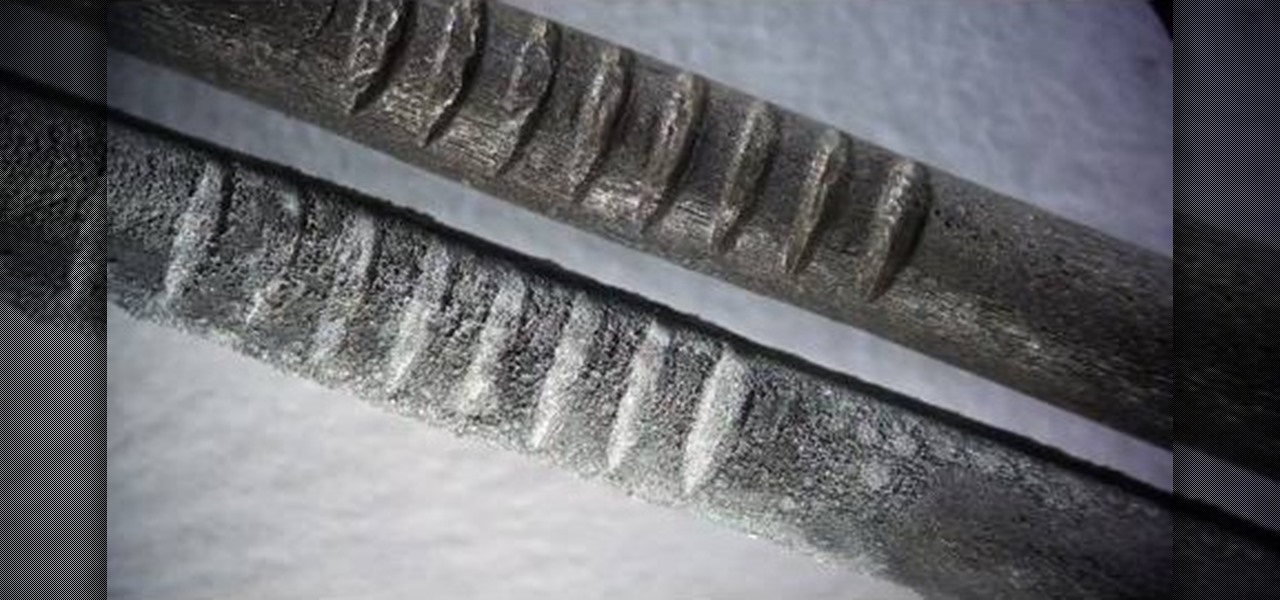
Rust protection doesn't have to cost a fortune. With a little zinc and some electricity, you can protect your precious metals from rust by galvanization. When you galvanize something, you're giving it a protective coating, and in this case, it's a zinc coating.

Looking to jazz up your Photoshop creations? Learn how to create 3D wrapping light streaks in Photoshop with help from this video. By starting with a simple 3D object created in Photoshop, "wrap" the object with light, specifically these light zips or bands to create this effect. Not pleased with the look of this effect? Create the path(s) and then tweak and create whatever kind of effect you want!
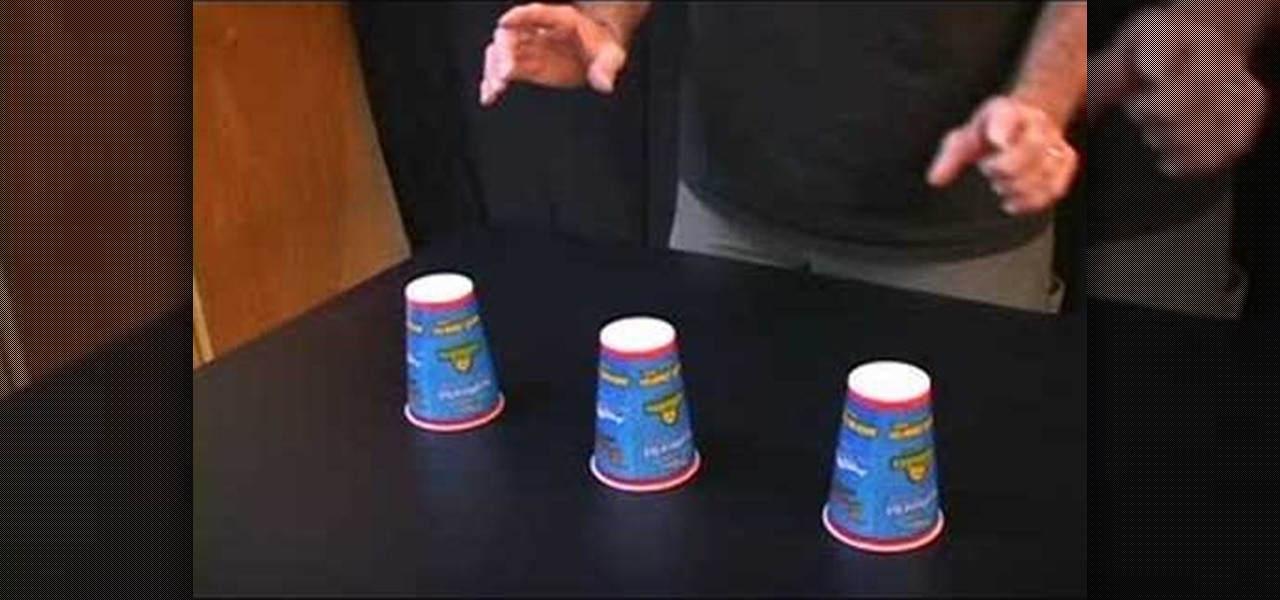
This is a video tutorial in the Pranks and Cons category where you are going to learn how to perform a simple mind trick with cups. For this you will need three cups or any similar articles under which another object can be hidden. You then ask one of your spectators to hide an object under one of the cups while your back is turned towards the cups. Then you turn around and point out the cup under which the object is hidden. The trick is to put an indiscernible mark on one of the cups that on...
In order to unwrap and object and export it in Blender, you will need to import and object in blender, by go to "file". Click on "import". Click on "wavefront". Then, go to the parent directory. Select the object, by right clicking. Then, go into edit mode via the drop down menu, underneath the object. When your "normals" are visible and facing the right direction.
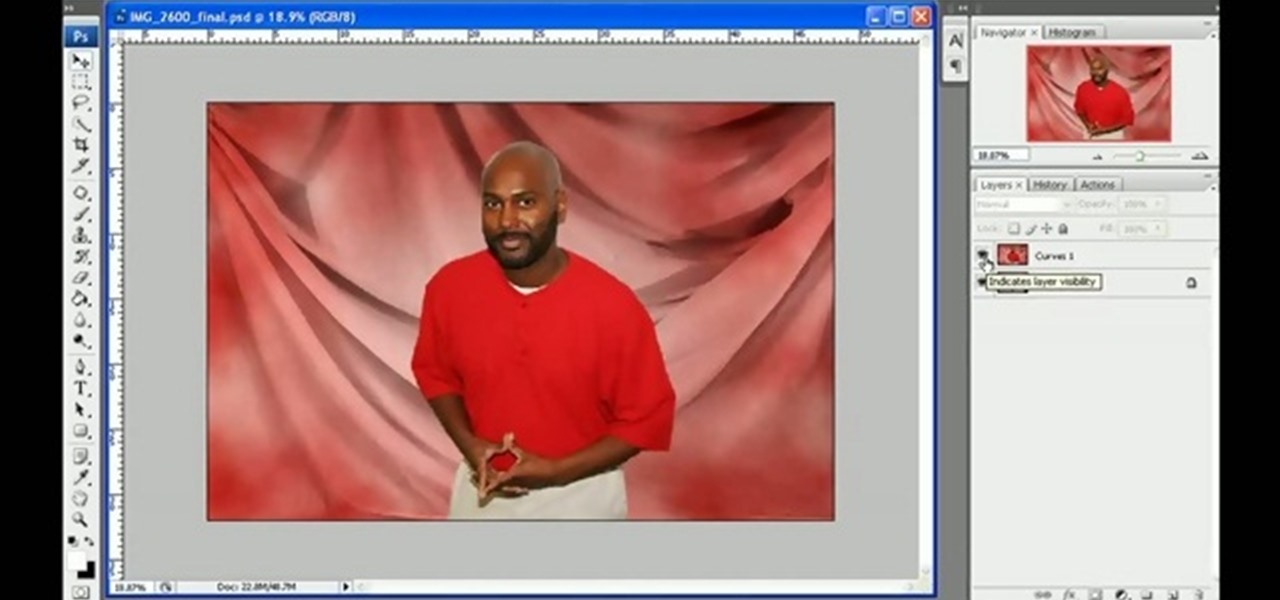
In this tutorial, we learn how to get a digital portrait backdrop in Photoshop. First, start by using the erase tool to remove the background from around the object completely. After this, fill in the background with the desired backdrop. Next, use the blending tool to blend the object's sides in with the backdrop, for a seamless look. Continue to do this for the entire object, cleaning up any blurry spots that you see as well. When you are finished, your object will have a new background and...

Two dimensional objects are measured in terms of perimeter and areas. A perimeter of a two dimensional object is the distance around that object. If you want to find the perimeter of an object, all you need to do is add up each one of the lengths of sides of that object. If you have a small figure like triangle, first compute the length of the three sides. Now adding these three sides gives you the perimeter of the triangle. A larger or more complicated shape might have more number of sides. ...
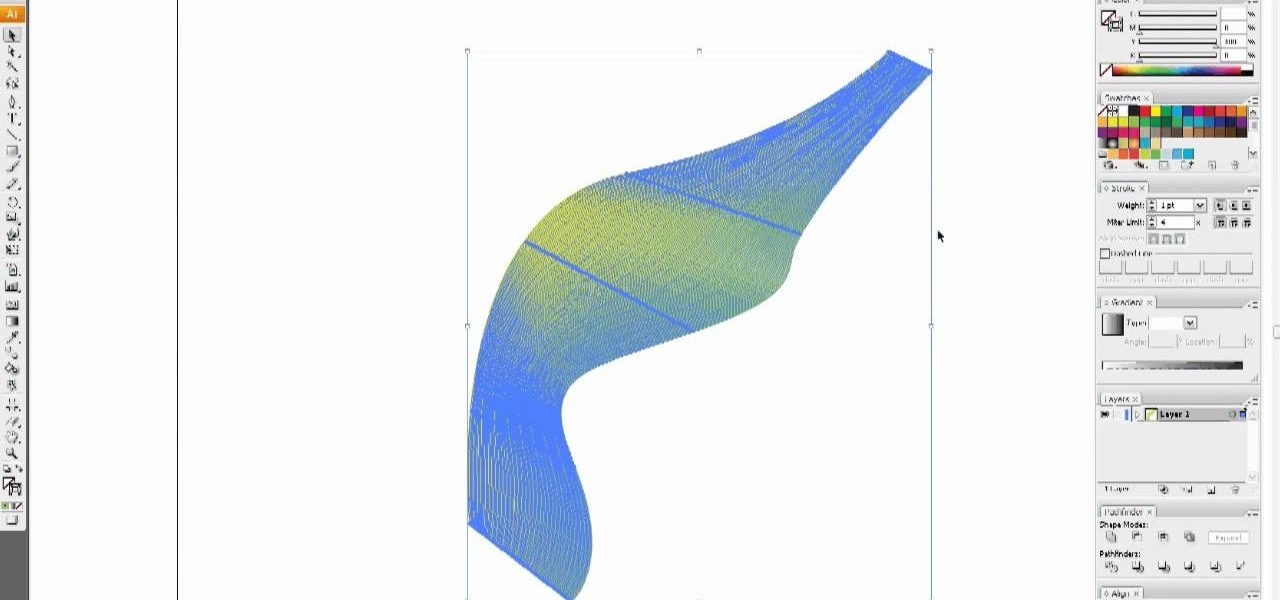
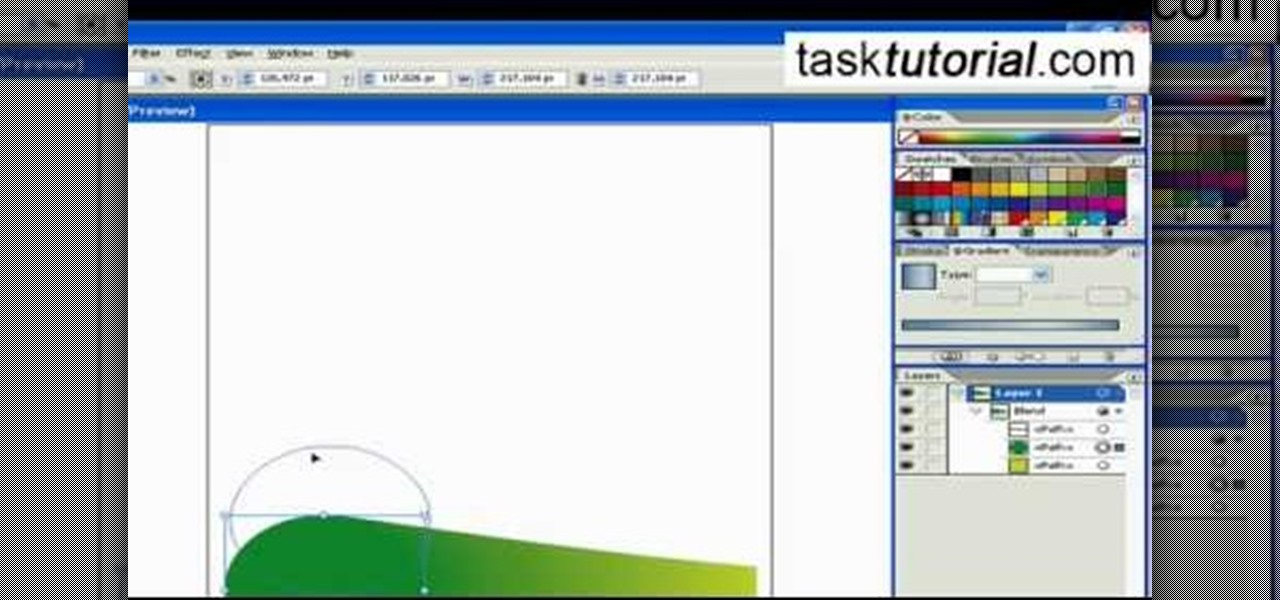
In this video tutorial, viewers learn how to use the blend tool in Adobe Illustrator. The blend tool will allow users to create objects between two strokes or filled objects. When you double-click on the blend tool, there will be 3 options to select from. Select the spacing and press OK. The three spacing options are: Smooth Color, Specify Steps and Specified Distance. Users are also able to select the amount strokes between the two objects. Now select the points of the two objects and it wil...
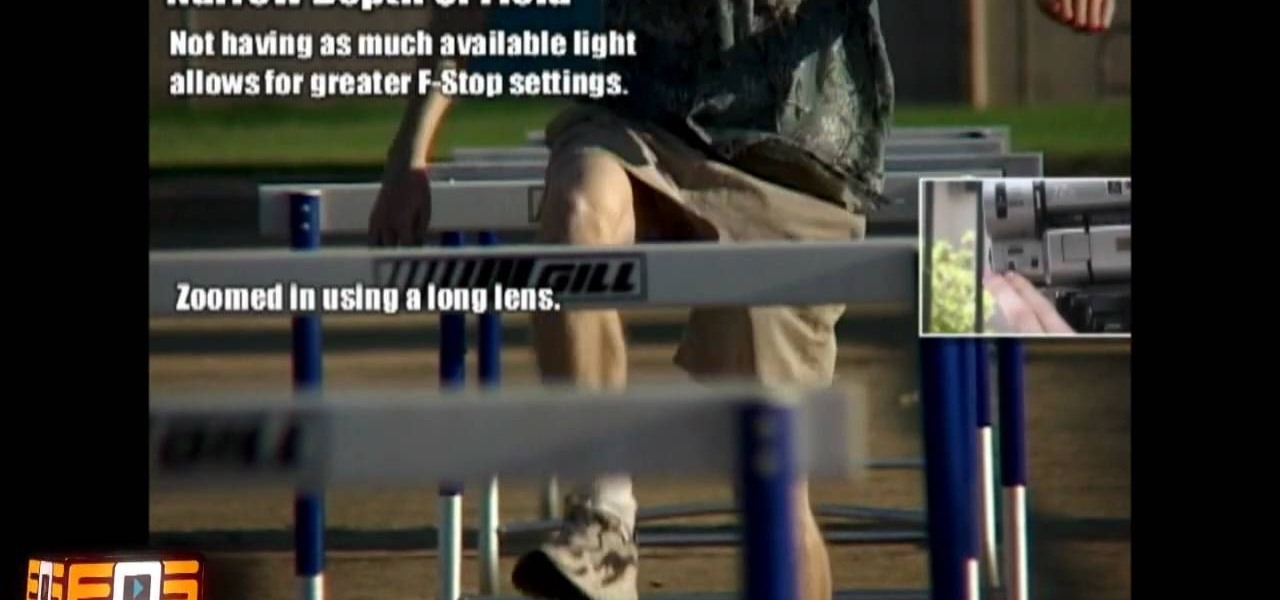
In this Film and Theater video tutorial you will learn about depth of field and how to adjust it. Depth of field means how many objects are in focus in the frame at one focus setting. If the depth of field is large, more objects at various distances from the camera are in focus. The first factor is the amount of light. If the light is good, more objects will remain in focus. On the other hand if you zoomed in with a long focal length lens the depth of field will reduce and lesser objects will...
This video in the Fine Art category will show you how to use the refine edge in Photoshop. This video tutorial is from Yanik Photo School. This feature is available in Photoshop CS3. If you are shooting objects in isolated background and you want to cut that object out and put it on a different background, the object will have jagged edges. Refine edge will help in smoothing those jagged edges. First select your object, then go to ‘select’ and click on ‘inverse’ and you have selected your obj...
In this tutorial, you'll see how to export UV and Object Buffer passes from Cinema 4D, and how to use those passes to re-texture objects in 2D inside of Fusion 5. Whether you're new to MAXON's popular 3D modeling application or are just looking to get better acquainted with Cinema 4D and its various features and functions, you're sure to enjoy this free video software tutorial. For more information, including complete instructions, watch this 3D modeler's guide.
Learn how to create and utilize Smart Objects when working in Adobe Photoshop CS4. Whether you're new to computer graphics, new to Adobe Photoshop CS4 or a seasoned design professional just looking to pick up a few new tips and tricks, you're certain to like this free video software tutorial. For more information, including detailed, step-by-step instructions, and to get started using Smart Objects in your own Photoshop projects, take a look!
The drawing tools in flash aren't always the most intuitive to newcomers. In this tutorial, Ralf will show you how to use the basic drawing tools in flash. You learn the difference between Merge Shapes and Drawn Objects, which are all shapes of the same look and feel with the exception that one can be more easily manipulated and the other. You'll learn how to use this selection and sub selection tools to select various objects on the flash stage. You also see how to use the oval and rectangle...
This video is a tutorial on how to remove scroll bars, sheet tabs and objects in Excel. To remove scroll bars and sheet tabs, go to the Office button, then Excel Options. On the screen that comes up go to the Advanced tab and scroll down to “Display options for this workbook”, where you will see some check boxes. Uncheck the boxes for horizontal scroll bar, vertical scroll bar and sheet tabs. This will remove them from the current workbook. This feature only works with the current workbook.
20 Questions is a great game to play when you have some time to kill. Check out this video and learn the basic rules of the game. 20 Questions is perfect whether you are in the car, a waiting room or anywhere else and feeling a bit bored.
Nick from Greyscale Gorilla presents a fantastic tutorial on texturing objects in Cinema 4D. This is especially helpful for creating realistic looking objects. Describing his workflow, his process is incredibly informative
Learn how to blend shapes and colors in Illustrator with this tutorial. Open Illustrator and put the circle with color which you want. Put the square on the color you want. Select the object, go the title bar select the object and then select the blend. You will be shown the result on the screen. Select the square and circle where you place the object by click and drag method. Go to the object and select the blend and choose the blend options. Change in specific steps which you want in the sc...
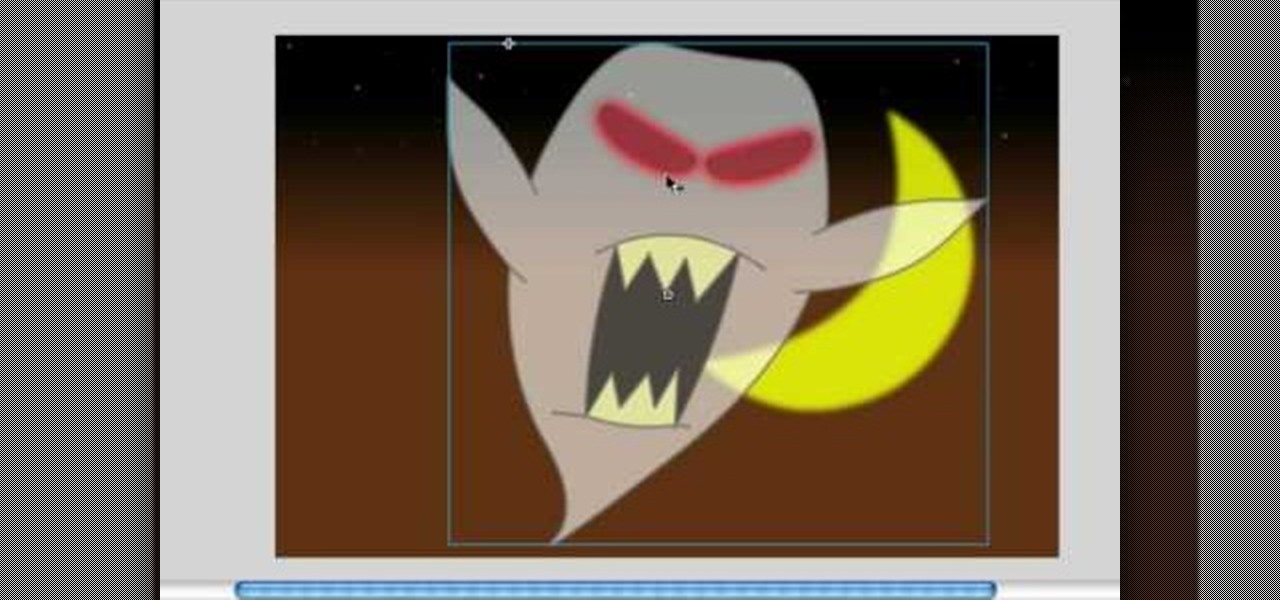
This video shows you how to create a glowing object in Adobe Flash CS3 Professional software. This is a tutorial video for beginner level viewers. Making objects glow is one of the many effects that can be applied in Flash. In this video the narrator draws a shape, converts the shape into a movie and adds a glow filter to the object. Watch this video and learn the correct parameters to be supplied to the program to get the desired glow effect.
One of the first things you may want to know when learning how to animate in Flash is how to orient an object to a path — the path, in turn, serving as a sort of metaphorical track for your Flash element.
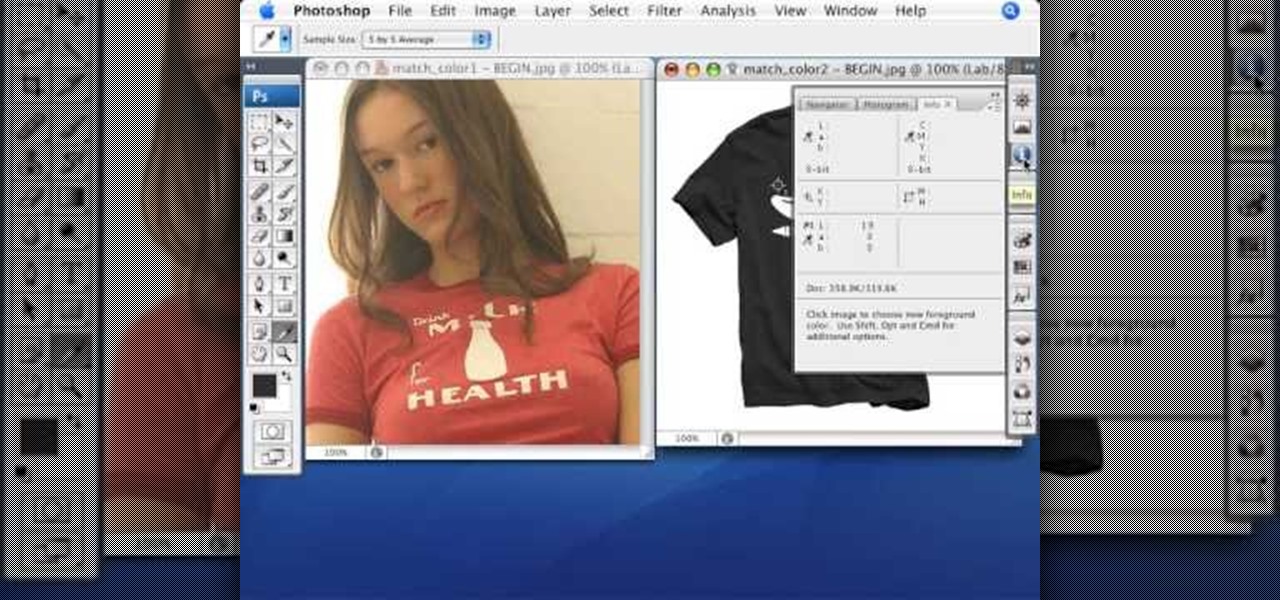
Match the color of objects on Photoshop. Take a picture of your self of one shirt that the shirt is on different color mean while choose the black tea shirt because it the traditionally one of the harder colors, change the image mode to the lab color for both images then use eyedropper tool and expose the info pallet select the neutral part of the image i.e. red. Hold down shift then we can see the icon changes then add contrast to it by hue saturation present in the layer pallet.
Need a little help with your new Adobe Photoshop graphics editing program? Working with Photoshop can be a bit tough if you don't know what you're doing, so instead of getting out the books, check out this 'no nonsense' video tutorial to learn how to create metallic looking objects in Adobe Photoshop. Photo manipulating and editing is always tricky, so just watch to see how to create metallic looking objects, for beginners.
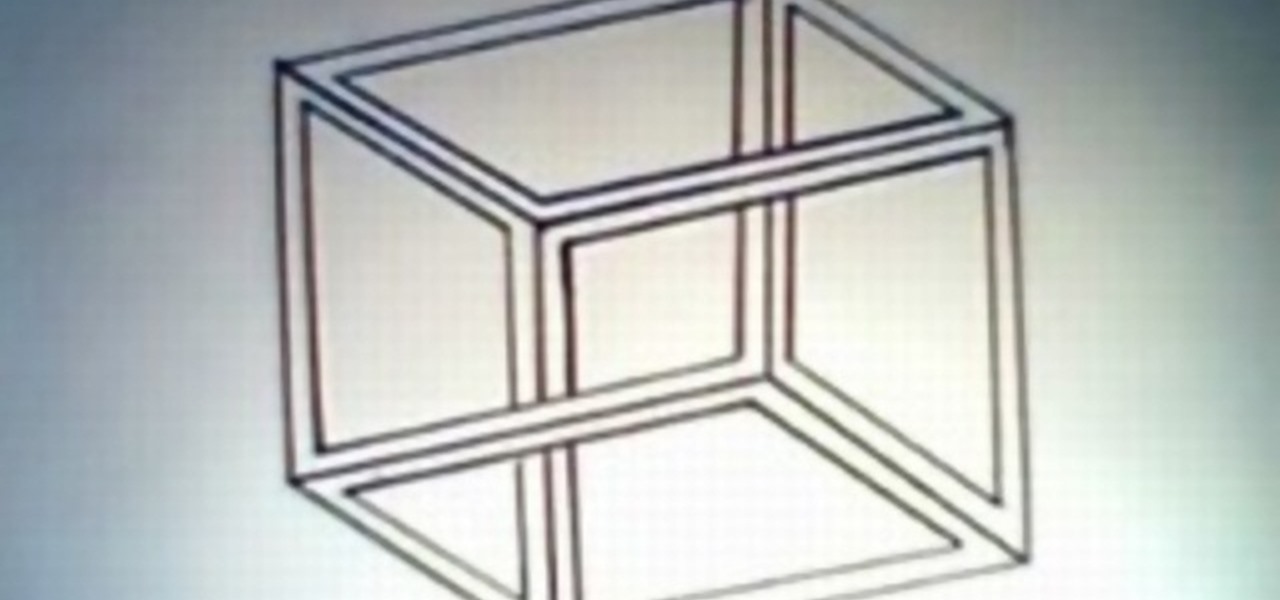
Draw it your self! with pen and paper, in the best style of M.C. Escher. Amazing three-dimensional impossible object. Takes only 2 minutes and produces this illusion object.
This image editing software tutorial shows you how to create an array from a rasterized object in Photoshop CS3. An array (in design terms, not programming terms) is an object that duplicates itself around a pivot point. So learn how to work with arrays to create designs in this Photoshop video.
Ever needed to fix a clip where an unwanted or unexpected object appears in the scene? A car is suddenly passing across or a stage hand got in the shot by accident? And re-shooting is expensive or impossible? You would be facing hours of tedious frame-by-frame rotoscoping to get rid of the pesky element in your video...
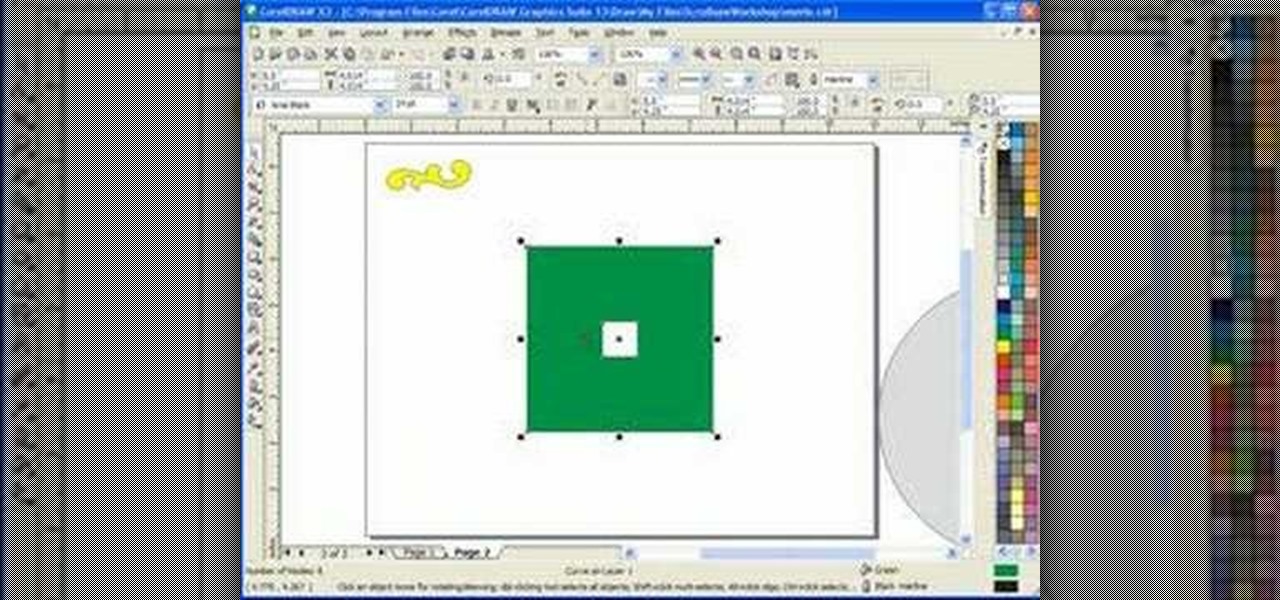
In this Corel Draw tutorial you will learn how to move and position objects in Corel Draw X3 to help create scroll saw patterns. If you create scroll saw woodwork and are into making your own patterns, this Corel Draw X3 tutorial will help you move and position objects.
This video tutorial will teach you how to apply custom textures to objects inside Sandbox 2. It won't work on all objects, but works on such items as laptops, computers, or monitors. You'll work with the material editor, find the right textures, and crop and resize pictures to fit.
This three part video series teaches you how to identify objects around the house in French. Part 1 of 3 - How to Identify household objects in French.
Watch this video to learn freehand glass making techniques to catchy music. See how to use fire in a bending technique. Break the glass under a flame, put it back together, separate it, and clamp it to form a flat object. (You know how the patience process goes . . .) Learn how to make a pendant or an earring.
Google just unveiled it's biggest search product in recent memory, except this time the search giant is looking to take over the world of virtual objects.
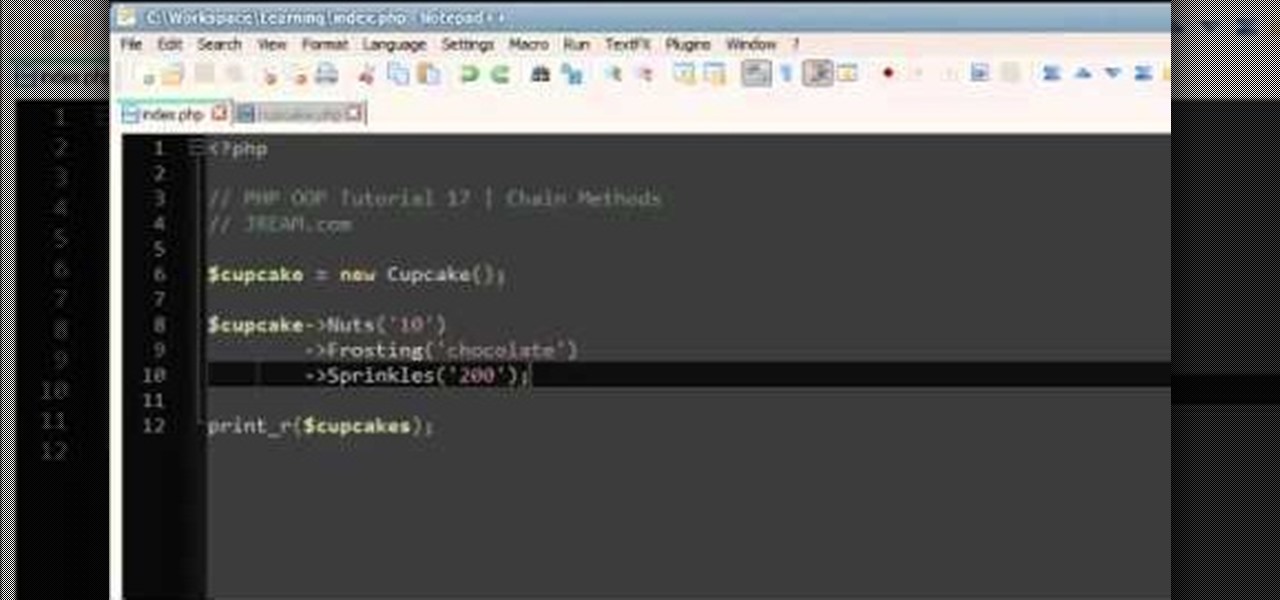
Chaining methods in PHP can be simple and straightforward if you follow along with this informative video tutorial on PHP OOP methods from JREAMdesign. The key action is to return the object after running the function so that you can run another function to the object directly afterwards.
You'll need to master the basics of object oriented programming to be able to use Python, and that's what this tutorial is all about. Use classes and objects so you can make your programs as efficient and elegant as possible when writing in Python.
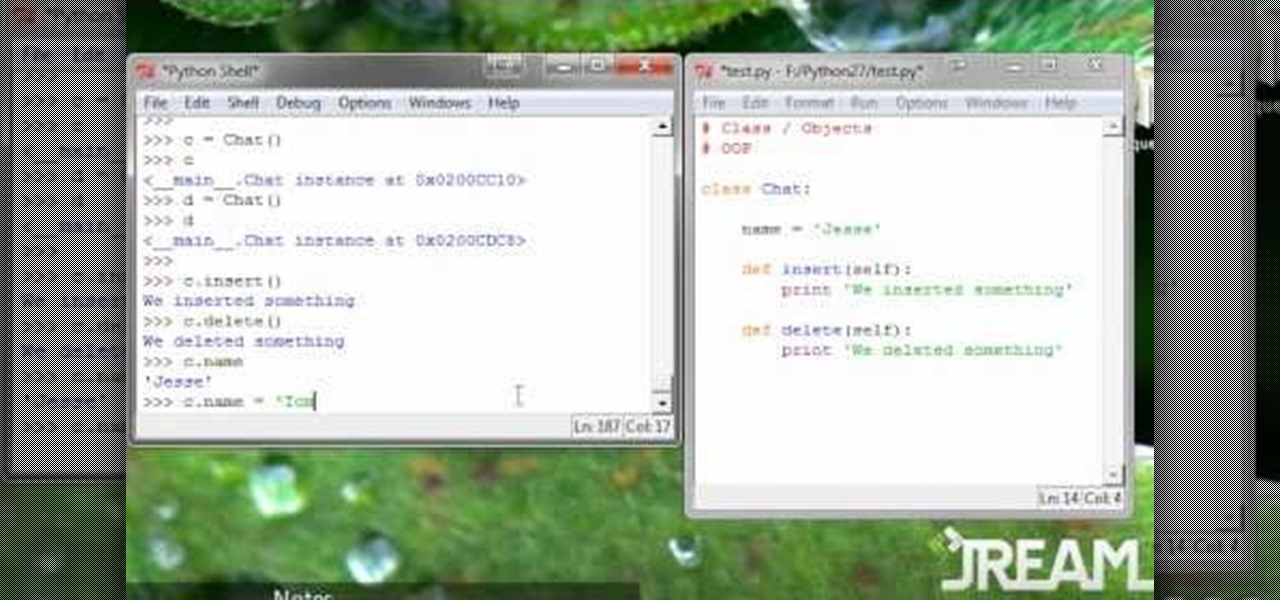
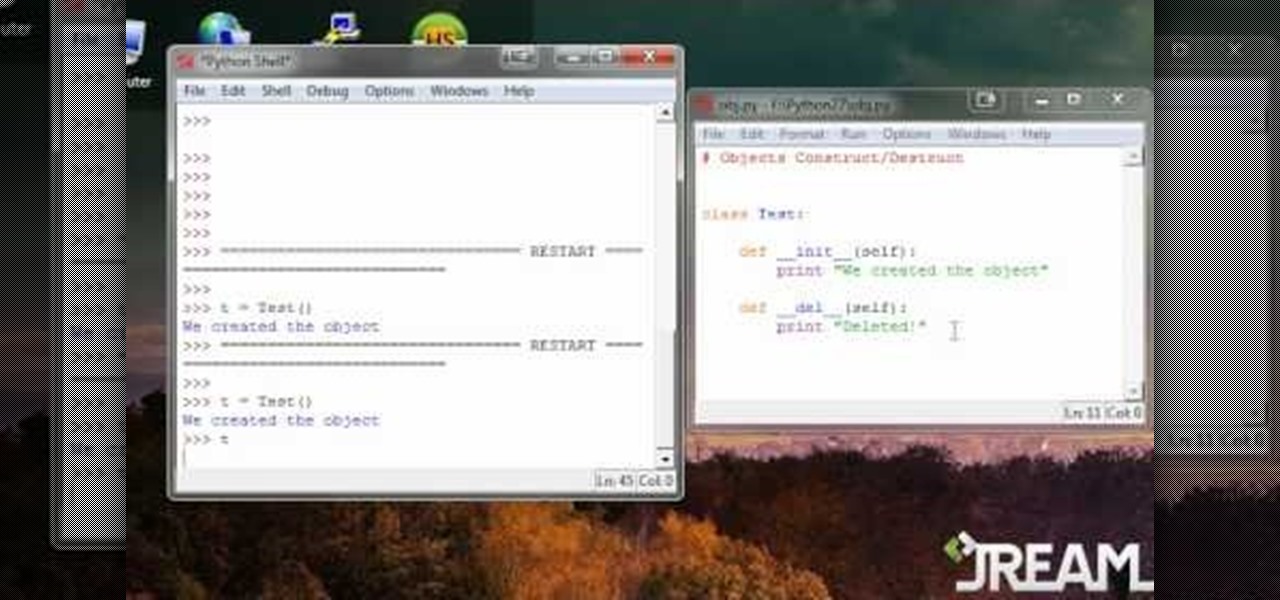
If you already grasp the basics of object oriented programming, this tutorial will be very easy for you. When you construct an object, you create it within the program (in this case, a program using Python), and when you destruct it, it deletes.
When you're programming in Python, and make a variable into a string, that becomes an object. This tutorial shows you how to use string methods and object methods when you're teaching yourself how to write a program using the Python language.
3D is very new to Photoshop only really coming into existence when CS3 was released. In CS3 however the 3D capabilities were pretty limited, but with the release of CS4 3D exploded into Photoshop and now has it's own set of tools and even it's own panel. You are now able to even create true 3D objects right from within Photoshop and texture them. In the following tutorial we will learn about creating a base 3D object and creating a few basic textures for that object. We will also take a momen...
The video shows how to calculate weight if the mass is given and vice versa.Later on in this unit you will learn about Newton's laws of motion and Newton's second law of motion gives us a way to change mass into weight and vice versa.This law will tell you what is happening to objects when the net force on the object is not equal to zero and the easy way to say what will happen is that the object will accelerate.But how much the object accelerates depends on two things,firstly the mass of the...
In this video, we learn how to make objects transparent in Flash. First, open your object up and convert it to a symbol in Flash. It doesn't matter if it's a graphic or movie clip, just make sure it's a symbol. Next, click on the symbol you just created and go to "properties". Find the section called "color effect" then find the drop down menu. You will see several options, choose "Alpha". Once you do this, you will have the ability to tweak how transparent you want your object to be. Use the...
On yourteachermathhelp teaches you how to use math rotations in pre-algebra. In this example, the shaded object represents the original one, while the empty object is the new, rotated one. Here, the original object has suffered a quarter of a turn, or a 90 degree turn. You can see that the top of the shaded figure or object has been turned to the left. This is in the opposite direction in which the hands of a clock move. This translates to a 90 degree turn in the counter-clockwise direction. ...
In this video the instructor shows how to insert a quick time video into your web page. To do this, first create a text box. It is always good to create a text box first and then insert your movie or flash object or any other media into it because it gives you more control of your object regarding its placement, rapping, and other things by containing it in that box. Now select the Quick Time object and browse to your movie and place it in the box. Now re-size the box to a required size for t...
Egg Bram teaches you how to create a cut text effect in Xara Extreme. Create a simple colored rectangle and add some text on top. Then select these two objects and go to Arrange - Combine Shapes - Subtract Shapes. Now the two objects have combined into one. Although the text appears to be white now, if you move another object underneath you will notice that the text is transparent. You can also add effects to this new objects, like a contour or a shadow.
After Effects is one of the best digital motion graphics software programs out there. Learn it. Now.