
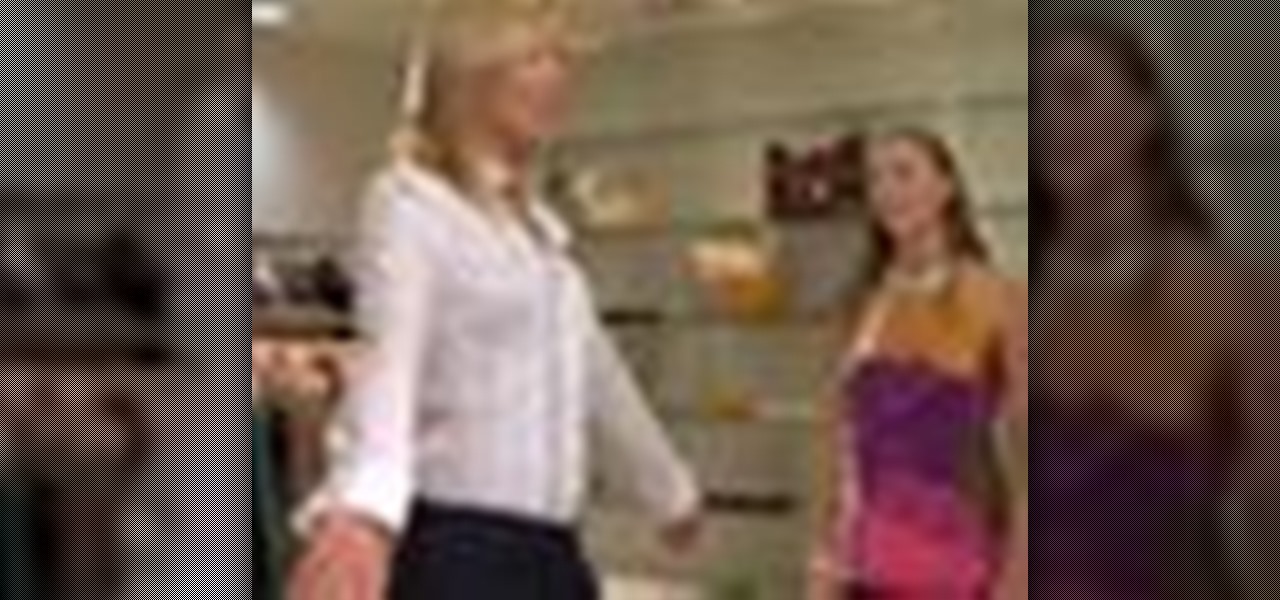
How To: Dress if you're a tall woman
Make the most of your height with these wardrobe tips. You Will Need

Make the most of your height with these wardrobe tips. You Will Need

A boyish figure is easy to dress: It's the shape high-fashion designers create for! Here's how to maximize the impact.

Some nights, I'm a lazy cook and only want to chop one clove of garlic for my immediate needs instead of prepping a giant batch and freezing it the way I normally do. The only problem is if I'm already feeling that lazy, I really don't feel like dirtying a whole cutting board. However, I still want my garlic to be finely minced so it suffuses my dish with its wonderful, one-of-a-kind flavor.
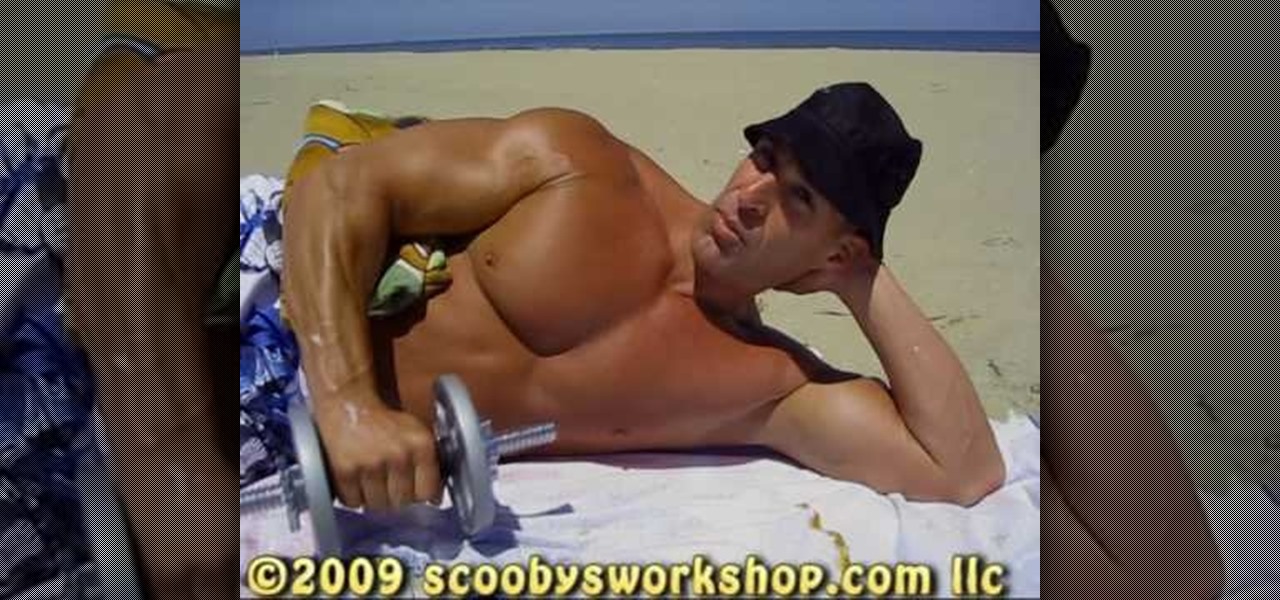
In this video, we learn how to reduce shoulder injuries with stabilizing exercises. This will not build your muscle, but it will help prevent you from hurting your shoulder, which will cause you not to work out. The first exercise you can do is to lay on your side and place a folded towel underneath your elbow. After this, relax your body and prop your head up with your other hand. Now, grab a small weight and lift from the ground to slightly higher than horizontal. The next exercise you can ...
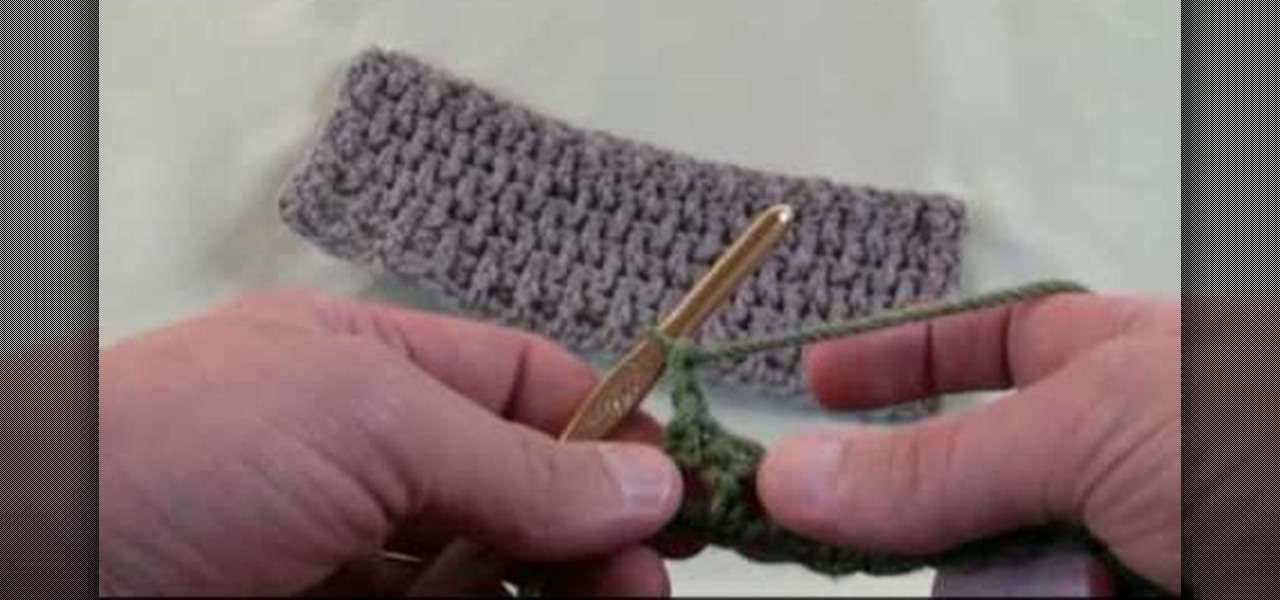
Expand your crocheting repertoire by learning how to crochet a crinkle stitch, which does indeed replicate fabric crinkles. With very hole-y yet tightly woven vertical lines of yarn intersection with horizontal ones, this type of stitch creates excellent warm fabric for scarves and cold weather gear.

The name of this crochet stitch says it all. Called the basket weave stitch, it consists of cubes of intersection vertical and horizontal yarns to create a unique pattern reminiscent of basket weaving.
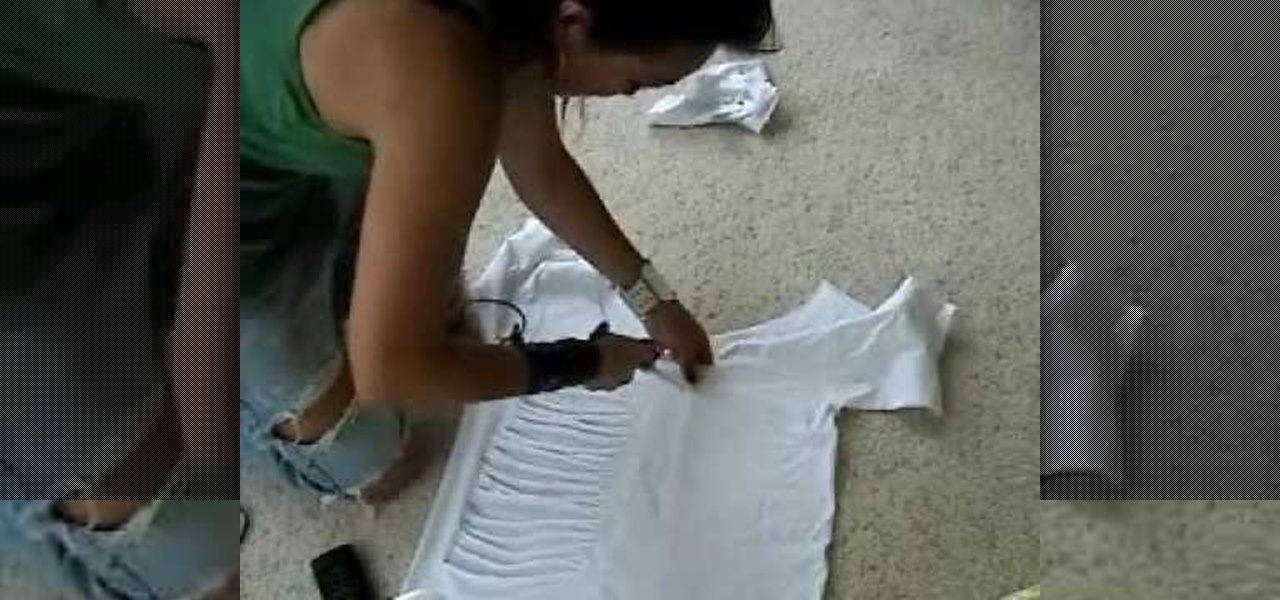
This video is a demonstration of how to cut up a T-shirt, inspired by 80's rock band fashions. Use a regular white T-shirt and start by cutting a deep scoop neck out of it, starting about an inch outside the neckband. Turn the shirt over and fold it in half Snip horizontal lines down half of the shirt all the way down. Then stretch out the thin strips. Cut the other side of the shirt the same way. Cut the sleeves off completely so it's more like a tank top. Wear the shirt over another tank to...
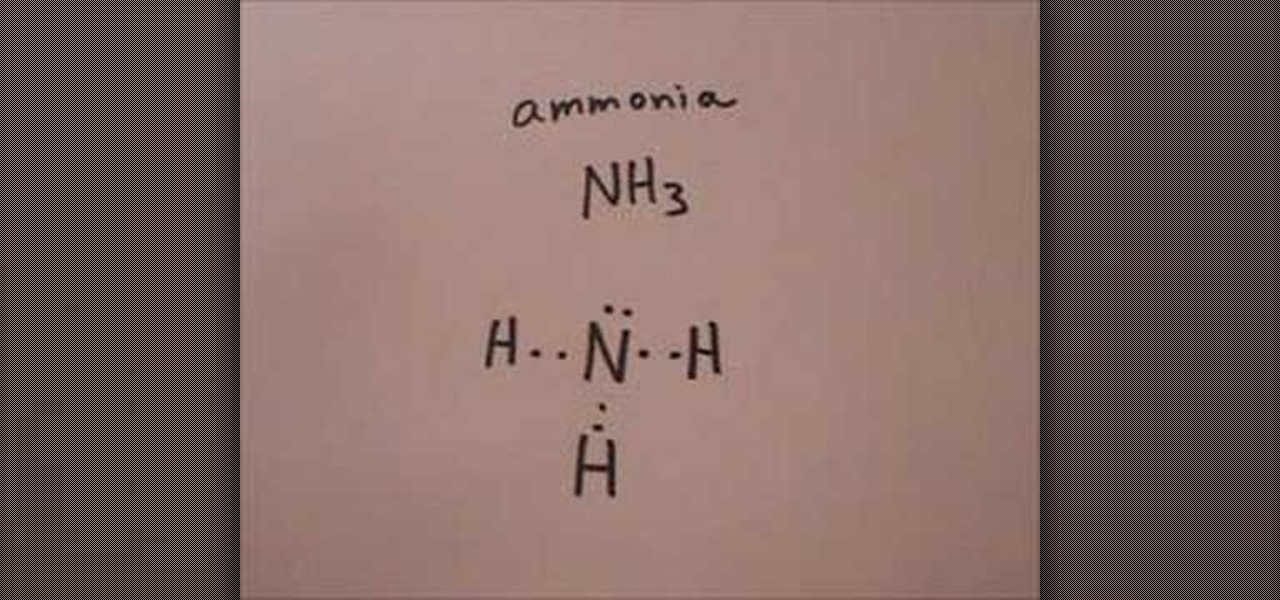
In this how-to video, you will learn how to make the Lewis structure for Ammonia. The formula for Ammonia is NH3. Now, write down H, N, and H in a horizontal line. Place an H under the N. Place two dots in between the spaces found in the H's and the N. Also place two dots above the N. Since the valance electrons are balanced, draw a line between the two dots connecting the H to the N. Leave the two dots above the N alone. This video shows just how easy it is to create a Lewis structure for Am...

Southwest Yard and Garden teaches viewers how to plant asparagus! First, in your garden you need to dig a trench that is about 8 inches deep. You should mix up some compost into this trench. Choose an asparagus that has a fern and make sure you choose a variety that is a male hybrid. These are more tolerant of other problems such as wilt. Simply, plant these 8 inches deep but do not cover them fully. Cover them gradually and cover it as it grows highly. Make sure your roots are laying horizon...
Curtis Smith (Extension Horticulturist) and Rick Daniell (Bernalillo Co. Horticulture Agent) examine the bark of a poplar tree. The young bark is smooth and will furrow as it grows older. There are straight horizontal lines on the bark that look like sap-sucker damage but in this case, the markings on the poplar is the normal bark development of the poplar. They also look at and discuss Fall Web Worm cocoons which look like bird nests on a tree. Web worms do not do as much damage to the tree ...

For this Final Cut Studio video tutorial, Zach King will teach you how to create an Apple reflection look in Final Cut Pro. To create an Apple reflection look, just go to the Video Generators tab, go to Render, and then Gradient. Next, go to Controls, click Gradient Type, go to Horizontal Bottom To Top, and also check Gaussian Blur. Check out the rest of the process in Final Cut. Let the Final Cut King show you how!

The first part is the trailer for a fixie feature from track bike legionnaires, MASH SF. The second is a video by Bre Pettis. This instructional DIY video shows you how to build a single speed fixed-gear or 'fixie' bicycle. Using old parts, build a bicycle effective for flat grounds. It looks like a lot of work, but if you have the tools, it should be relatively inexpensive. Learn aside Bre Pettis and Make Magazine.
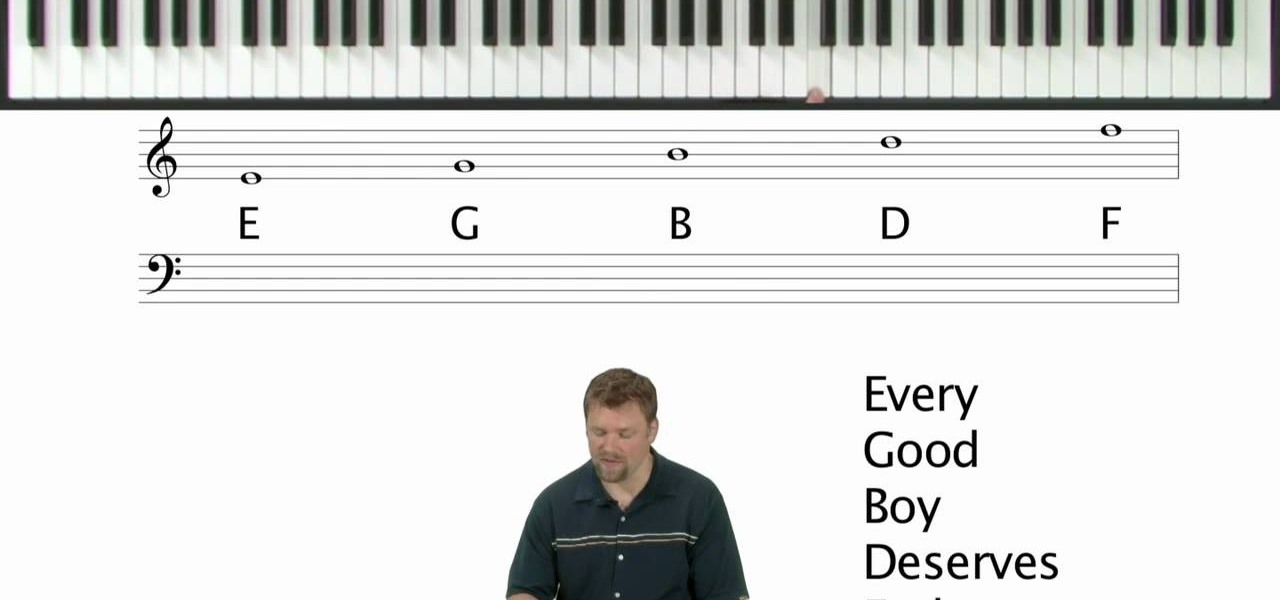
In this tutorial, we learn how to start reading sheet music for the piano. To be able to read the notes, you need to visualize what you are doing on the piano. A good starting point is the middle C on the keyboard. For a piano, you have horizontal lines in two sets on the sheet of paper. These lines are called "staffs" and the vertical lines are the "bar lines". The sections are called "measures". The top of those staffs is all the notes above the middle c. The bottom is all the notes below m...
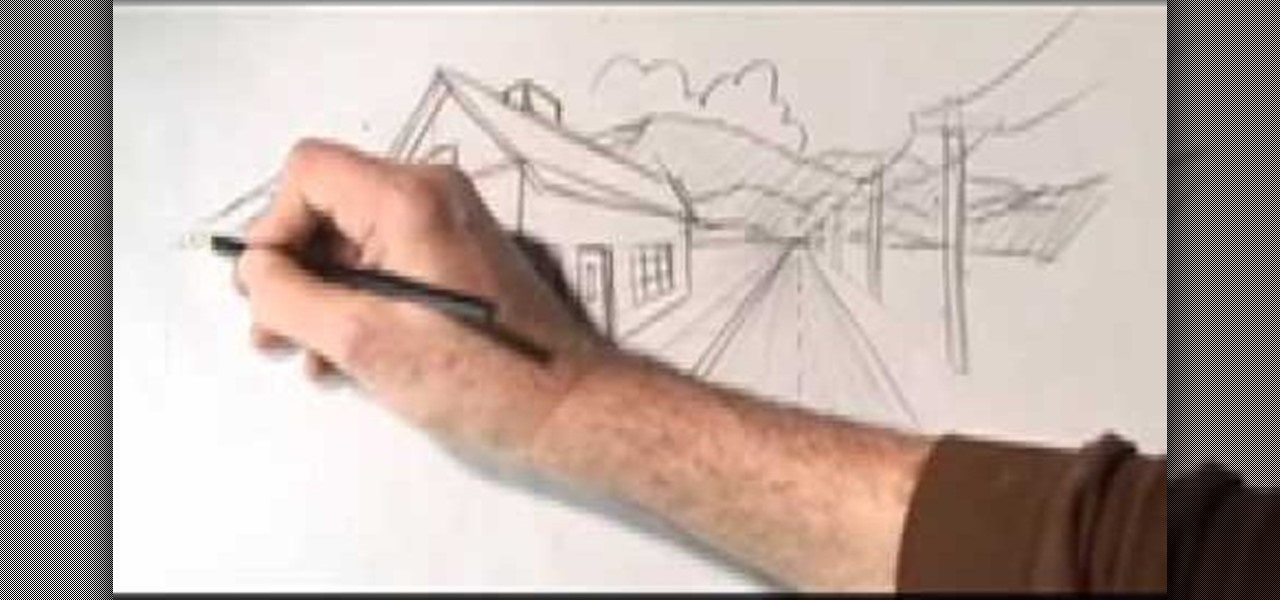
In this video, we learn how to draw two point perspective. Start off with a horizontal line on your paper. After this, draw a small point on the line where your drawing will focus to. From here, you will start to draw lines coming out of this. Next, you will design the rest of the picture around the main focal point you started out with. Add in lines to create lots of detail and make sure to use shading to show depth. Erase any background lines you don't need. Then when you are finished, you ...

In this tutorial, we learn how to create a warm grunge background in Photoshop. First, create a large circle on a burnt orange background in Photoshop. Now, go to layer, adjustment layer, then levels. Hit "ok" then the level's adjustment layer will be masked. Now, go grab the bottom black slider and brighten up the middle. Use the overlay to create a center glow. Next, bring in texture using a brushed metal texture from this photo. Now, even the image out by going to image, then image rotatio...

Strength training is the bread and butter of a good exercise routine, especially if you're an athelete. Whether your sport requires more speed (sprinting) or raw physical power (football), having strong muscles that can easily be stretched is important for keeping vital and fit.
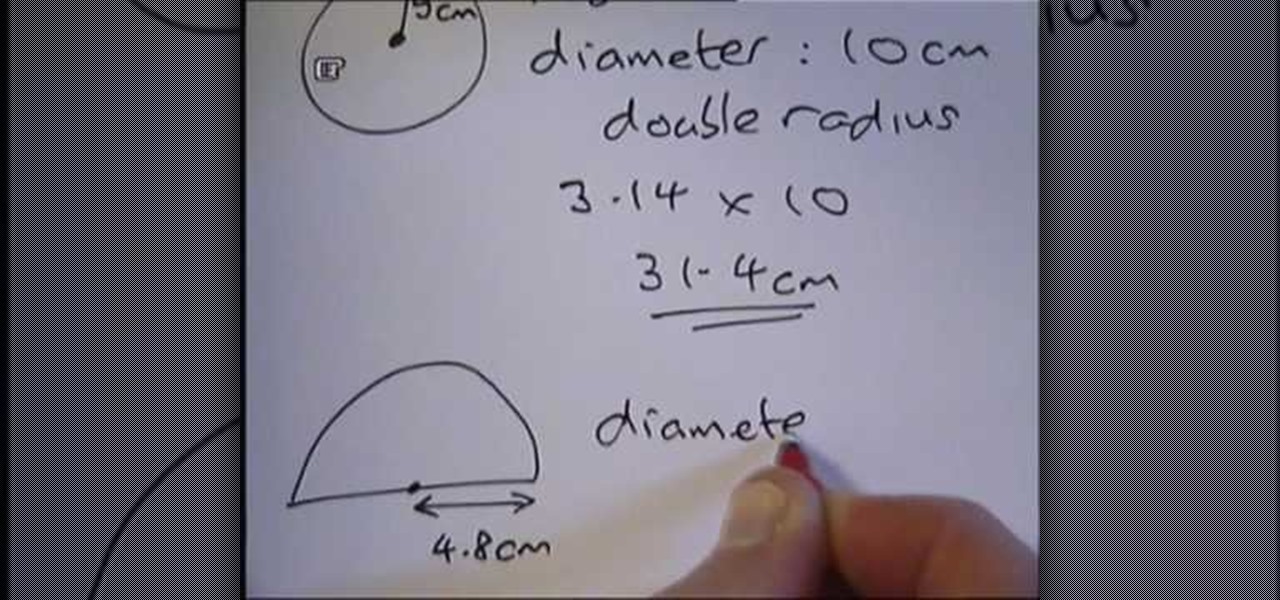
In this video tutorial, viewers learn how to find the circumference of a circle. This task is very easy, simple and fast to do. To find the circumference of a circle, multiple Pi with the diameter of the circle. The value of Pi is 3.14. The diameter is equal to 2 times the radius. Simply multiply the radius by 2 to find he diameter. The diameter is the straight horizontal line in the center of a circle. This video provides a demonstration for viewers to easily understand and follow along. Thi...
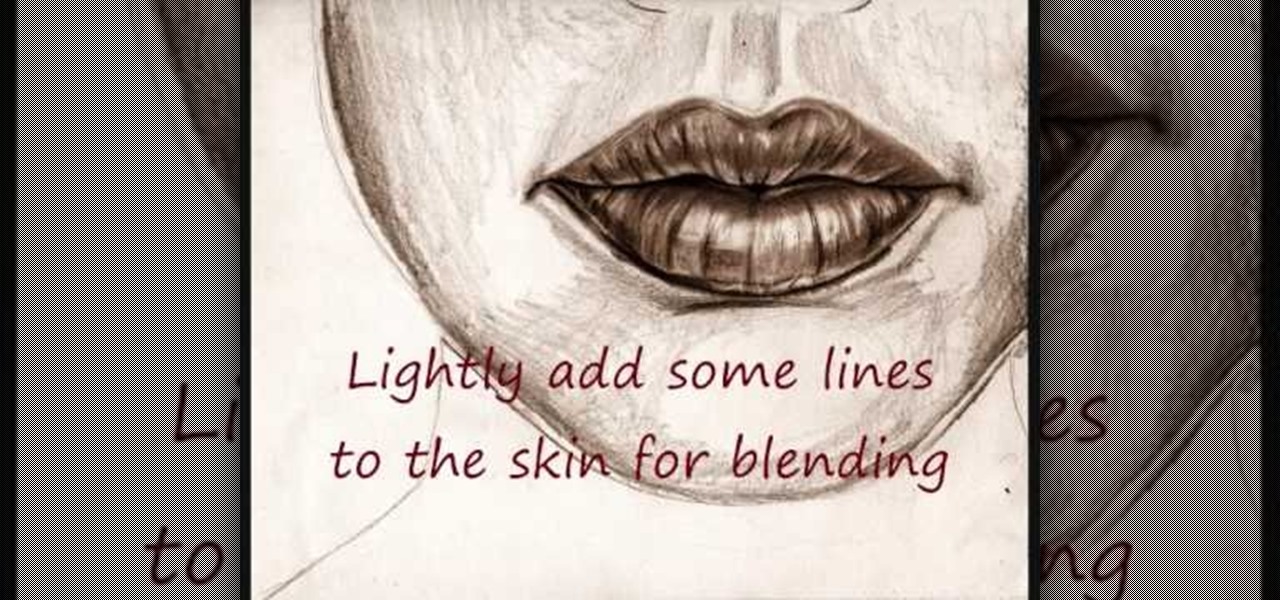
In this video tutorial, viewers learn how to draw lips. Begin by drawing a horizontal line for the mouth and draw a Mickey Mouse shape in between the line. Then sketch the upper lip with the 2 smaller circles on top and draw the lower lip with the large circle as guidelines. Now users may draw the rest of the face. Then darken and define the upper and lower lips. Now lightly sketch some lines on the lips to show depth. Then darken and shade the lips. This video will benefit those viewers who ...

Expand your crocheting repertoire by learning how to crochet a crinkle stitch, which does indeed replicate fabric crinkles. With very hole-y yet tightly woven vertical lines of yarn intersection with horizontal ones, this type of stitch creates excellent warm fabric for scarves and cold weather gear.
In this Fine Art video tutorial you will learn how to write the letter Q in calligraphy copperplate. Hamid Reza Ebrahimi shows you how to this using a Brause & Co No 86 nib, Persian traditional black calligraphy ink, Brause marbled penholder and Persian leather pasteboard and Steinbach pasteboard. To write the capital "Q", dip the nib in to the ink, then starting at the 2nd horizontal line, write upwards touching the top line. Then continue writing downwards till you touch the 4th line and no...
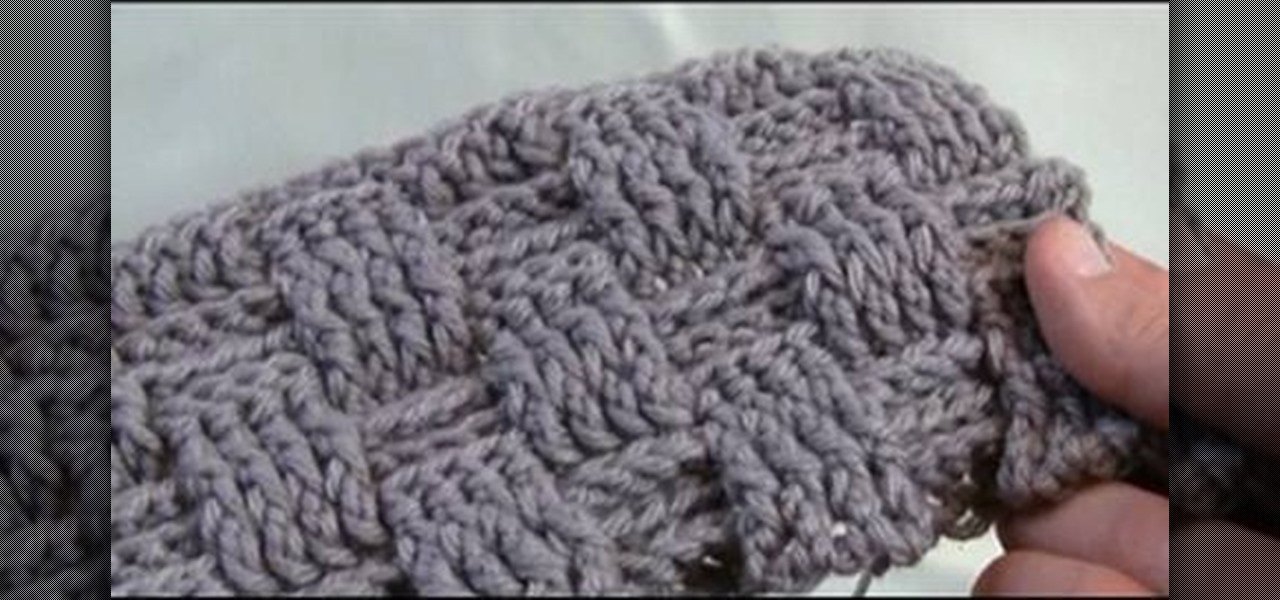
The name of this crochet stitch says it all. Called the basket weave stitch, it consists of cubes of intersection vertical and horizontal yarns to create a unique pattern reminiscent of basket weaving.

Whether you're interested in learning Microsoft Excel from the bottom up or just looking to pick up a few tips and tricks, you're in the right place. In this tutorial from everyone's favorite digital spreadsheet guru, ExcelIsFun, the 42nd installment in his "Highline Excel Class" series of free video Excel lessons, you'll learn ten tricks involving the LOOKUP function:
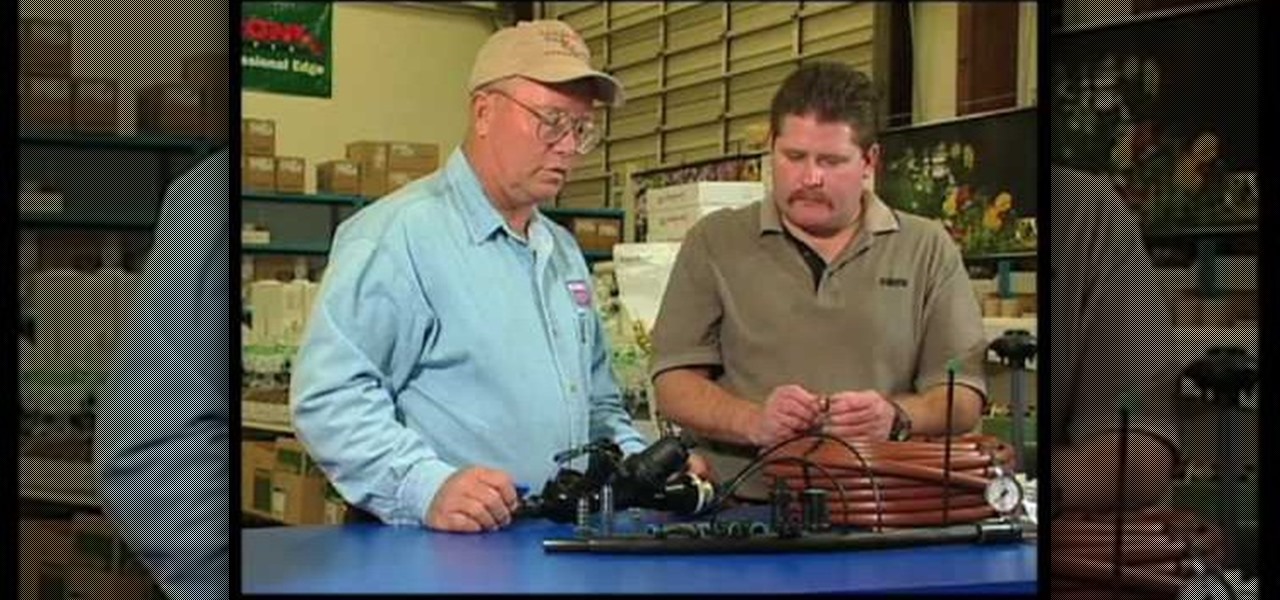
This video illustrate us how to build a drip irrigation system. Here are the following steps: 1. To build a drip irrigation system you need a pipe, hydro cyclone, screen filter, Pressure building pump and micro filter.step 2: Connect the pipe to the water source and let it pass through the hydro cyclone to settle down all the sand. 3: Now from the hydro cyclone pass it through the pressure gauge for building up the pressure ant then this pipe passes through the network of horizontal and verti...
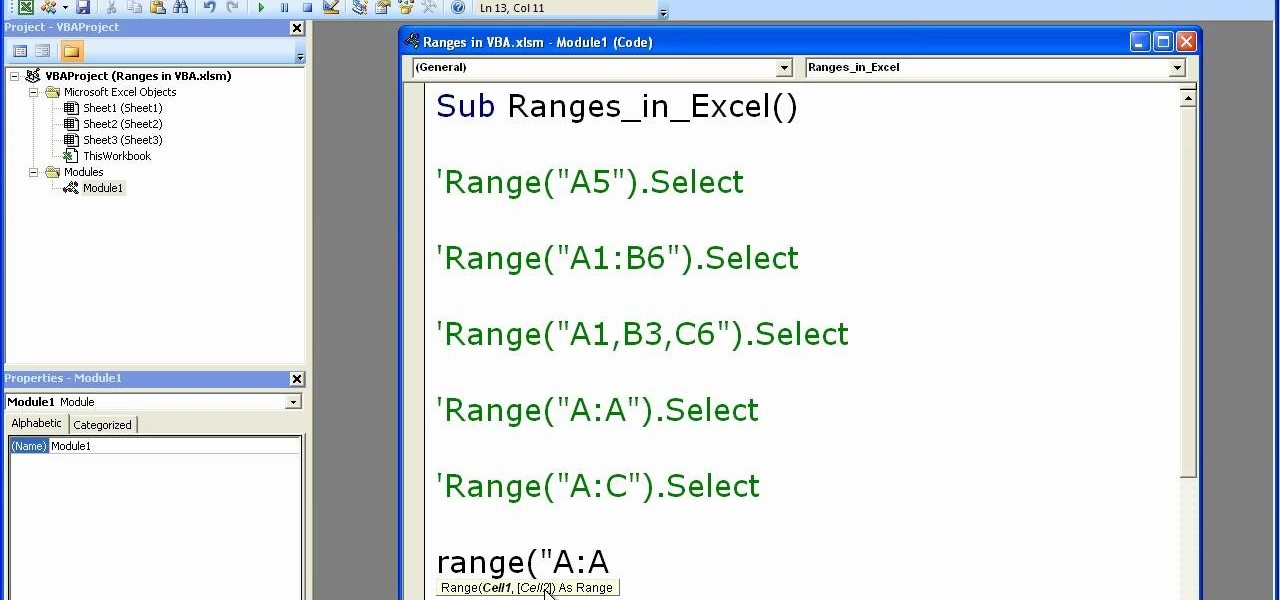
Microsoft excel is a powerful tool used to work with numbers and data by filling them down in rows and columns of a table. Excels also supports macros, which are small scripts to automate certain functions. In Microsoft Excel you can select entire rows and columns using the range property. You can also use macros to select individual rows and columns as well as multiple variations of rows, columns, and individual cells all at once. In Excel a horizontal line of data is called as row and a ver...
In this Home & Garden video tutorial you will learn how to test lawn irrigation systems. John White presents this video. This is done by a simple can test. Take a few cans of the same size with vertical walls and flat bottom. Place them around the sprinkler head at different distances and make sure they are horizontal. This will show whether the sprinkler is spreading water evenly. Then you can time it and measure the amount of water. This way in future, you will know how long to run the syst...
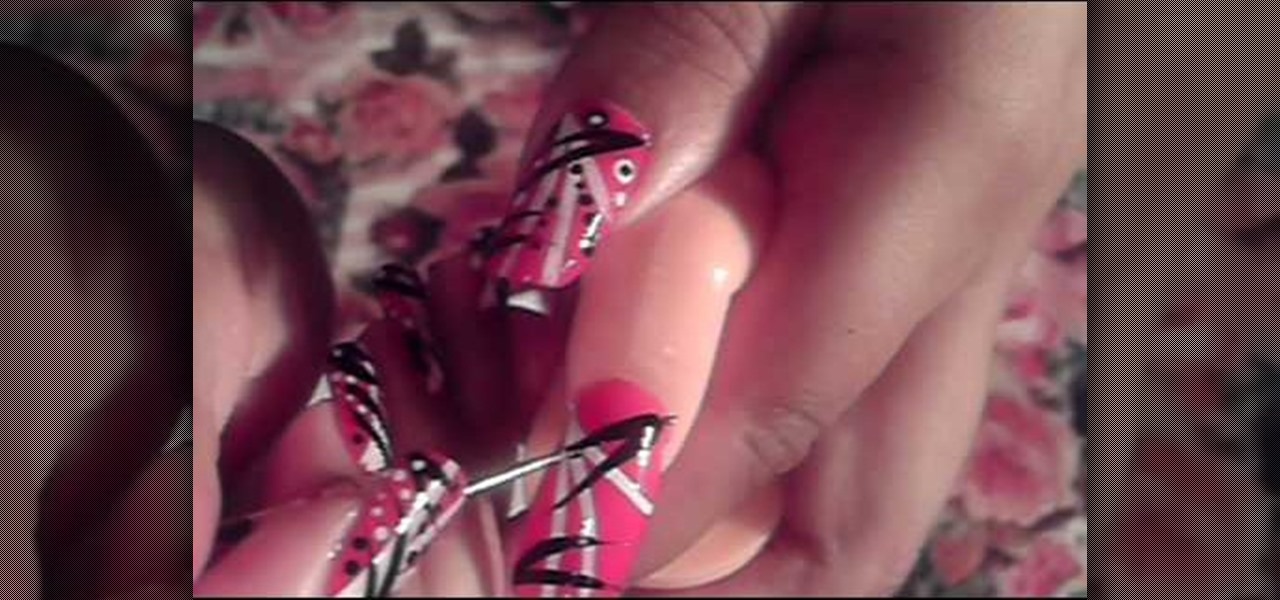
This video illustrate us how to create a sassy red, black and white nail design. Here are the following steps :step 1: First of all remove any previous nail paint.Step 2: Now apply some primer on the nails for long lasting effects of the nail paint.Step 3: Now take red nail paint and apply it all over the nails, let it dry.Step 4:Now take black nail paint and draw fine horizontal lines all over the nail.Step 5 : Now take white nail paint and apply polka dots on these lines as well as on the e...
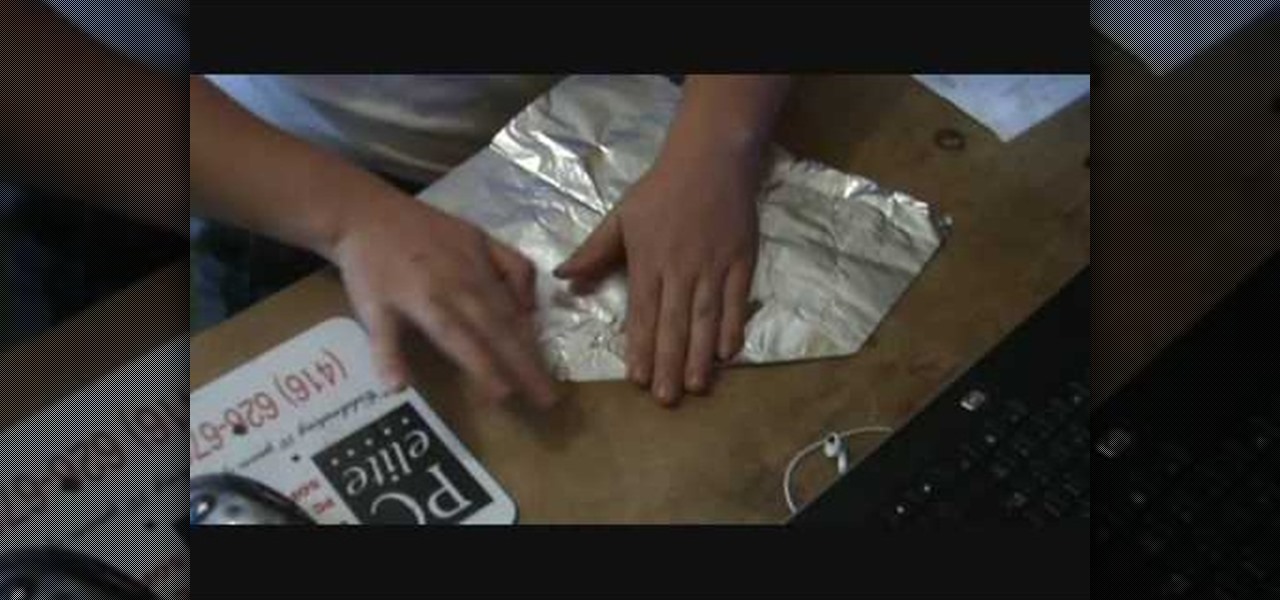
Learn how to make the perfect tinfoil airplane glider, every time. Obtain a rectangular sheet of tinfoil. Fold the shorter side of the rectangle foil in half and make a crease. Unfold the foil. Fold one of the corners into the middle crease. Fold the opposite corner into the middle crease. Fold the side into the middle crease. Fold the foil in half along the middle crease. Fold each side down so that it meets with the bottom crease and creates flaps. Press down on plane to strengthen the crea...

Dawn5377 teaches you how to make a twist box. Start with a piece of designer paper and fold it according to video specifications. Once done you will fold all the score lines, which are both horizontal and vertical. For the Xs you will fold in once one way and then the other. You will also crease the tiny line to the edge of the paper, using a sort of pinch motion. You punch three holes on each side - top and bottom. Fold the paper horizontally and glue it. Push the two ends opposite of each o...

In this video tutorial, viewers learn how to make an origami fortune teller. Fold a sheet of blank paper in half--vertically and horizontally. Fold the four corners of the paper into the middle. Flip the paper over and fold the corners into the middle. Fold it on the horizontals and diagonals. From then on, users can decorate the fortune teller. This video will benefit those viewers who enjoy origami and art.
This video shows the procedure to draw a face. The video shows various stages to draw a face. These include drawing an egg on the paper, dividing the egg into various parts by horizontal lines, drawing the nose and lips, drawing the eyes and ears. The video cleverly deals with issues relating to the evidence of not being a professional. The video shows the various choices that can be made by the artist in drawing the face like the pencils to use.
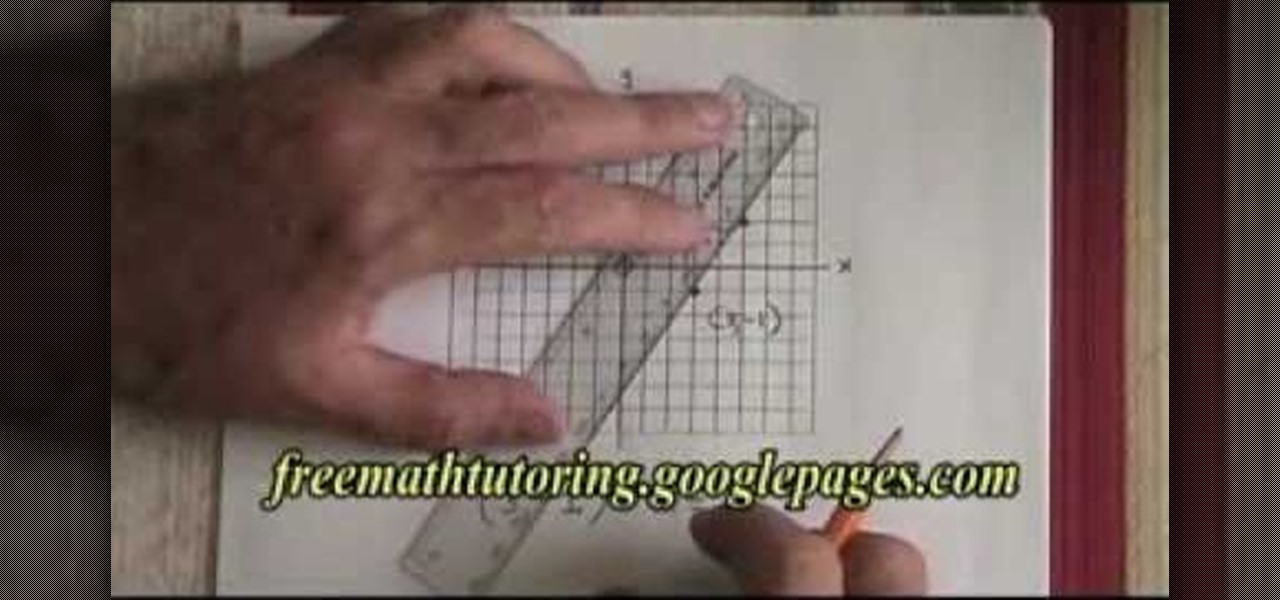
In this video the tutor shows how to graph a straight line using the rise over run method. The rise over run trick allows you to graph a straight line as long as you have a starting point and a slope value in the form of a fraction. The first step is to graph the starting point. In the second step he states that the numerator of the slope is rise and the denominator of the slope is run. He says that the rise is vertical and the run is horizontal and shows how do rise and run using those value...

Fingernail ridges are usually a sign of bad health. Horizontal ridges in your nails are caused by trauma to the cuticle as well as by medications or sickness. Meanwhile, verticle ridges are hereditary but can be caused by trauma.

In this tutorial, we learn how to draw curvy steps using pens. To start, you will first draw a horizontal line with a point in it. From here, you will need to draw lines coming out of the point. These lines will act as your reference point for the different items in the drawing. Next, draw the steps using the reference points. The one at the bottom should be larger, getting smaller as you work your way up. Draw these using the triangle shape in sort of a wedge. Shade in the bottom area to cre...

In this video, we learn how to resize an image in MS Paint without losing resolution. First, you will go to the file menu and then open. From here, open up the photo you want to resize. After this, go the 'image' section on the toolbar and then click 'stretch and skew'. From here, change the vertical and horizontal stretches until you have the size of picture that you want! Continue to play with it until it's right and then save this over again. This should only take a few minutes and will ke...

In this tutorial, we learn how to draw curvy steps using pencil. To start, you will draw a thin horizontal line with a small point on it. After this, you will draw lines out from this, using a ruler to keep them straight. From here, draw your steps on the bottom of the page using the lines to keep them proportioned and in place. Draw them in a triangle wedge shape and then color them in. Shade the bottom and the sides to give them depth and dimension. After this, draw in the area around the s...
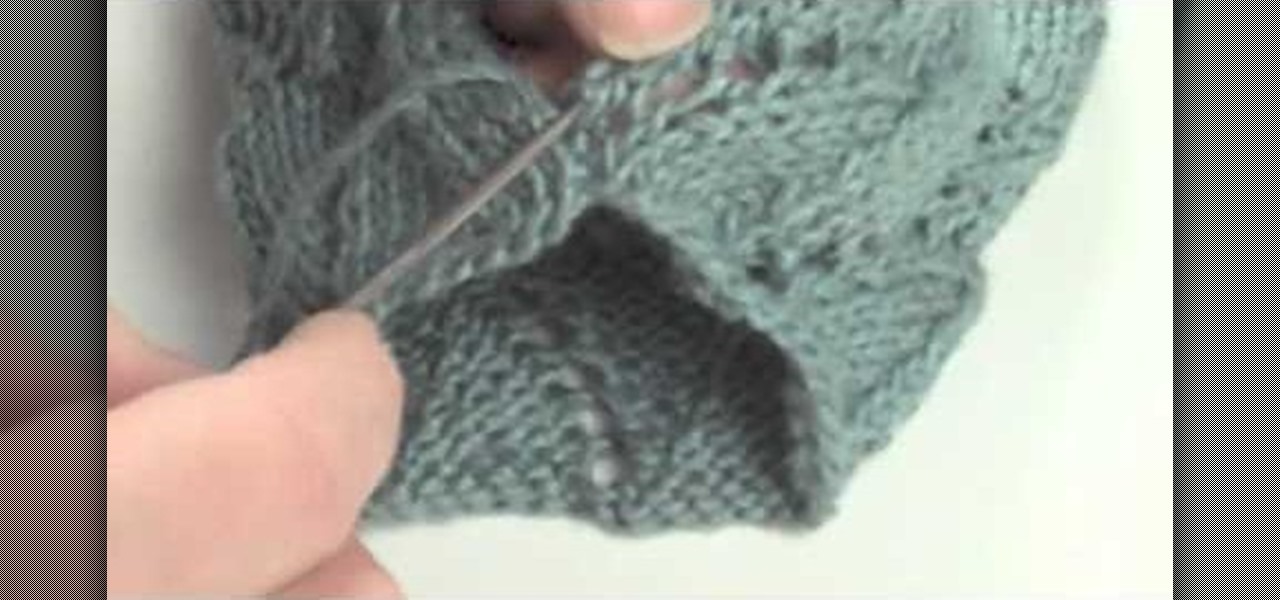
In this tutorial, we learn how to do the mattress stitch. First, lay the pieces flat and thread yarn tail onto the needle. Next, you will anchor the yarn to the bottom edge of the opposite piece. Then, go back through the side and find the tunnel of horizontal bars, one stitch in from the edge. Continue to do this around the stitches to combine them together. Keep alternating sides and just do one bar at a time to get the best results. You can do two bars at a time if you are comfortable with...

In this video, we learn how to find the determinant & area of a parallelogram. The determinant of a 2x2 matrix is equal to the area of the parallelogram defined by the column vectors of the matrix. Graph both of the equations that you are given on the vertical and horizontal axis. After you have all of the coordinates in place, you will be able to plug in the correct numbers to figure out what the answer to the equation in. This is more advanced math, so if you have not done it before, you sh...
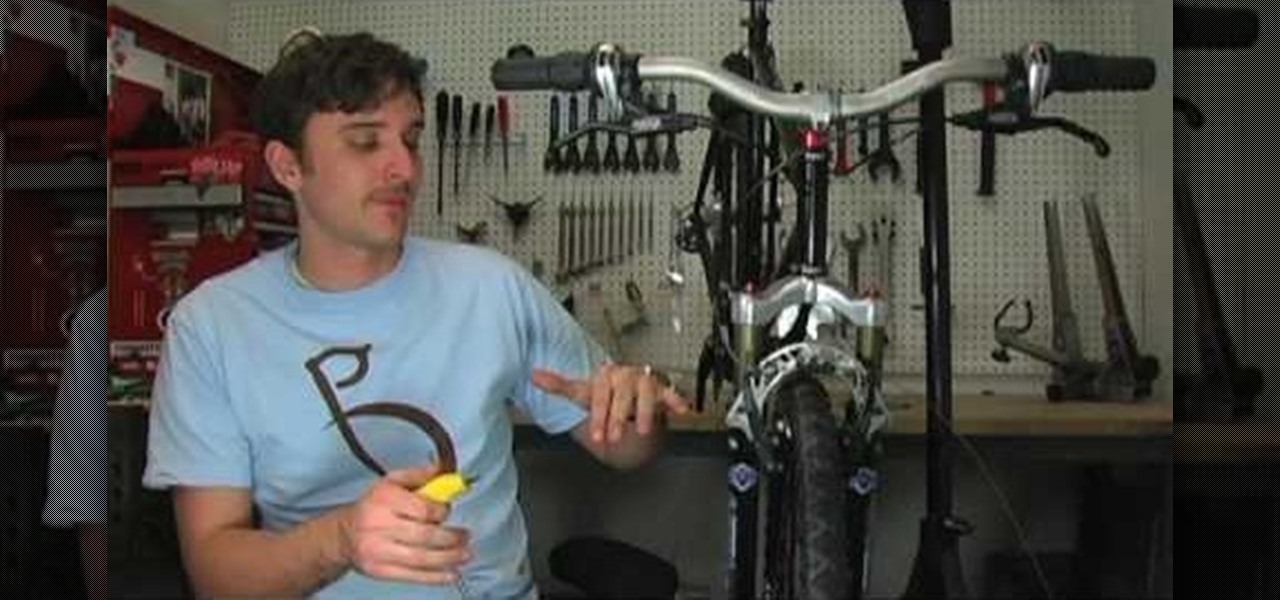
This video tutorial is in the Sports category which will show you how to adjust your front brakes on your bike. The brake pads are very adjustable. It has 360 degrees rotation which helps in installing it on the bike easily. First install the brake arms. Then loosen up the brake pad screw and lower it to bring it in line with the rim of the wheel. Now hold it in place and tighten the screw. Thereafter you can any vertical and horizontal adjustments. You can then repeat the same procedure for ...
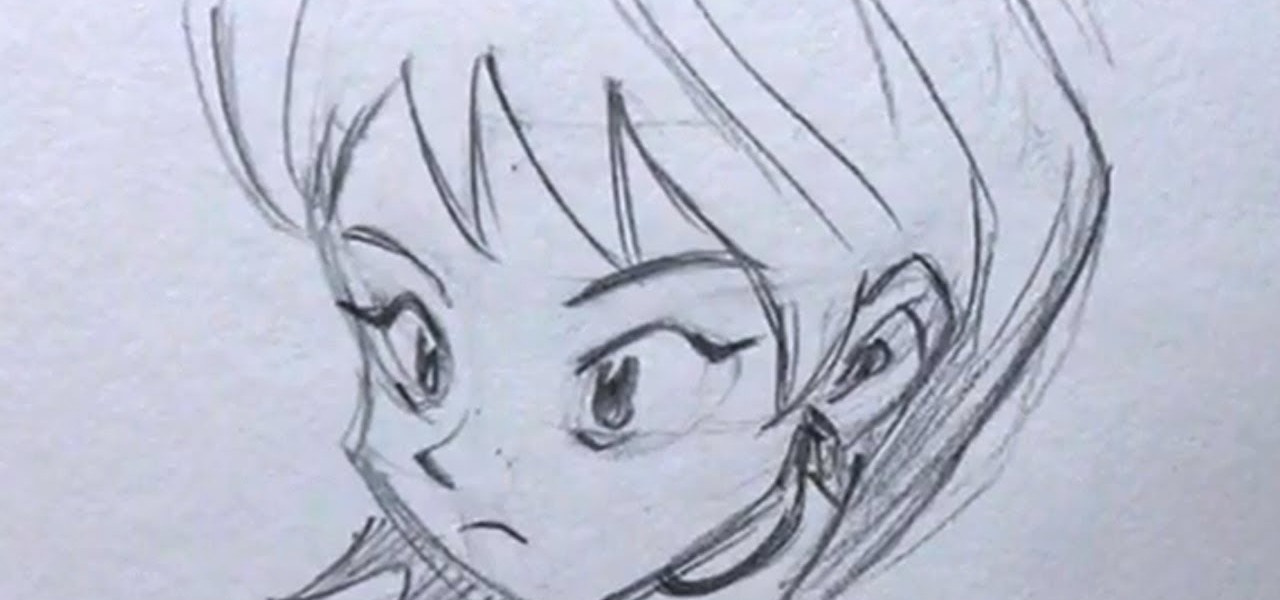
In this tutorial, we learn how to draw manga faces 3/4 view tilted down. You will start with a circle for the head, but you will make the chin go off to the side slightly. Next, you will draw a horizontal and vertical intersecting line off to the side of the face where the chin is. Next, draw in the circles for the eyes, then draw in the brow line. The brow line should be lower than normal. Once you have all the guidelines set up, add in the ear and start to draw in the details of the face. W...
In this tutorial, we learn how to make the perfect hole for your destroyed denim. First, you will need to grab a pair of sharp scissors. Make small horizontal cuts around 1 cm apart. Once you have made as many cuts as you want, you will use tweezers to pull out the fray that is on the bottom of the cuts in the jeans. To create nicks and grindings, use a Dremmel tool on the jeans. This will help you sand down the area of the jeans you want the hole to be and create a distressed look. When fini...