

How To: Use a Panasonic MiniDV camcorder
Check out this video tutorial to show you how to use a Panasonic MiniDV camcorder. This video was made by the equipment room at CUNY Journalism School in New York.

Check out this video tutorial to show you how to use a Panasonic MiniDV camcorder. This video was made by the equipment room at CUNY Journalism School in New York.
So you want to make your own video game using Flash CS4 and Actionscript 3. We applaud your chutzpah. This video will walk you through what should probably be your first steps: importing a sprite character, making them move around in response to keyboard inputs, and making them animate depending on how they are moving. Once you have this established, you can move on to creating enemies to fight, environments to wander, and all the other elements that make a good game.

If you've never done it before, making a podcast can be tricky, with multiple programs to use and multiple file types to deal with. But, this video series helps you through the complete process of creating a podcast, everything including recording, editing, images, exporting, converting, uploading, and finally… sharing. Watch this whole series to learn how to make podcasts using GarageBand, iWeb, iTunes, and Fugu.

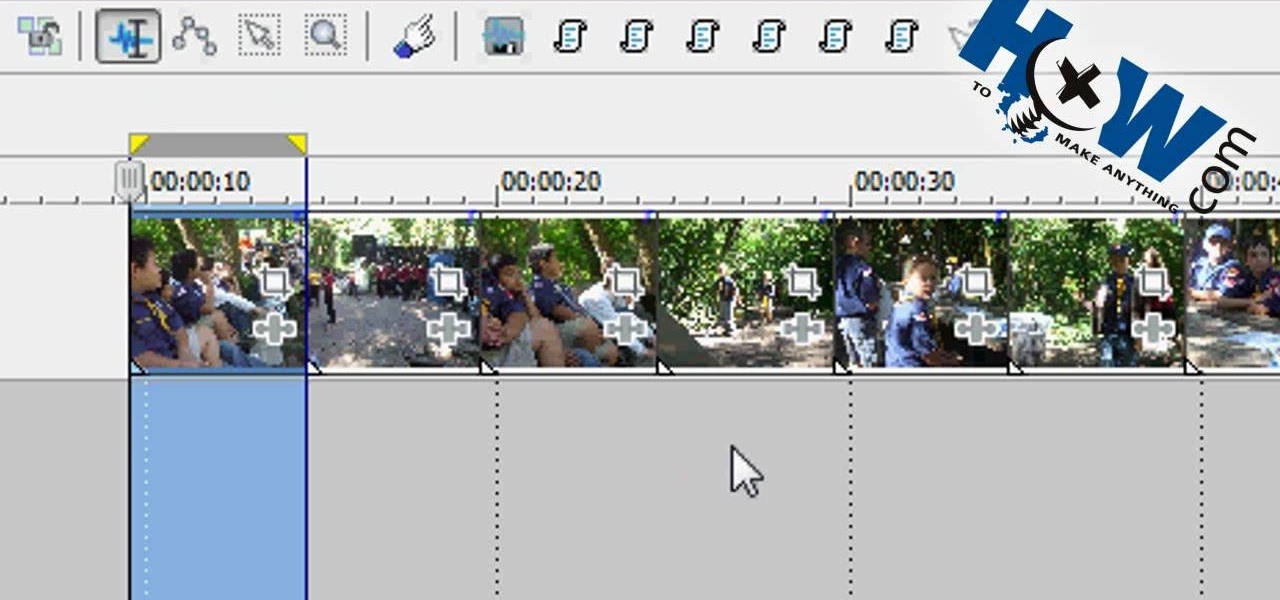
Learn how to edit videos in this quick and easy tutorial. Use iMovie in this project to make a 5x5, which is a series of 5-second video clips compiled together into a 25-second video project. This tutorial details the various steps of video editing, including importing footage, arranging clips in the timeline, trimming & cutting, editing sound & music, adding text effects and exporting to a video sharing site like Vimeo.

When you've finished a LiveType project, you can import it directly into Final Cut Express. The LiveType projects looks and behaves like an ordinary clip, but it has a .ipr file extension. Edit it like a normal clip, and you can change its attributes after importing by right clicking and selecting "Open in Editor." Final Cut Express automatically updates the imported file.
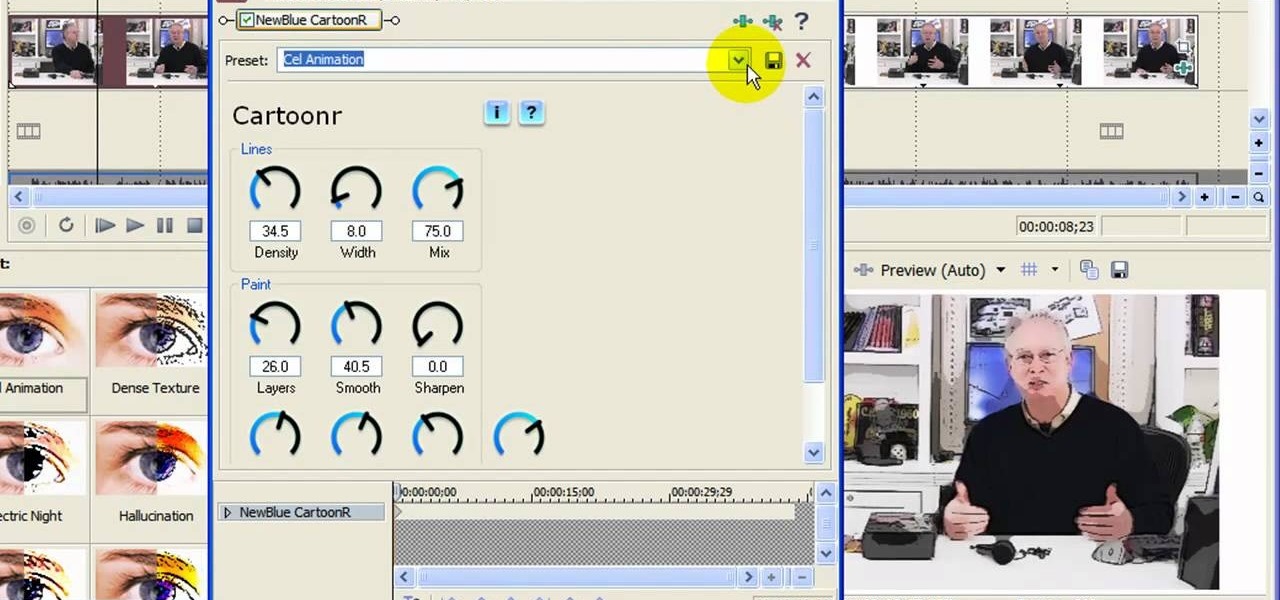
In this video tutorial, viewers learn how to create a cartoon effect from video in Sony Movie Studio. Begin by importing the video clip(s) into the time line. Then click on the Video Effects tab and select New Blue Cartoon R. This is a plug in that needs to be downloaded. Users are able to select various different cartoon styles from the Preset drop-down menu. Users are also able to configure the lines and paint of the cartoon effect. This video will benefit those viewers who enjoy create and...
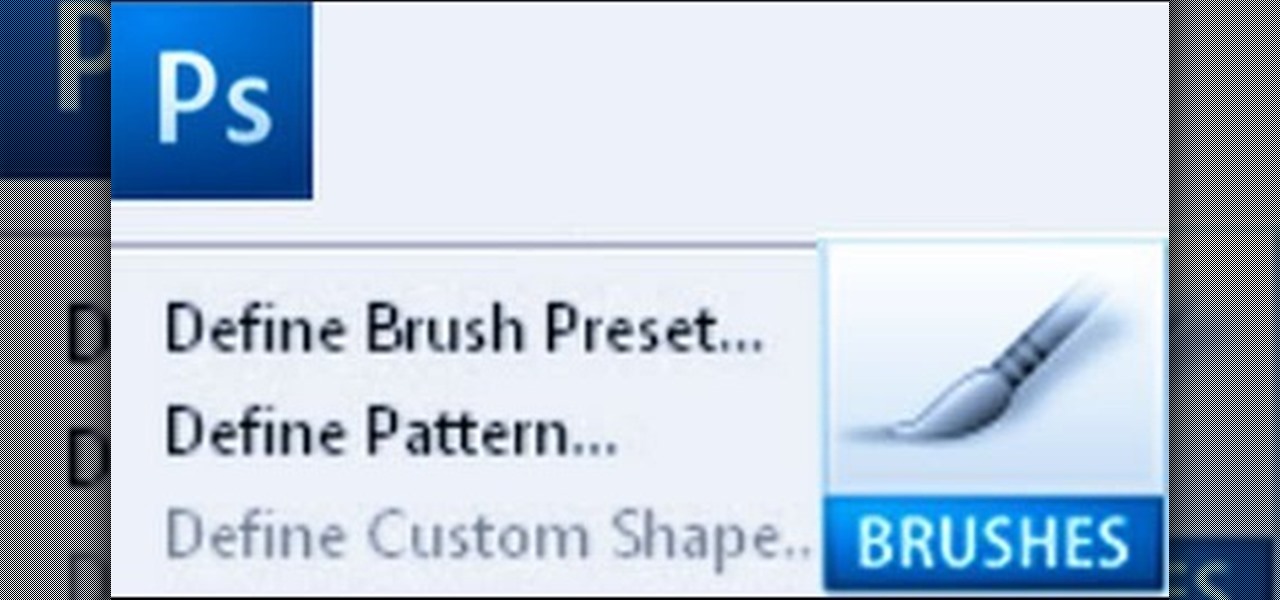
Importing custom brushes and patterns into Photoshop is not too complicated, you can probably handle that already. But what if you want to create your own? This video will teach you how to create your own custom brushes and patterns within Photoshop, which you can then use yourself or make available to others on the web. The former will save you lots of time when you find yourself making the same pattern over and over again because you can make a brush that will draw it automatically. How handy!
In this video tutorial, viewers learn how to create high definition videos in iMovie. Begin by importing the video into the program. Click on Share and select Export using Quick Time. Set the Export to Movie to Quick Time Movie and then click on Options. Under Video, select Settings. Change the Compression Type to MPEG--4 Video, leave the frame rater at Current, Key frames to Automatic and Quality to the Best. Click OK and then click on Size under Video. Set the Dimensions to 1280 x 720 HD. T...

In this two-part tutorial, learn about the basics of After Effects. These videos are made for those people who are new to After Effects and want to learn how to use it.
Move over Pro Tools LE— Pro Tools 9 is here! One of the most exciting things about Pro Tools 9 is that there's more tracks without having to have a Toolkit. Another great thing is being able to run Pro Tools without having to use Digidesign, M-Audio or any Avid hardware. Also, there's Delay Compensation Engine on a native system that doesn't require HD hardware or HD native. And this is just the beginning. To see more of the features in Pro Tools 9, watch this overview video.
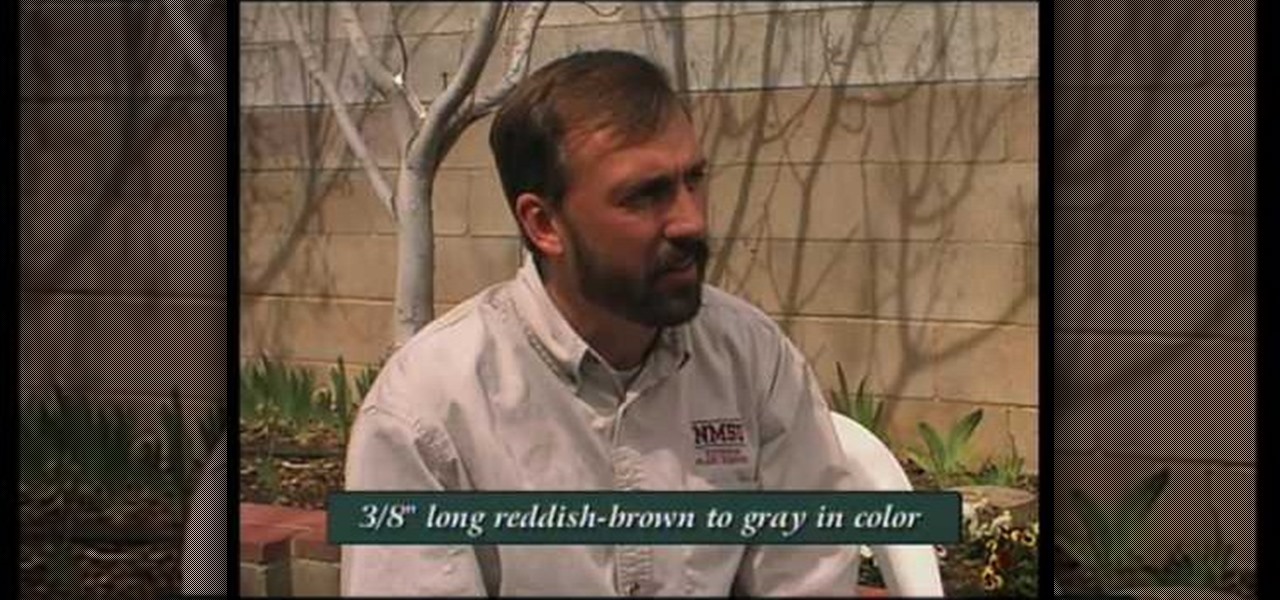
This is a tutorial for controlling the Pine tip moth. Identifying and controlling the pine tip moth consists of studying the small plants of pine. The attacks on pine trees is caused by Nantucket pine tree moth found along the Rio Grande Valley as far north as Espanola, it has spread to South Arizona and California by importing grafts from Mexico. The moths are 3/8 inch long reddish brown to grey in color. They attack the main stem of the baby plant and the pines instead of growing vertical g...
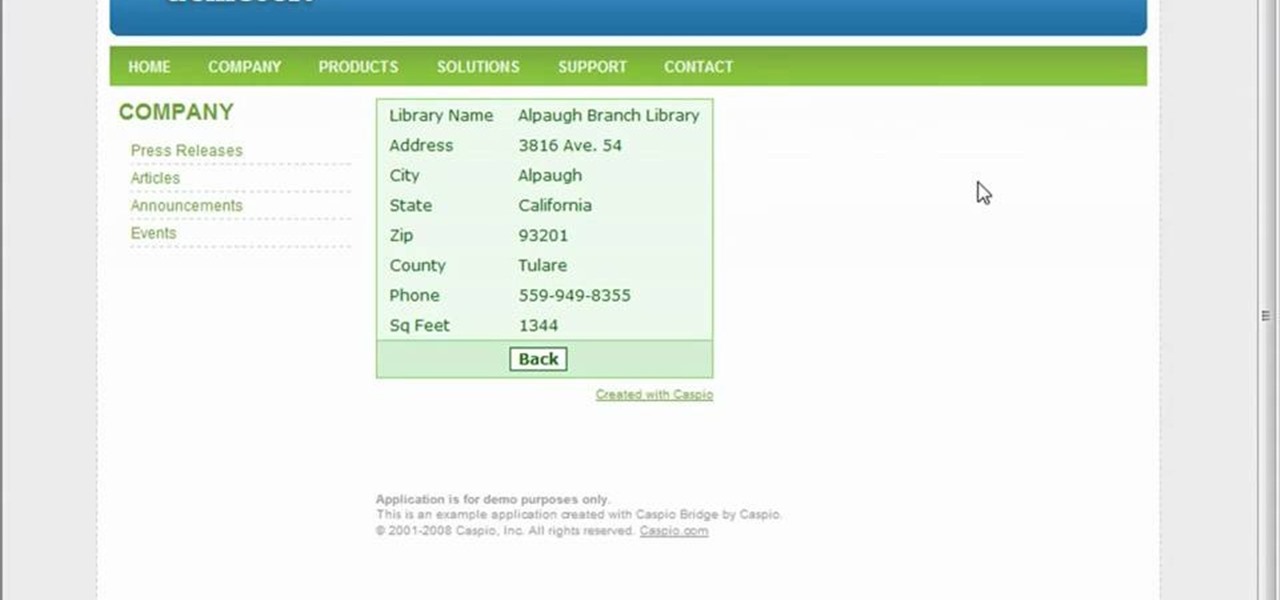
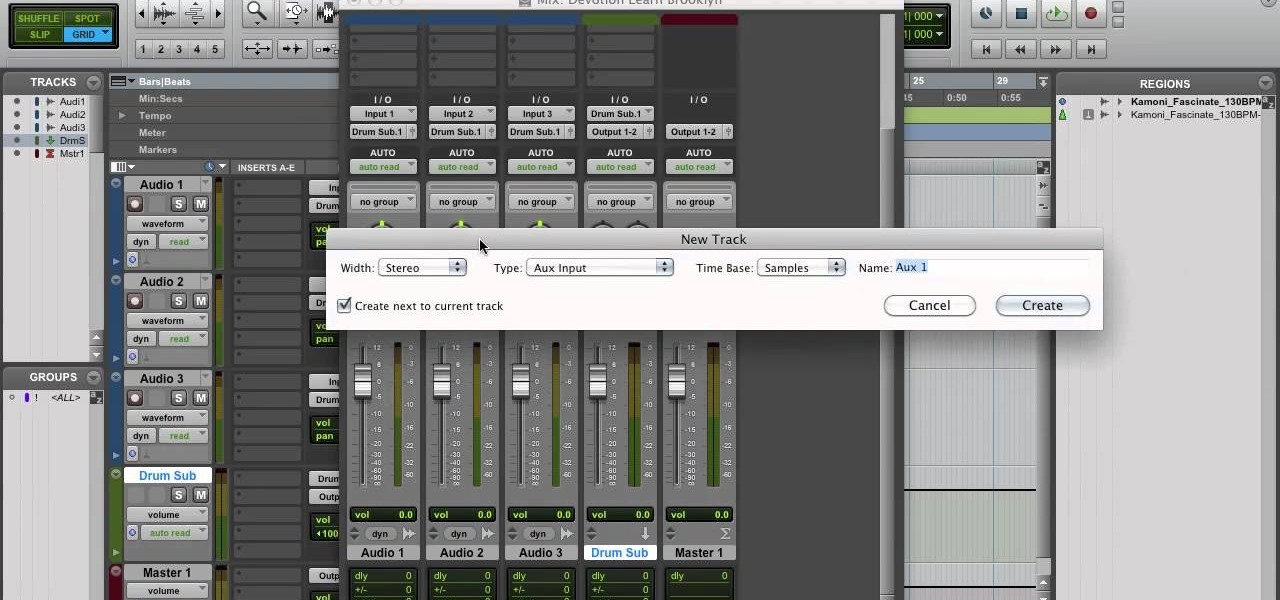
To start off the process of publishing your access database online we first look at a sample MS ACCESS database with typical formats and a online searchable application where users can search by library name or city and get details of the library. There are 3 steps to publish the database. The first step is importing data which can be done through clicking on the file menu and then click on import data through a Microsoft Access Database. Now select the file you want to import through the bro...
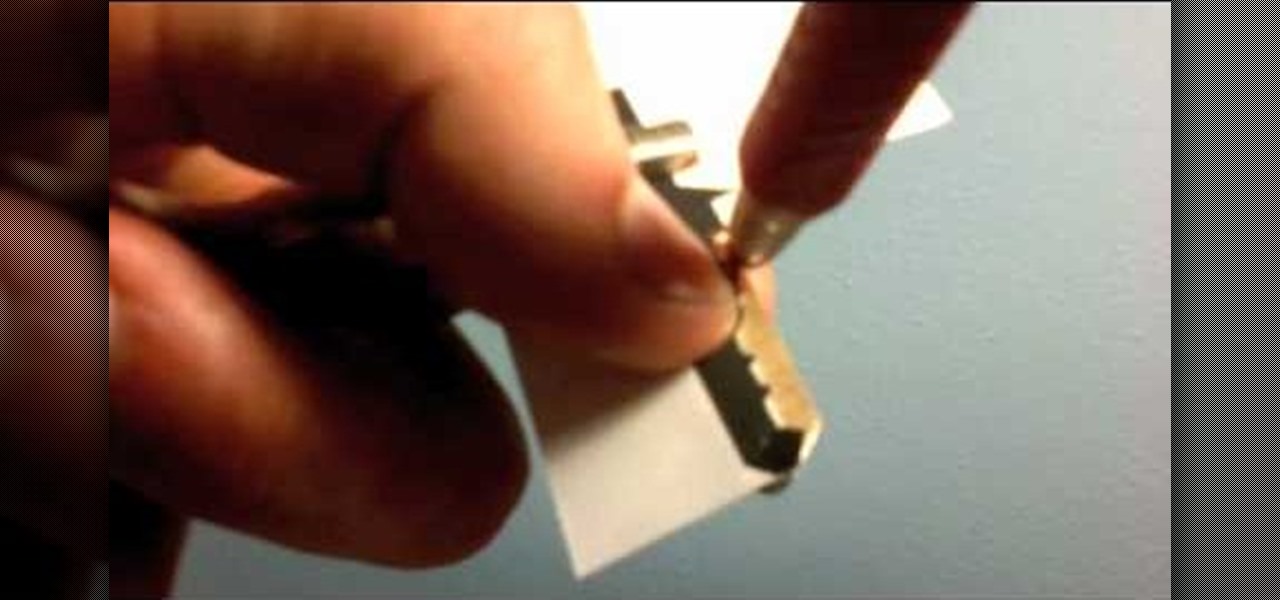
In this ten-step video tutorial, you'll learn how to quickly copy keys using a camera, printer and Dremel tool. With this ten-step process you'll learn the necessary steps to copy almost any key... even if you only have access to it for a brief period of time.
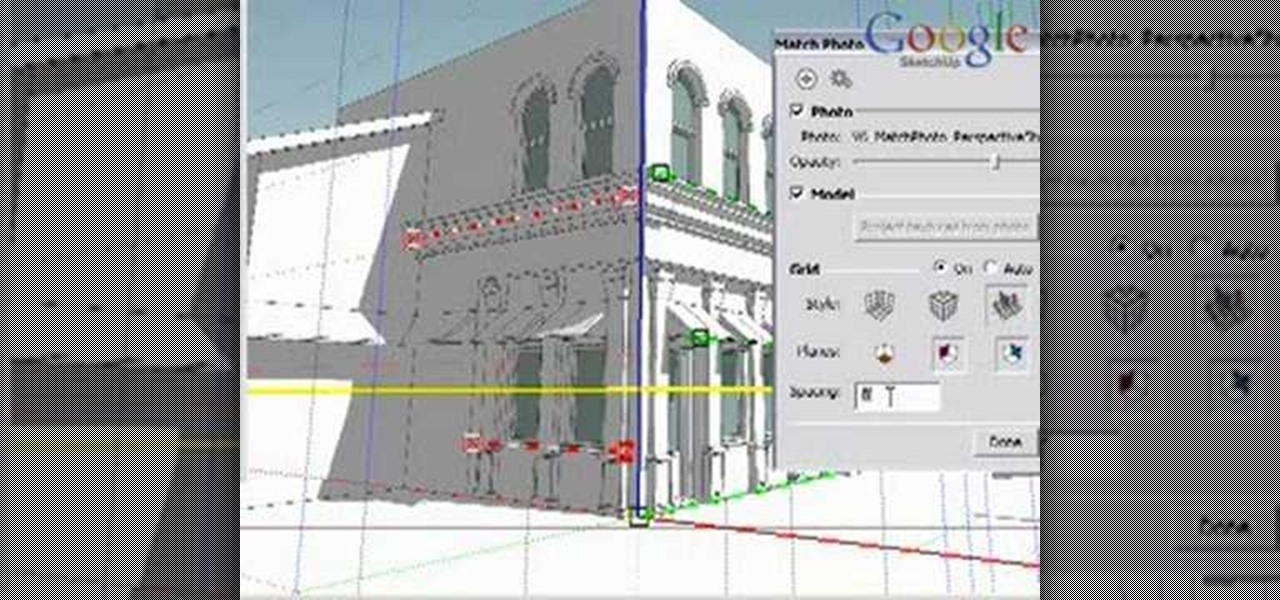
Matching a photo allows you to import and align the SketchUp axes to match the photo perspective you want to use as a modeling reference. With this done, you can create models using the photo as a direct reference. PART ONE covers the basics of importing and aligning the axis to start modeling in Google SketchUp.
Interested in importing and displaying an external feed on your Tumblr page? This brief video tutorial from the folks at Butterscotch will teach you everything you need to know. For more information, including detailed, step-by-step instructions, and to get started embedding feeds on your own Tumblr blog, take a look.
A great number of audio editors don't support importing/exporting AC3 files, luckily the awesome—and, of course, free–Audacity does. Whether you're new to computer recording, new to the Audacity DAW (digital audio workstation) or just looking to pick up a few new tricks, you're sure to benefit from this free video software tutorial, which presents a complete overview of how to open and edit Dolby Digital AC3 audio when working in Audacity.
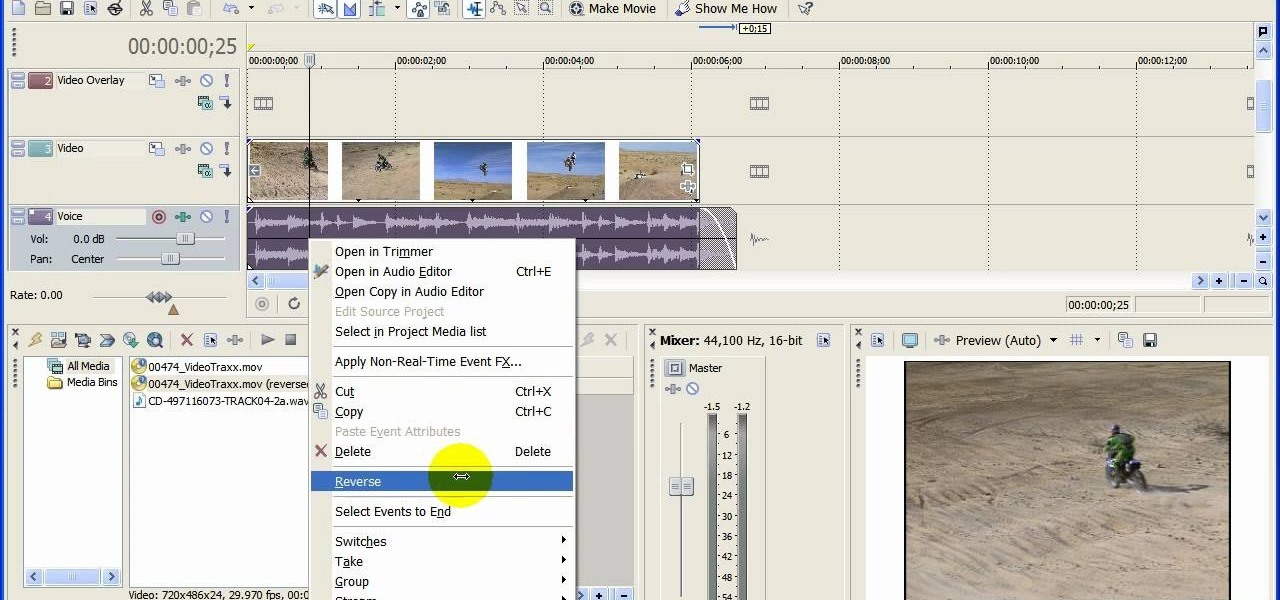
In this video tutorial, viewers learn how to reverse video direction in Sony Vegas Movie Studio. This task is very easy, fast and simple to do. Begin by importing the video clip(s) and/or audio into the time line. Then right-click on the clip and select Reverse. To reverse the audio, right-click on the track and select Reverse. To undo the video or track, right-click it and select Reverse once again. This video will benefit those viewers who enjoy editing and creating videos, and would like t...
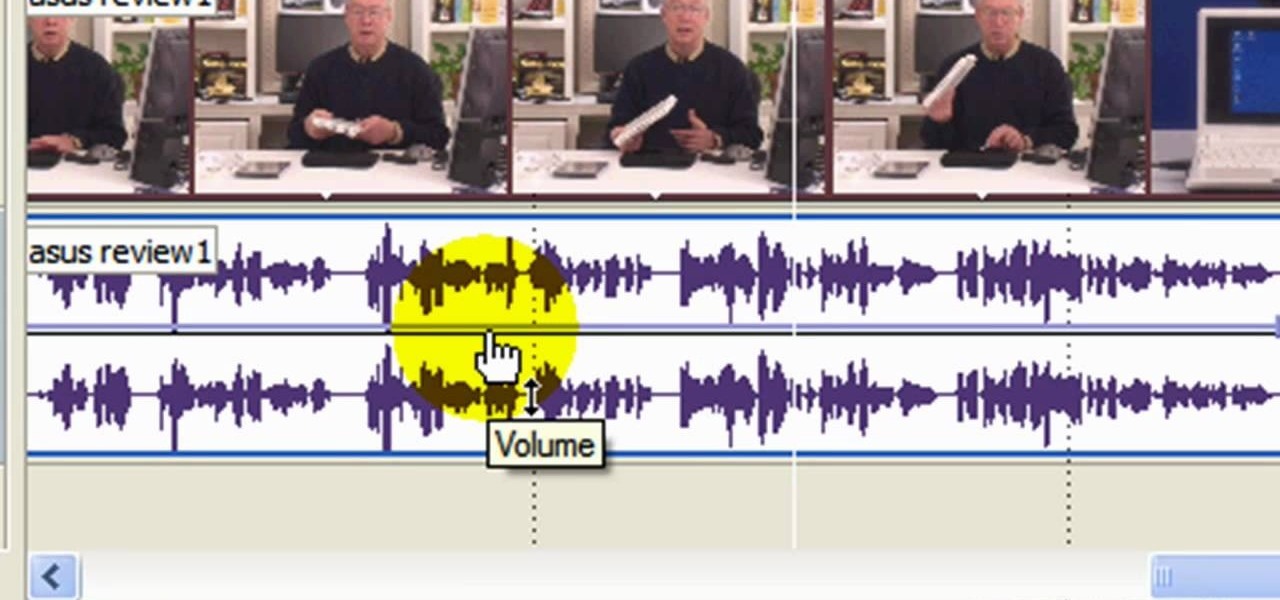
In this video tutorial, viewers learn how to use volume envelopes in Sony Vegas Movie Studio. Begin by importing the audio track into the time line. Then right-click on the audio control panel, go to Insert/Remove Envelope and select Volume. This will place a purple line through the audio track. Users are able to control the volume by moving the line up or down to increase or decrease the volume. Users are also able to select certain points by creating starting and ending points in the audio ...
In this video tutorial, viewers learn how to make a batch render in Sony Vegas. Sony Vegas is a professional non-linear editing system. Viewers will learn how to use the batch render. At default, it is located on the toolbar. Begin by importing your clips or images into the time line. One of the batch render's features is to render regions. Begin putting regions around the clips by highlighting the clip, press R and press Enter. The add the Add Regions To Event script to automatically set reg...

This video describes the initial creation of a database using File Maker Pro 10. While this video does not go into anything complicated, it does give a great preview of how their particular program works. The movie indicates there are templates available, however the series of movies explains how to create them from scratch. There seems to be another six or so official movies. This three minutes movie covers new database creation, naming, importing fields, naming new fields, relationship crea...

In this flash tutorial the instructor shows how to make a black and white mask animation. To do this, first start by importing your image into the flash tool and bring it on to the scene. The image should be wider than the scene. Now select and distribute the layers. Now convert those images into movie clips. Now go to frame 80 and add all frames. Get back to the first layer and create a shape that is the your mask. Now go to frame 40, select key layer and add free transform tool. Now, mask t...
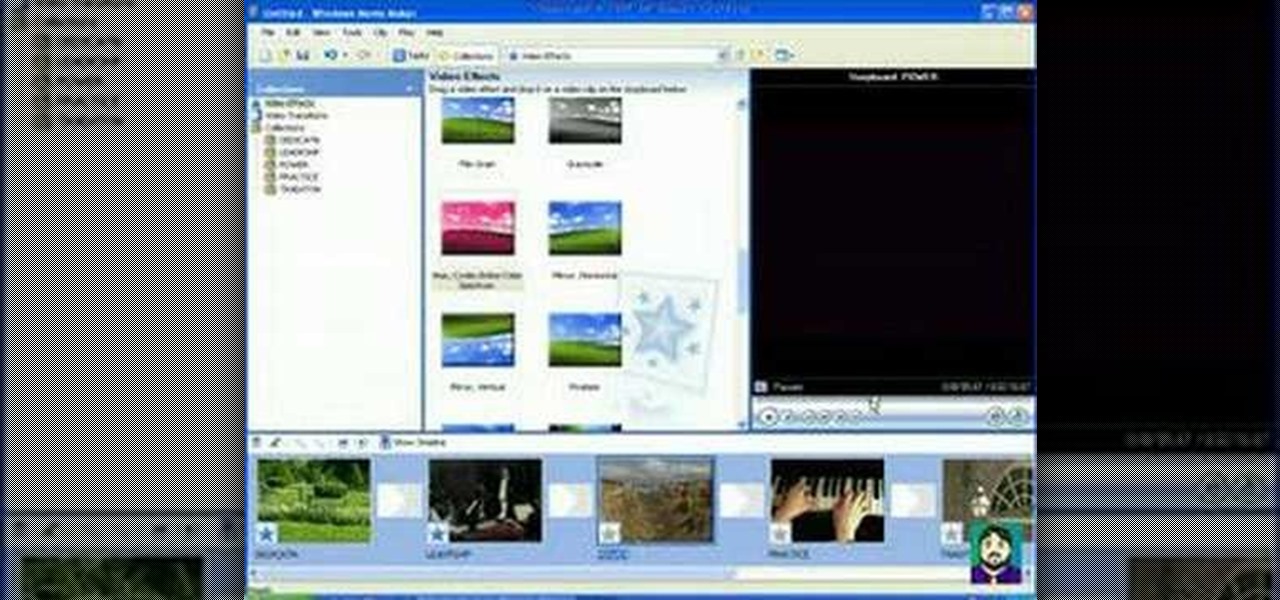
Edit your video footage like a pro with Windows Live Movie Maker. This informative video from Vimeo's excellent Video 101 series of tutorials reviews the steps involved in using the software to create a basic 5x5—that is, a video composed of five clips of five seconds each. The different steps highlighted include importing your video clips, trimming the footage, editing audio, adding transitions, adding text & titles, and uploading to video sharing sites.
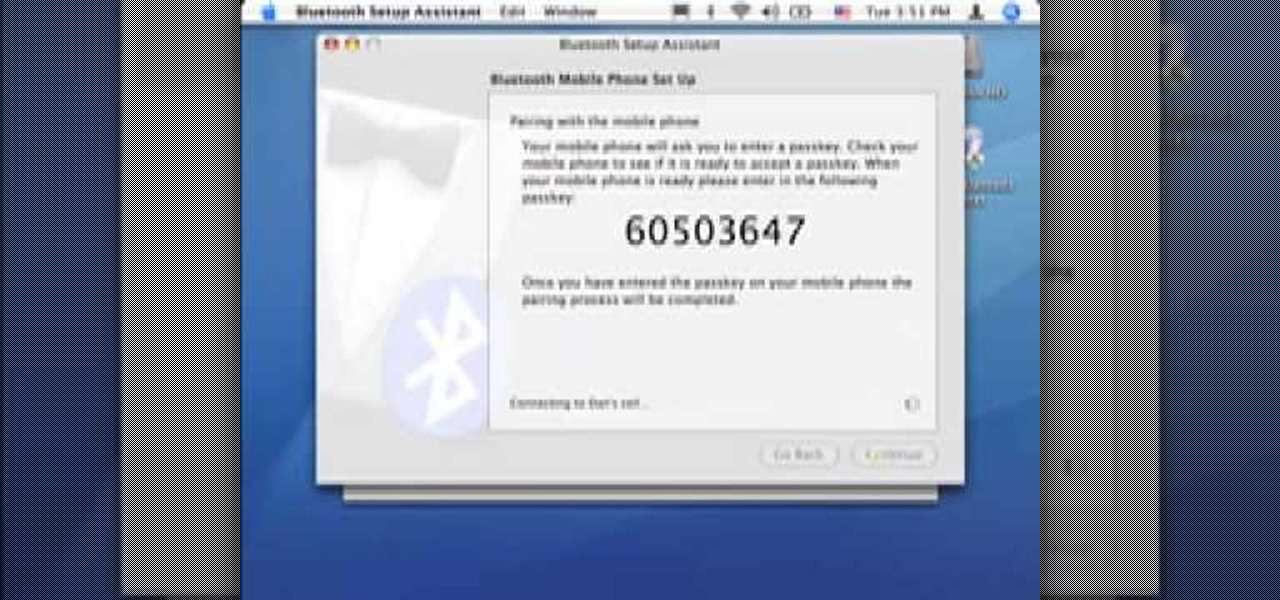
Did you know you can sync up your cell phone (any cell phone with Bluetooth) with your MAC computer? Doing so will enable you to do several things, including importing and syncing your address book, iCal (calender application), and even tethering your phone with your computer so you can get internet.

Now you can create really sophisticated tables in InDesign CS2. Your tables can contain text or graphics and best of all they can be created dynamically by importing tables from Microsoft Word or Excel. In this video you’ll see how to create tables from scratch as well as how to create them in Excel.

The video demonstrates how to add animated images and video content to your Microsoft PowerPoint presentation.

This 3D software modeling tutorial series shows you step by step how to create a suitable model for Google Earth within SketchUp. The series will start by showing you how to export data from Google Earth to use for reference, how to build and optimize the modle, texture it in Photoshop or Picasa and export and load it to Google Earth.

In this tutorial, we learn how to tune your car in Photoshop. First, open up the image of your car and then add in a picture of different wheels. Then, place these wheels over the existing ones on the car and blend them in, then change the color as you prefer. Do this for the wheels that you are able to see on the image. After this, lower the car and add in a bumper to the front of the car, importing images in from various sources. Continue to add in parts to the vehicle, using shading and bl...
In this video tutorial, viewers learn how to download music from Limewire to iTunes to be able to sync it into their iPod device. This task is very easy, fast and simple to do. Begin by opening the Limewire and iTunes program. Then download the desired song(s). Now go to the Limewire library by clicking on the Library tab. Then simply highlight the song(s) and drag it into the iTunes library. This video will benefit those viewers who have an iPod device, and would like to learn how to get fre...
In this video tutorial, viewers learn how to create fog using Adobe Photoshop. Begin by importing the image into the program and duplicate the image. Now go to Filter, select Blur and select Radial Blur. Set the amount to 100, Blur Method to Zoom and Quality to Best. Now select the rectangular marking tool and select the sky. Then open the Hue/Saturation menu and set the Saturation to -100. Use the eraser tool to remove the gray from the edges. Now use the paint tool and paint white streaks o...
In this video tutorial, viewers learn how to add a watermark to an image using Adobe Photoshop. Begin by importing the image into the program. Select the Horizontal Type Mask Tool under the Text tool. Then select the font color, type and size. Now type in the text and click out of it when finished. Then press the Control and J key to open the text into a layer. Click on the layer and select the style. Now finish by editing and customizing the text. This video will benefit those viewers who ha...
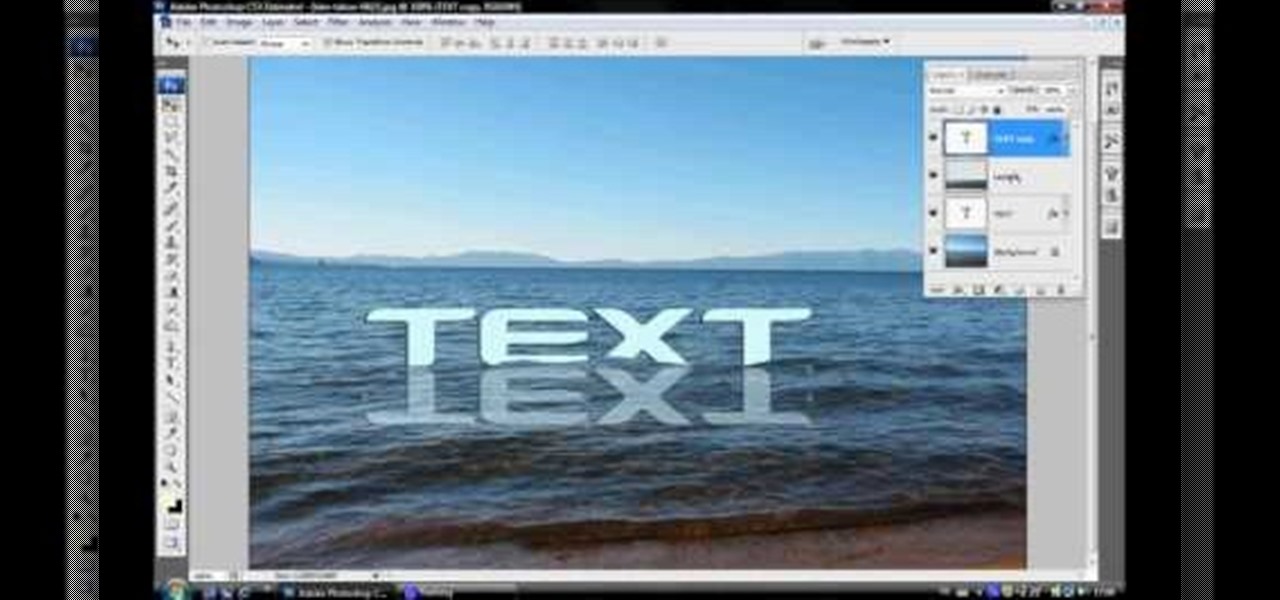
In this video tutorial, viewers learn how to make floating text on water. Begin by importing the water image into the program. Begin by selecting the polygonal lasso tool in the toolbox and select the top of the water. Once you have made the selection, right-click on it and select Layer via Copy. Then select the text tool and type in your text. Create a contour to make the 3D and give the text a light color. Then place Layer 1 over the ext layer and use the selection tool to place it behind t...
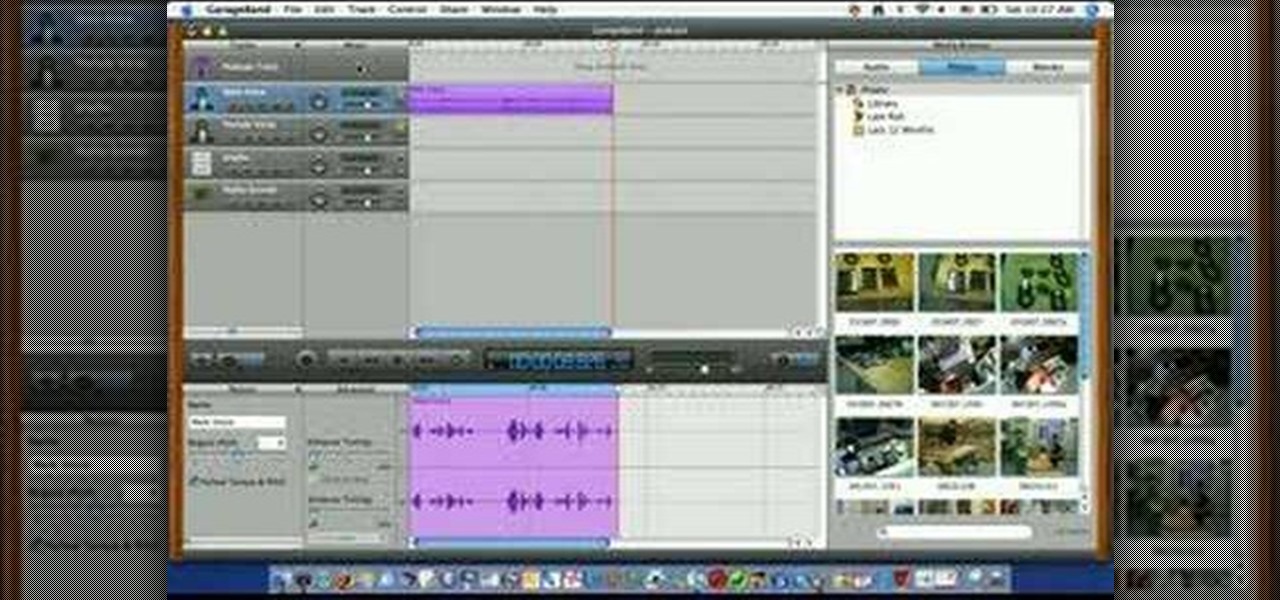
This video is describing how to create a podcast by using the Garage Band program on a Mac computer. Start by going to Garage Band and go to new podcast. Click create. Under the podcast you should choose what gender of voice that you would like. The top track is to add photos from your iPhoto. Select the voice that you would like to record on and click the record button on the bottom of the screen in order to begin. Record your podcast. Then to get your podcast into iTunes go to the share but...
This 3 part Movie Maker tutorial explains all the main functions of Movie Maker and how to use them. Part one starts with importing video clips, editing clips, adding video effects and transitions, etc. Part two covers basic sound control, adding titles and credits, and putting in overlay credits. Part three shows you how to take a pile of pictures and music and instantly create a musical montage.

In this video tutorial, viewers learn how to change the color of lips in Adobe Photoshop. Begin by importing the image into the program. Select the quick mask tool and then select the brush tool. Now color the part that you want to retouch. This will allow the mask to create a selection. No click on the masking tool to create a selection. Then select the marquee tool. Right-click the selection and click on Select Inverse. Right-click the selection again and select Feather. Make it 1 pixel and...

In this video tutorial, viewers learn how to make a digital sunburn using Adobe Photoshop. Begin by importing the image into the program. Then use the masking tool and select the areas of the skin that you want to sunburn. Now select a reddish color and use the brush tool to paint the select areas. Then click on the masking tool to create a selection use the marquee tool to invert the selection. Now right-click on the selection and select Inverse Selects. Then go to Image, click on Regulation...
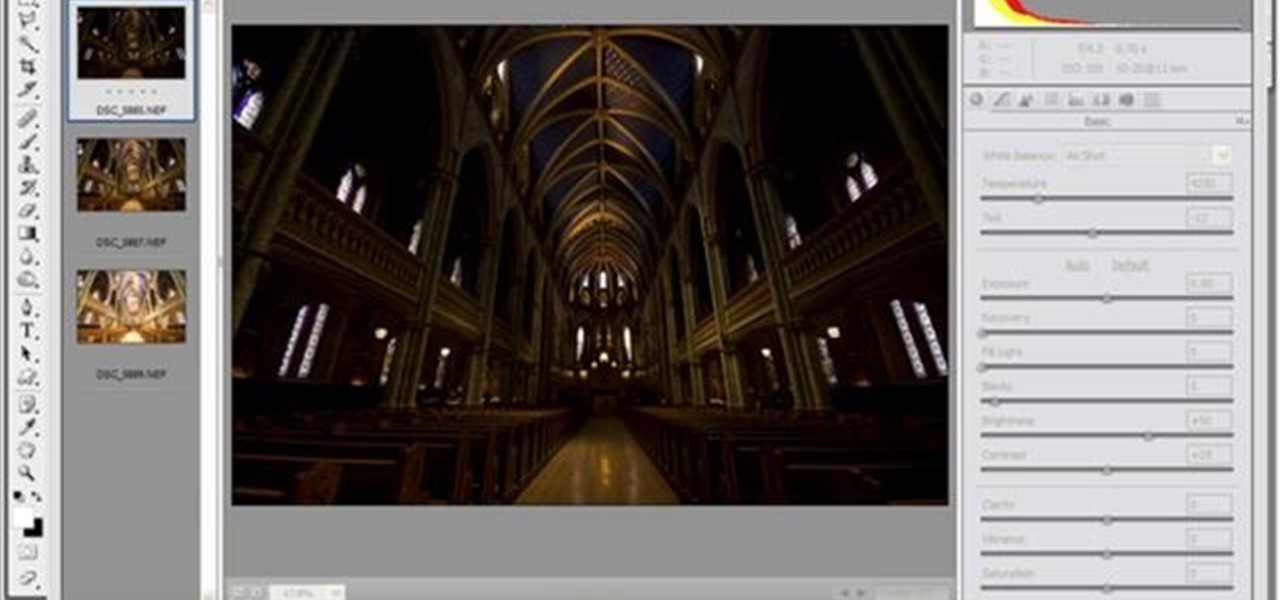
Yanick's Photo School demonstrates how to use Photoshop to make HDR images in Photoshop CS3. This tutorial first explains that HDR means "High Dynamic Range" which is a process to get details from a photo from both the highlights and shadows of a particular scene. The first thing that is necessary is to take multiple views of the same image with different exposures. To start off, you will take three exposures: one that is two stops down, one that is normal exposure, and one that is two stops ...

It's easy to restore lost browser bookmarks from a backup copy. Here are step-by-step instructions for Internet Explorer and Firefox.
When you want to post a breathtaking landscape or picture-perfect portrait that you just took with your DSLR camera to Instagram, Facebook, or some other social platform, there's an easy way to do so — even if you don't have a computer handy, which is typical when you're out and about.

With just a few taps, an Android phone can be weaponized into a covert hacking device capable of running tools such as Nmap, Nikto, and Netcat — all without rooting the device.
My standard text greeting to friends is something along the lines of "Wazzup biznitch?"—but apparently the auto-correct function on my Samsung Galaxy S3 has a problem with that. Time after time I have to retype it or just add all my made-up words to the word list—and I use a lot of made-up words, because that's what bosses do. But texting isn't the only way I communicate. I also use email, chat, and social media on a daily basis—and I don't always use my phone. So, wouldn't it be awesome if m...