Robert demonstrates how to quickly insert formulas into Excel. To create a sum, highlight your selected cells and press the sum key. Expand the formula by clicking on the fill handle. Double click on the fill handle to expand the formula. To sum vertical columns, highlight all the cells and click the sum button. Press and hold down the control key for another shortcut to work in accordance with the auto sum button. You can also select the average for the area. You can also select the area and...
This video teaches you how to use Photoshop to remove people from a picture but you can essentially use this method to remove anything you want from a picture. First, click on the lasso tool and highlight a figure you want to remove. Drag the highlight adjacent to the figure and copy the image. Now paste what you’ve copied over the figure you want to remove. This will work best and is easiest if the area next to the figure is similar to the background of the figure. If you paste the image a...
In this video he just draws a simple picture of boo. It maybe takes two or three minutes to make the sketch. First you just draw a circle roughly, and add ears to that. Next add tongue which is very long and outside of the mouth. You just have to give importance to the teeth in this drawing to make your sketch great. Next you just add teeth, which is wide. Next make the teeth highlight. Next draw two small circles like eyes and highlight it with the pencil. Next make the rough sketch into the...
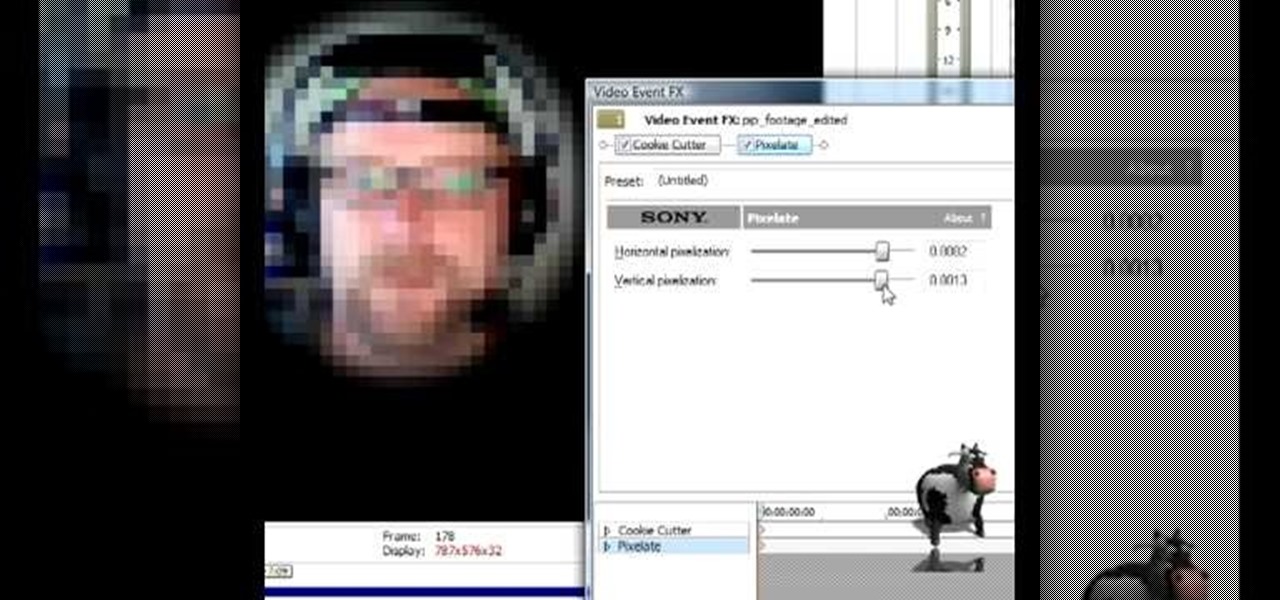
In this video tutorial, Mad Cow Moo shows you how to do blurs on footage in Sony Vegas. Looking on the time line for a break in the audio, place the cursor at this point and hit s on the keyboard to split the video into segments Go to the time line to the final frame you want and point the cursor here, creating a highlight, and hit the s key again. Right click on the audio, select group from the drop down and choose, "Remove From". Right click the video track on the left top corresponding to ...

In this video, Steven Chong teaches you about when to use the "functional" resume format. In this video you will be introduced to the "functional" resume format, and when to use it. The Functional Format Resume lists your employment history into sections. These sections highlight areas of skill and accomplishment. Reasons to use this type of format include: When you are overqualified. If you have gaps in your employment history. When you are going to a completely different industry. If you fo...
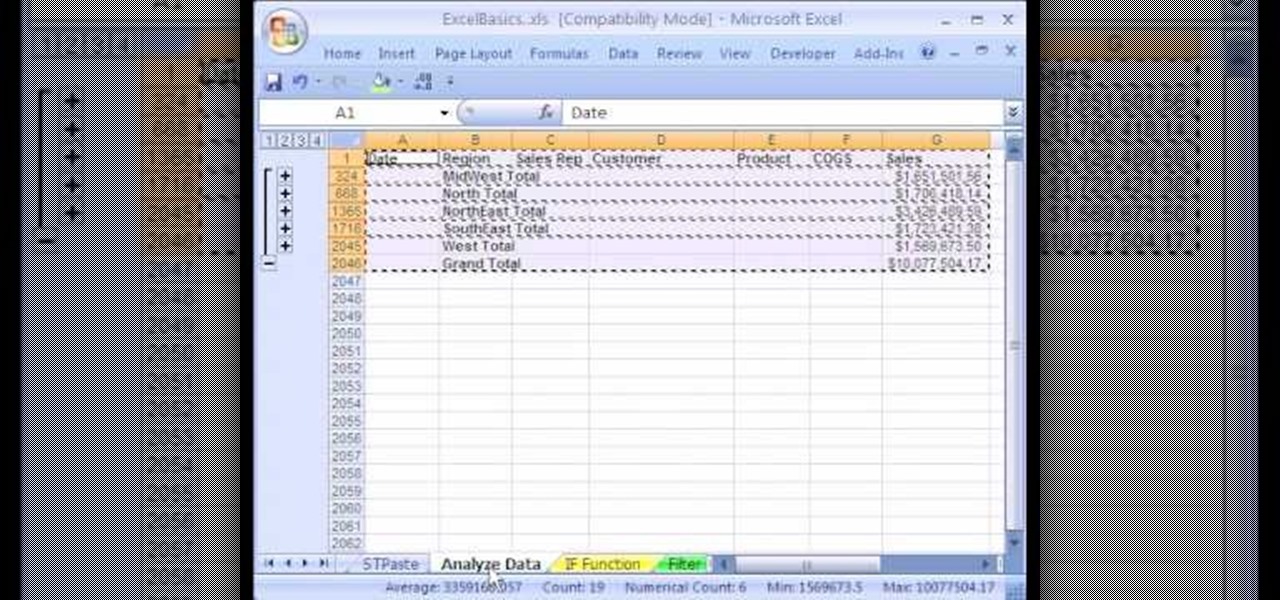
1. The following instruction describes how to generate sub totals in Microsoft Excel Sheet. 2. Take Region as a Primary column and Sales Rep as a Secondary Column. 3. First method to sort: Select a cell in Region and goto Data select A to Z. 4. Second method to sort: Select a cell in Region and Right click and select Sort A to Z 5. Then click a cell in Region and select Data->OutLine->SubTotal 6. In the SubTotal Window select 1.Each Change in: Region 2.Use function:Sum 3.Add subTotal to:Sales...

This video will show its viewers how to get nice seductive eyes for the Valentine Day. The video will show step by step, the use of different colors and different brushes in addition to the brand and line of makeup to be used, including the use of colors on different parts of the eye lids. The video also explains the effects of colors and brushes on your eyes. For example some brushes give you more of a smoky or concentrated look. It also shows how to highlight your eyes with the use of other...
Need to lighten or darken up a digital picture? You can make most of your lightening and darkening adjustments, even before you learn more complex Photoshop features like curves and levels; It's easy. Here's how.
Sometimes there is a part of the photo that needs a little more emphasis than other bits. In this tutorial, you will learn how to use the photo editing program, Lightroom, to add focus and emphasis to certain parts of your images. Learn how to strategically darken and lighten areas of your photos to highlight whatever you choose. This clip is hosted by a professional and you will get tons of great advice.
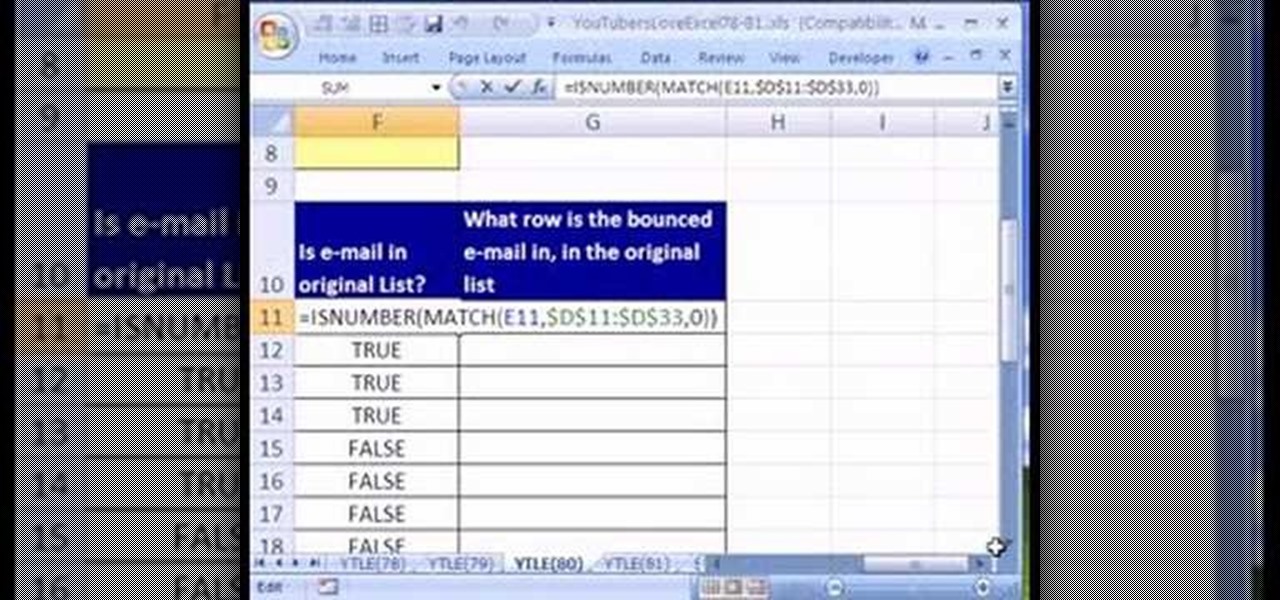
Love Microsoft Excel? This clip contains a tip that just might induce you to. With this free video tutorial from ExcelIsFun, the 80th installment of his "YouTubers Love Excel" or YTLE series of free video MS Excel lessons, you'll learn how to highlight an entire record (row) in a database that matches a bounced email addresss. Learn to love digital spreadsheets more perfectly with the tricks outlined in this free Microsoft Office how-to.
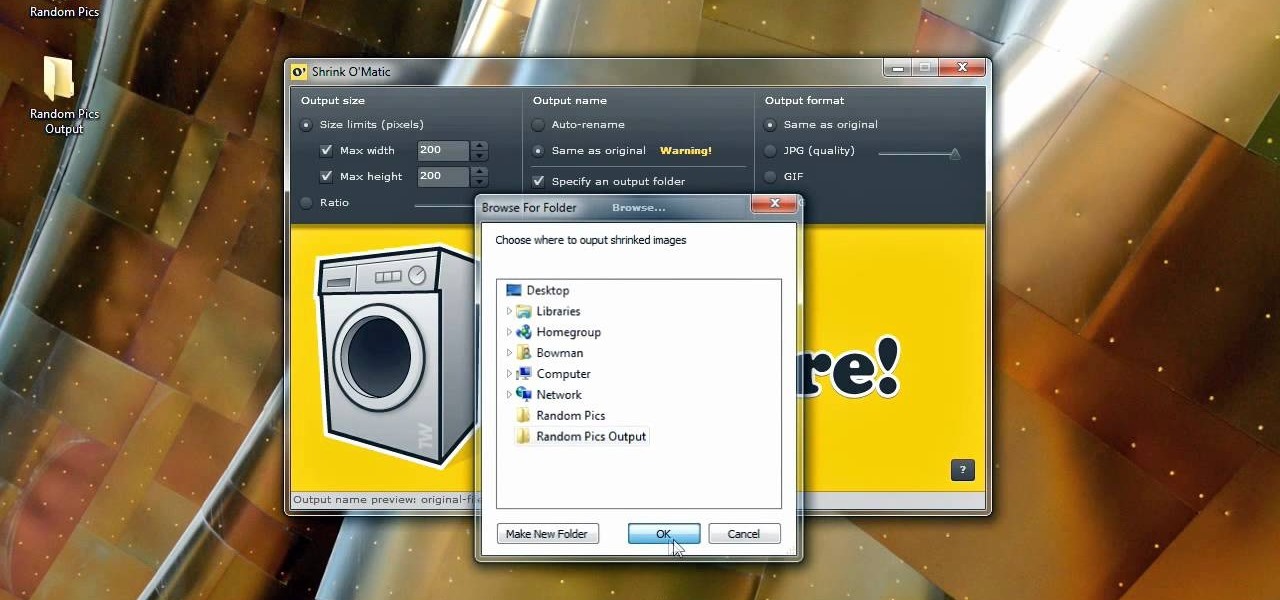
Bowman shows you how to resize your photos using Shrink O'Matic. Resize your pictures by doing the following: Open Shrink O'Matic and choose your settings, for example output size, pixels, ratio, etc. Highlight the pictures you wish to resize, and drop them into Shrink O'Matic. Open the Output Folder and you will be able to see the images in their new file size.
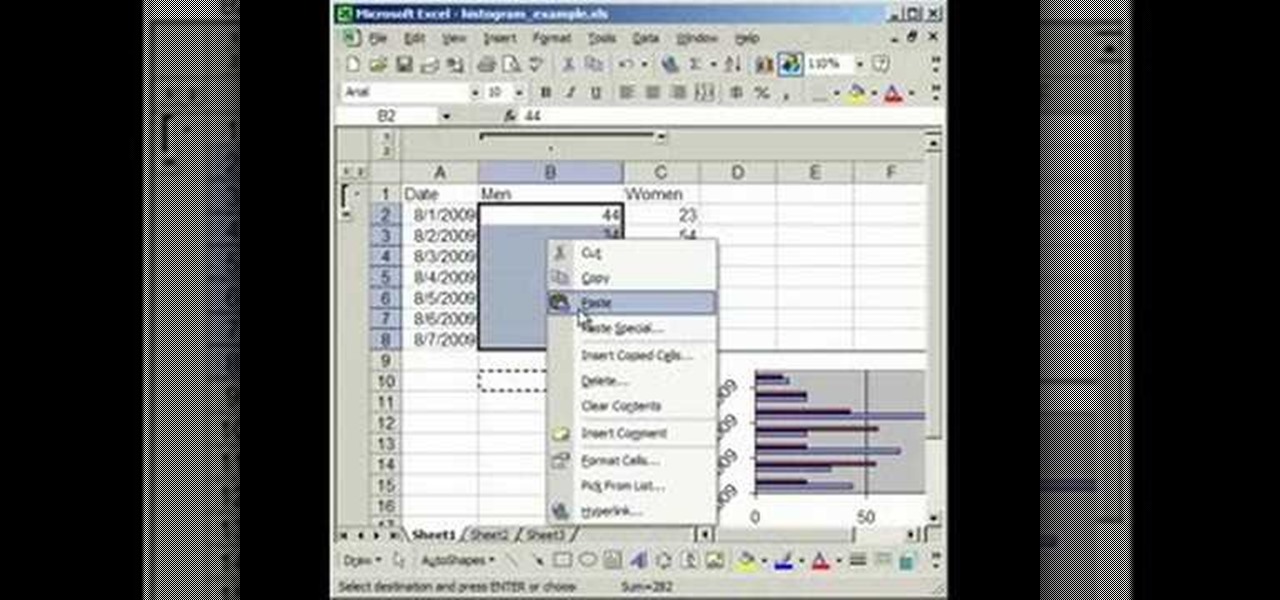
In this tutorial, we learn how to make a histogram chart in Excel. To create a vertical histogram, you will enter in data to the chart. Then, highlight all of the data and go to "insert", "chart", then choose a regular column chart. Grab a regular 2D column and then make sure your values are correct. Then, right click and go to "chart options", then take the legend off. Now, make these columns all touch each other by right clicking over the columns and formatting them. Go to "options" then ch...
In this video tutorial, viewers learn how to use the noise removal tool in Camtasia Studio. Begin by uploading the audio track into the time line. Then select and highlight the region that contains the noise. Now click on Edit and select Audio Enhancements. Under Background noise removal, users are able to select to automatically or manually remove the noise. Once selected, simply click on the Remove Noise button. Users also have the option to adjust the sensitivity. This video will benefit t...
In this video, we learn how to use the polygonal lasso tool in Photoshop. This will allow you to create a selection on your photo in a freehand style. First, select the tool from your toolbar, it's the third selection down. Once you select this, go to your picture and find the piece you want to cut out or copy. Press and hold the control and space bar, then highlight the area you want to. This is great to make a selection that has a straight edge. If you just click with it, it will have a dia...
A sleeping prank victim is much easier to deal with than an awake one. They can't prevent the prank, and afterwards are usually too disoriented to respond violently with any effectiveness. This video will show you several pranks to play on sleeping victims, some of which you've probably seen before and a couple we're betting you haven't.
It's true that some supermodels have cheekbones so sharp they could grate cheese (think Gisele and Karlie Kloss). These girls were born pretty, but that doesn't mean they don't need a little help in the makeup department to look their modeling best.
In this video, we learn how to use a text box in Excel 2007. To do this, you will go to the insert tab and then go to the text box and select text box. Now, draw yourself a text box then highlight and copy the text you want, then paste it in. now you will have a paragraph of text written on top of your cells. You don't have to copy and paste, you can type it in as well. If you want to format the text, right click in the box and then change the preferences you want to change to format the text...
In this video, we learn how to quickly copy and paste data in Microsoft Excel. First, if you have two columns that you want to add up, you will highlight the columns and then copy and paste them into the other cells. Another way is to select the cell and go to the bottom right hand corner, then drag it down. This will fill your formula in to every cell below it! This will save you a lot of time instead of having to type in formulas for the columns that you are trying to do equations with! Thi...
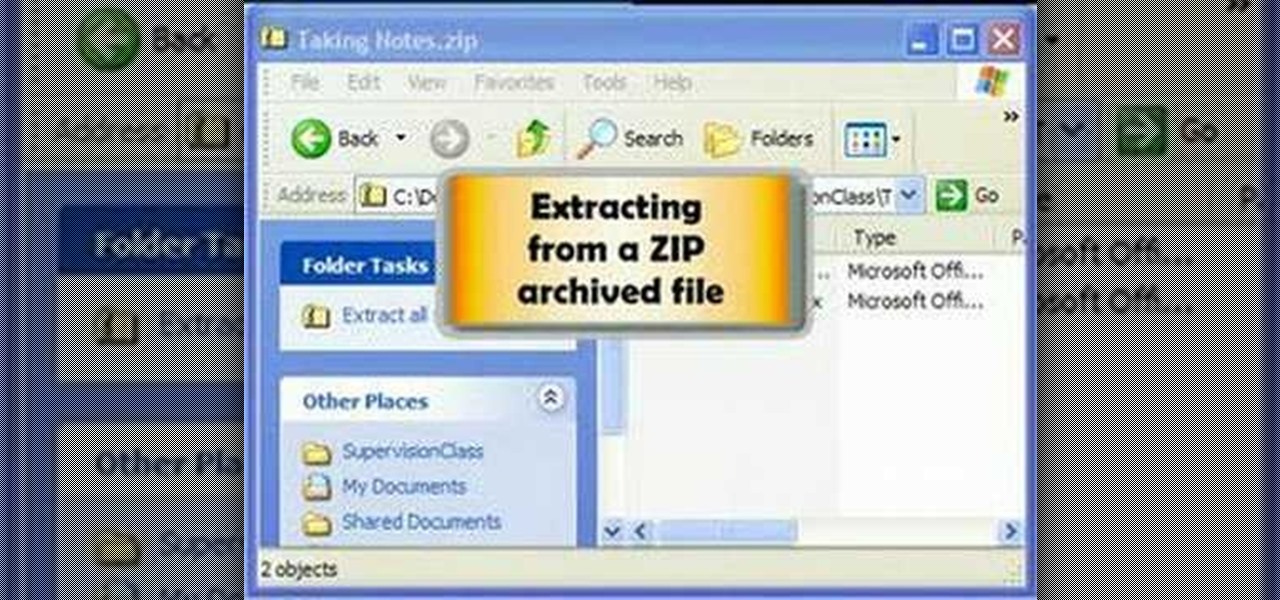
In this tutorial, we learn how to zip and unzip files in Windows XP. First, find the files you want to compress, then highlight them by dragging the mouse. Next, go into the file menu and click "send to", then "compress zip folder". Now, your folder will be created and you can double click it to see the folder viewer of the compressed folder. To open these up from the zip archive, first find the file folder that has been zipped. After this, go to the file menu, then click "extract all" and yo...
In order to clear the cell content in Excel, using a macro, you will first need to have a table. If you don't already have a spreadsheet, you will need to create one with random numbers. Next, highlight some numbers, by clicking one box and dragging in order to select a number of boxes. Click Alt + F11.
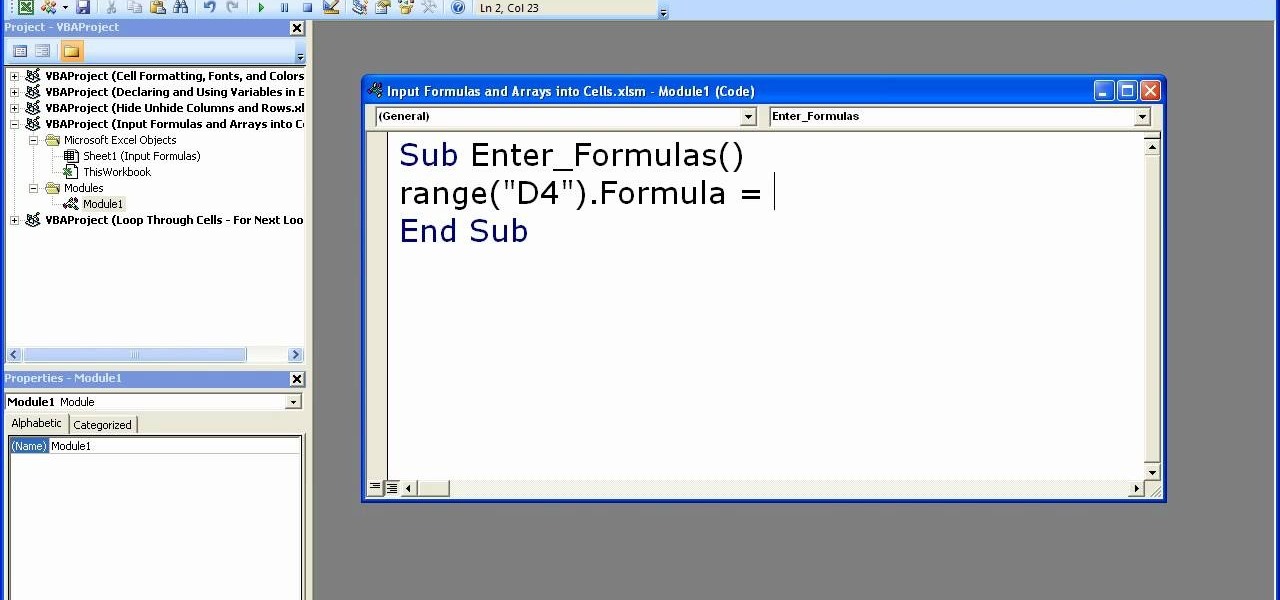
In order to enter formulas in Excels with a macro, you will need to open your spreadsheet. Formulas are used to do calculations. Go to the field, where you want to enter a formula. Type in the formula. Then, highlight the formula. Press Control + C to copy the formula. Next, delete the contents of the cell. Press Alt + F11.
This video tutorial is in the Software category which will show you how to insert or delete a comment in MS Word 2007. This video shows how to insert both text and audio comments in to your word document. Click on the 'review' tab on top, highlight a part of the text that you want add comment to and click on 'new comment' tab. Then you can insert the comment in the comment box. You can continue adding comments throughout the document in the same way. You can view the comments by selecting 'ne...
In this how-to video, you will learn how to change the font size with Microsoft Word 2007. First, open the program and type in a sentence or two. Now, move your cursor to where the font name is. To the right of this should be a drop down menu with numbers. These are the sizes of the font. Highlight the text. Now, click and change the number to change the size of the text. The larger the number, the bigger the font will become. This video shows you just how easy it is to change the font with t...
Mike Callahan with Butterscotch demonstrates how to work with tables in MS Word 2007. Tables are useful for creating information charts and address lists. First, open up Microsoft Word. To create a table, click on the insert tab on the top tool bar. Highlight the elements that you would like to appear in the table by selecting the desired number of columns and rows. Pressing enter inside of a table, it will increase the side of the cell all the way across the table. It will not just increase ...
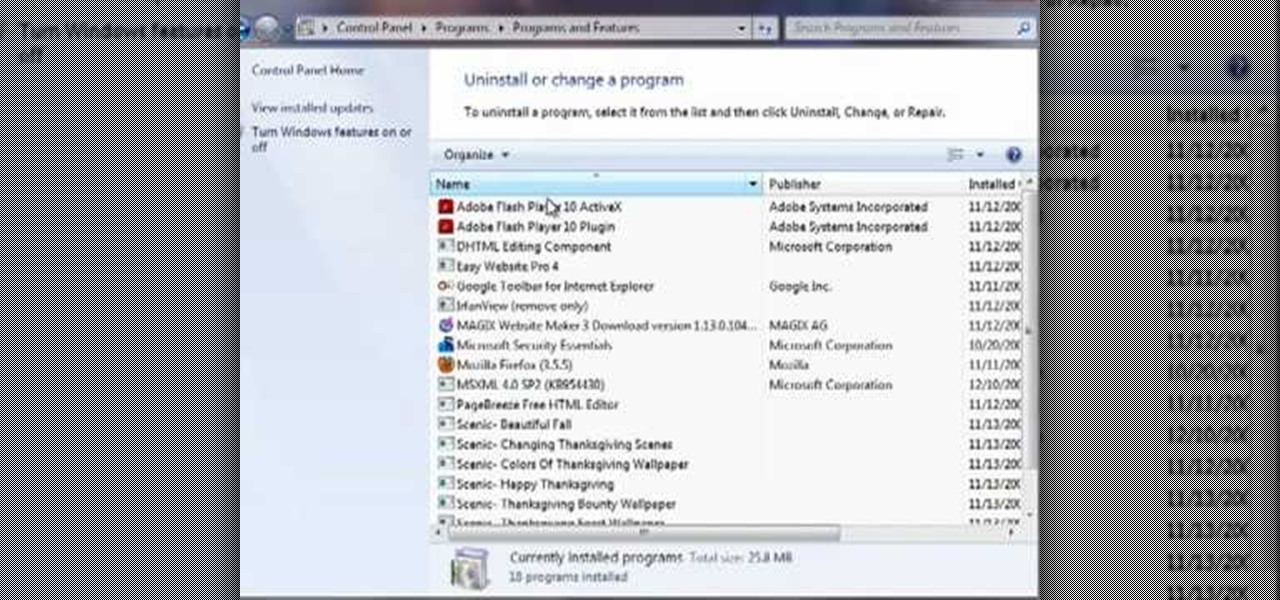
This video by Butterscotch shows viewers how to uninstall a program in Windows 7. To begin, click on the start button at the bottom-left of the screen. Click 'Control Panel' in the boxes that pop up. Click 'System and Security'. On the left side of the window, there will be a link marked 'Programs'. Click on it. Click 'Uninstall a program' beneath the 'Programs and Features' heading. Highlight the program you want to uninstall, then click the 'Uninstall/Change' button near the top of the wind...
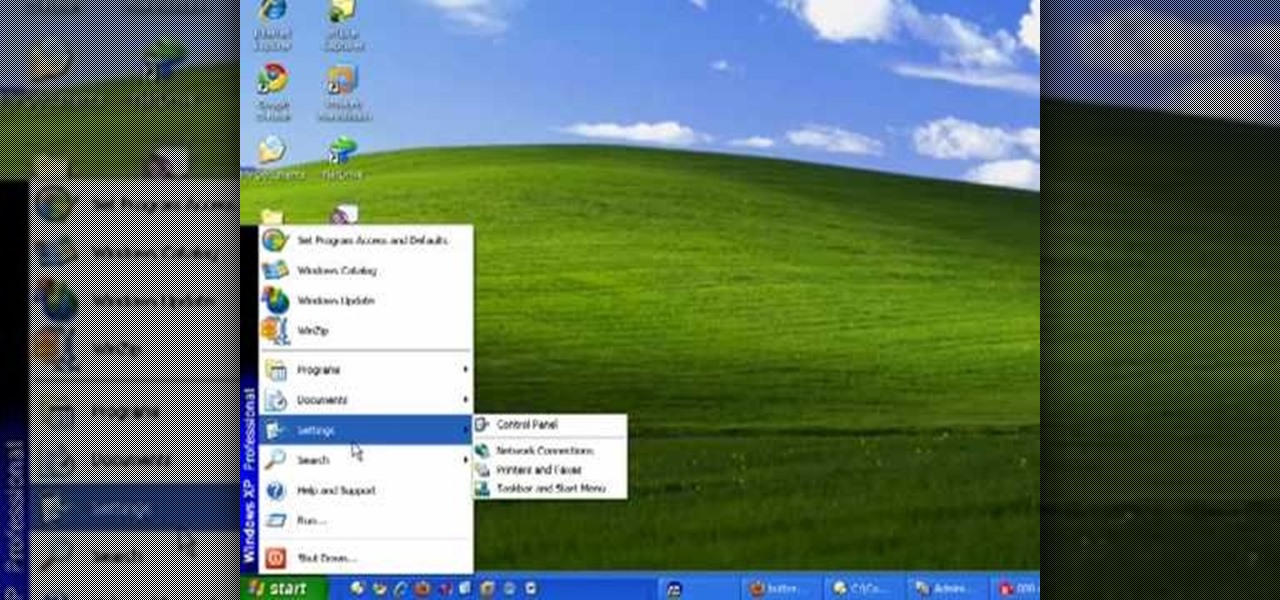
The speaker in this video will show you how to find basic computer information of your computer. In this video, he is using a computer with Windows XP. You begin by clicking on the "start" button located at the bottom left corner of the screen, then highlight "settings", and then click on "control panel". A window will then pop up. Double click on the icon labeled "system". Under the general tab, the basic computer information for your computer will show up. You will see various information s...
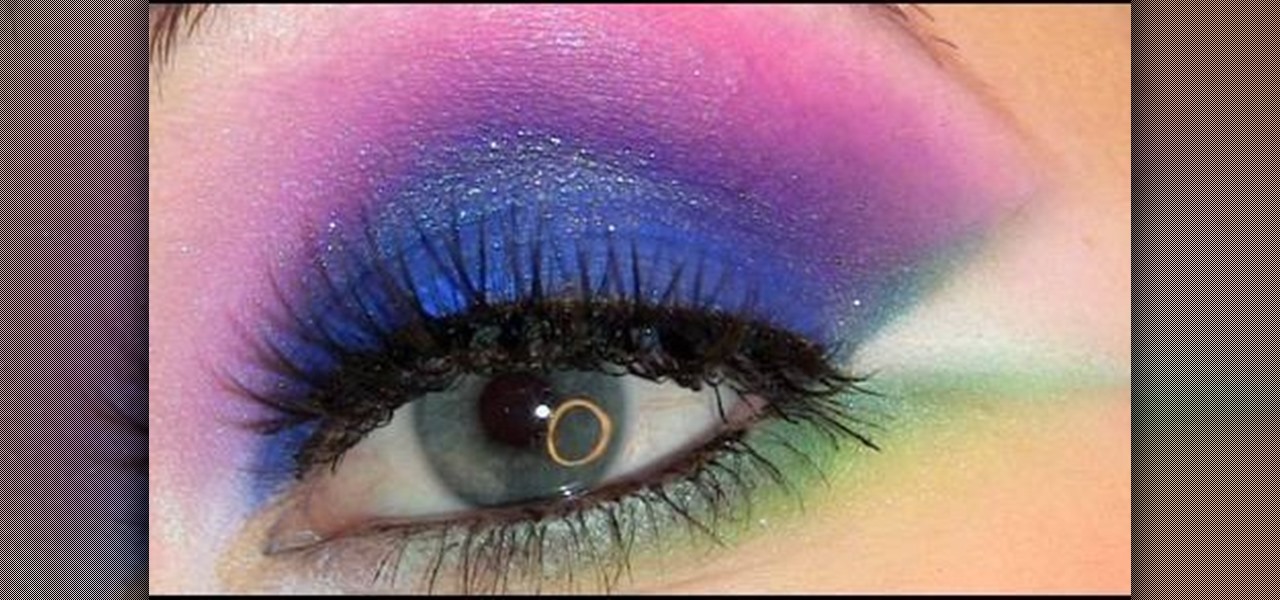
This video teaches the secrets of creating an Electro pop makeup style in simple steps. First wet a dark blue eyeshadow powder and apply to your eyelids. Now apply a pink eyeshadow using 222 brush and apply it over the blue. Now use white color and highlight under your eyebrows. Apply a green color using a flat brush under your lower lash and apply a brighter green over it. Apply a white eyeliner to the inner corner and make a triangle shape at the outer corner. Now apply some eyeliner, lashe...
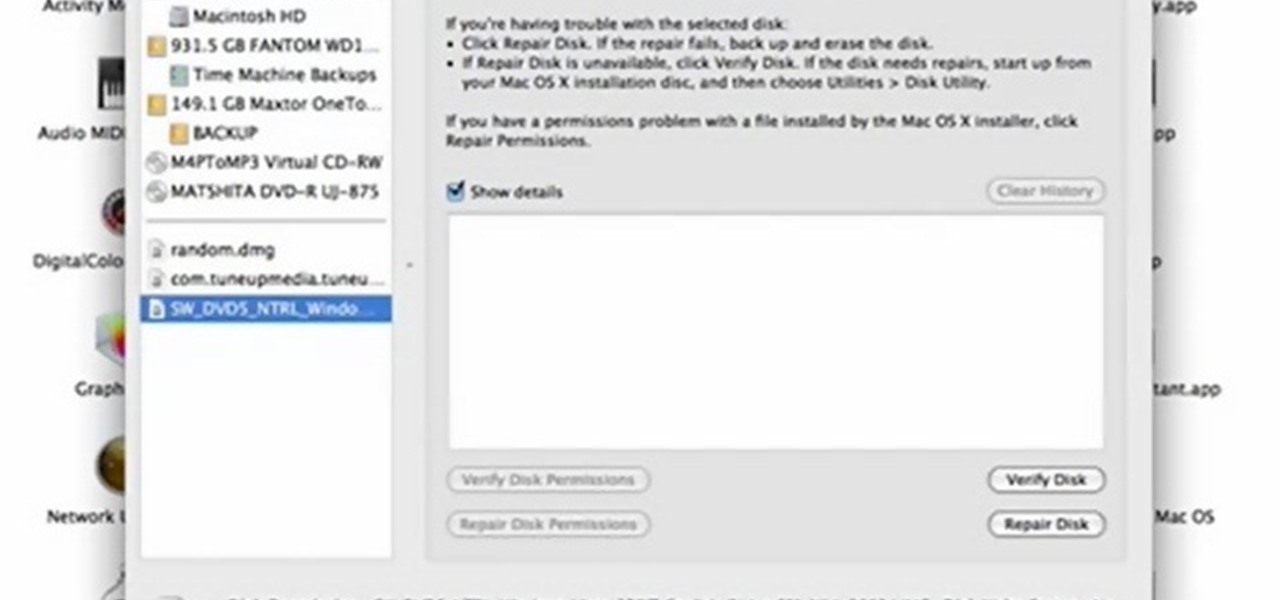
In this quick video tutorial Mike will show you how to burn an IMG file to DVD on the Mac. Follow these steps to burn an IMG file to DVD on the Mac: Click on Finder Applications Utilities Disk Utility. Highlight the file, click Burn. You will be asked if you want to burn it to the superdrive. Click Burn. It may take a while, but when you are done you will have a CD or DVD that is ready to use.
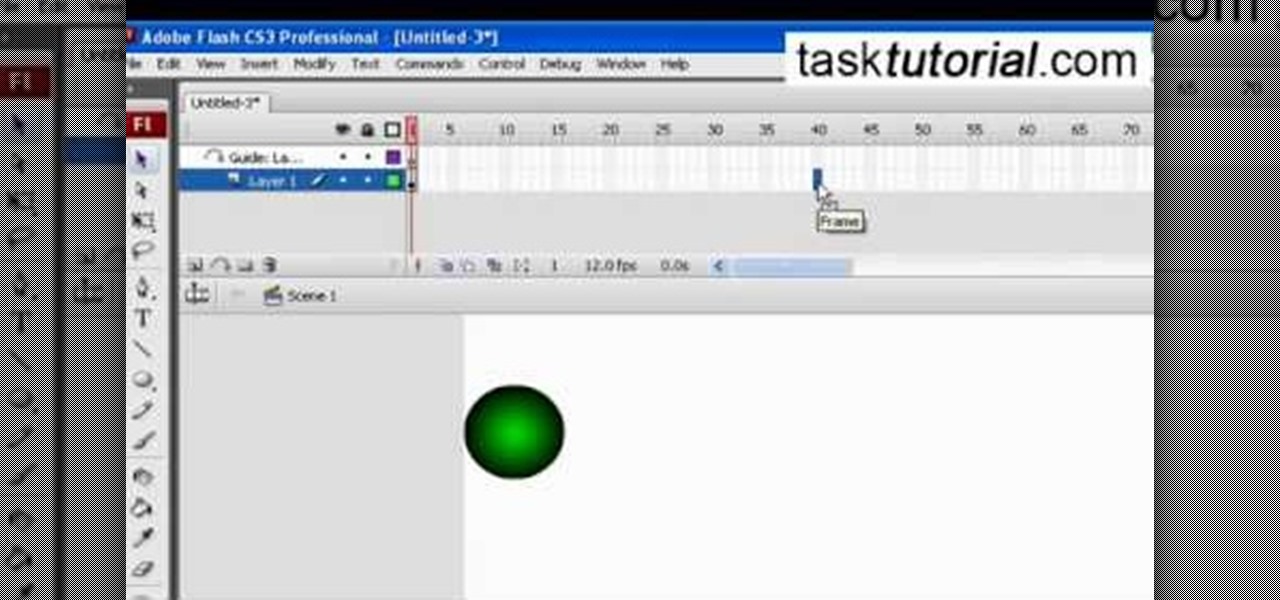
This tutorial video, from tasktutorial demonstrates how to create animation using the motion guide function in Flash. You will learn how to create an object, in this case, a ball, and create an animation that makes it appear to bounce. The guide shows you, how to add a motion guide by selecting a key frame and drawing it in. Then you will learn how to snap the object to your guide line, and add motion to it by selecting another key frame between the first and last frames, and snapping the obj...
This tutorial is a great one to watch if you are looking for an elegant but still natural smoky eye look. Start off by taking the eye shadow Grey Stone and applying it all over the lid. Then take the MAC eye shadow called Omega right over the crease, rounding it off at the end. Use the MAC Charcoal Brown eye shadow right on the outer corner of the eye. Then put the NYX dark brown eye shadow on the outer corner, as well brushing it into the outer bottom of the eye. The next step is to take a s...
Pixie Lott is an English music artist whose song "Boys and Girls" topped the UK charts in September of 2009. If you want to look like her from the music video, just watch as Princess Pinkcat shows you how to create a Pixie Lott "Boys and Girls" makeup look.
TutCast shows viewers how to create the blood spatter from Watchmen in Photoshop! First go to TutCast.com/watchmen and download the given file that will provide you with the layers needed for this project. First, click layer and click bevel and emboss. First, start with Inner Bevel, Keep it smooth and leave depth at 100. Direction is up and change the size to 8 and soften to 10. Now, set the angle to -70 and altitude to 30. Now, the gloss contour you should pick the fourth option and the high...
Many of us have had a bad haircut, so don't let it bring you down. Instead, use these tips to help improve your cut!
Don't just use a belt for keeping your pants up, use it to give you some style! As important an accessory as a handbag, a belt doesn’t just hold up your pants or pull in your tummy. Change your look by creatively matching your belt with your outfit.
In order to apply MLA format in MS Word 2007, you will need to change the lines and spacings. Press Control + A. This will highlight all of your typing. Then, click on No Spacing. Scroll to Times New Roman, in the font style drop down menu. Change the font size to 12. Change the line spacing to 2.0. You will need to re-center anything that was centered before. Your headers and footers will still be in the default font style. So, you will need to change them as well. Double click on the header...
This video teaches you how to apply make up for a vampire look. Start by applying black eye-liner to your upper and lower lash line. Make sure to apply it pretty thick. Next, blend out the liner with a flat brush. Blend up on the upper lash line so that the liner is covering the eye lid. Blend the lower lash line downwards. Next, take a fluffy brush and dark red eye shadow and apply to the inner half the upper lid and also to the lower lash line. Add the same shadow to the inner corners of th...
Description Of Excel Magic Trick 444-> to understand this you can also download it from EMT 440-451.
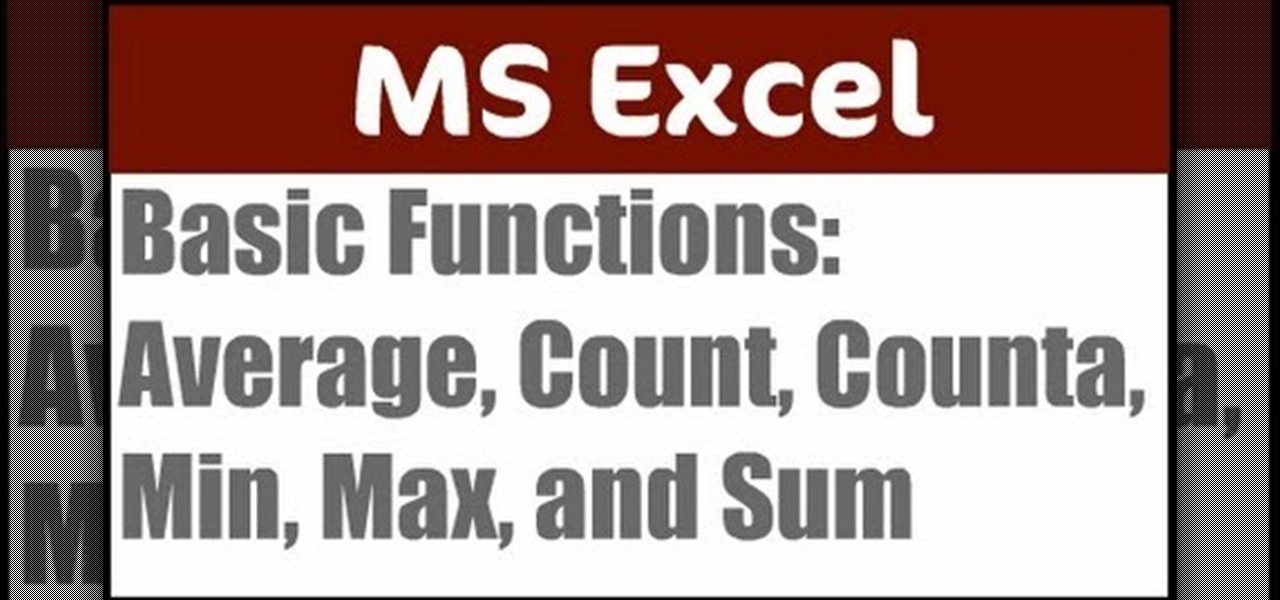
This video shows us how to use the following functions in Excel: average, count, counta, min, max, and sum. First, start off by create a set of numbers to work with. After that, click on an empty cell that you want to use for the functions. To do an average, click on the functions button on the top right corner of the menu bar, you'll see a list of all the functions that are available. Select average, and then highlight all the numbers that you want to find the average of. Repeat the exact sa...
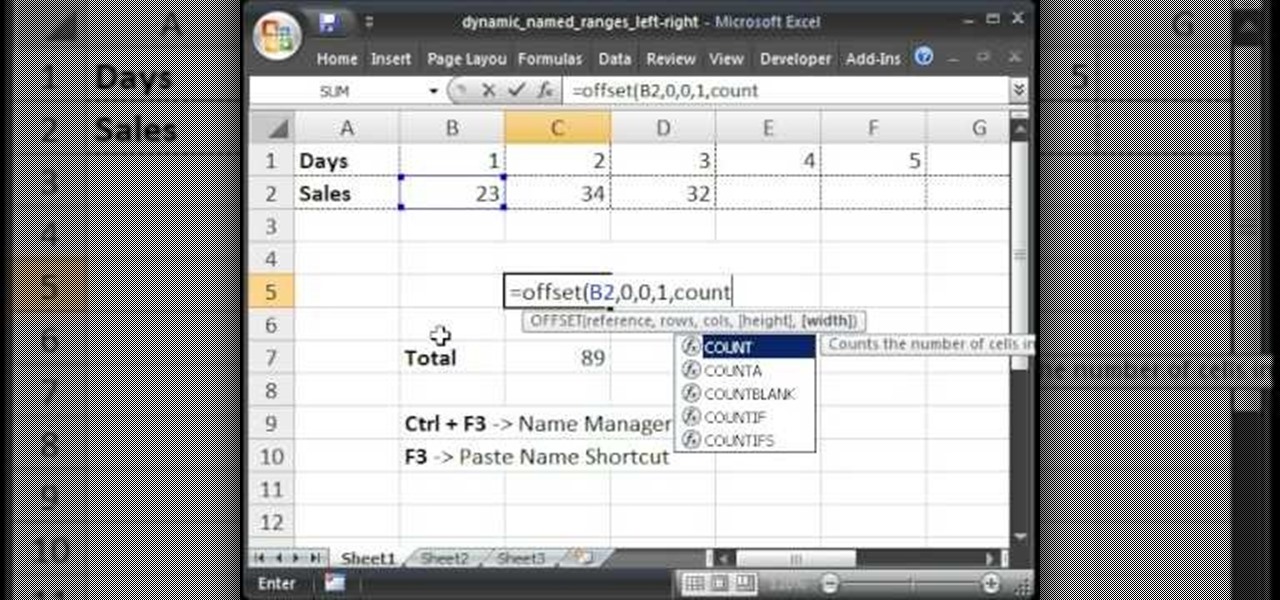
Teach Excel describes how to create a dynamically updating named range that goes from left to right using Excel. First, you define the named range by highlighting the cells containing numbers in a certain row. In the name box to the left of the formula bar, type the name of the data. In this example, the numbers correspond to sales, so type "sales." To check if the named range works, click on an empty cell and enter =sum(sales). That should return the sum of the highlighted cells. However, as...
This video explains how to add a bulleted or numbered list in Microsoft Word 2007. The shortcut to create a bullet-list is simple holding Shift and pressing the "A" key. After you hit the space bar or type a character the bullet will appear, and when you hit the Enter key it will continue the bulleted list. For numbering you just need to type the number you want and a dot after it and it should begin a numbered list. The list will continue if you press enter just like a bullet-list will. If y...