Do you love to edit your photos in Photoshop? Watch this quick video that contains some really neat tips on how to use the healing brushes and patch tools in Photoshop. The spot healing brush makes it easy to brush away blemishes or other marks on the skin. It's good for small spots, not larger areas. You can use the patch tool for larger jobs. These two tools combined will give you a pretty impressive end look. It can remove tattoos, wrinkles, acne and so much more!
Cleaning makeup brush rolls can be quite challenging and frustrating. MakeupByRenRen teaches us an easy and quick technique on how she cleans her sigma makeup brush rolls. Things you will need: an oil-based facial cleanser or a regular olive oil and paper towel. Grab a paper towel and damp it with your oil-based facial cleanser or regular olive oil. Gently rub the paper towel on the surface of your dirty makeup brush rolls. Make sure that you go in every direction to effectively remove all th...
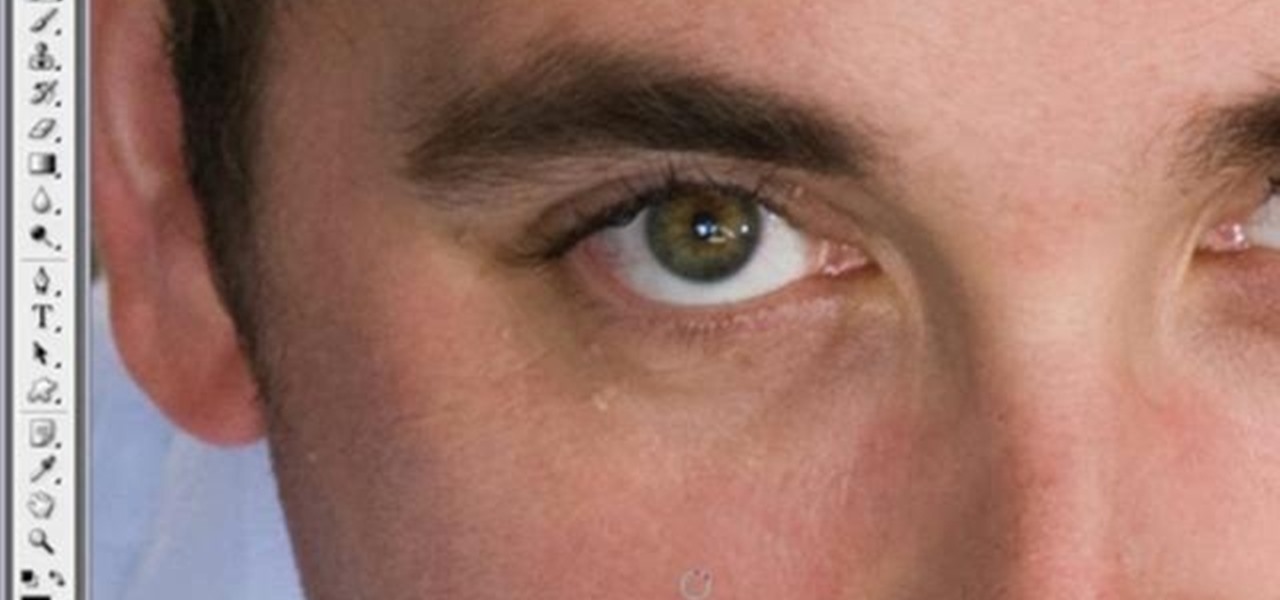
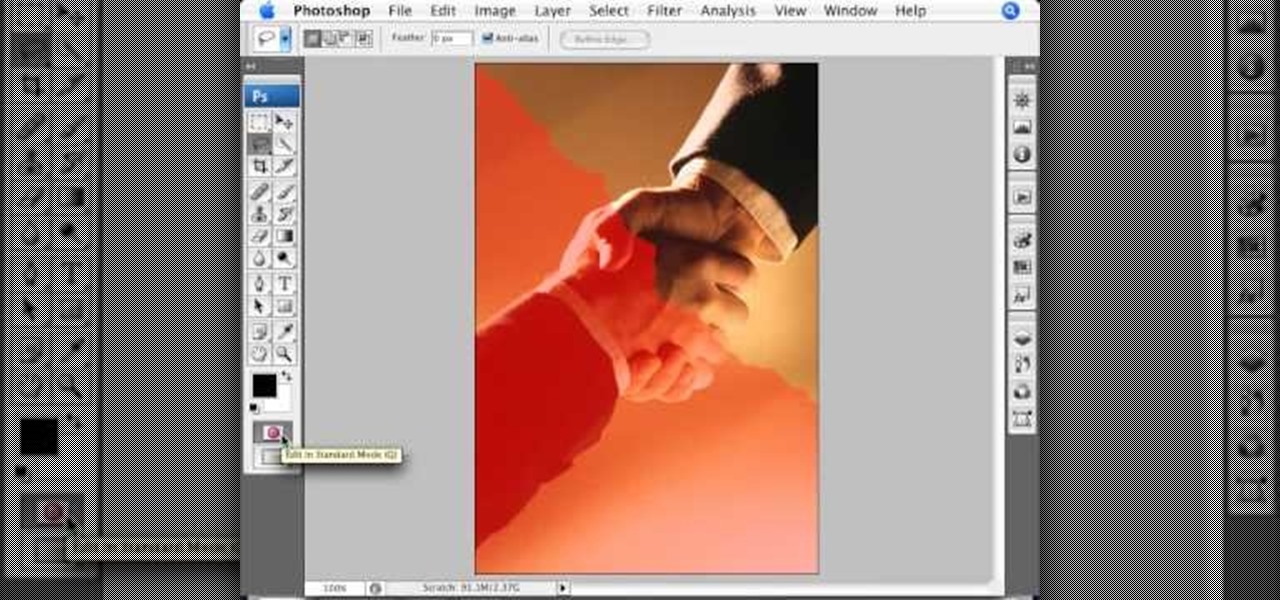
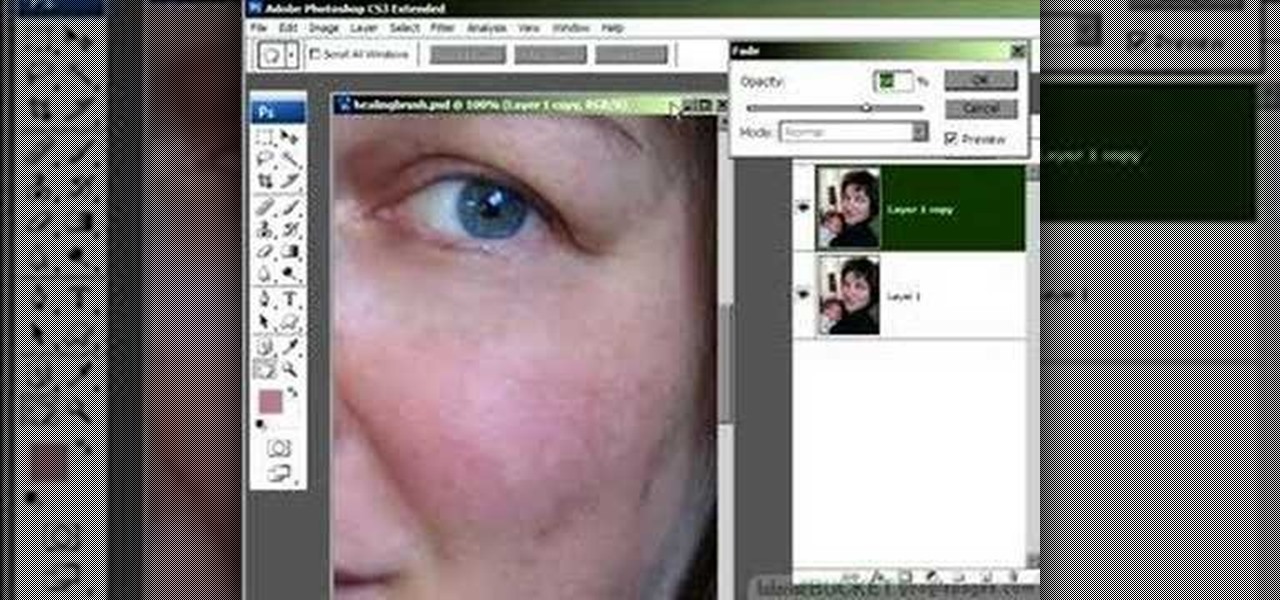
This video in the Software category will show you how to remove pimples and wrinkles in Photoshop. Yanik from Yanik’s photo school presents this video. Select the photo you want to work on. First you duplicate the layer by ctrl+J or select from the dropdown menu. You start off with removing those pimples that you want to remove completely. Select the spot healing or the regular healing brush. Yanik prefers the regular healing brush. Also choose a small brush size. To select a source point, ho...
In this Photoshop tutorial, learn how to convert regular photos into works of art that create a painted on effect. By using the right brush tool, a regular picture can be made to look as though it was painted onto a canvas with real brush strokes. This tutorial shows us how to use different types of brush presets loaded in Photoshop in conjunction with a new layer to create a canvas effect. The result is photo converted into a painting.

In this clip, you'll learn how to make use of the regular Brush tool when doing design work in Adobe Illustrator CS4 or CS5. Whether you're new to Adobe's popular vector graphics editing software or a seasoned professional just looking to better acquaint yourself with the program and its various features and filters, you're sure to be well served by this video tutorial. For more information, including detailed, step-by-step instructions, watch this free video guide.

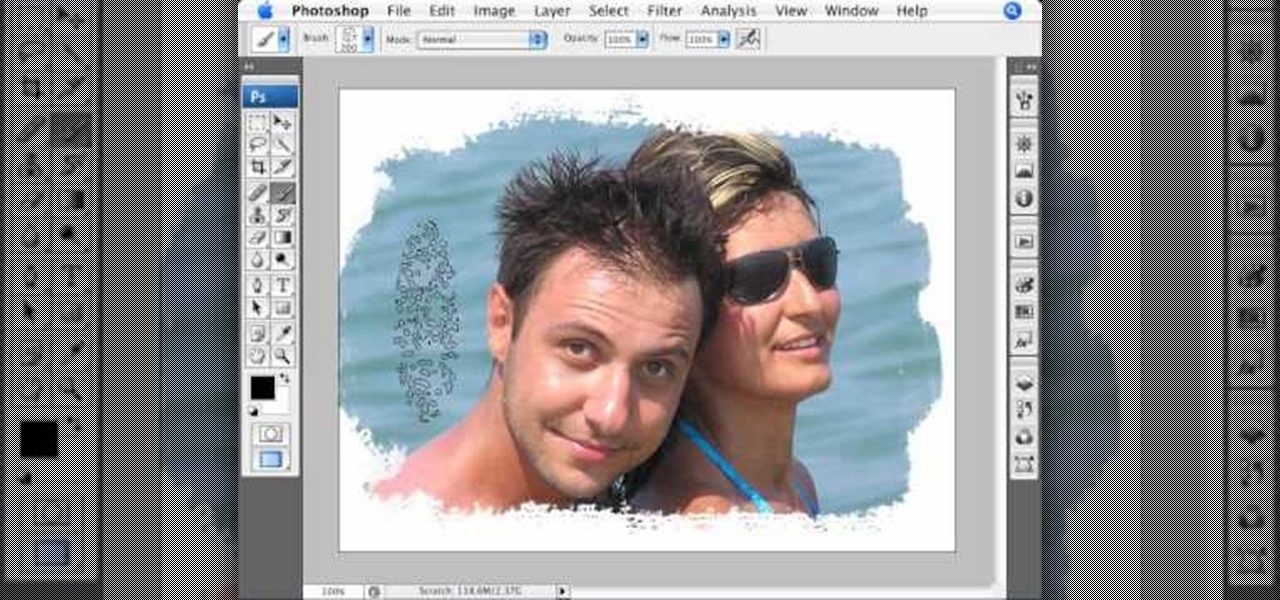
This video tutorial by photoshopuniverse shows you how to create a postage stamp in Photoshop. First take a suitable image and decide the shape of the stamp. Corp the image to suit the shape of the stamp by selecting the area and choosing corp and increase the canvas size as shown in order to create the perforated cutout. Transform the image into a regular layer and once again increase the canvas size to create a back ground with an appropriate color as shown. Add a layer mask, chose the brus...

In this video from stephenswodadancer we learn how to do a hairstyle on the American Girl doll Mia. You need a brush, 2 regular sized bobby pins and 2 rubber bands. Start by brushing her hair back from her head and hold it with your hand. Using your finger nail start at about the corner of her eye and go up on each side. Pick up all that hair in the front. Turn her around and brush it out smooth and put the bobby pins in on each side. You can leave it like that or continue on. Part the back o...
In this tutorial, we learn how to transform into a broken statue for Halloween. Start off by putting your hair back in a beanie, then painting your face white with a sponge. Next, stop halfway through your face so one side is still normal and the other side is completely white. Make sure you make a diagonal line, making the smaller area your regular face and the larger area your white face. Now, create contours on your face using a light touch with a brush that has gray on it. Now, take your ...
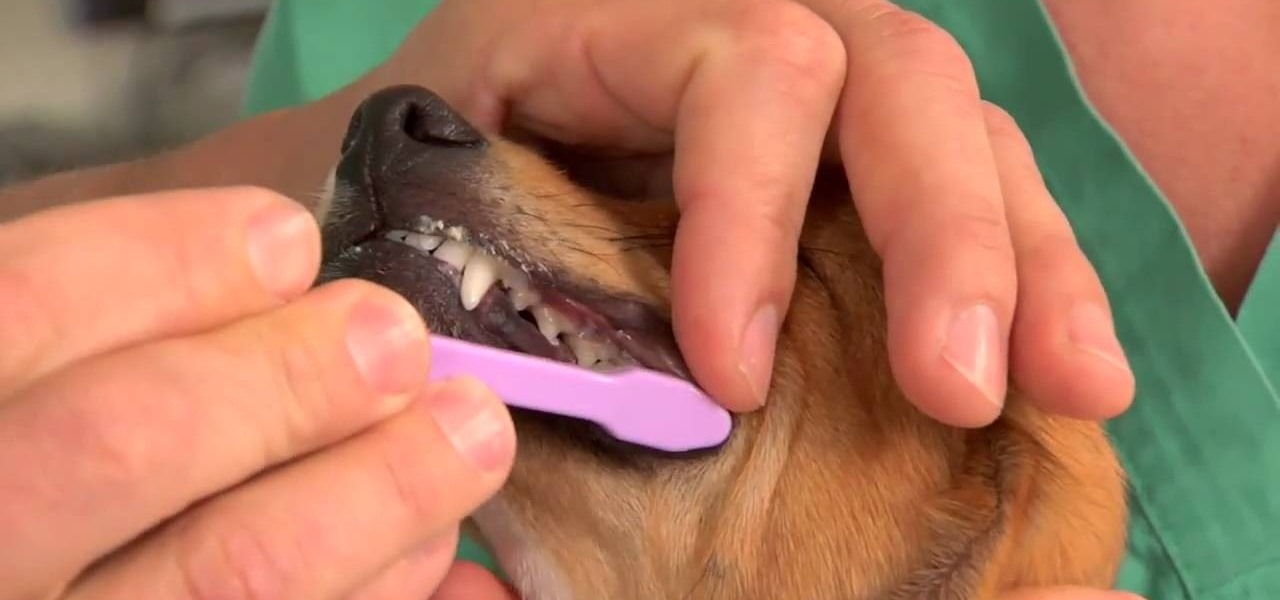
Learn how to care for your pet with help from VetVid. See how to brush your dog's teeth. Brushing your dog's teeth may actually prevent some serious canine health problems. In this video tutorial, learn the proper technique for brushing your dog's teeth, how often you should brush your dog's teeth, and what are some other home care options to keep your dog's teeth healthy.
Most girls dress up only one way during Halloween: With a suitably colored bra (green for a leprechaun, pink for a bunny, for instance) and teeny mini skirt in a matching shade, plus some sort of headpiece so people don't just think they're hookers.
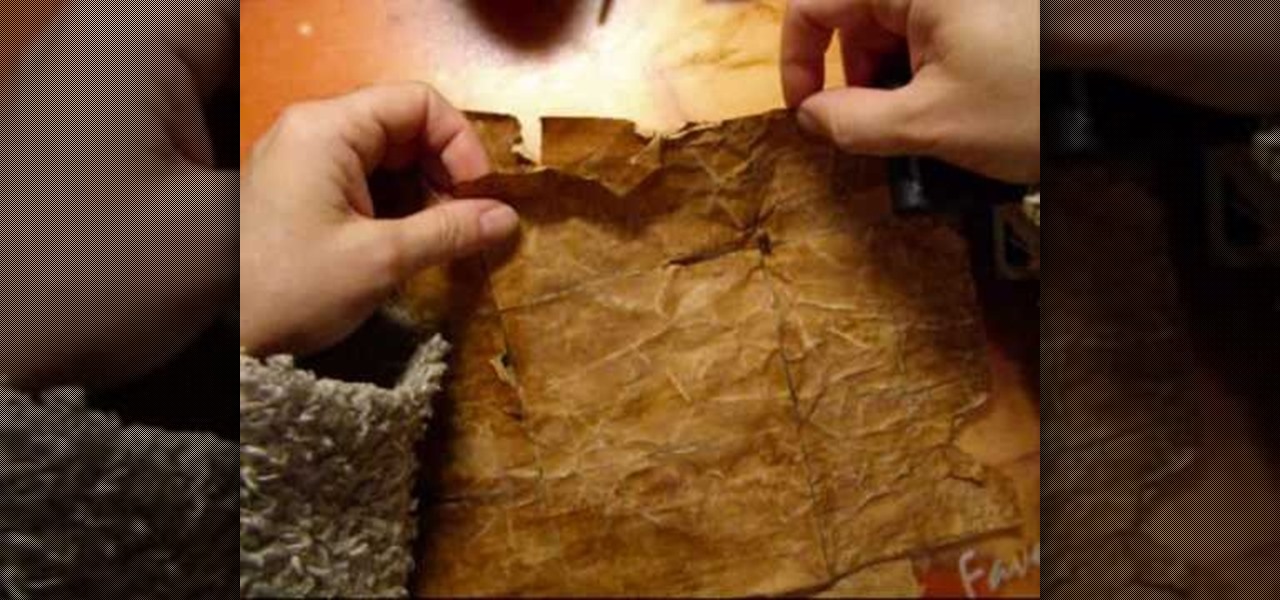
In this tutorial, we learn how to make paper look like it's 200 years old using coffee. First, take a regular piece of copy paper and then use a paint brush to paint a cup of coffee over the entire piece of paper. Use a blow dryer to dry the paper, then brush several more coats onto the paper until the brown looks like it' realistic. To finish, use distressed marks over the paper, then use a blow dry to dry off the entire thing. To finish, apply a couple more coats of coffee to the paper, the...
In this how-to video, you will learn how to groom your dog. Grooming is important for any kind of dog. It is important to find a groomer if you cannot do it yourself. Hair under the arms should be trimmed, otherwise it will become dread locked. It is also important to brush your dog's teeth on a regular basis. You can feed your dog with a brand that is good for teeth care. Purchase and use a brush specially designed for dogs. This will help keep your dog's hair from becoming matted. Teach you...
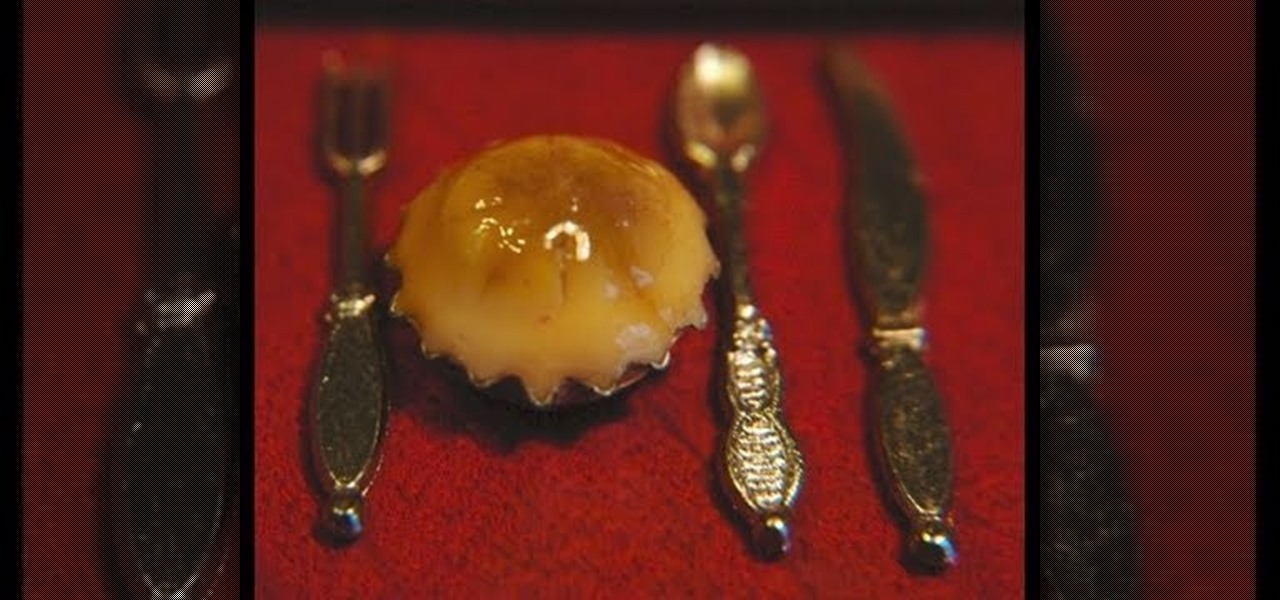
Garden of Imagination demonstrates how to make miniature polymer clay pot pies. Find miniature bottle caps in the scrap booking section of the craft store. You can use a regular sized bottle cap to make a big pie. Roll a piece of ecru clay into a ball and mold it into the bottle cap. Round the top to give it a pot pie shape. Use a small blade to create seared lines into the pie top. Brush mustard yellow pastel to tint the top of the pie. Brush a brown pastel accent on the top of the pie. Bake...
It is a demonstration of a cream blush with a # 130. We will be using a steela convertible collar and a color called camellia which is #1 and is used mostly as a blush which nice and bronzy. You firstly stamp the brush onto the blush and then lightly tap the brush onto your hand first so as to ensure you won't have too much of blush on your face.
Pixel Perfect is the "perfect" show to help you with your Photoshop skills. Be amazed and learn as master digital artist Bert Monroy takes a stylus and a digital pad and treats it as Monet and Picasso do with oil and canvas. Learn the tips and tricks you need to whip those digital pictures into shape with Adobe Photoshop and Illustrator. In this episode, Ben shows you how to turn images into watercolor paintings in Photoshop.
In this clip, you'll learn how to make use of the regular Brush tool when doing design work in Adobe Illustrator CS4 or CS5. Whether you're new to Adobe's popular vector graphics editing software or a seasoned professional just looking to better acquaint yourself with the program and its various features and filters, you're sure to be well served by this video tutorial. For more information, including detailed, step-by-step instructions, watch this free video guide.
This makeup palette is the Forest Fairy Sprite Wood Nymph created by MissChievious. Begin with regular foundation. Get a little dark gold and golden cream eyeshadow with a knife & mix it into foundation. Take a large makeup blush type brush & put green shadow around top & sides of forehead blending it up into hairline & around the sides of face, continuing slightly onto the cheek hollows as you might do a light contouring. Take golden cream & dark gold & mix them before applying to center of ...
Having less-than-brilliant teeth doesn't have to mean a trip to the dentist or a whitening kit. Try this all-natural remedy instead. Watch this video to learn how to whiten teeth naturally.
Wash your window blinds with a minimum of mess. Howcast presents you with tips on how to effectively clean your window blinds. Blinds can be tricky to clean, so pay attention.
Create amazing fairy eyes using silver eyeshadow in easy steps! Start with a base all over your lid and eye area. Now add a little to your lower lash line. You will then apply a highlight with brush to your brow bone With a new smaller brush use a light shimmery silver to apply to the inner part of your eyelid. Apply about 1/3 of the way in. Apply a light lavender color to the rest of your eyelid. Using a darker purple apply to the outer corner of your lid, also pulling it into the crease are...
In this video, we learn how to use a Stila Jewel Palette to make a shimmery eye look. First, you will need to brush a nude color onto the lid, then grab a shimmer gray color and brush it onto the outer edge of the eye and into the inner corner of the eye. Next, grab a gold color and brush it onto the middle of the eye and nowhere else. Then, take the black color again and brush it into the crease of the eye and on the sides to create a contrast. After this, take the purple color and brush it ...
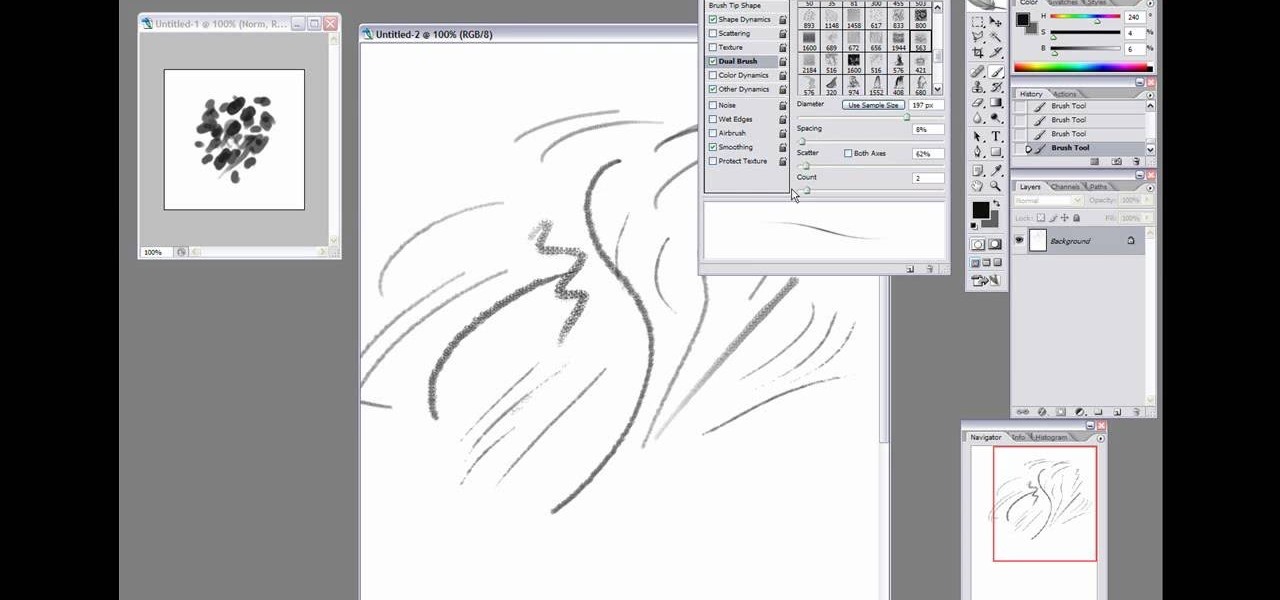
Did you know you can create your own brushes on Photoshop? You're probably already overwhelmed by the variety of brushes, brush diameters, and other various picture settings that Photoshop offers, but if you're a professional artist or graphic designer it's sometimes necessary to create your own brush for a project.
Every bObi robotic vacuum works best with a clean dustbin and brushes. Luckily all of bObi's parts are easy to remove and wash, so you can do so whenever you notice large amounts of debris collected.
This beauty video demonstrates how to do an 88 Palette purple posey makeup look .
Watch this video to learn how to use Rebound 25 brush-on silicone rubber to make a mold. This two part video series is very detailed and helpful! You could make a mold of anything you choose!
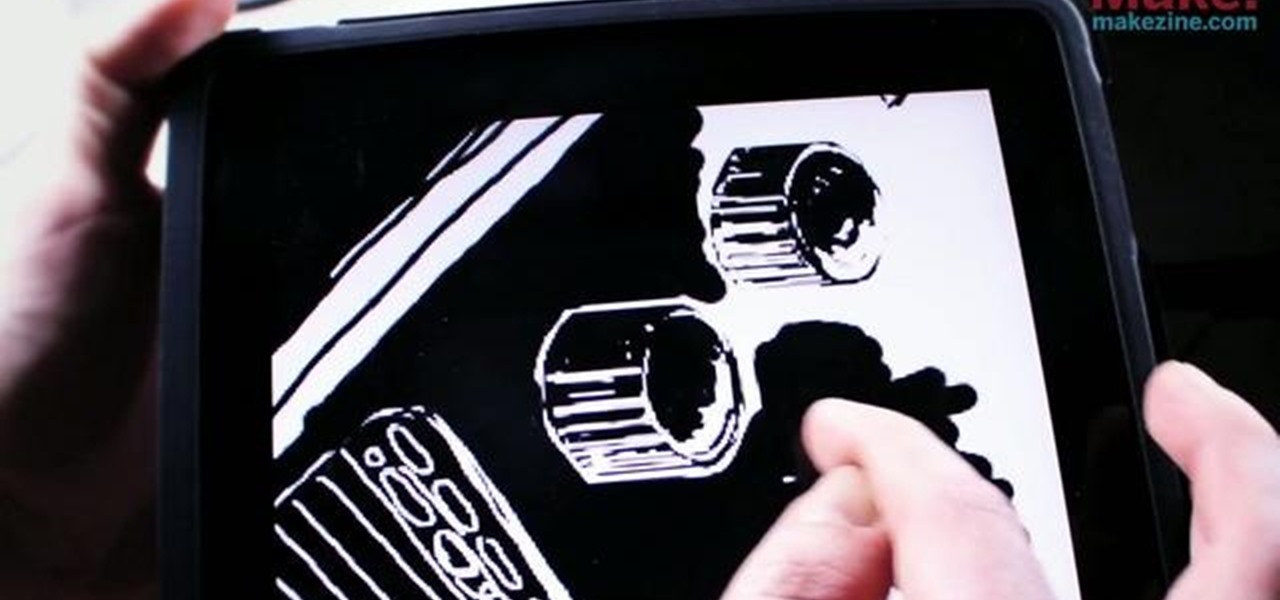
While the iPad can do many things, it is missing the ability to be controlled by anything other than a finger. This can be frustrating if you would like to use your iPad for more intricate activities such as drawing or designing.
In this video we learn how to make it seem like your photo is torn in half using Adobe Photoshop. The first step is to decide how you would like to have your photo "torn" up. The second step is to select the lasso tool and draw the tear line through the photo. The third step is to select the rest of the image you want to keep. The fourth step is to go into Quick Mask mode and select Filter, Brush Strokes, then Splatter. This creates the jagged edge torn effect. Finally select a smoothness bet...
Any bObsweep vacuum needs regular maintenance at home. All owners should know how to change and clean the main and side brushes, empty the dustbin, and replace the filters inside.
In this tutorial, we learn how to create an everyday contoured look. First, apply a full coverage foundation to your face. Mac is recommended, using a color that is a match to your skin. Blend this on the face using a foundation brush. Next, apply a loose powder over your skin with a brush to settle the foundation onto your skin. After this, you will brush a bronzer of your choice onto the cheek bones, followed by a blush brushed onto your cheekbones. After this, you can also brush the bronze...
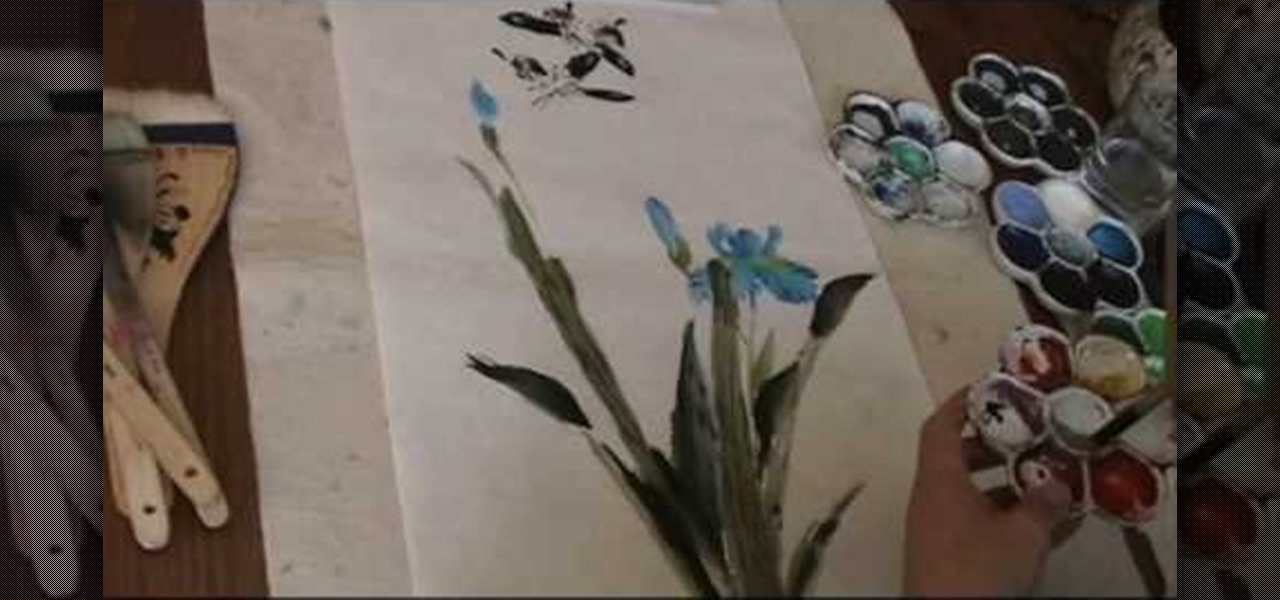
The Hake brush is a type of flat brush used in Chinese painting along with the more typical trimmed brush. In this video the artist demonstrates the use of such a brush to create painting of an Iris with a blue butterfly and some calligraphy to finish it off. If you don't already have a Hake brush as part of your Chinese art toolkit, this video should convince you to invest in one.
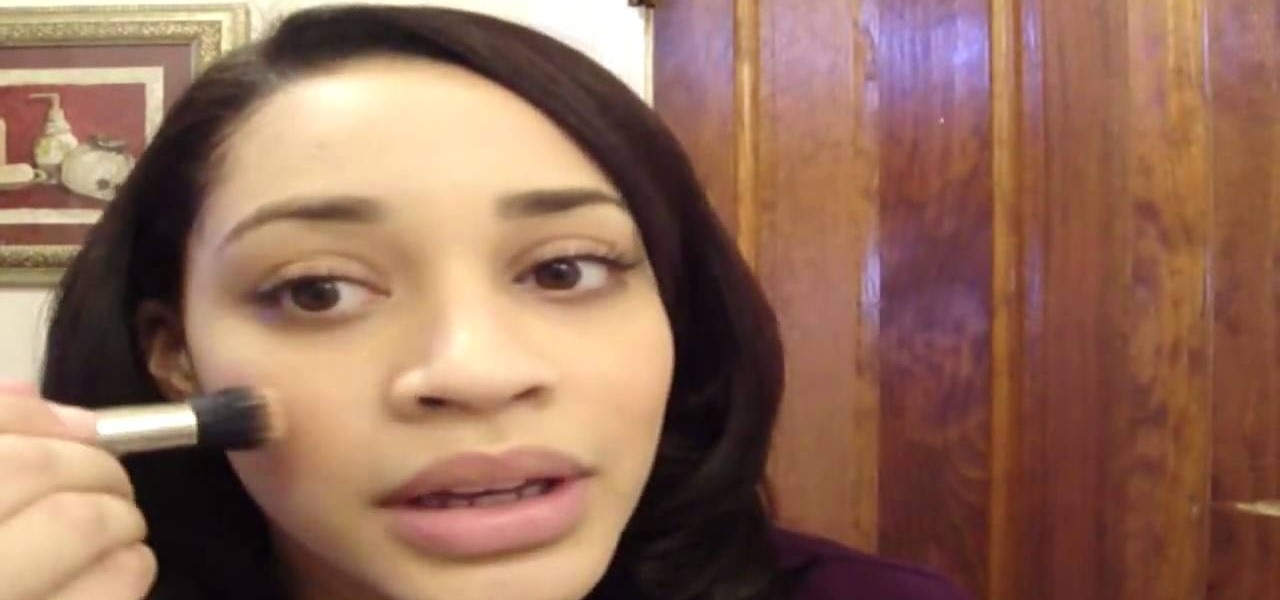
It's very important to clean your make-up brushes so now and then. This video shows you how. Every day- wipe makeup brushes off on clean old towel
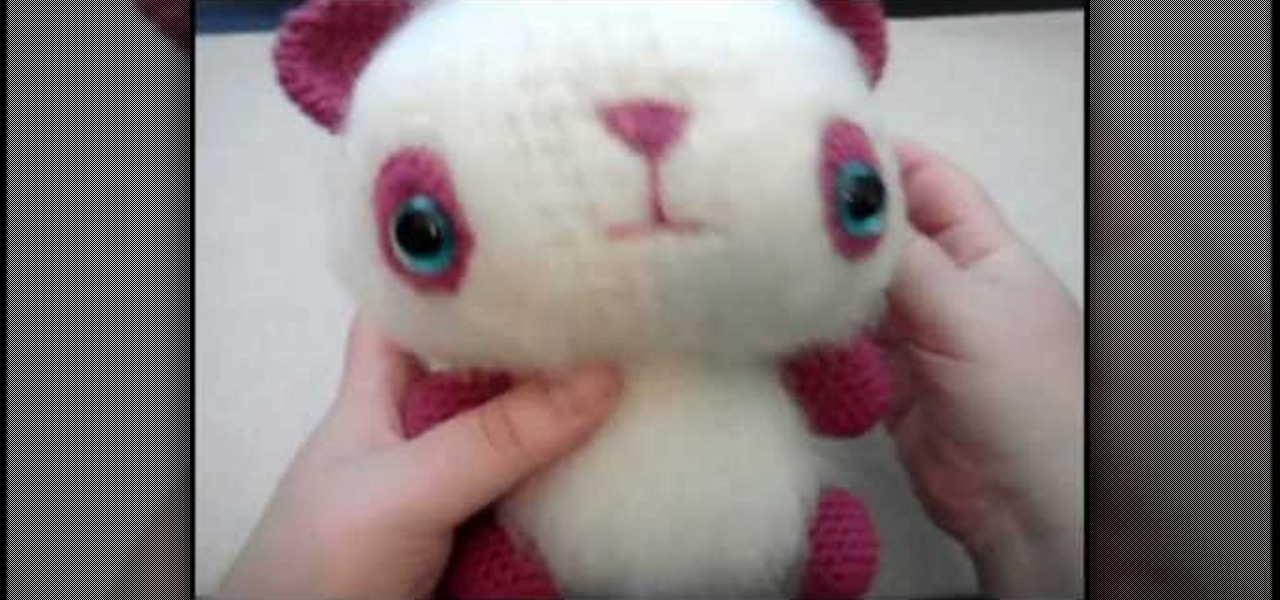
Tammy Snow will teach you how to brush your crochet to make your panda fuzzy. Take your finished crocheted head piece and fold it in half. Brush the head with a pull and lift action with your dog slicker brush. After brushing one way, turn the piece around and repeat brushing the opposite way. Repeat brushing and turning until the definition of your crochet stitches are almost invisible. The brushing could take up to an hour to get your desired appearance. Follow these simple instructions and...
Aperture's new retouch brush makes it simple to remove dust, blemishes, spots, and other unwanted elements from an image by simply brushing over them.
Peter Erskine is best known for his versatility and ardent love of working in various musical settings. In this installment from his video lesson series in which he covers basic brush skills on the drumset, Peter demonstrates how to play bossa nova and pop grooves with the brushes.
In this tutorial, we learn how to use a round brush for multi-colored scroll work. First, dampen your brush and grab some bright colors. Take and lay the brush into one color at first. Then, turn the brush over and pick up another color. Now, you will push down and lift the brush up as you are twisting around. Next, reload the brush and do the same process over again. Use more of certain colors, then you will have gorgeous mixes of different colors. You can also add in another color at the ti...
In this video, we learn how to clean brushes using Genesis cleaner for reborn dolls. First, dip the brush into the cleaning solution and allow the dye to drain off of the brush. After most of the paint is gone from the brush, dip it into water and continue to clean until the water running over it runs clear. Continue to repeat this process for all of the different brushes you have used. When finished, lay the brushes down on a flat and dry surface, then let dry overnight or until they are com...
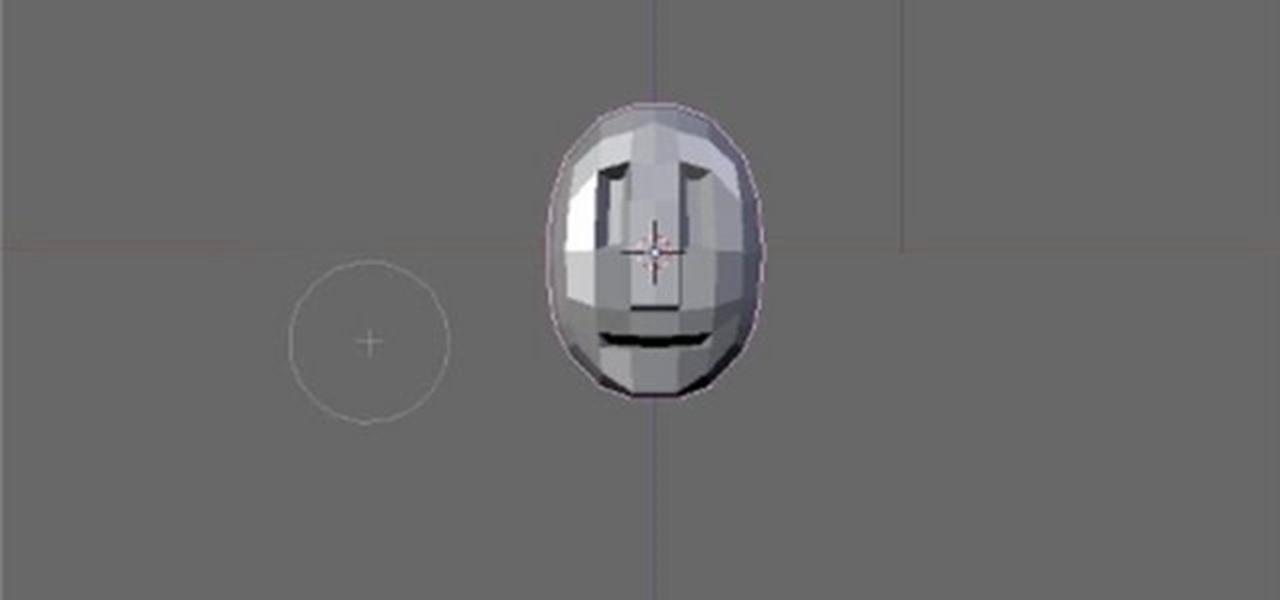
This clip presents an introduciton on how to create and bake brushes within most versions of Blender. Whether you're new to the Blender Foundation's popular 3D modeling program or a seasoned graphic artist just interested in better acquainting yourself with the application, you're sure to be well served by this free video tutorial. For more information, including detailed instructions, take a look!
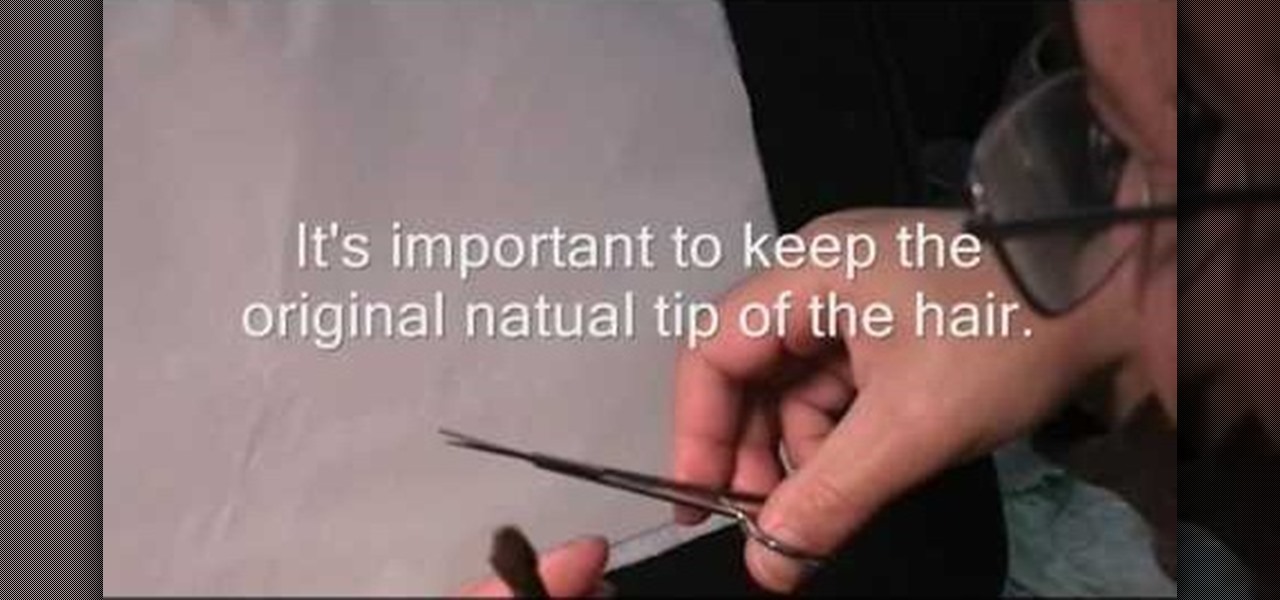
This video will be very handy to all the Chinese painting enthusiasts out there. It demonstrates how to trim an old split brush in to a sharp liner by trimming it with scissors. This allows you to do multiple kinds of brushstrokes without changing brushes, saving time and allowing you to purchase fewer brushes.
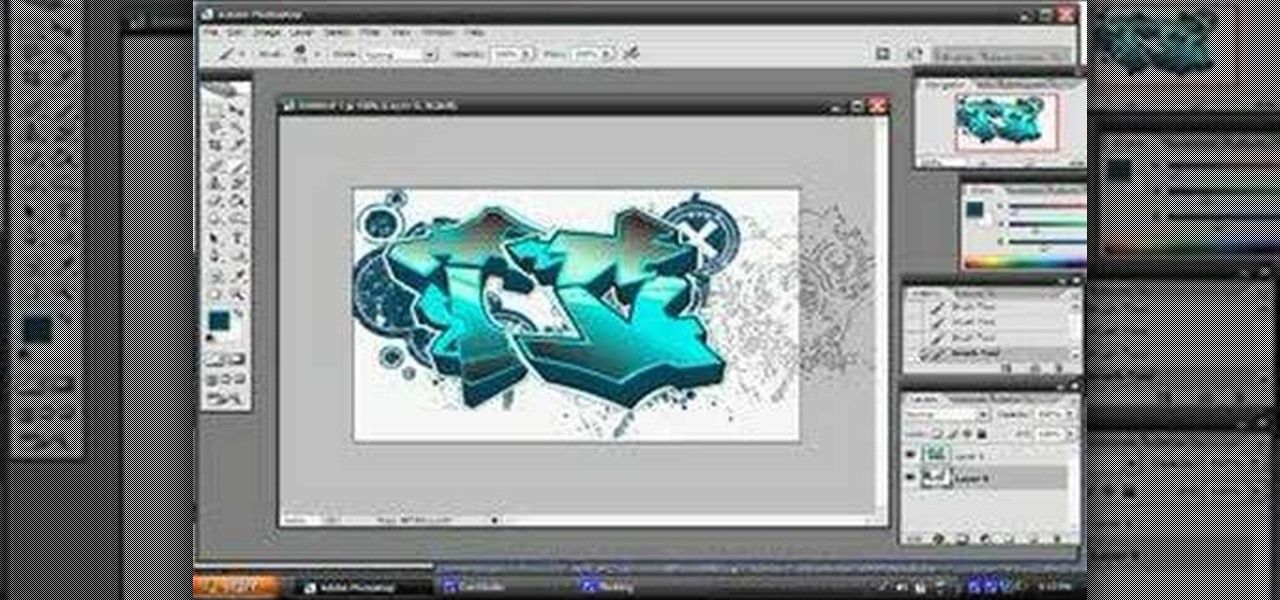
Walagers helps us learn how to make graffiti in Photoshop. First, go to "Select" and click on "Color Range". Use the eye dropper tool to select the color of the background, then press delete. Next, press "alt" and double click on the background layer to convert it to a normal layer. Using the brush tool, select the type of brush you want and the brush's size. Brushes can be downloaded from Brusheezy.com. Use the eyedropper tool to select part of the graffiti. It is recommended to use the same...
Peter Erskine is best known for his versatility and ardent love of working in various musical settings. In this indispensable installment from his video lesson series in which he covers basic brush skills on the drumset, Peter will guide you through playing time with the brushes.