
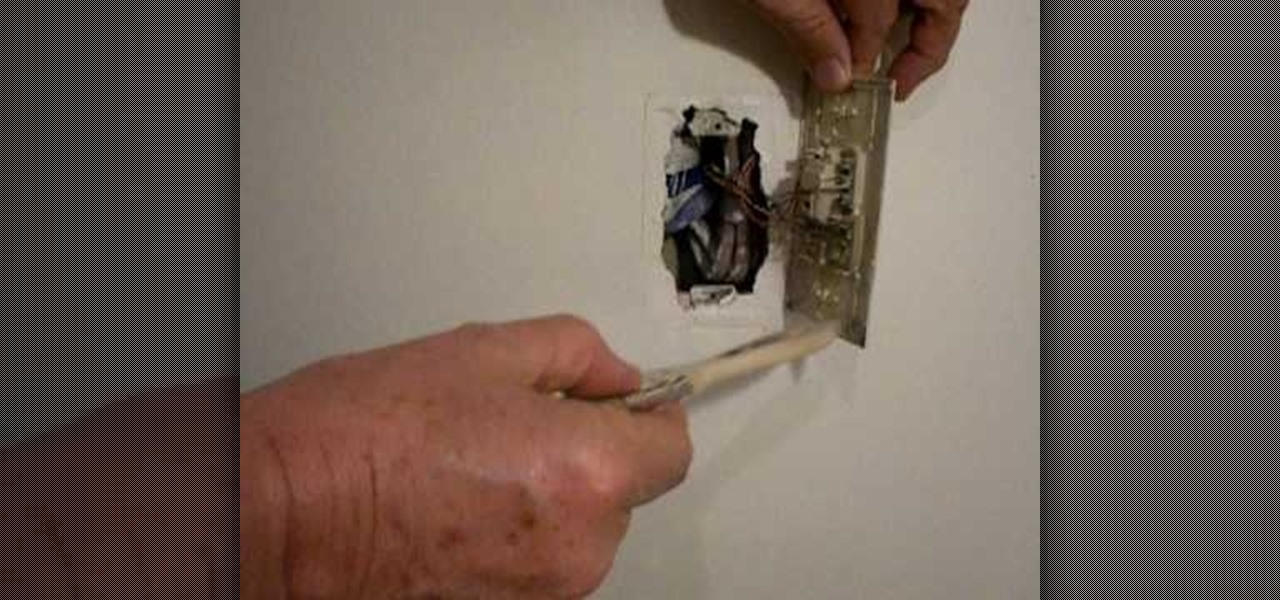
How To: Replace an electrical socket step by step
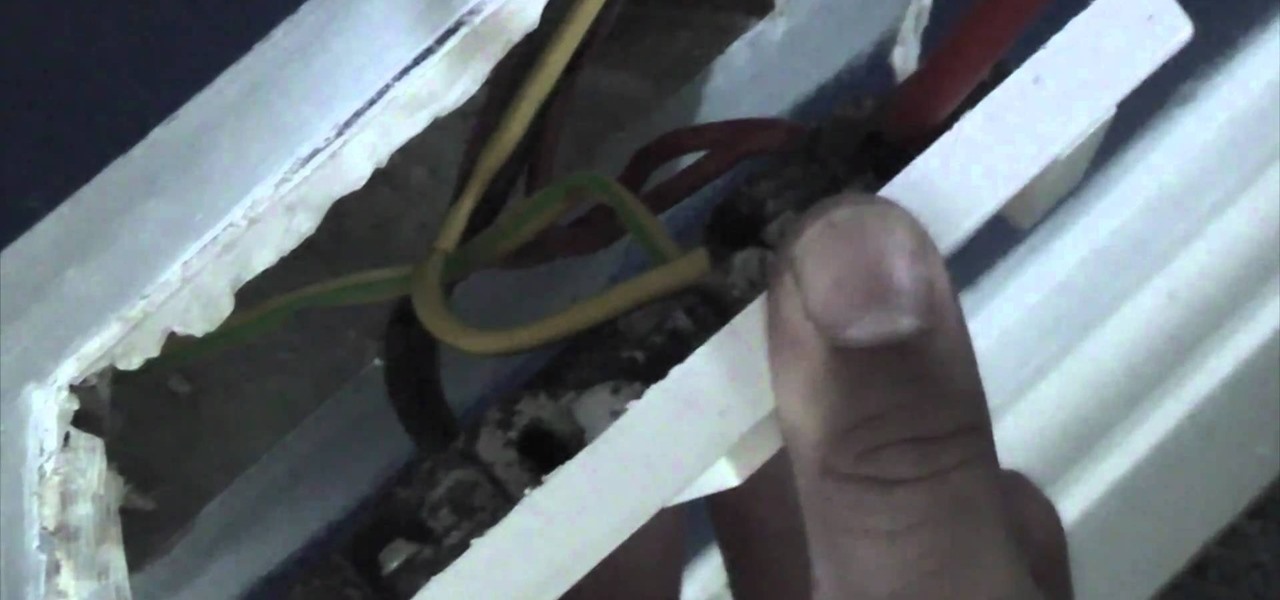
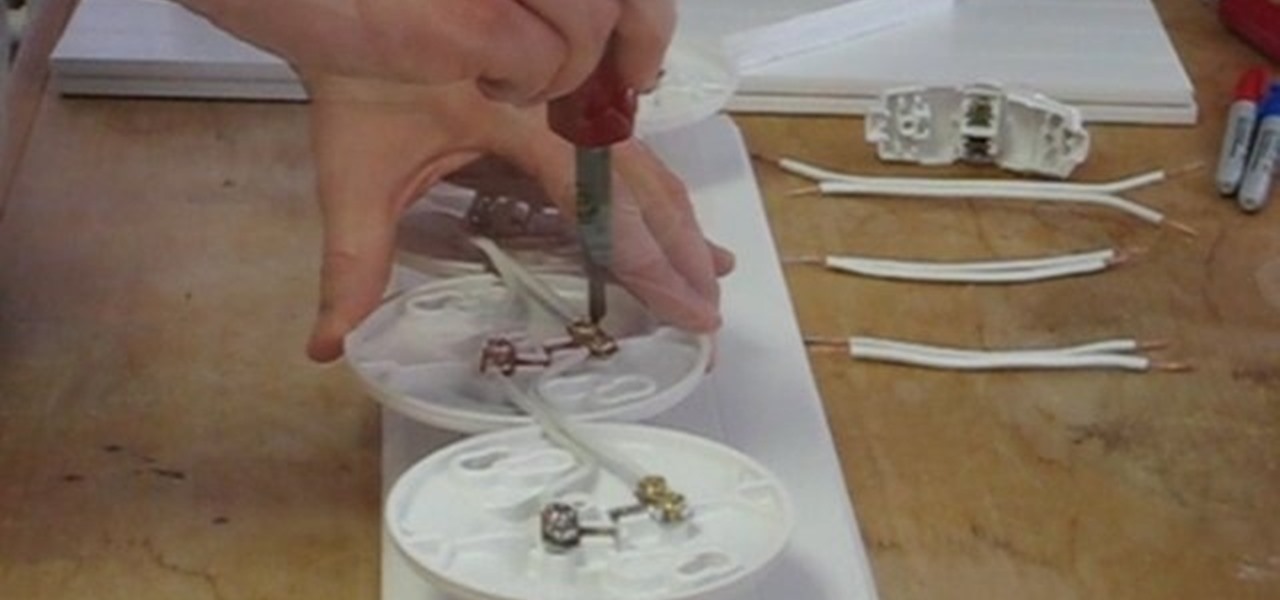
Electrical sockets are often taken for granted. It's not until one of them breaks or stops working and our laptops won't turn on that we truly have a crisis (mostly over lost internet time).

Electrical sockets are often taken for granted. It's not until one of them breaks or stops working and our laptops won't turn on that we truly have a crisis (mostly over lost internet time).
Video: . Ever have trouble getting out spark plugs because you can never hold on to them? Or how about dropping a bolt or a nut in a tight spot? Now you dont have to worry about that every again because the guys at www.PoorManMods.com show you how to magnetize you sockets and wrenches to make your life a little easier and more efficient!

Welcome back everyone! It's been awhile hasn't it? Sorry for being so quiet, but my CCNA courses have really picked up recently. In the last article we covered how to import modules and how we can use them. In this article, we'll actually be covering a module that is essential to the hacking aspect of Python, sockets.

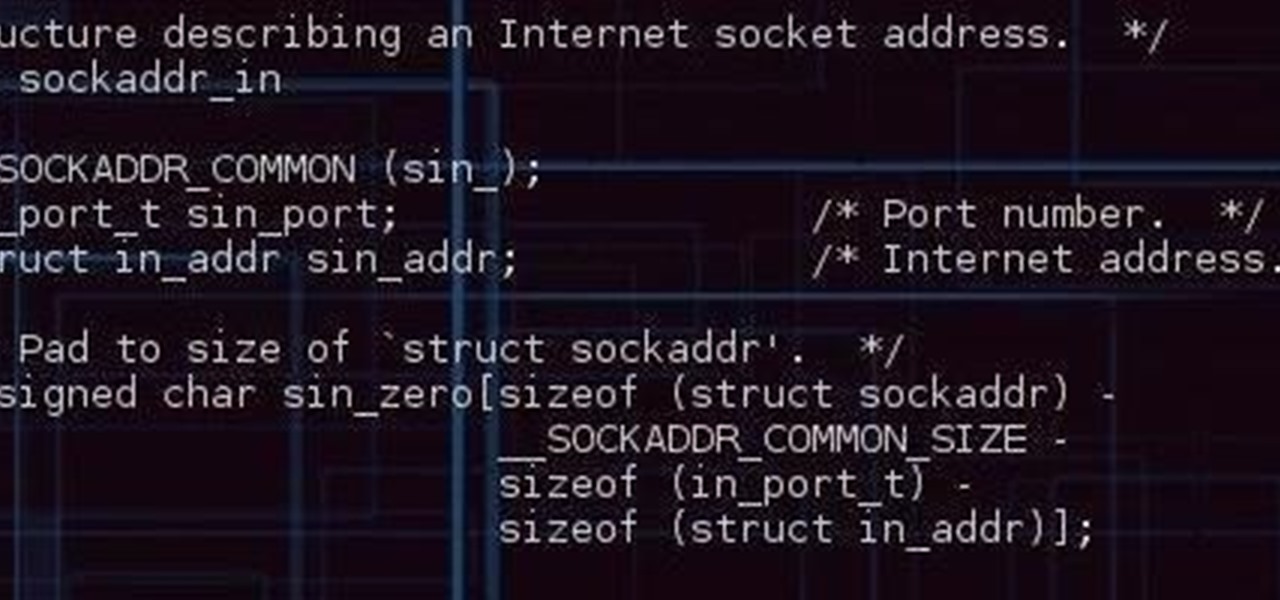
Socket programming in Unix allows multiple computer programs to "talk" to each other in the form of open "pipes". This is used in many popular programs for the Linux system (see any distribution). This how-to is created to understand the simple creation of a socket and what the various parts of the call mean.

In this video, we learn how to create a black eye with cinema makeup. First, you will need black makeup, black eyeliner, and a sponge. Start out by applying purple shadow with a flat brush on the sockets on the bottom of the eye. Apply this down until you reach the top of the cheekbone. Start to pat on a light dusting of black eyeshadow on the same area. After this, start rubbing purple and pink colors into the cheek area and dark brown on the top of the eye. After this, rub the purple on the...
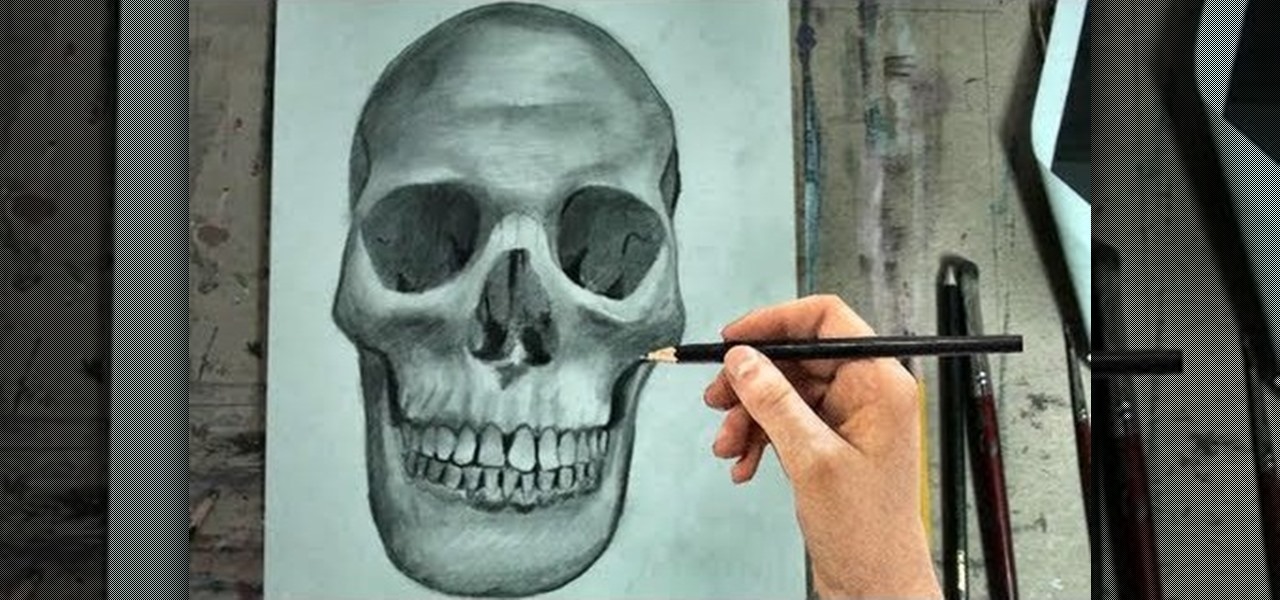
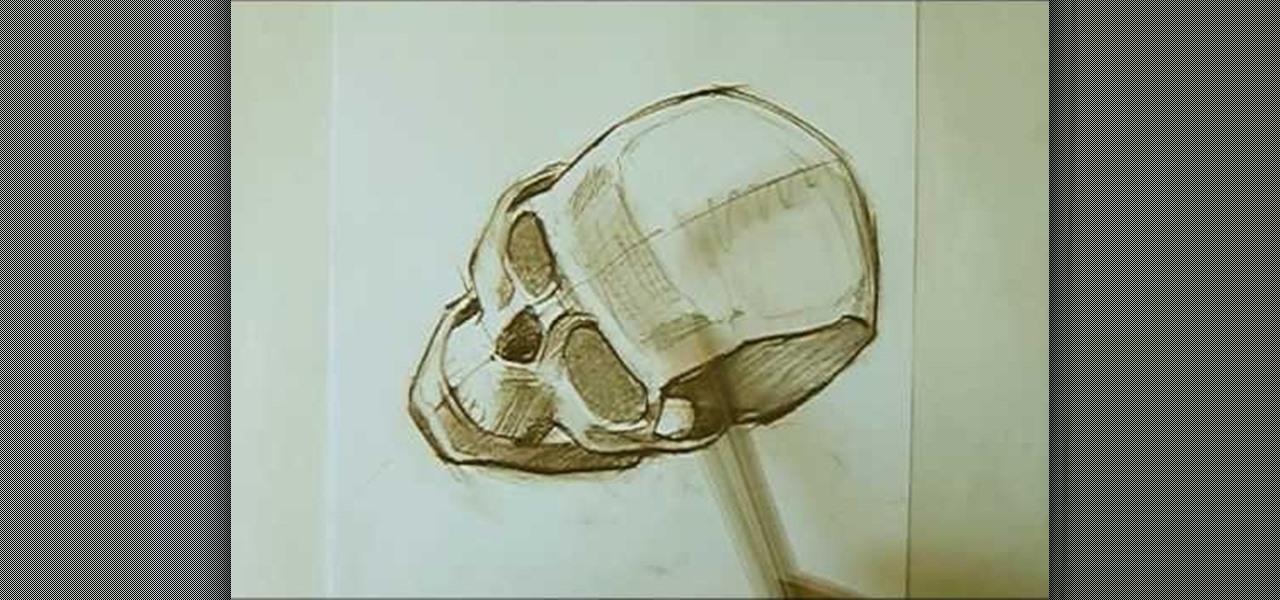
Halloween is the holiday of goblins, ghouls and witchcraft, and also death. So, what better way to celebrate the spooky season than with a skeleton drawing? More specifically, a human skull? Merrill K has you covered with this drawing tutorial. He'll show you the trick to sketching out a human skull (frontal view) in step-by-step instructions. Make sure to pause the video after each step and look at the screen every few seconds while you are drawing.

Watch this tutorial to learn how to draw Beyoncé Knowles. Make sure to pause the video after each step and look at the screen every few seconds while you are drawing.
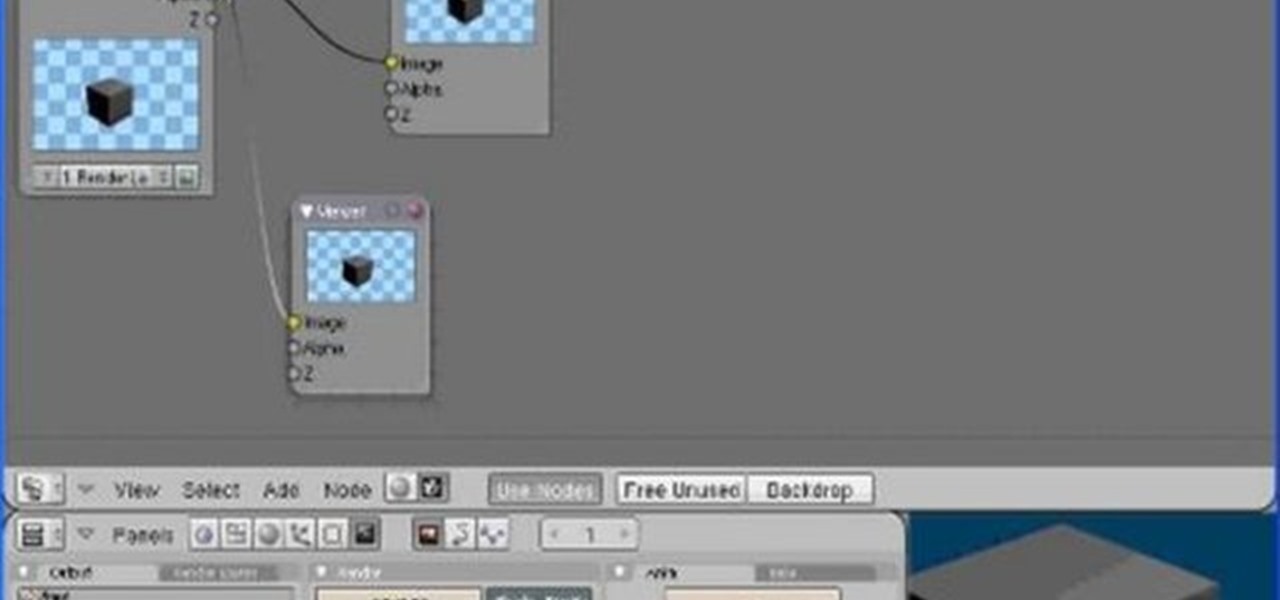
Conceptually, what is node-based compositing and what do nodes do? This clip uses the factory analogy to convey the concept. Blender can process video, images, sequences, and families of images in a directory. Then you'll fire up Blender and talk about threading nodes and how images are duplicated and routed through the compositing network ("noodle"), how threads are created between sockets. Creating threads, cut threads. The clip also points out common threading errors and misrouting threads...
Bring a little life to your films, or maybe a little "light". Watch this video to see how to make your own 400-watt video light for film or photography. You can make this video light with mere parts from the local hardware store, such as plastic paneling (which is cheap, easy to cut and non-conductive), zip ties, 4 plastic bulb sockets, lamp cord (like Romex), a cheap plug, and good and cheap diffusion. With all of these materials, you'll have your own homemade light for any film or photo pro...

YouTube user goldiestarling teaches you how to apply a purply sugar skull makeup look inspired by Sylvia Ji's Purple Crush painting. Use a white eyeliner to create the sockets of the skull, then go around the nose area. Color the whole face using a creamy white pencil and add red blush on the cheeks. Use a creamy purple color to fill in the sockets and the tip of the nose. Draw small flower petals on the edges of each socket. Use a black color to draw a spider web on the forehead. Then draw b...

In this tutorial, we learn how to draw a skull. First, draw the outline for the skull. Remember not to draw the hair on the head, because skulls do not have these! After this, you will draw on the cracks to the top of the head and shade around them. From here, draw in black on the inside of the eye sockets. Then, draw the lines around the eye sockets. From here, draw the area for the nose and then the teeth. Next, you will draw in the jaw line and add in additional shading and lines to finish...

In this tutorial, we learn how to draw a skull. First, select a picture of a skull that you want to draw. Then, sketch a few lines so you know where you are going to position the sockets in the eyes. Also do this for where you're going to position the nose and mouth cavities. Then, erase any unwanted background lines. From here, you will draw over your original sketch and then tone the eyes and the sockets. From here, you will tone and add shading to the rest of the skull and the areas behind...

In this how-to video, you will learn how to draw a human skull. First, start off with the main outline of the skull. From here, add the eye and nose sockets. Next, redo the outline of the skull to give it more texture. You can do the same for the holes. From here, add the teeth and the jaw lines of the skull. You can start adding in details such as the shading of the sockets and the jaw. Erase the old outlines to fine tune the skull. You can also add details such as cracks and texture marks. ...

Worried about your baby or toddler either wrecking or wrecking themselves in your home? Baby proofing time! Make sure your house is safe and secure for your child when they start exploring their turf.
This is a great instructional video on how to build an 8000 lumen CFL and makeshift rain shield. First you need build a PVC frame. For that you will need 3-3/4 'T'S, 4-12" 3/4 pipes,2-2 1/2 " pipes and 4-3/4 caps. You will also need 1-1 " 'T'. 2- 1" 1" pipes and 1-1"-3/4" reducer. Hold the job in a mechanical vice and cut the material into required sizes and make the snap fittings. Then friction fit the rest of the components into this stand. Then lastly you have to make the light box. That i...
One day, your car may break down and you won't be able to afford to hire a mechanic, so what do you do... you look on the web for some how-to vehicle repair videos and become your own car mechanic, that's what. You don't need any advanced training to perform repairs and simple maintenance on your automobile, but you may need a few tools. Invest in the basic tools and you'll be prepared for just about any car malfunction you can think of. These tutorials will help get you on your way, as long ...

This is a step-by-step guide to removing and installing the front wheel bearing hub on a 1993-2004 Dodge Intrepid. The tools you will need are a jack and jack stands, wrenches, sockets, ratchets, a screwdriver, a hammer, a C-clamp, a torque wrench, and a breaker bar.

You don't need to buy an expensive ring light, you can make your own at home. You'll need a sheet of sturdy plywood, a pencil, some string, a dimmer switch, the light bulb sockets, some electrical wire, a drill and some hardware.
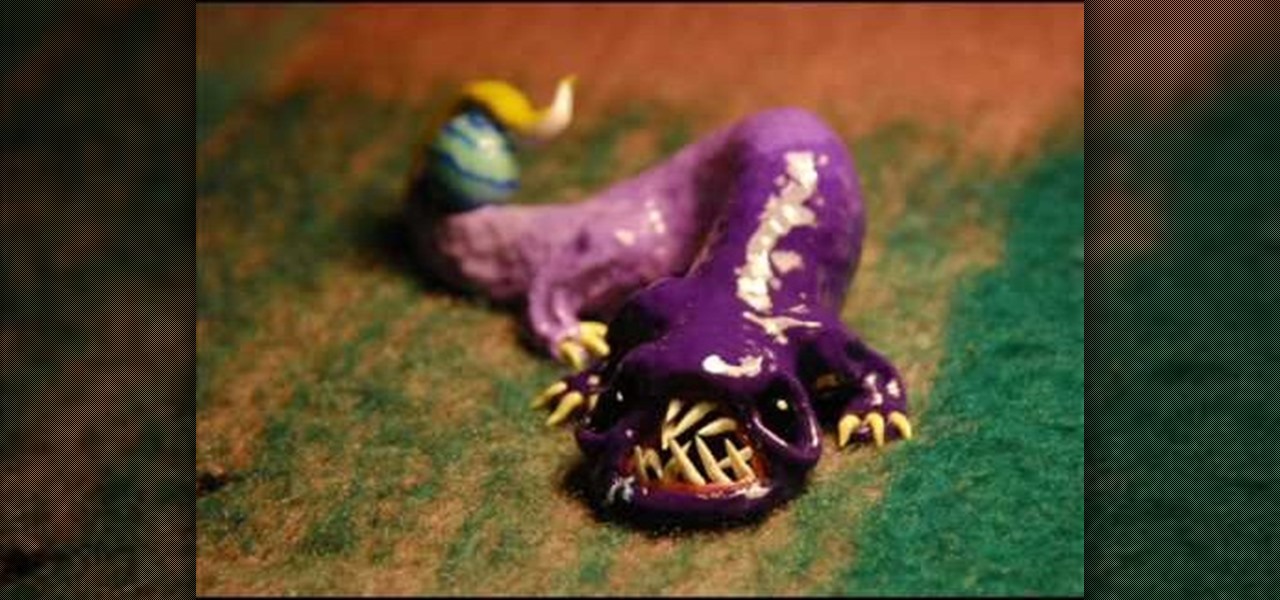
First of all take the clay and make a roll. Now keep rolling to form a roll that has one end large and the other end smaller at the tip. Now bend the roll upwards from the middle. Now take a match stick. Now use this to make a hole to make the mouth. Use to fingers to make the corners of the mouth round in shape. Make the mouth wide and open. Now make the eyes by using a matchstick to pierce the sockets. Now take a little clay and then make a roll of it. Now make a leg out of it by making the...

This Pixologic Zbrush 3.1 video tutorial shows you how to place eyes in your 3D animated character's head. You'll have to sculpt out those eye sockets out first and then grab a squirkle to work with, using a few tools. If you want to be a great 3D digital animator, learning the basics of Zbrush modeling is a must. You'll see how to move, rotate, and scale an object, too.
Hello, I'm a new guy around here and since I'm not seeing much tutorials in C i thought of contributing with something relatively simple. This will be a short series.
In this tutorial, we learn how to draw a skull with proper proportions. First, draw the outline of the skull with the light touch of a pencil. After this, use the pencil to draw two crossing lines that are the same length. Next, draw in the features of the face and head using the lines on the drawing. From here, you will start to add in the details to the features of the face and erase any background lines. Use the side of your pencil and the top of it to shade in the sockets and lines. To fi...
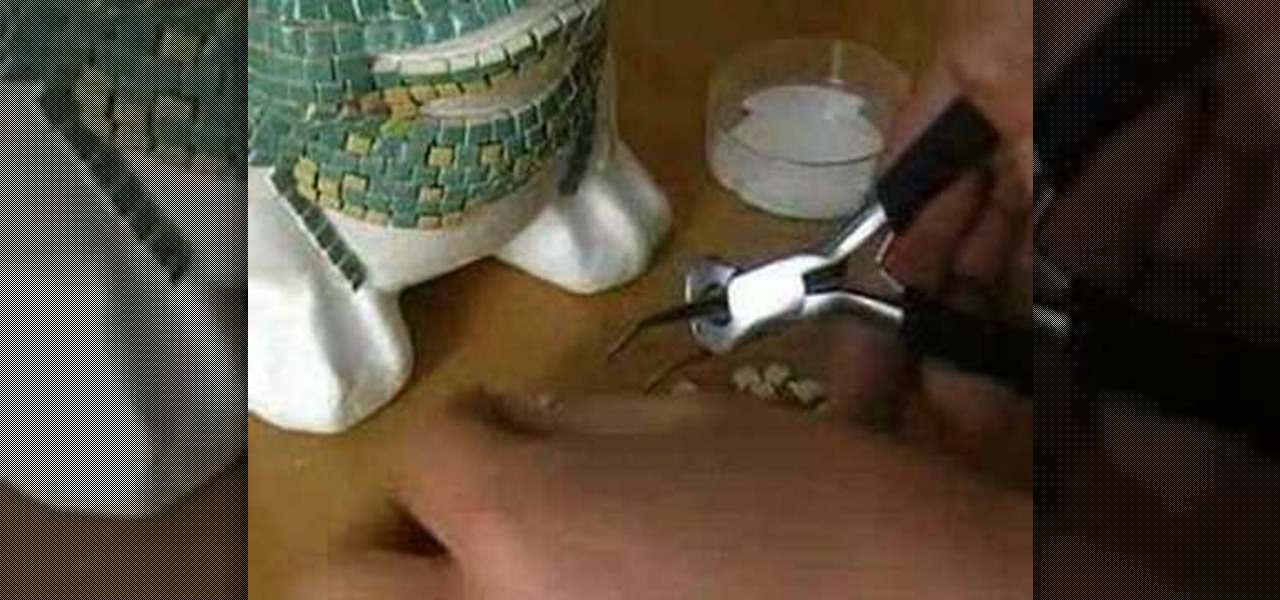
In this tutorial, we learn how to make a mosaic frog for your garden. Start by painting white glue over the eye sockets where the eyeballs will be placed. After you place the eyes on, brush on glue to all surface areas and start to place the mosaic on the glue. Follow directions that are given to you for the patterns so you know where to place each tile. You must cut the corner pieces so they fit in correctly. After two hours of drying time, you will rub a powdered solution all over the frog,...
Diatomaceous Earth may be useful for killing bugs in walls. Light sockets and phone jacks provide a highway for bugs to travel from one infested room to another or one infested apartment or another. They also function as a hide-out for them during daytime hours, when they might be more visible.

In this video tutorial, viewers learn how to find bed bugs and how to get rid of them. When users are aware that their home is infested with bed bugs, it is critical for users to locate all of the bugs. There are many areas where bed bugs inhabit. Bed bugs can be found on the bed, headboard, electrical sockets and telephone jacks. Bed bugs may also be found in cracks. The best treatment to remove bed bugs is to use Delta Dust, bed bug spray or any other bed bug products. This video will benef...

In this video, we learn how to draw a realistic skull. Start off by using a pencil to draw out the basic outline of the skull. After this, add in further details, such as shading on the side of the head to show that it is hollow. Also add in the sockets for the eyes and show where the nose is at. Draw in the jaw bone as well as the teeth and the jaw line around it. Draw on cracks to the face at different places to make it look more realistic. Add in shading and darker lines where you feel nec...
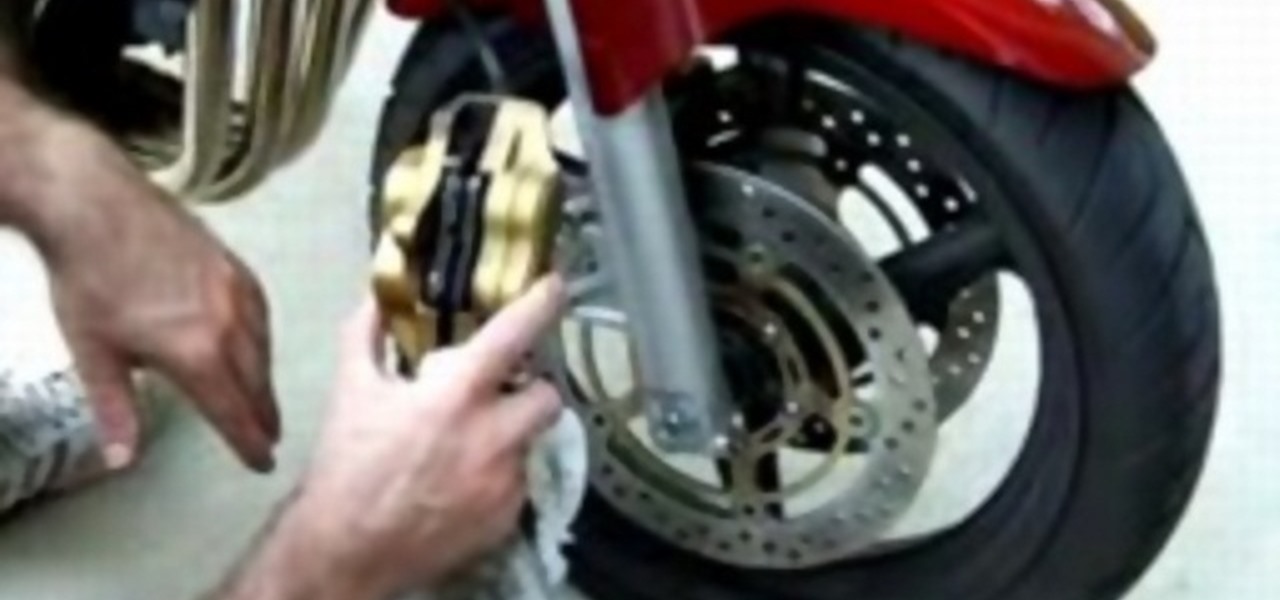
Unlock the two front bolts using a 12mm socket. Carefully remove the device holding the pads from the rotor. Check if your sockets are worn down beyond the indicated notch. If they are, they need to be replaced. Loosen the pin that is holding the pads using a medium-sized screw driver or an L-shaped driver. Once the pin has loosen enough, use a screw driver to stick between the pads and force more space between them. Remove the pin completely. Remove the old brake pads and replace them with y...

In this video tutorial, viewers will learn how to draw a skull using a computer. Start by drawing a circle for the head and a rectangular shape at the bottom. Draw a line in the center as a guideline. Then draw the eyes, nose and mouth. Now outline the skull and add the details. Shade in the eye sockets, nose and mouth. Now you can erase the guideline. Start coloring the skull to a preferred color. Then add in a darker color around the skull to shade it. Finally, outline the skull and color t...
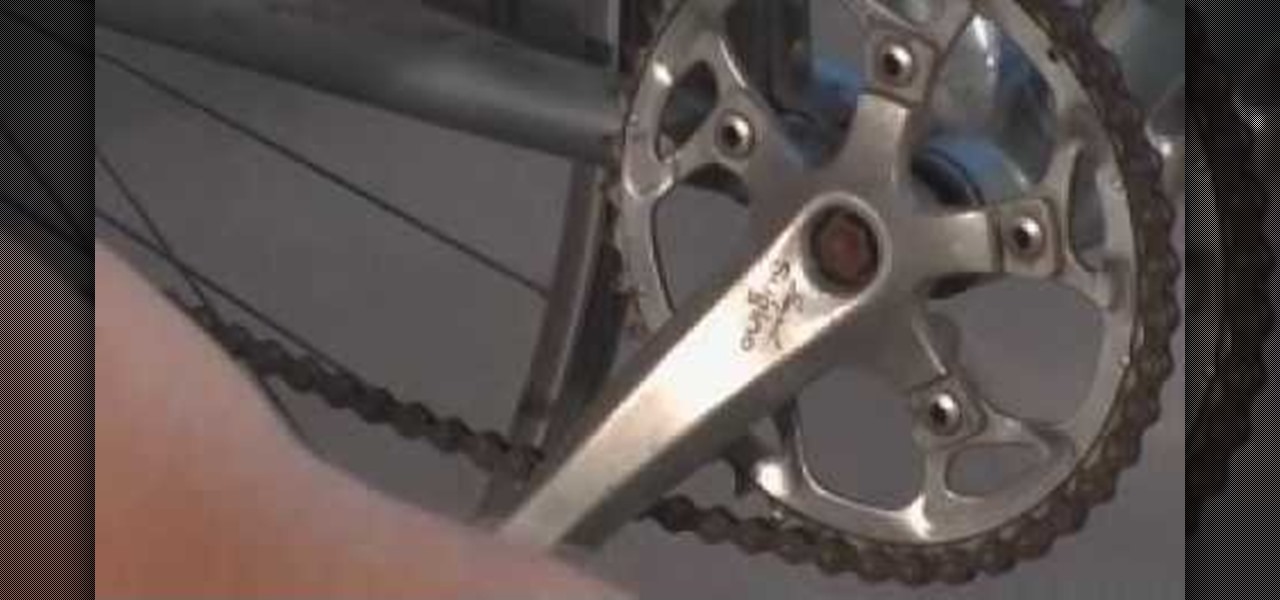
In this how-to video, you will learn how to remove a crank arm with a square taper on a bicycle. You will need a crank puller. You will also need two sockets (14mm and 9/16"), a quarter, a socket wrench, and a screwdriver. Use the quarter as a screwdriver to pull off the cover. You can use the screwdriver in case that does not work. Take the 14mm socket, place it in the socket wrench, and twist off the bolt. Take the crank puller and screw it on one end. Twist the lever until the crank is loo...

Whole Structure Heating Jeff White from Bedbug-central.com explains the different methods of effectively killing bed bugs in your home with heat instead of poison.
Are your sinuses killing you? There are ways to relieve this pain by applying pressue. Learn to apply pressure to points of the body with your thumbs or fingers to relieve sinus pain.
You may think you'll never be in an emergency situation, but you can never be too prepared! This video provides excellent tips on what to bring and do in an emergency situation.

In this tutorial, we learn how to draw a twisted skull. First, draw the outline of the skull and then start to draw in the jaw line around the middle. After you have this drawn out, draw in the teeth on the top and bottom of the face. Then, draw in the eye sockets and the nose shape. From here, start to add in lines that look like cracks around the top and sides of the skull. There is no perfect way to draw this, draw it how you feel it should look! Add in some shading to show the depth and c...
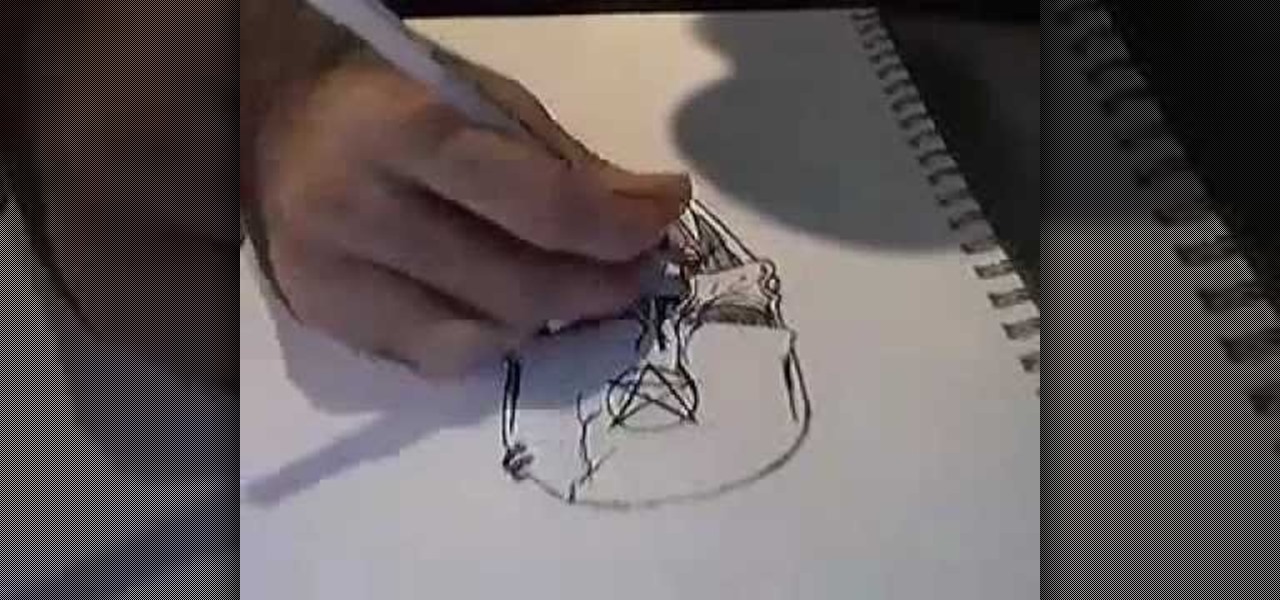
In this video, we learn how to draw a skull. Start off by drawing in the eyes and then draw the nose and basic outline of the head. Add in lines on the head to show broken and cracked bones. After this, draw in eye sockets and add details to the nose as well. Shade in the eyes and then start to draw the jawbone and where the teeth are at. Shade between the teeth and then draw the chin in. Add in shading where you feel it's needed, then add in more cracks to make it look more real and you're f...

Replacing a turn signal is easy and will keep your car running efficiently. Learn how to switch turn signal sockets and bulbs, and how to check wiring in this free car maintenance video.
Alright so last time I gave you a homework assignment. This week we're gonna look at my version of the UDP-Flooder.

In this article, we will build a parallel password cracker using the techniques explained in the previous part. As SHA-512 is the digest function that Kali (and most modern Linux distributions) use to store our passwords, we will make a SHA-512 password cracker.

Using a Phillips head screwdriver remove the screw under the handle in the back of your iMac. Remove the screws outlined in the picture below. Remove screws 1 and 2 with a standard Phillips head screwdriver. Screws 3 and 4 use a standard flat head screwdriver. After removing the screws, gently pull out all of the plugs. Next holding the clear handle just below the bar code, pull out the section of the iMac.

NOTICE: Ciuffy will be answering questions related to my articles on my behalf as I am very busy. Hope You Have Fun !!!

Alright, this will be my first tutorial in C. Note that this guide is written for Linux.