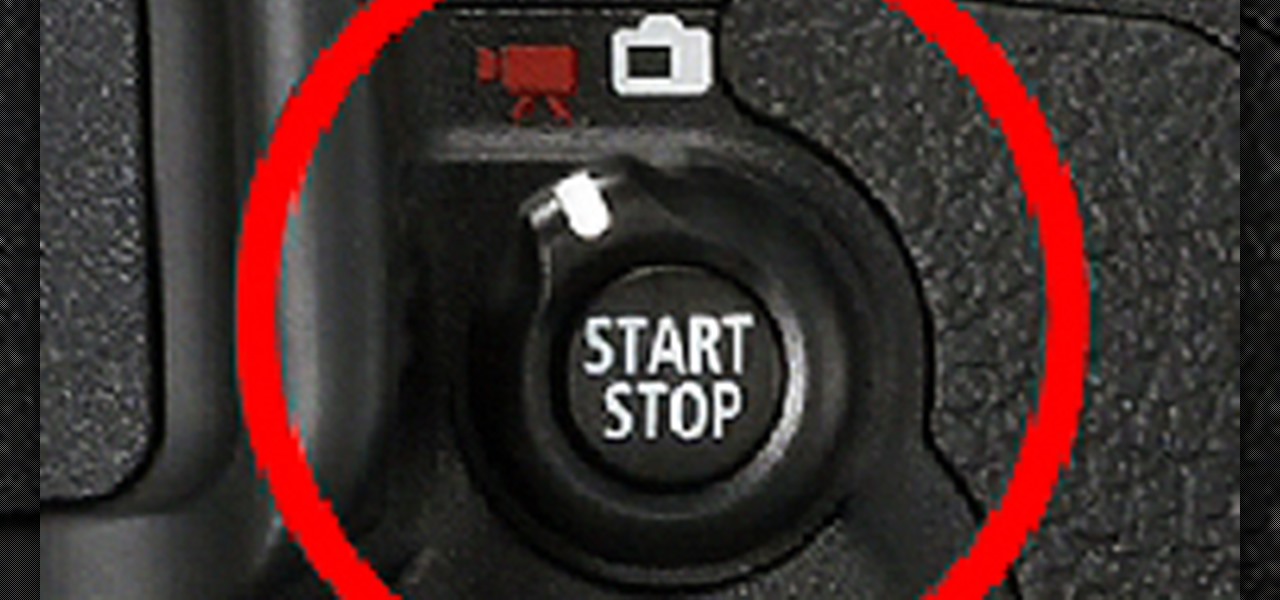
You can use the Canon EOS 7D to shoot digital video at a variety of frame rates and resolutions up to full HD. In this video, see the basics of movie mode and how to use it. This is the best digital SLR camera to film video with.
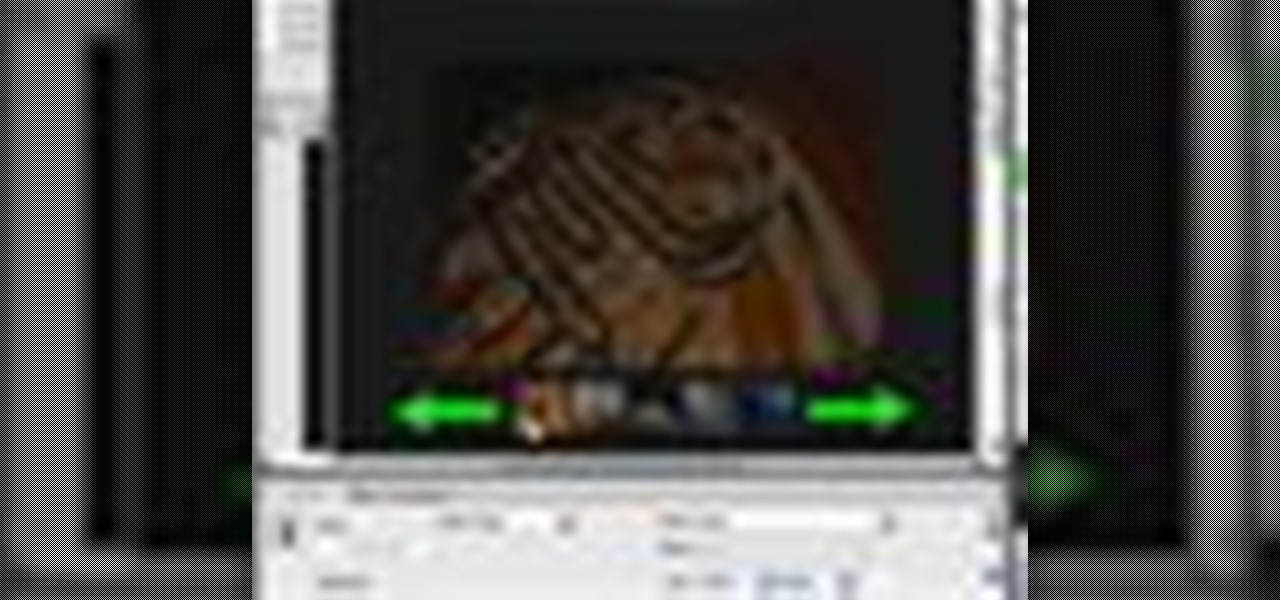
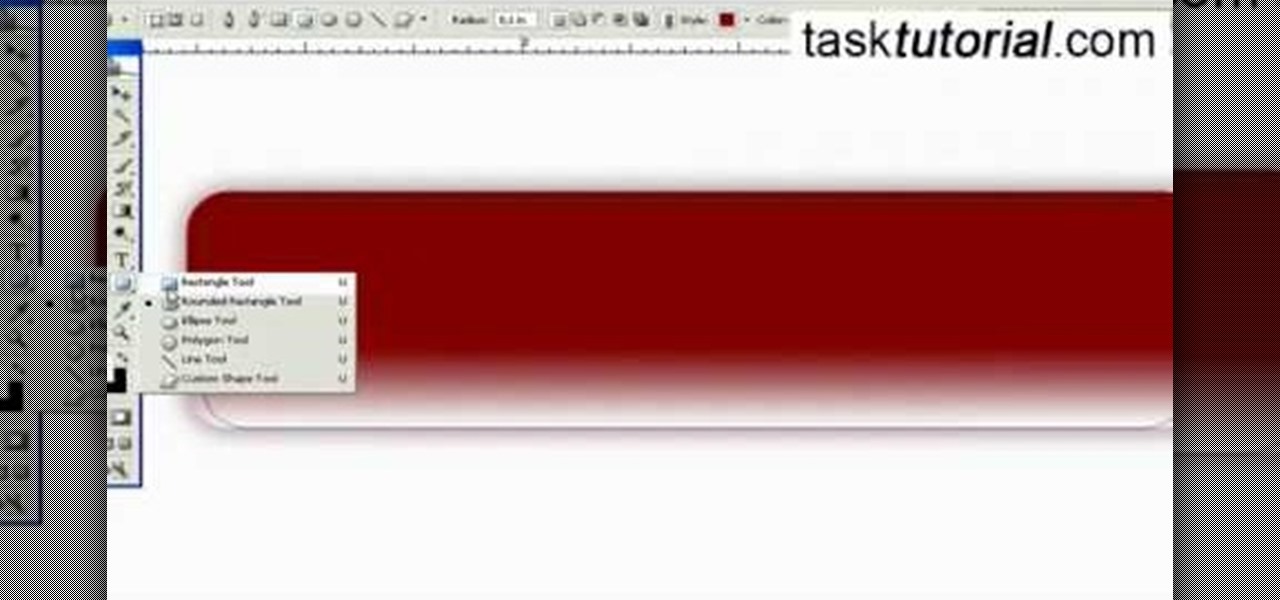
In order to add a Next or a Previous buttons in Photoshop, you will need to begin by selecting a photo. Double clip into MasterclipMC. Create Films Layer and make a new layer. Name it Next and previous. Create a rectangle. Use the Polystar options. Adjust the size to the appropriate size. Make a triangle. Place it in front of your rectangle. This is your arrow. Make a copy of it. Rotate one to point in the opposite direction. Name them Previous and Next. Drag them into position. Rename the bu...

If you need to remove vocals from a song in Pro Tools first you need to open Pro Tools and load the song. First, you need to split this track so go to Track and click split to mono. Now, mute this first track. Next, you want to remove the stereo by panning each the bottom to 0. Now, flip the phase by going to the bottom clicking EQ plugin. Now the vocal is pretty much gone.
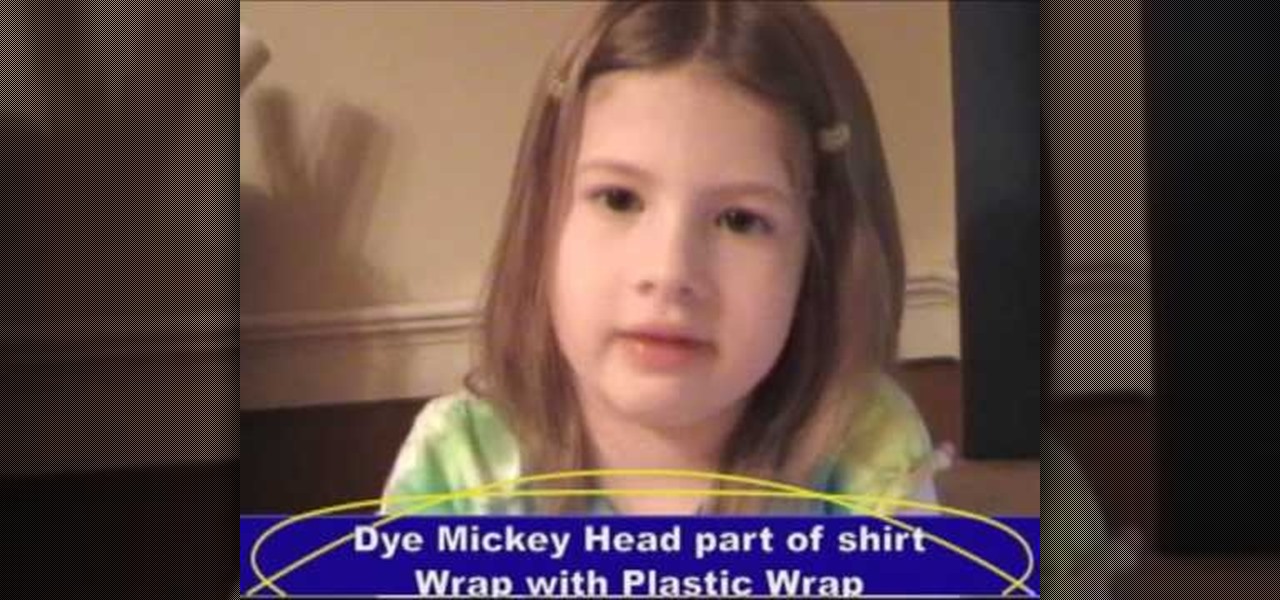
Making a Mickey Mouse tie-dye shirt is as easy as can be. First trace a Mickey mouse outline onto a plain white shirt with a pencil. Using plain dental floss and a needle, sew around the tracing you've just created. For optimal results soak the shirt in soda ash (this step is optional). On the final stitch, pull on the dental floss until Mickey's head "pops up". You will need several rubber bands for the next few steps. First tightly wrap some rubber bands around Mickey's head. Add additional...
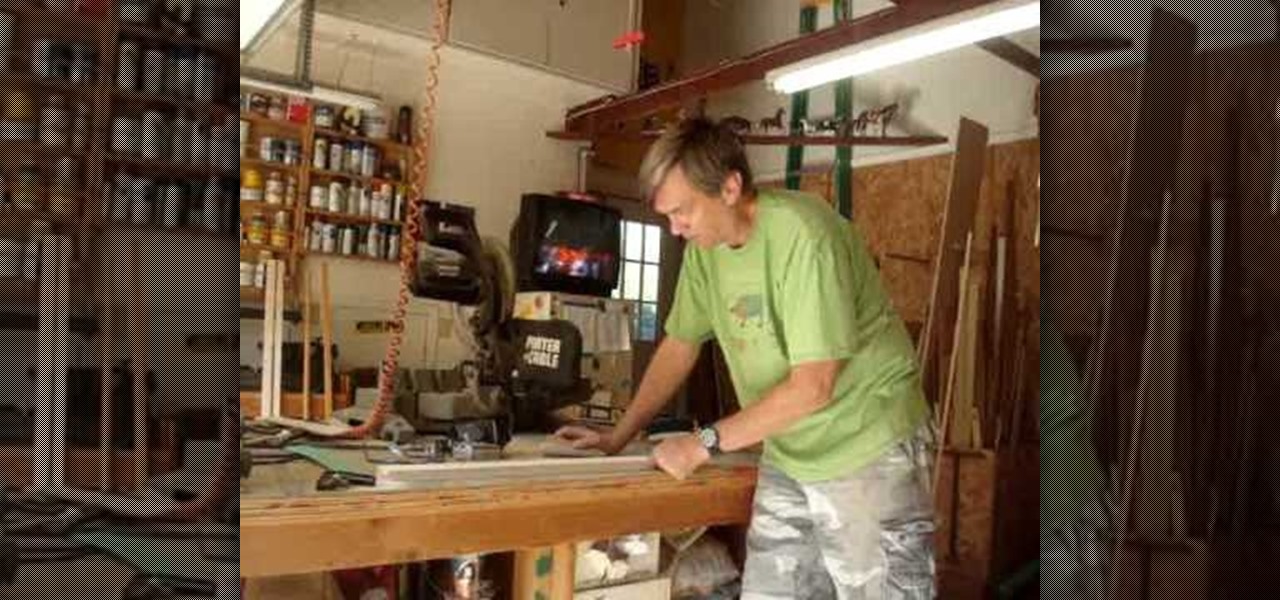
A jewelry box is not just a great way to keep your jewels safe, it is also a beautiful addition to your decor. In this video, learn how to make a gorgeous, professional looking jewelry box from walnut, maple and cherry woods. This in depth, seven piece series takes you from selecting your wood, through the finishing touches. These boxes are lovely enough to compete with anything on a store shelf.
Pixel Perfect is the "perfect" show to help you with your Photoshop skills. Be amazed and learn as master digital artist Bert Monroy takes a stylus and a digital pad and treats it as Monet and Picasso do with oil and canvas. Learn the tips and tricks you need to whip those digital pictures into shape with Adobe Photoshop and Illustrator. In this episode, Ben shows you how to use color correction in Photoshop.

This video tutorial is in the Computers & Programming category where you will learn how to use caret browsing. Caret browsing is a method of selecting text on any web page. You can activate caret browsing by pressing the f7 button on your computer. It is available in Internet Explorer and Firefox browsers. Normally, for selecting text on a web page, you highlight the text by clicking and dragging the cursor and then you can copy and paste it in to a text editor. While doing this, if there are...
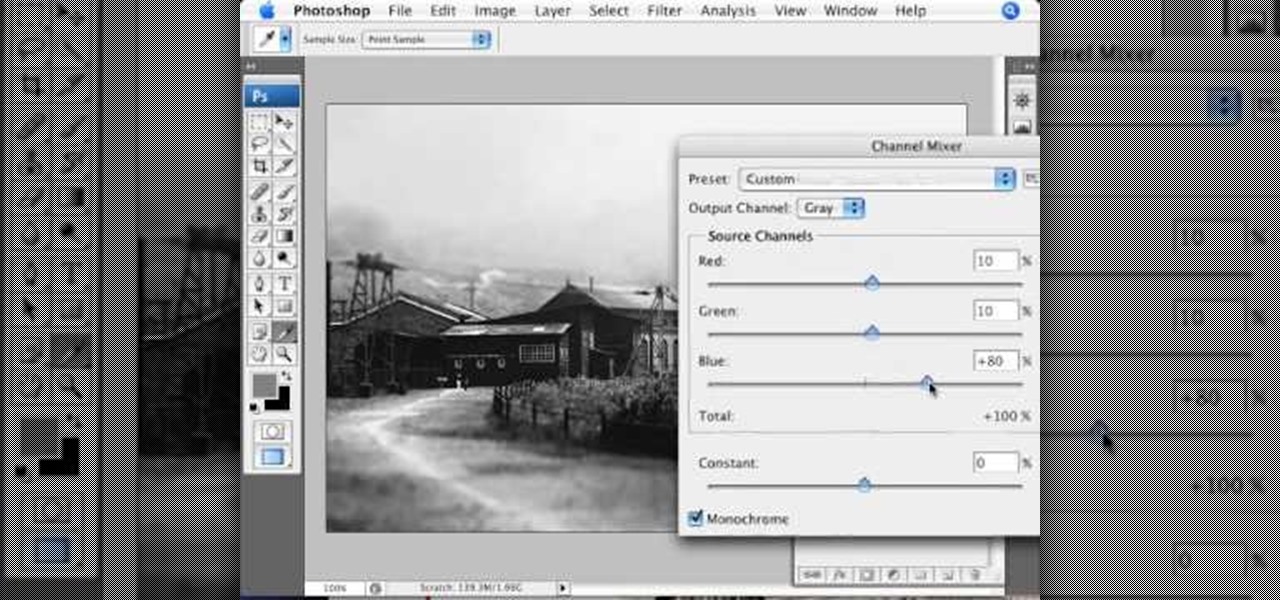
This video demonstrates the split tone effect in Photoshop. A split tone effect makes a picture look more rustic by changing the tones. First, add an adjustment layer to the picture by opening the channel mixer window. Select Monochrome and adjust the RGB values to create a black and white image to your own personal preference. Next, add another layer by opening the color balance window. Here you can change the colors of the light areas by selecting Highlights and changing the color sliders, ...
You can replace the audio in Sony Vegas. To do this first delete the audio which you want to remove by selecting it on the right side and press delete. Now go to the website like findsound.com and download the sound and then import it to the Sony Vegas and drag it to the layers. If your sound file has some blank space you can delete it by just selecting it and press delete. Now drag the audio to the begining of the video. Now you can play the video and hear the sound is better than before. No...
Pixel Perfect is the "perfect" show to help you with your Photoshop skills. Be amazed and learn as master digital artist Bert Monroy takes a stylus and a digital pad and treats it as Monet and Picasso do with oil and canvas. Learn the tips and tricks you need to whip those digital pictures into shape with Adobe Photoshop and Illustrator. In this episode, Ben shows you how to turn images into watercolor paintings in Photoshop.
Trim and cut video footage with iMovie. This video tutorial provides an overview of the steps involved, including selecting video resources to be used in the project, placing video resources in the timeline, highlighting the actual clips to be used from the resources, and rearranging the chronological order of the clips in the timeline.
You already know you can create photo pages by selecting a photos template and dragging in individual photos from your iPhoto library. Now there's an easy way to add entire photo albums to your site, each with their own dedicated photo pages.
When you've finished a LiveType project, you can import it directly into Final Cut Express. The LiveType projects looks and behaves like an ordinary clip, but it has a .ipr file extension. Edit it like a normal clip, and you can change its attributes after importing by right clicking and selecting "Open in Editor." Final Cut Express automatically updates the imported file.
In this tutorial, Gary teaches us how to speed up and slow down in reverse in iMovie 09. First, open up iMovie on your computer and set your preferences so the advanced tools are turned on. Now, open up your project and play it back at normal speed. Next, go to the information for this clip by selecting the "i" button. Click on the speed and then click "convert entire clip" so you can control the speed of the clip. After this, you can move the lever on the gauge to make it faster or slower. W...
Makeup artists often throw around terms like "cool undertones" and "warm neutrals," but when it comes to buying a foundation, most women select one by swiping it on and then wiping it off.
In this video tutorial, viewers learn how to save and swap icons on a Mac OS X computer. Begin by selecting the application that you want to get the icon from, and copy it. Then open preview, go to the File menu and click on "Create new clipboard". Users are also able to apply the icons on other applications or drives. After you have copied the desired icon, select the application with the icon that you want to replace, press the Command and I buttons, select the icon and paste the copied ico...
In this video tutorial, viewers learn how to use Flickr photos in their screen-saver. This task can only be done on the Windows computer. Users will need to download the program from the website provided in the video. Once downloaded and installed, there is an option in the Screen Saver Settings. Users are able to take photos from specific users or groups, or can search through tags and contacts. Further options include selecting the size of the photo and delay between switching the photos. U...
This video tutorial by photoshopuniverse shows you how to create a postage stamp in Photoshop. First take a suitable image and decide the shape of the stamp. Corp the image to suit the shape of the stamp by selecting the area and choosing corp and increase the canvas size as shown in order to create the perforated cutout. Transform the image into a regular layer and once again increase the canvas size to create a back ground with an appropriate color as shown. Add a layer mask, chose the brus...
This video shows you how to simulate hand coloring in Photoshop. The first step in the process of simulating hand coloring is to turn the image you have chosen into black and white. Following turning the pictures coloring to black and white you must bring up the hue color control panel. The final task includes selecting the object to color within your image as well as picking the color in hue that you wish to use. The coloring must be done manually by the users control of the mouse.
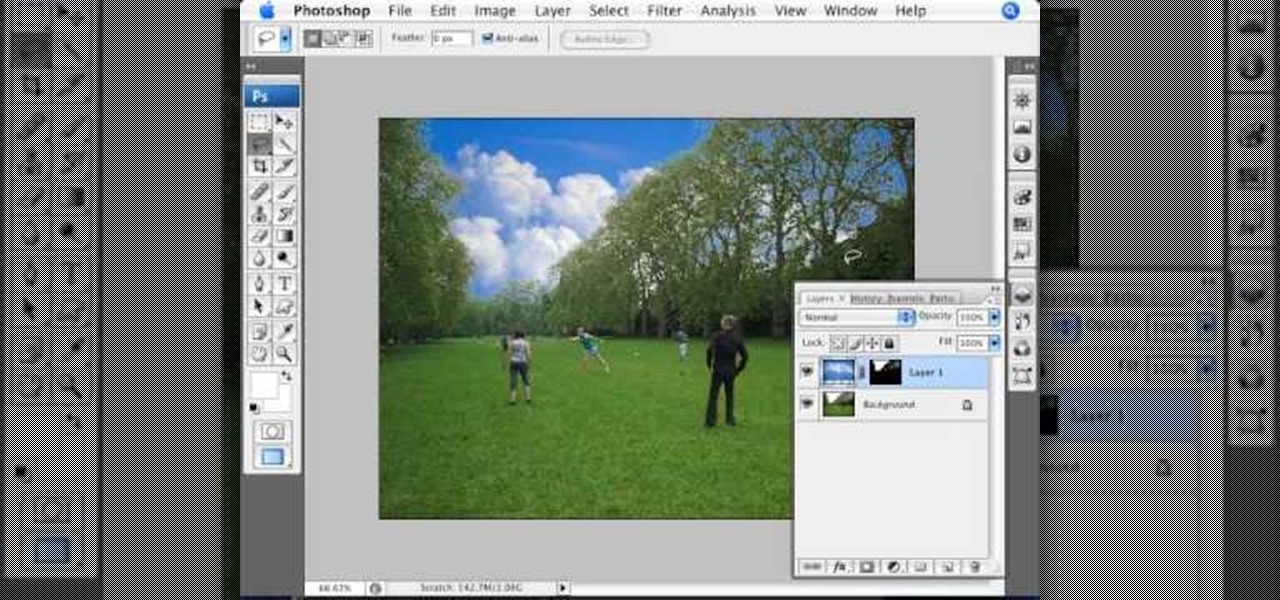
In this Photoshop tutorial the instructor teaches you to replace the sky in a photograph. If you have a photograph which has a very dull and blown out sky you can change it to make it look better as shown in this video tutorial. Some times when the sky is cloudy or due to improper white balance you end up with photos having a over bright or dull sky. Now you can find another image where the sky looks bright and attractive and replace the sky in this image with that one. Open the photo that yo...
This video shows how to make a quick pivot table data filtering by using Excel 2010's ‘Slicer’ functionality. ‘Slicer’ delivers enhanced visual filtering method to allow you to get the data you need more quickly. When selecting a cell in the pivot table you will find ‘Slicer’ in the filter group of the ‘Insert’ tab. Click on ‘Slicer’ and an 'Insert Slicer' dialogue shows up where you can pick particular data fields from the slider list. Once you click on ‘OK’, the ‘Slicer’ objects with filter...
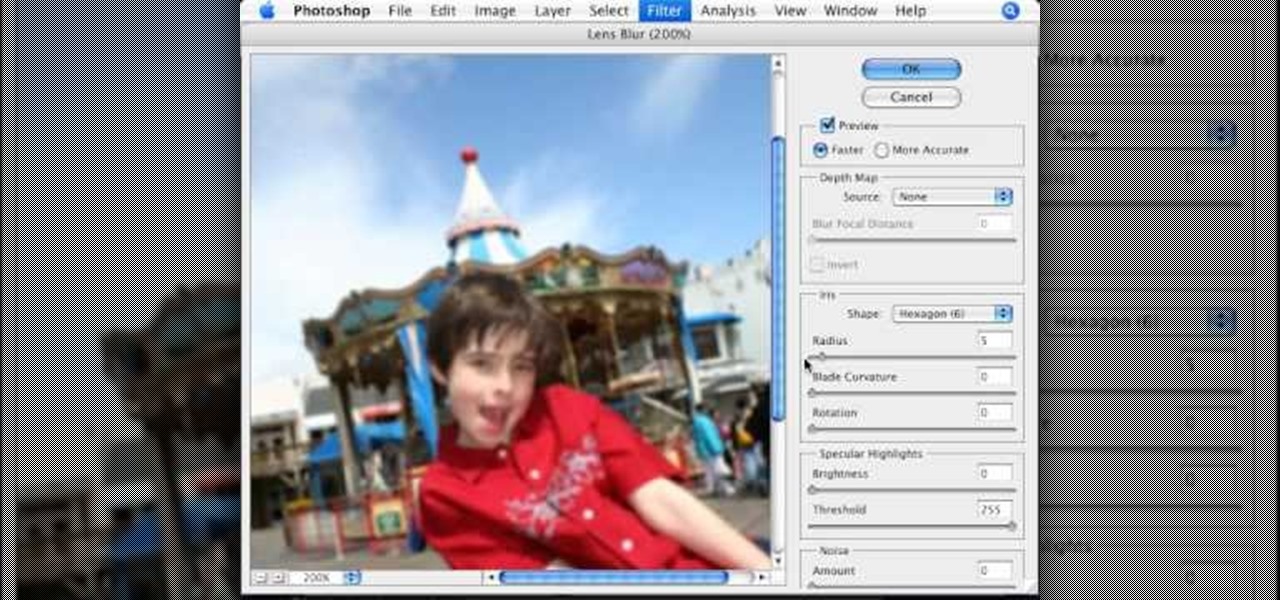
This video tutorial, by photoshopuniverse, shows you how to reduce the depth of field after a photo is taken using Photoshop. This enables you to ensure that your main subject is clearly in focus while the background is out of focus or blurry. First duplicate the layer using the short cut that was mentioned and apply the filter lens blur to the new layer and adjust the radius so that an adequate amount of blurring is achieved. Add a layer mask and bring the subject to focus by selecting the b...
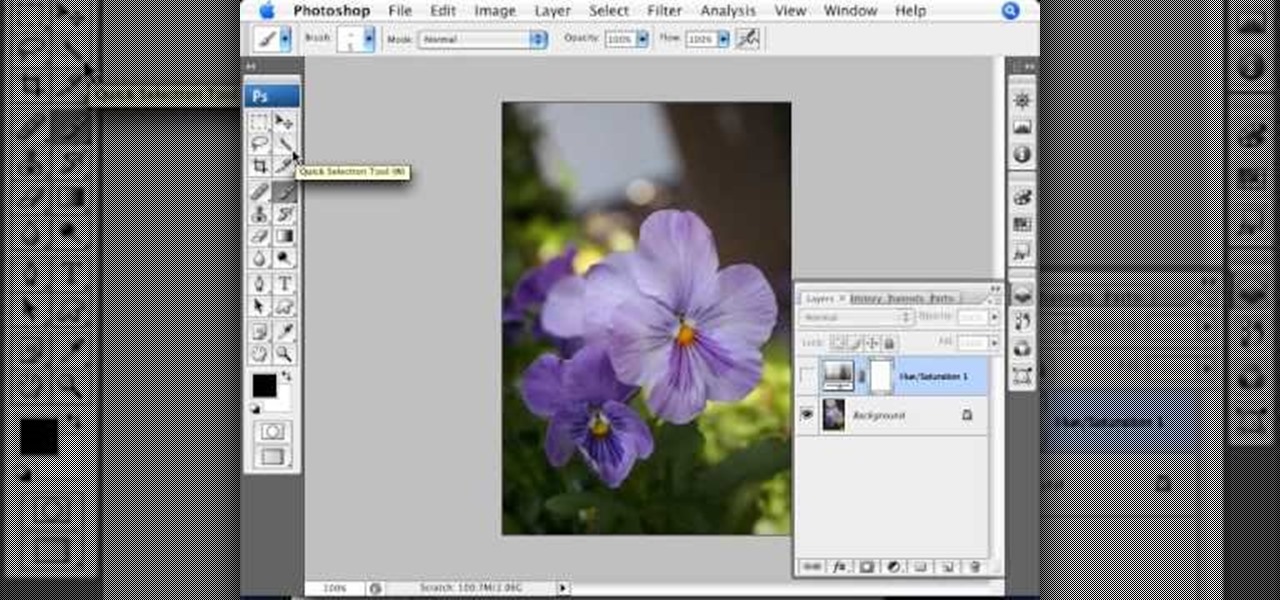
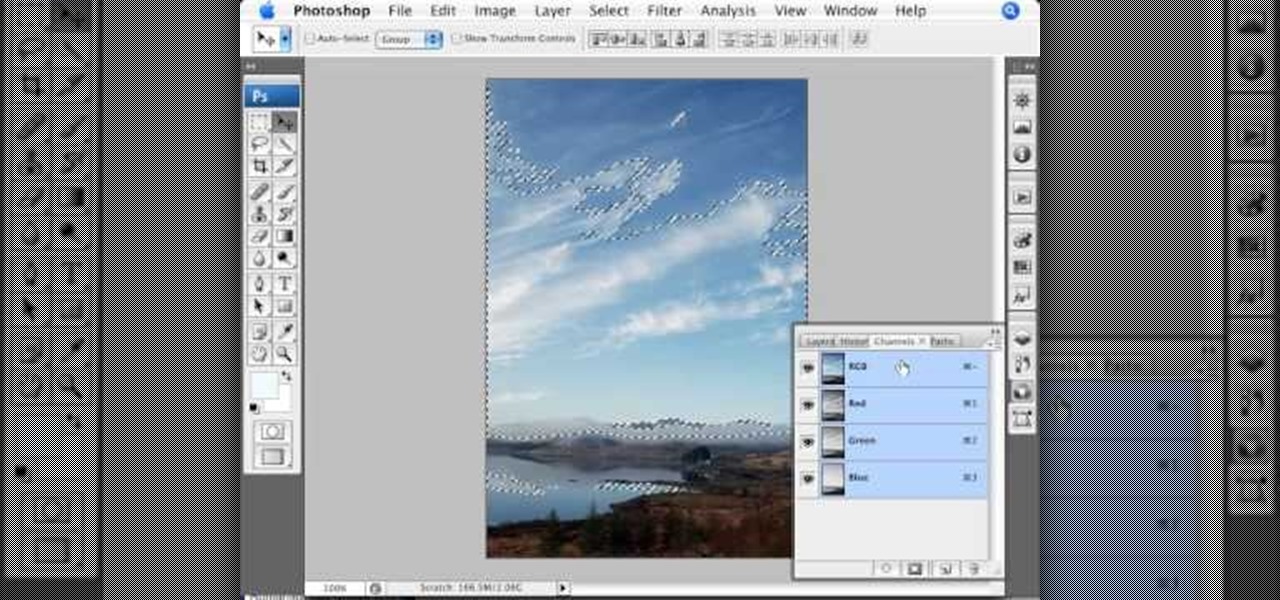
This video is about using a luminosity mask in Photoshop. The luminosity mask is used to enhance the color and contrast in photos that lack each of these. The color is enhanced or punched up. Choose the manipulation tool: channel and RGB. To choose RGB, touch control and then select RGB. Select the 100 % white or light parts of the photo, it will not select the darker or black images. Copy the light parts of the image by using control J. Choose to copy the lightest parts by selecting overlay ...
The video is basically about how to modify the focal point of the image. When the image has some stuff on the background and when you want the viewers to focus more on one particular area and making the rest of the image darker, you need to modify the light values of the image, which will be taught in this video. This can be done by just selecting the area, which you need to highlight on the image by giving some border and then add curves. In the curves the area is made darker than the rest b...
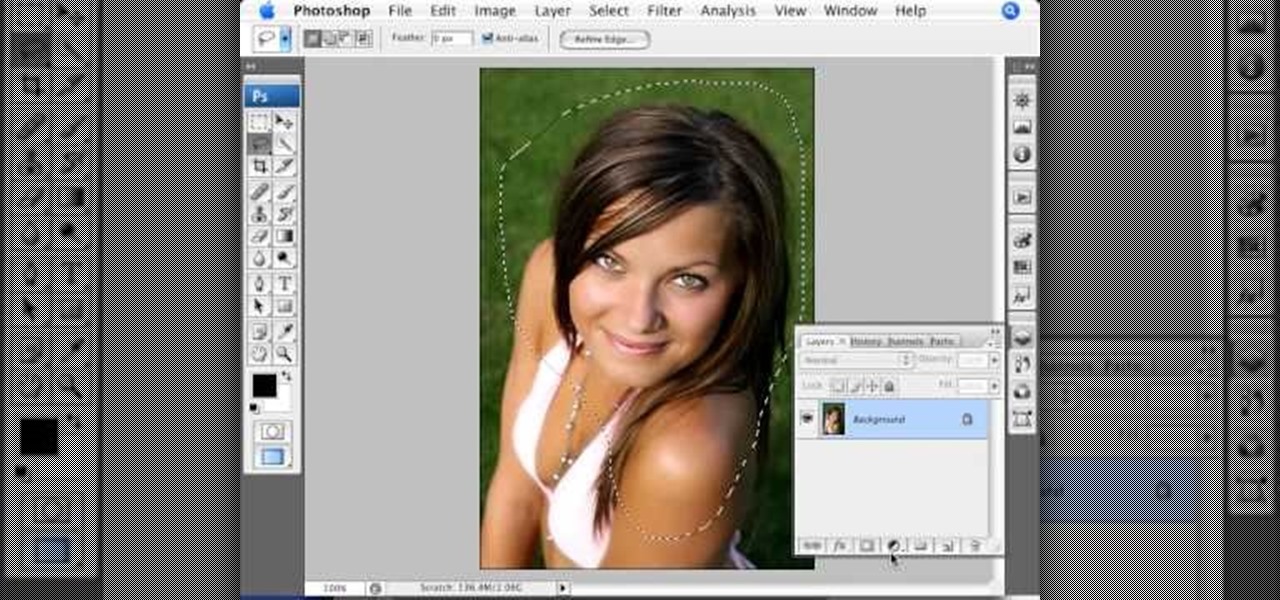
This video explains how we can have a smooth skin in the pictures using Photoshop tools. The healing brush tool is used to delete all blemishes, red spots or black marks from the skin in the photo. While doing this it is important to select smaller portions and then go ahead instead of selecting bigger portions of the skin. Later the median filter is used so that the smoothing is just optimum. This actually helps in getting the right image specially for close up photos.
Topiaries are no longer just speciality plants. They have become very popular and are showing up in garden centers and nurseries across the country. Topiaries have been used for thousands of years, in places like Babylon and England. Today we take the mystery out of topiaries and discuss pruning trees and shrubs to look like geometric forms. As well we talk about designing topiaries, selecting the trees and shrubs and maintaining them to look their best and show you how to create small topiar...
Are you tired of crying and having puffy eyes after cutting a large onion for dinner? Learn how to spice up any dish with a nice mild shallot, without the tears. Shallots are similar to onions and just as flavorful.
Second Class Boy Scouts work on building their outdoor survival and camping skills. Compass work, nature observation, camp tools, and swimming are areas where new skills are mastered and demonstrated. A second class scout, having completed all the requirements, should be able to lead a hike, care for his own equipment, set up a campsite, and perform basic first aid.
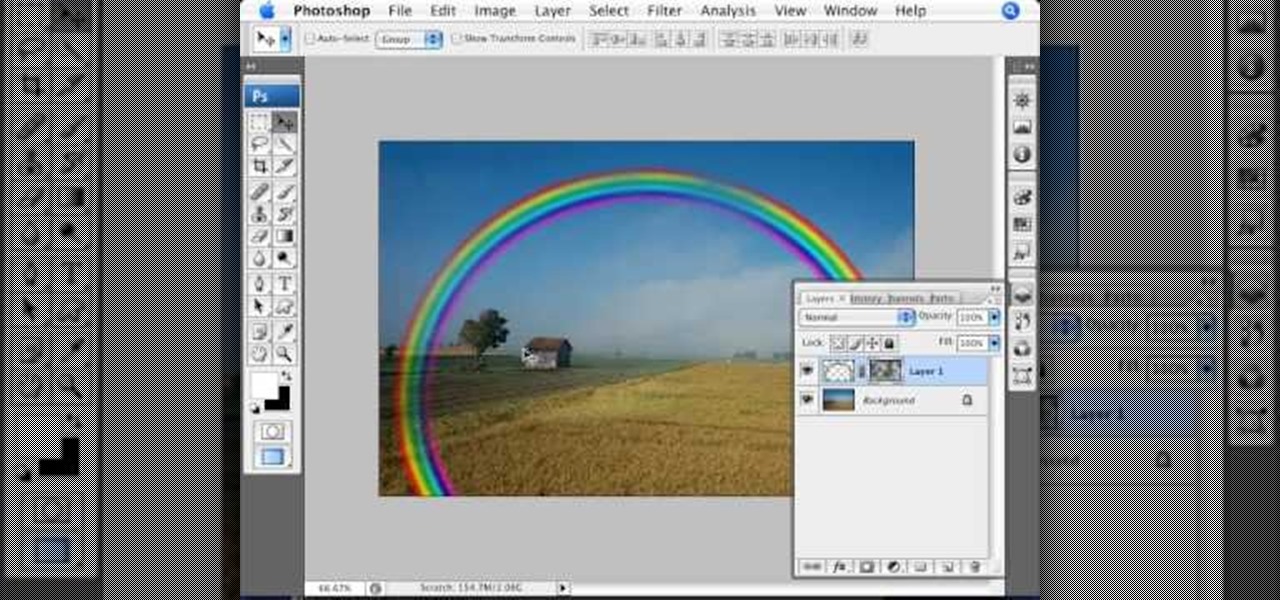
Open the picture you wish to place a rainbow within. A good scene has clouds that are receding into the distance and the light angle coming in from the front of the scene. A rainbow effect appears when by the sun is shining from behind you into the mist-filled air where it is refracted by raindrops.
This video from photoshopuniverse shows us how to make your picture look like it's a puzzle by using Photoshop! First you want to open up the layers palette and duplicate the layer. Now add a new layer and bring it down to the middle and fill it in with black. Now to get the puzzle into place, go to Filter---Show Menu Items---Texture---Texturizer. Click the arrow to load texture. Load in puzzle texture. Now you can set the scaling to however many puzzle pieces you want. He put it at 75% and t...
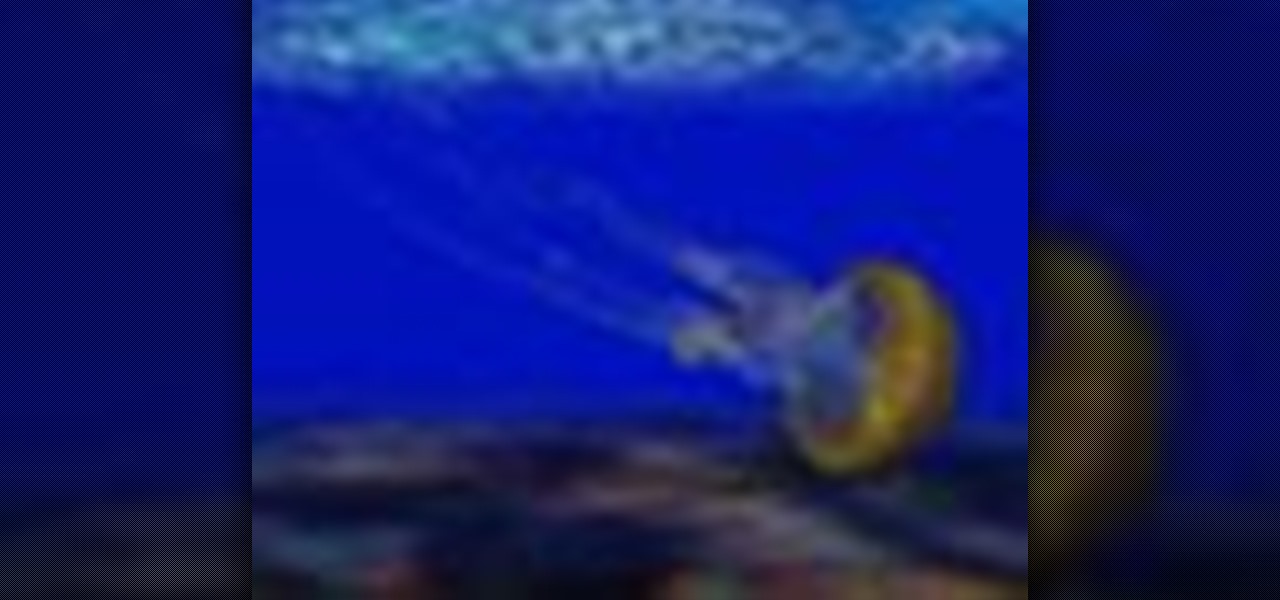
Pixel Perfect is the "perfect" show to help you with your Photoshop skills. Be amazed and learn as master digital artist Bert Monroy takes a stylus and a digital pad and treats it as Monet and Picasso do with oil and canvas. Learn the tips and tricks you need to whip those digital pictures into shape with Adobe Photoshop and Illustrator. In this episode, Ben shows you how to create a jellyfish environment in Photoshop.
This 5 minute video covers the basics of photographing architecture using Nikon equipment. It gives good basic explanation of basic lessons in architecture photography, including selecting a proper position and distance to either provide or avoid distortion as desired, selecting the proper lens, selecting the film speed for indoor photographs, and how this may affect your choice to use a triPod, and even how to use Nikon's software to correct or adjust photographs after they've been taken. If...
This video will show you have to make a glass bar in Photoshop. Adobe Photoshop is a great program for manipulating photo and adding interesting effects to your pictures. The glass bar is distinctive because of it’s colored shading.
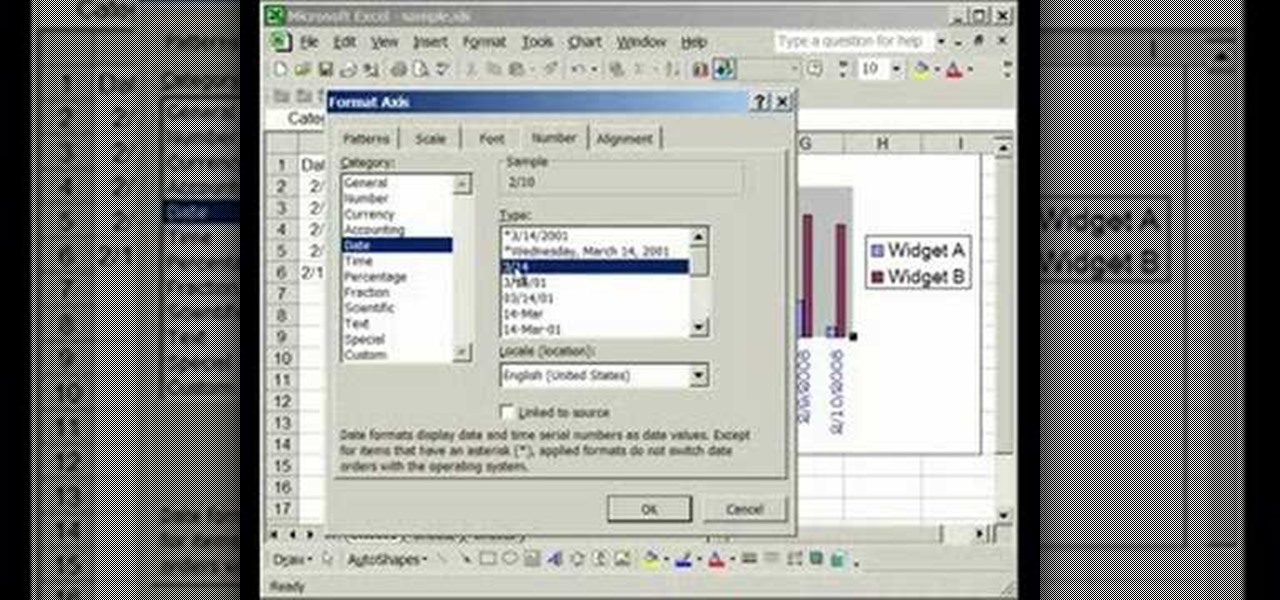
This video is about formatting the charts in Excel especially the x and y axes. The video begins by selecting a chart and right clicking the dates at the bottom of the data points. The format axis window pops up and by making changes to the style, color and the weight of lines given in the patterns tab, you can change the way the x-axis looks like. You can also change appearance of characters appearing close to the x-axis by selecting options in the font menu. You can also change the format o...
Learn how to make an animated GIF from a video clip using Adobe Photoshop CS4. You'll need to use an external editing program (like Sony Vegas) to create a small clip from your larger video beforehand. From Photoshop, go to "File" and select "Import" and then "Video Frames to Layers" from the pop-up menu and select your video clip. Choose "From Beginning to End" when prompted about range to import. The duration of the video clip will now be displayed in frames. By default, each frame is set t...
In this video the instructor shows how to user printer options in Microsoft Word 2007. To do this go to the Microsoft button and click it. Form the drop down menu select the print option. Now you are presented with the three options of Print, Quick Print and Print Preview. Print is used to directly send documents to the printer by selecting the necessary settings. Quick Print is used to quickly send the documents to the printer using the default settings. Print preview is a useful way of seei...
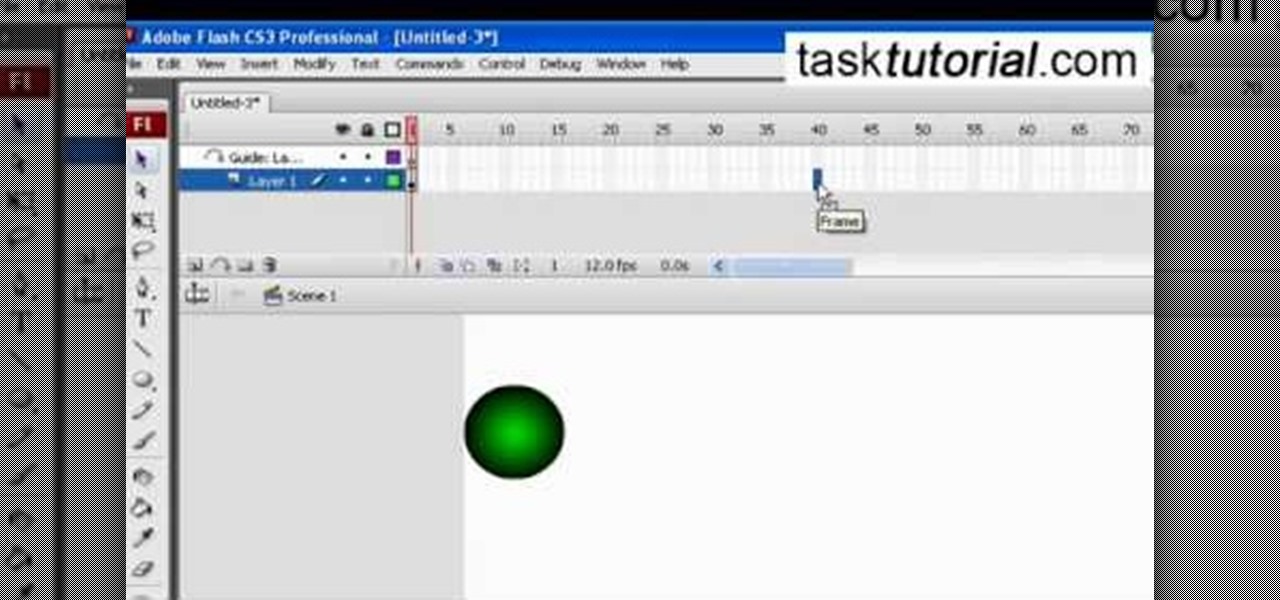
This tutorial video, from tasktutorial demonstrates how to create animation using the motion guide function in Flash. You will learn how to create an object, in this case, a ball, and create an animation that makes it appear to bounce. The guide shows you, how to add a motion guide by selecting a key frame and drawing it in. Then you will learn how to snap the object to your guide line, and add motion to it by selecting another key frame between the first and last frames, and snapping the obj...
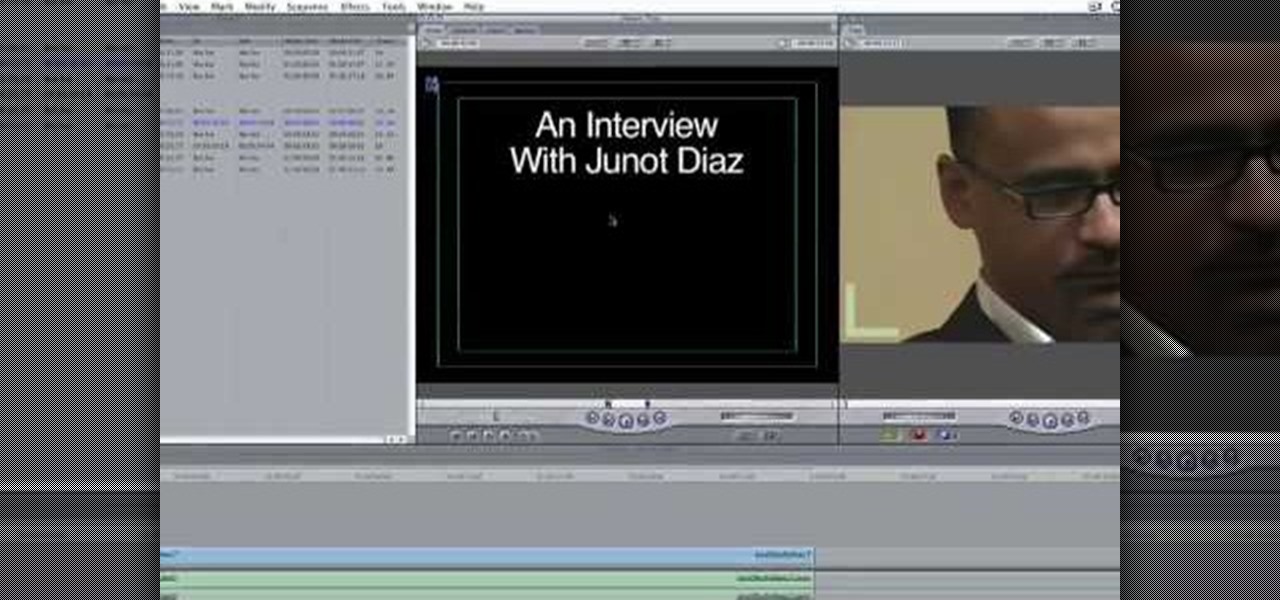
In this how-to video, you will learn how to add text and titles to videos using Final Cut Pro. First, place a time line play head where you want the text to appear. Move the mouse to the lower right corner of the viewer window and click the add text pop up menu. Select text and the viewer will change to a black box with Sample Text in the middle. Click on the tab labeled Controls. You can edit the text in this new window. You can move the text by selecting Image and Wire Frame. This will allo...
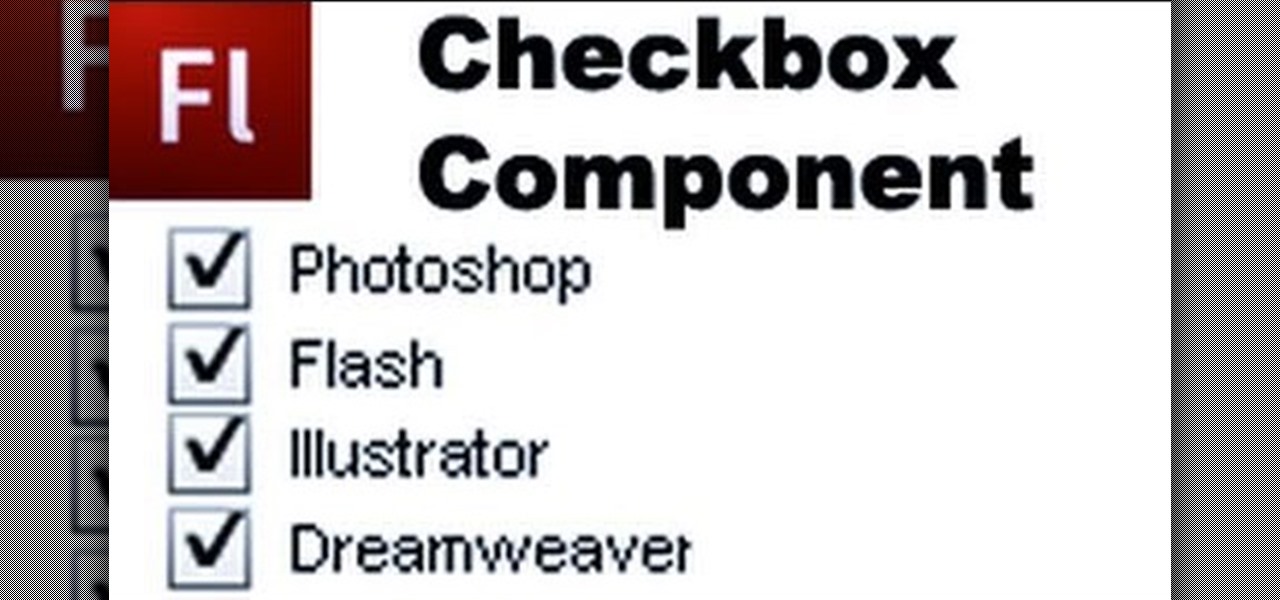
Checkboxes let users to your site select or deselect items in a list (such as adding products to a shopping cart or selecting multiple answers to a quiz or poll). This tutorial shows you how to build and incorporate checkboxes to your website or other Flash project.
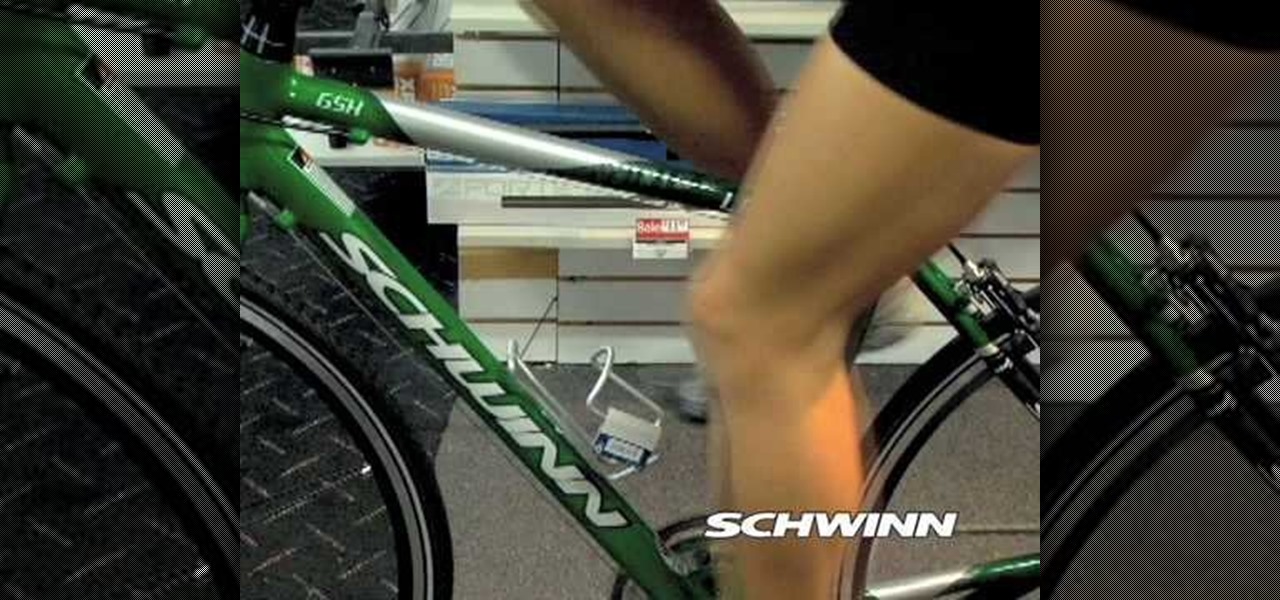
Jessi Stensland, professional triathlete, explains how selecting the right bike can mean the difference between a comfortable ride and possible neck, back, knee or shoulder pains. Stensland first takes us through finding the right bike size with charts such as those available on Schwinn bikes. After the right size is determined, riders should determine the proper fit by adjusting their bike's handlebars and seat. Lastly, Stensland instructs bike riders on how to choose the proper saddle.