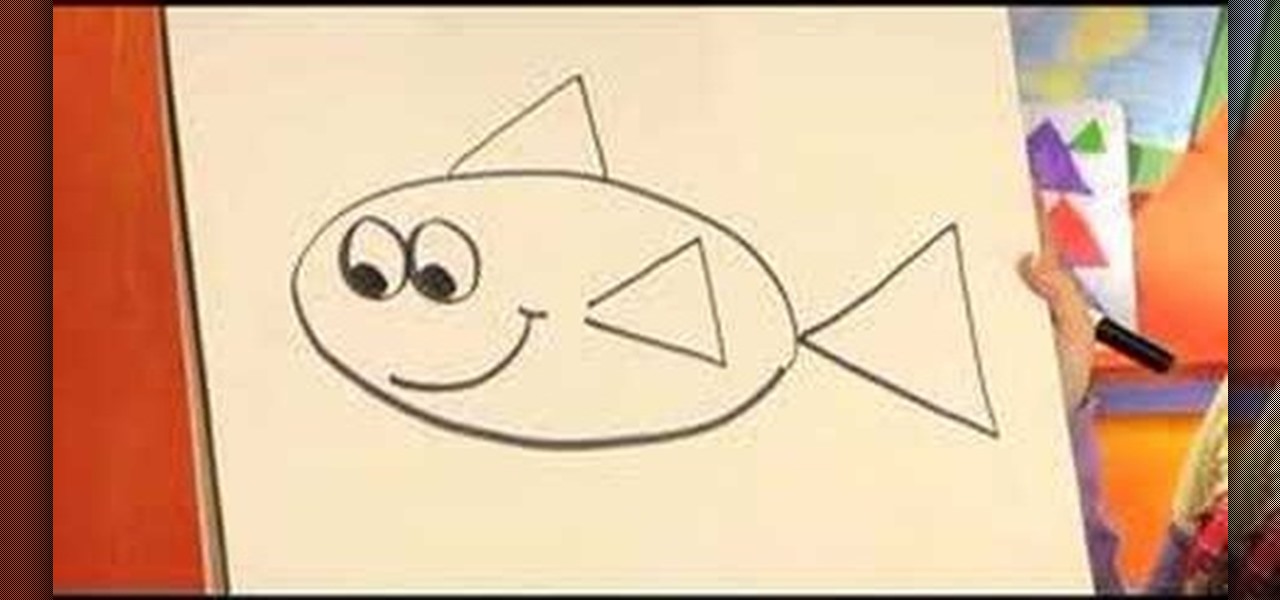
This video shows the viewer how to teach their children to draw a cartoon style fish. The video is literally a tutorial showing a young woman teaching a group of children. She does this by using simple shapes, which children already know how to draw, to build up the bigger fish. She starts with an oval shaped body and a tail. She then adds two eyes and a line for a mouth before finishing with fins and stripes. Finally she colors her fish in before showing the children’s efforts.
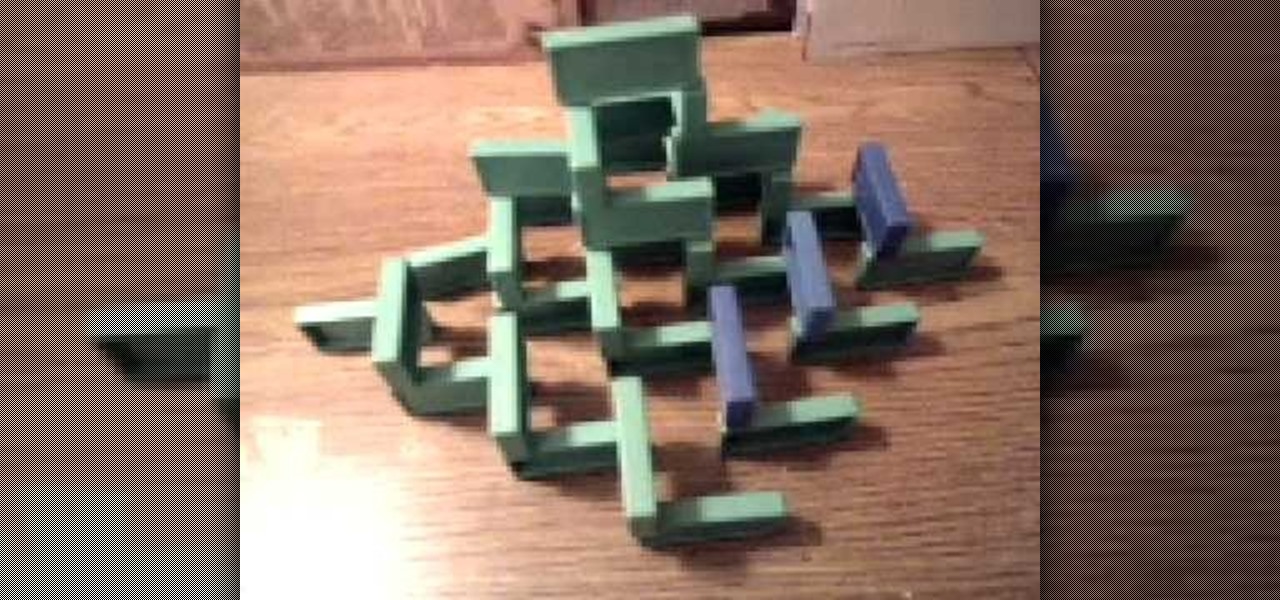
This shows you how to easily construct a 3D domino pyramid. First, line up your dominoes on their sides in a zigzagged diamond-shaped pattern. Then, stack dominoes on the left side facing vertically-going from one to another-on all the dominoes except the three in the top left side of the pyramid. Continue to build this way, moving up and alternating in placement in the middle of the diamond. Finally you'll work your way up to one top piece. Then you add a row of dominoes around the outside t...
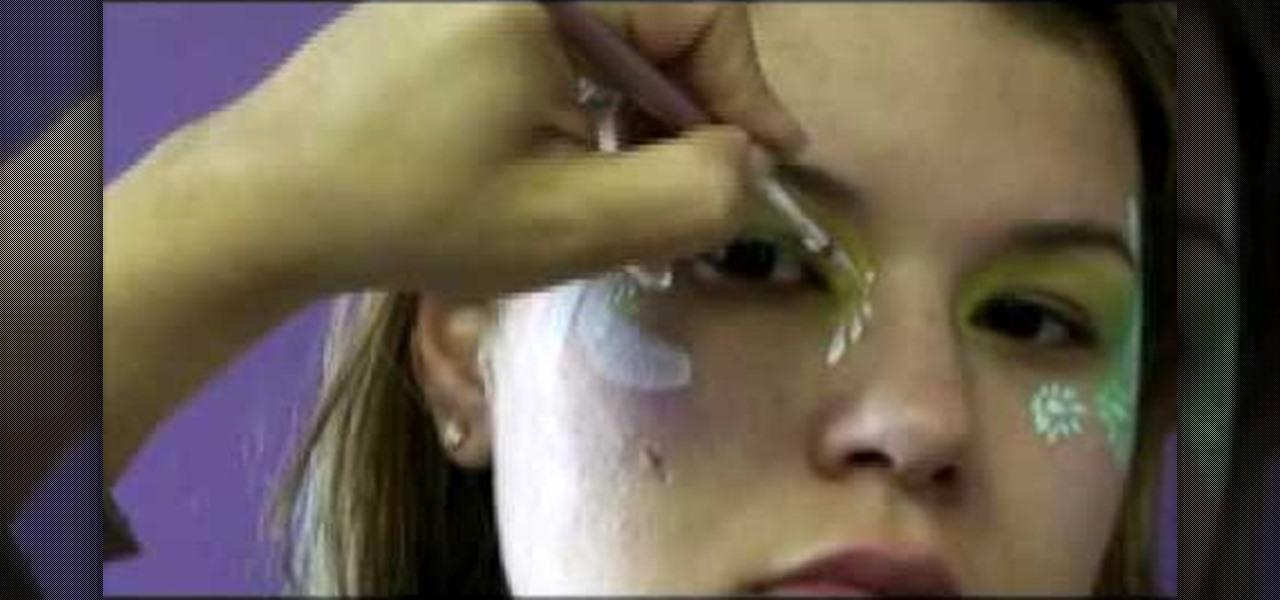
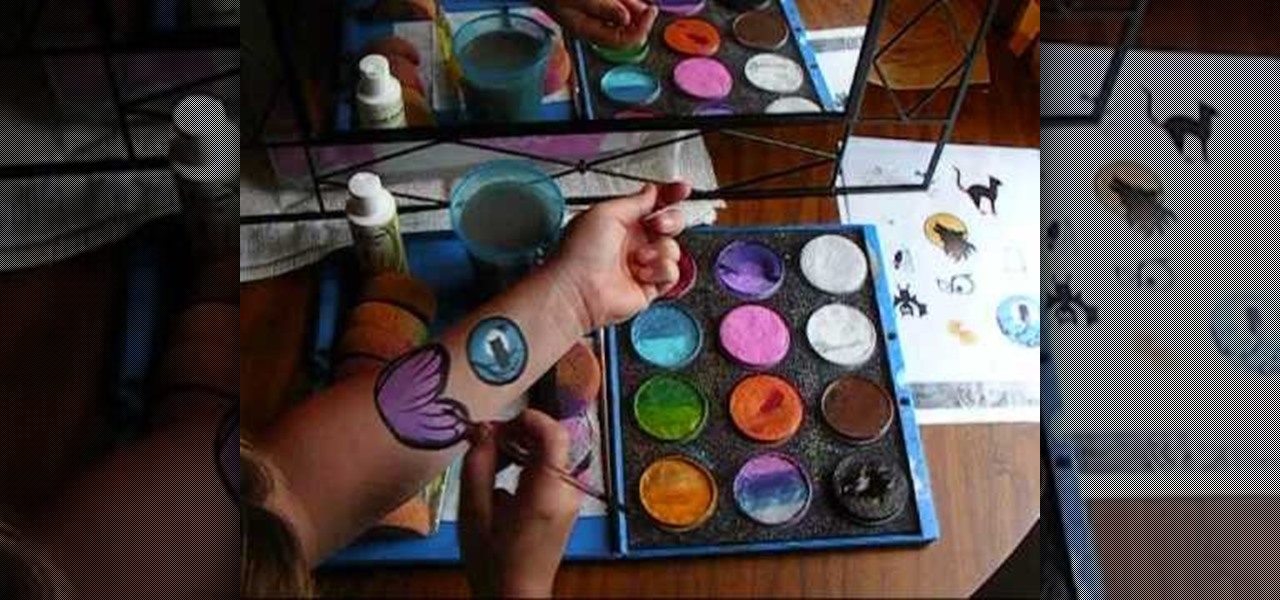
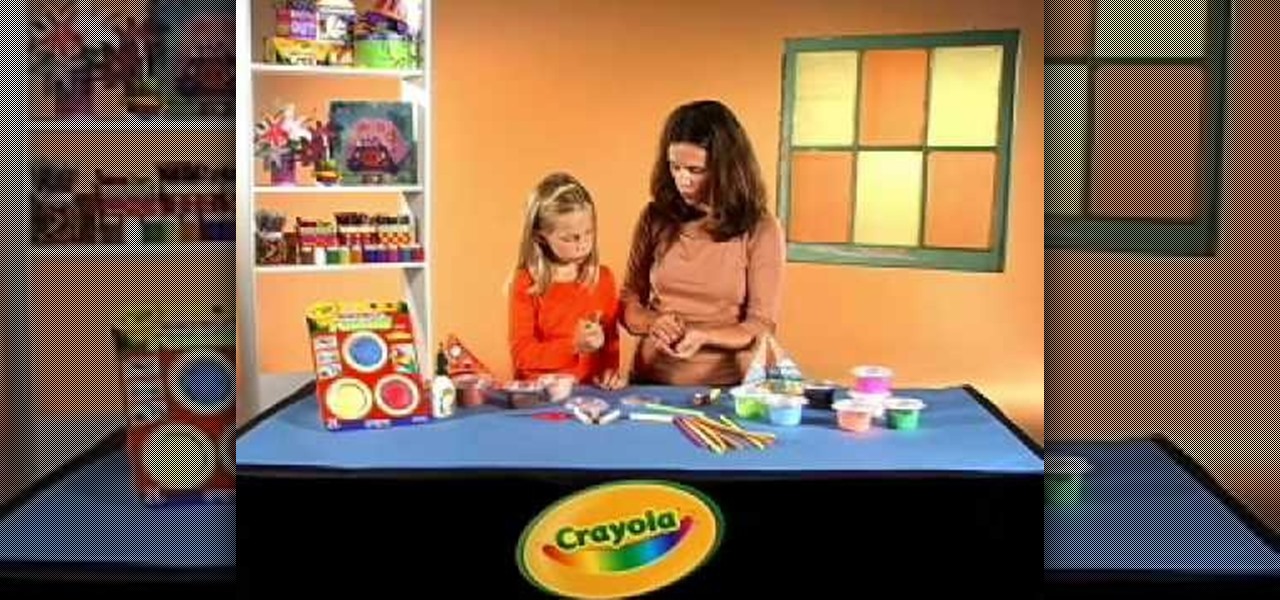
Check out this step by step video to learn how to face paint tear drop flowers. Great activity for kids.

Four glass marbles can make this amazing physics toy. It's like a top, or dreidel.
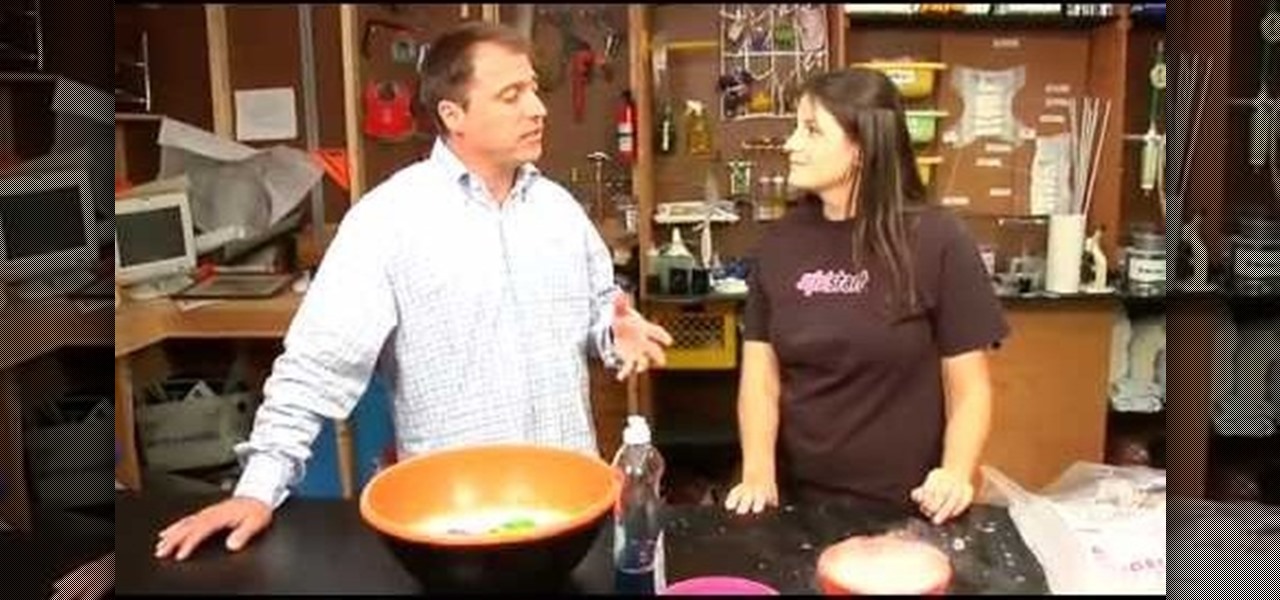
Usually our 5-Minute Projects involve soldering and LED lights and other such electronic accoutrements, but this week we decided to skip the fancy stuff in favor of an old-school science project: making rheopectic slime from Borax and glue. This is a pretty safe experiment even for kids--just make sure to do it with parental supervision and keep the Borax, slime, and any fingers that have been touching the aforementioned items out of eyes, noses and mouths.
Kipkay shows you how to make play dough. You use two cups of flower, two cups of water, one cup of salt, two tablespoons of vegetable oil, and one tablespoon of cream of tartar. Stir over low heat until the dough clumps, knead the dough, separate the dough into four balls, and then add food coloring.

Involve your children in Thanksgiving this year by letting them decorate and set the 'kids' table' this year! Here are a few ideas to create a fun and kid-friendly table setting that you can put your children in charge of this holiday season!
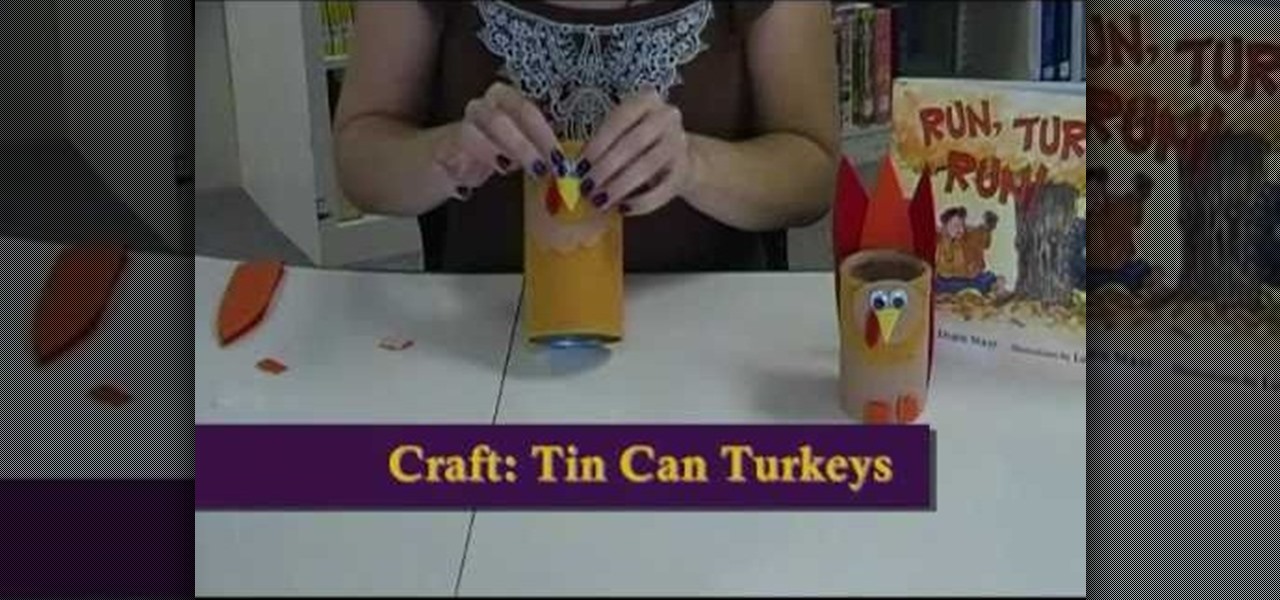
This tutorial shows you how to make some fun turkey crafts with your children. For young children, you can make a colorful turkey out of a paper cup, some paint, glue and construction paper. For older children, you can create a tin can turkey out of felt and some hot gule.
In this video, we learn how to mow to Make a Dry Ice Crystal Ball! This is a fun activity you can do with your kids and that you will enjoy as well. To start, you will need to take some Dawn dish soap that doesn't have soap and isn't anti-bacterial. After this, put this in water and add rags into it. Swish it around to make the water bubble up. Now, grab a smaller bowl and fill it with water. Then, take another bowl and put dry ice in it using a glove. Next, Now, drag the rag over the top of ...
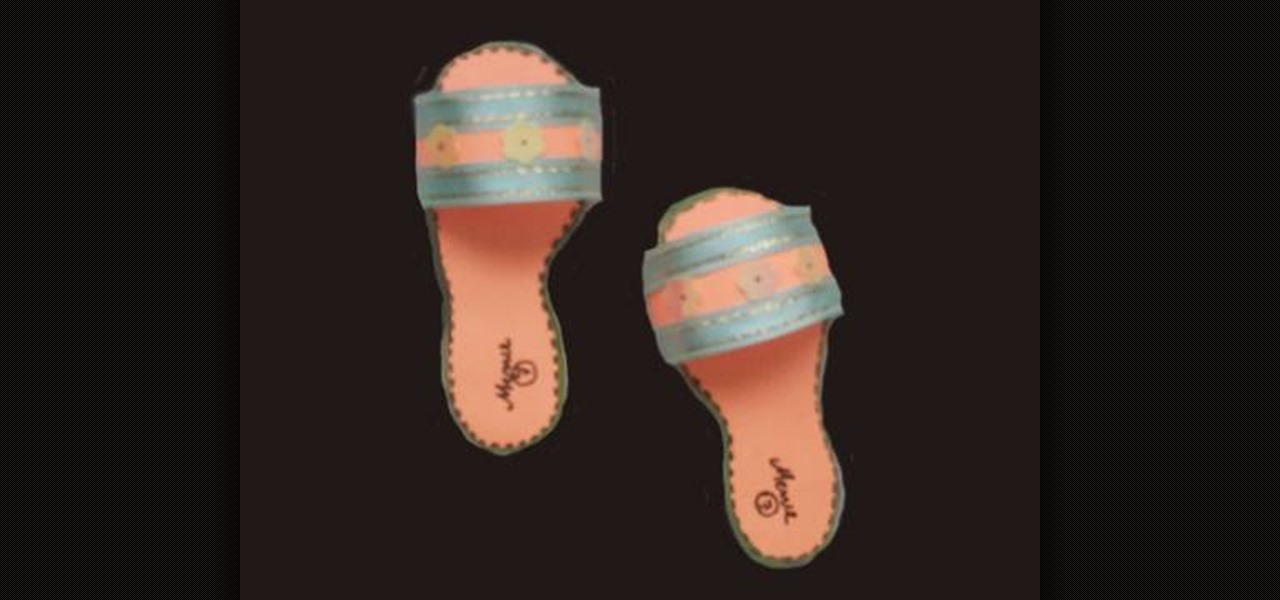
This is a fun craft to do with your child which teaches them how to make a Turkish-style pair of slippers. All you'll need is some colored cardboard, decorative ribbon, glue, scissors, colored markers and a few decorations to put on the shoes.
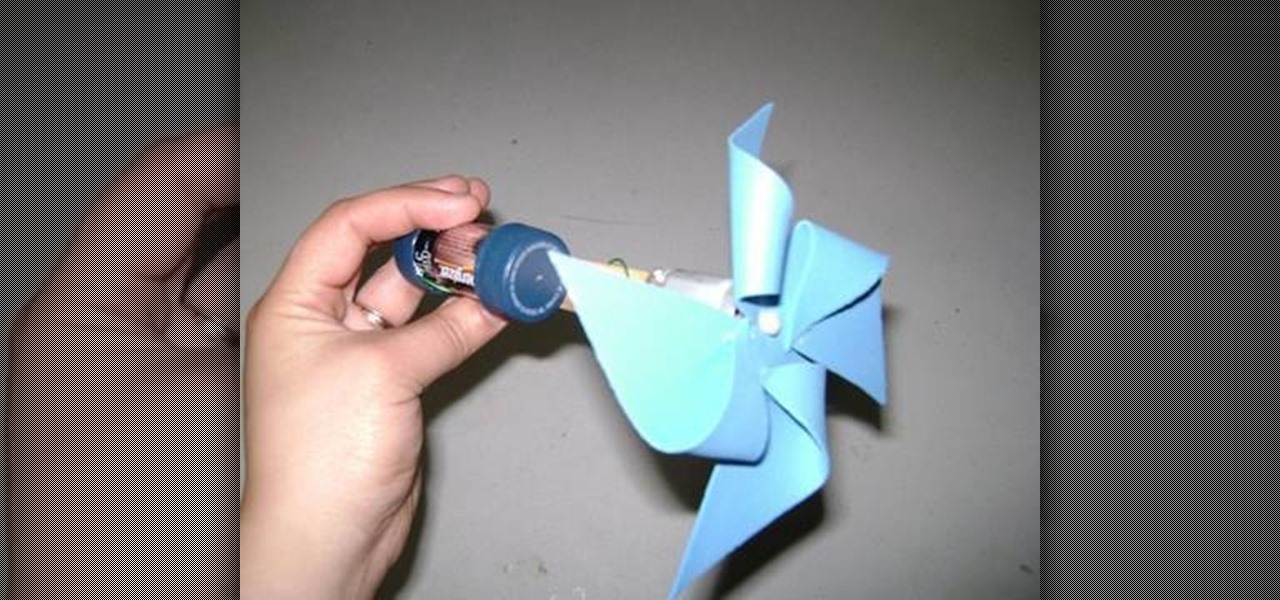
Here's another fun summertime craft for your budding engineer - make a spinning paper pinwheel or fan! You'll need a C-battery, a toy motor, two soda caps, a popsicle stick, foil paper, copper wire, a small sheet of foam, a sharp pencil, a hot glue gun and some safety scissors.
In order to face paint flowers and butterflies, you will need the following: metallic white, pin, a sponge, a paintbrush, green paint, glitter, yellow paint, purple paint, and blue paint.
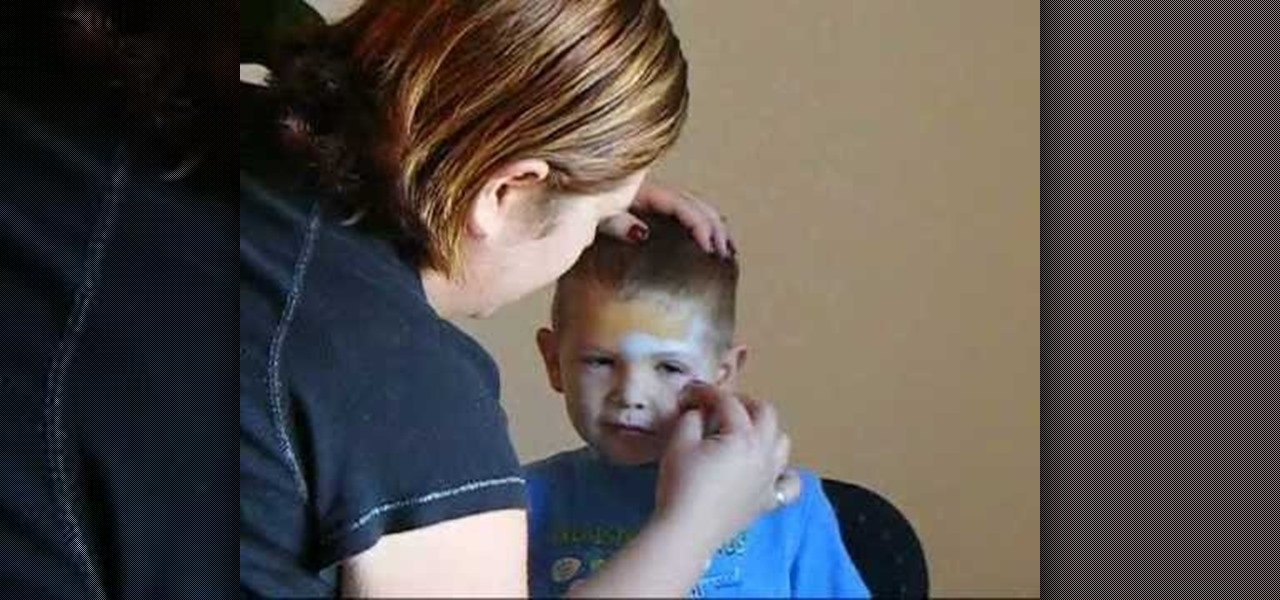
In this video, we learn how to mix face paints with water. First, you will dip your brush into water and then dip it into the paint color you want. Now, paint on your body where you want that color to do. When finished, place the brush into the water and swish it around until clean, then dip the brush into a new color and continue painting on your body with new brushes, cleaning them as you go. To use a sponge, dip the tip of the sponge into the water, then rub it into the paint color you des...
In this video, we learn how to do Batman face paint. First, you will need to apply a metallic silver paint to make a mask Batman design around the eyes. Next, use a fine tip brush to paint black for the outline around the Batman design. You may need to have the logo printed out by you so you know how to paint it. Next, draw a circle around each of the eyes, then you will have the completed Batman face paint! This is great for children and is extremely easy to do. This is great for parties and...
In this video, we learn how to face paint a snake design. First, dip a paintbrush into dark green paint and place it on the forehead. Bring the brush down in a snake shape until you reach the cheek. Make a lump at the bottom of the snake followed by a small line for the tail. After this, dip a different brush into white and make a small dot on the face to make eyes, then make two teeth fangs. Also fill in the bottom to make the rattle on the bottom of the tail. Next, use red to make a snake t...
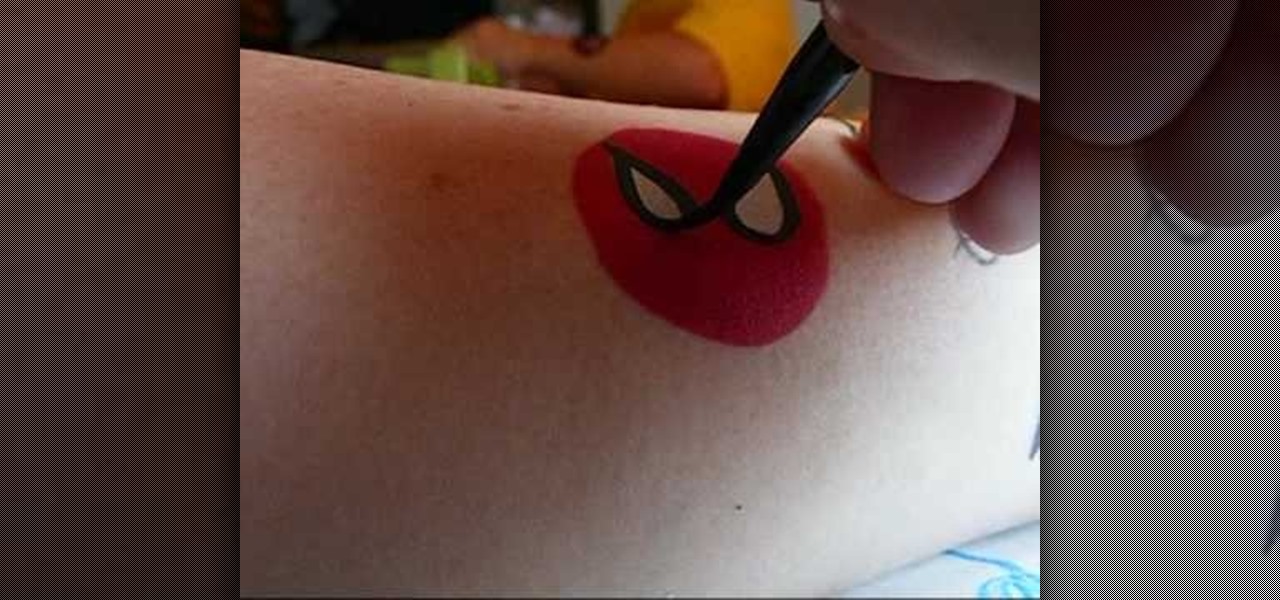
In this video, we learn how to make five easy face or body paint designs. First, to make a shooting star, grab a sponge and apply your paint to the edge of it. You will want to paint three colors next to each other on the edge of the sponge. Now, drag this across the skin and make a point at the end, then paint on a star. Next, to make a flower you will paint four hearts that are all touching with their points in the middle, then paint on leaves by swiping the brush sideways. To paint Spiderm...
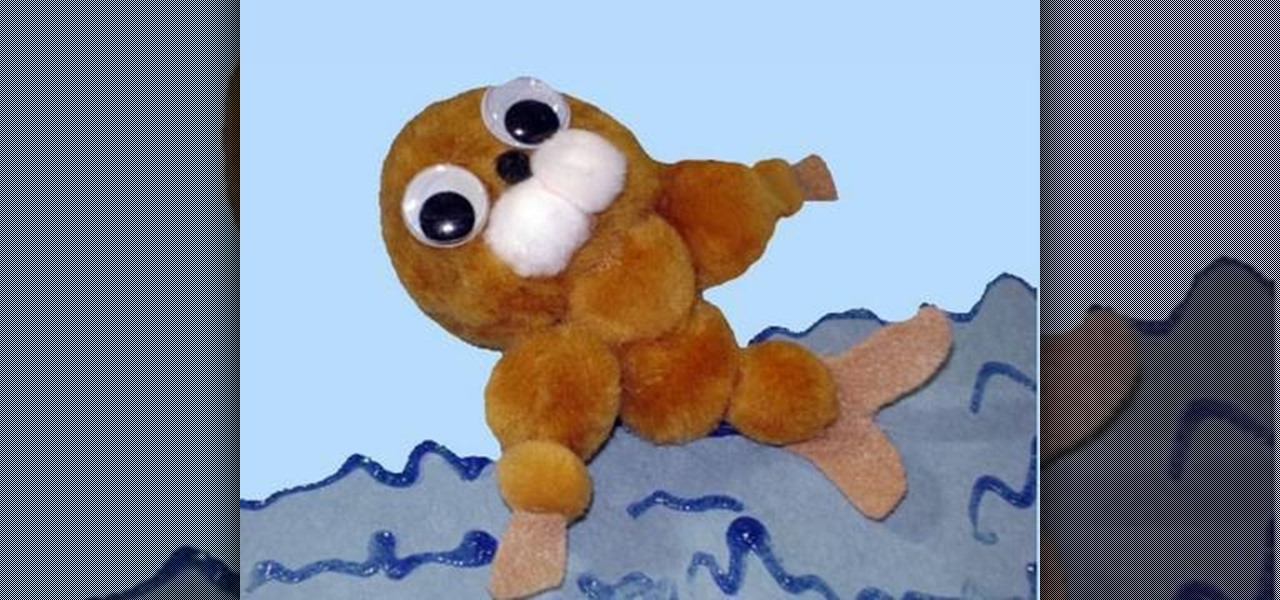
In this video tutorial, viewers learn how to make a pom pom seal. The materials required for this project are: 1 large brown pom pom, 4 medium brown pom poms, 3 small pom poms, 2 white pom poms, 1 small piece of brown felt, 2 googly eyes, glue and scissors. Begin by gluing the brown pom poms together. The large pom pom is the head, 4 medium pom poms are the body and 2 small pom poms are the hands. Then glue the 2 white pom poms and mini black pom pom on the head for the mouth and nose. Glue t...
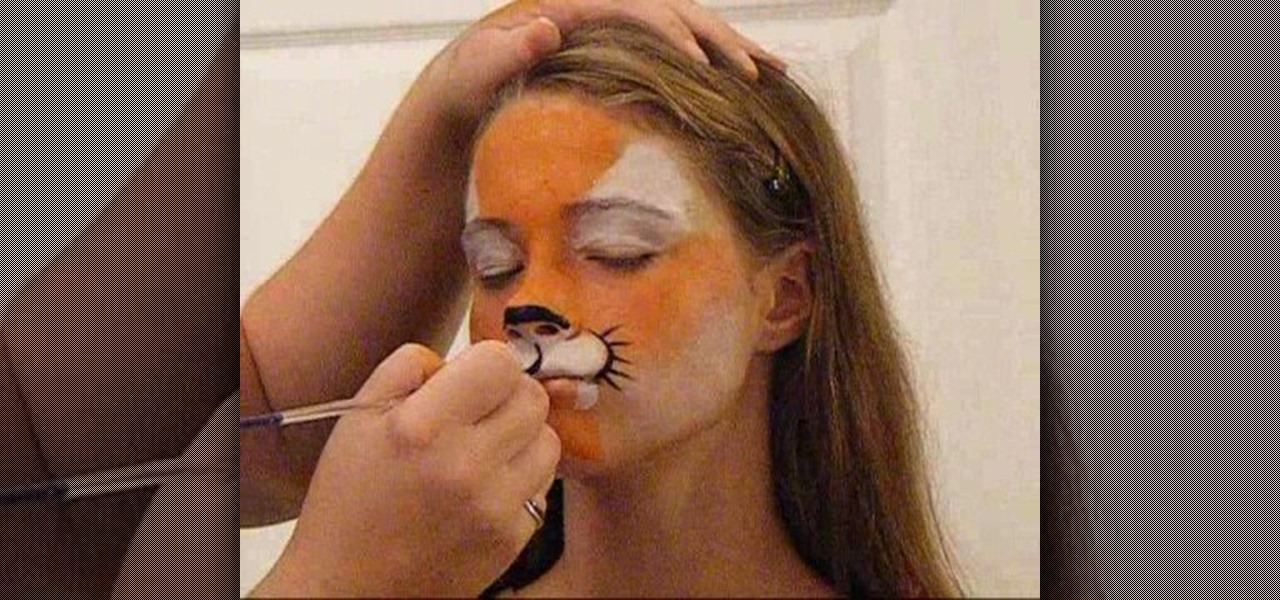
In this video, we learn how to do tiger face paint in two minutes. This is a simple tiger, so it will be perfect for family outings or something you need done quickly. First, use a sponge and orange paint to paint the middle of the face orange. After this, use a sponge with white paint to make the eyes white and the section underneath the nose white. Now, take your orange paint again and paint the cheeks and chin orange. Use the white paint to make fangs on the lips going down to the chin. Ne...
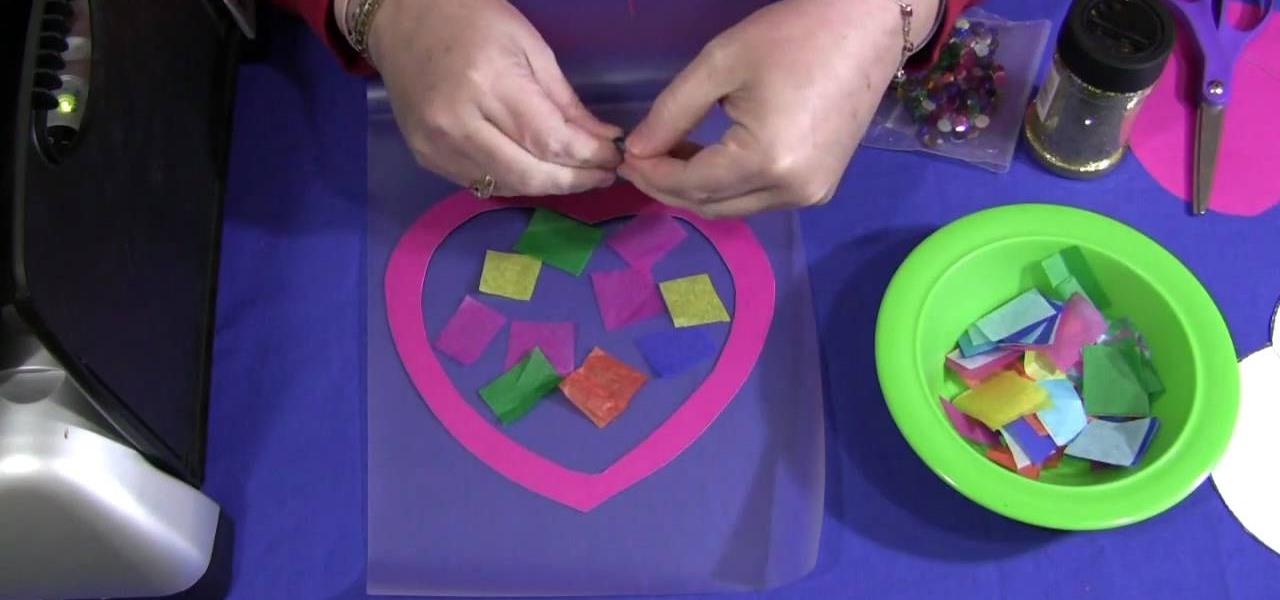
In this video, we learn how to make a sun catcher with your kids. First, you need laminating paper, two paper hearts, and scissors. First, cut the center of one heart out by sticking your scissors in and making your way around the heart. Next, place the outline of the heart inside of the laminating pouch, then decorate the inside of it how you prefer. You can use whatever you want to decorate the inside, including: glitter, crayon shavings, tissue paper, etc. Next, place the paper inside of a...
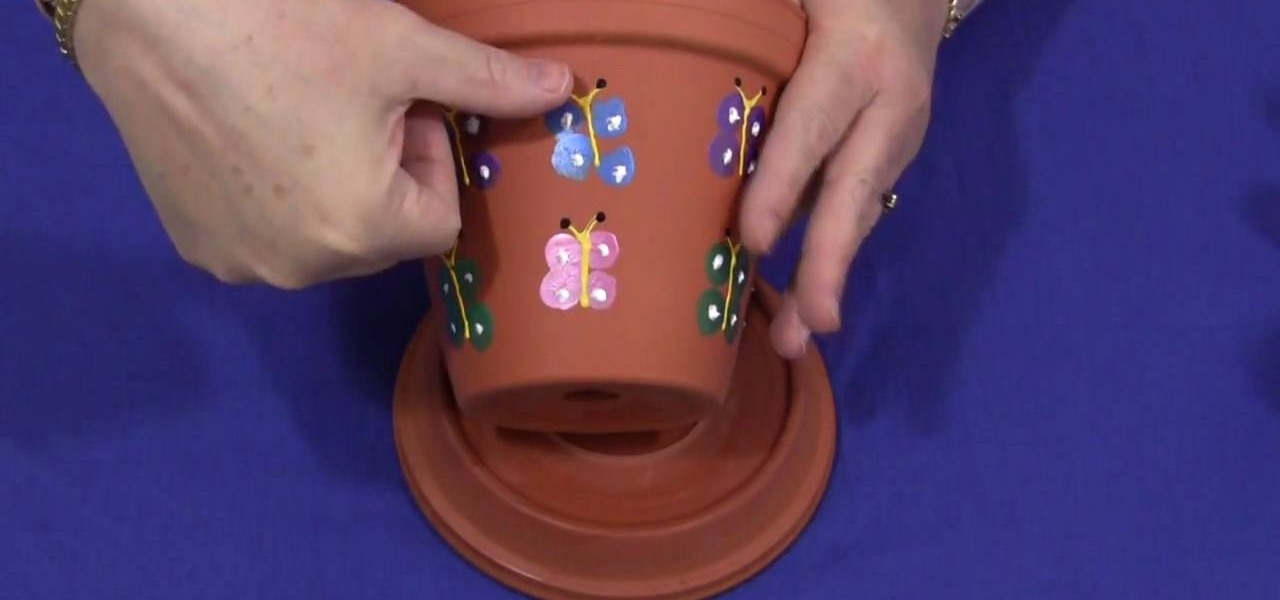
Shelley Lovett teaches us how to make a thumbprint butterfly clay pot in this tutorial. First, start off with a medium sized clay pot and several different colored paints. To make the butterflies, have your kids dip their thumbprint into paint and make a butterfly. Make two thumbprints on each side of the butterfly body. Use a paintbrush to paint in the body and head of the butterfly. When finished, use a sealer to secure the paint on the pot, then let dry completely. You can now use these po...
In this Family video tutorial you will learn how to craft felt frog puppets with your kids. The materials you will need for this are felt (pink, dark and light green), a piece of red lace, 2 large white pompoms, 2 small black pompoms, scissors, glue and marker. Take two layers of dark green felt and draw out the outline of half of the left palm. Fold the felts in half and cut out the outline. Stick the two pieces along the edges to make a glove. Next cut a rectangular piece out of the light g...
In this video tutorial, viewers learn how to make a recycled potato container car. The materials required for this project are: a recycled potato chips, half of a skewer stick, 4 recycled plastic soda caps, glue and a sharp pencil. Users may also need paint, brush and string. Begin by peeling off the label of the container and poke 2 holes on each side of the container. Then apply glue onto 2 of the caps attach them onto the ends of a skewer. Now put the skewers through the holes of the car a...
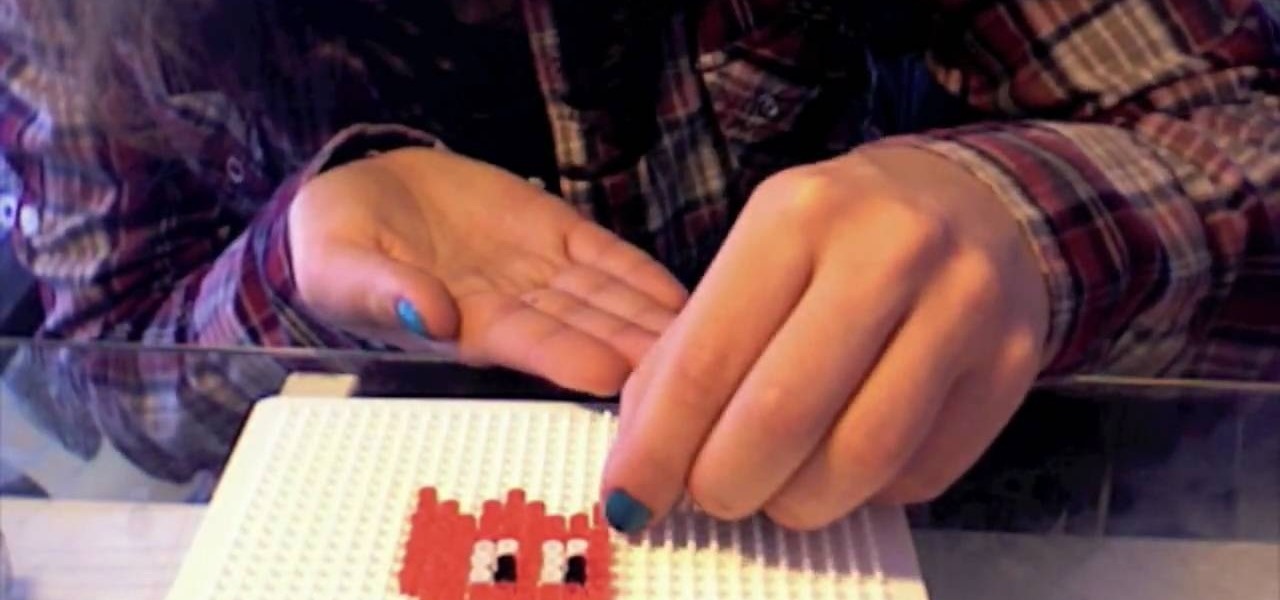
Hama beads are a cool kids activity. In this tutorial, learn how to use these moldable beads to create a Pac-Man style ghost. Once you've put this guy together you can use it as decoration, a coaster, an accessory, a magnet or just a cool paperweight. Have fun!
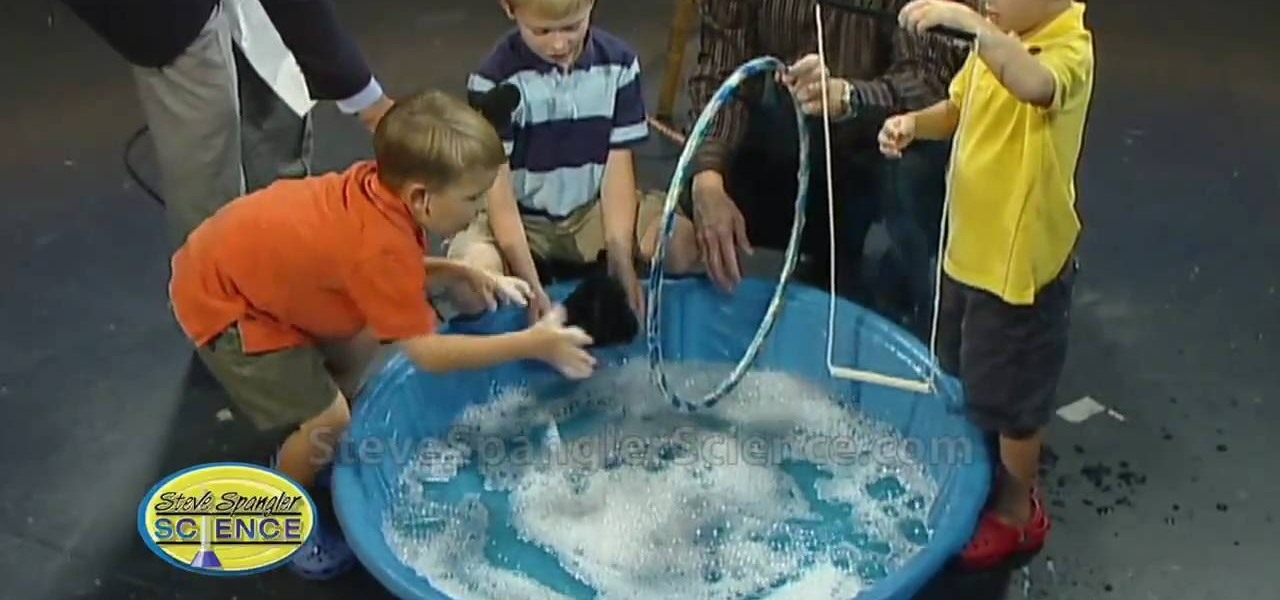
Looking for a fun outdoor activity that will keep your kids occupied all summer? Check out this tutorial!
School's out! What better time to find fun things for the little ones to do than summertime? One fun and timeless outdoor activity is blowing bubbles.
Do your kids love to get messy? What kid doesn't? In this video, learn how to make "goop", a fun way to keep your kids' hands and senses entertained. To make this goop, you will need: Cornstarch, water, and food coloring.
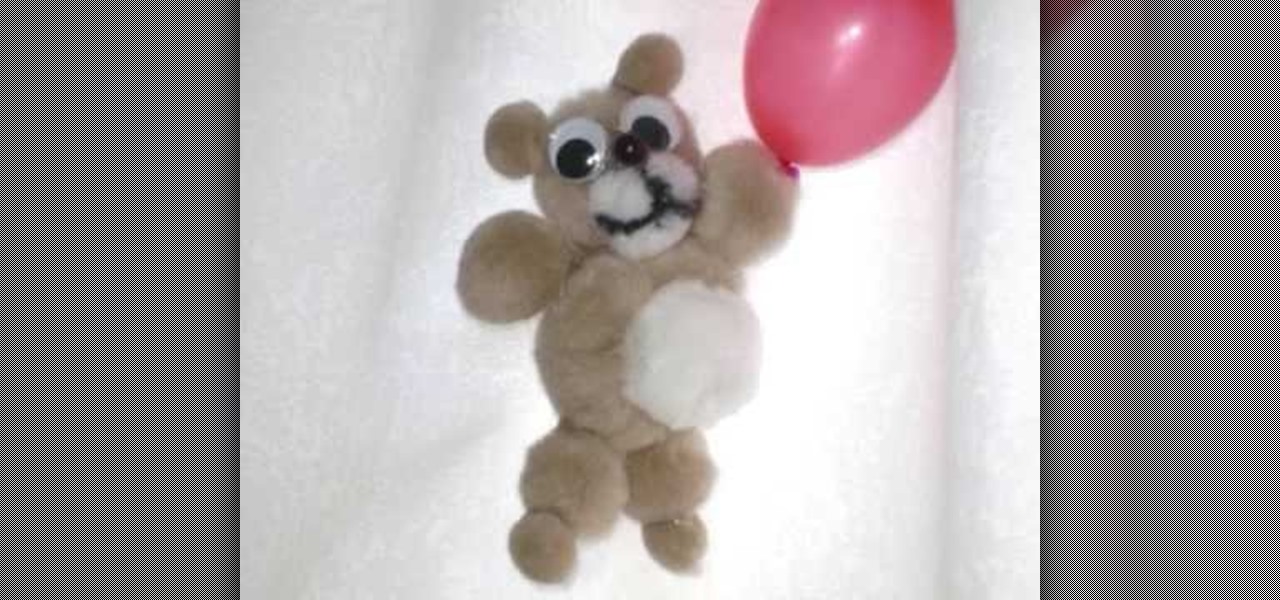
Have fun with your kids this weekend and incorporate an arts & crafts project into your weekend activities! In this Simple Kid's Crafts tutorial, learn how to make a teddy bear out of pom poms, perfect for children kindergarden age and up. Get your children's creative juices pumping with fun arts & crafts projects like this one!
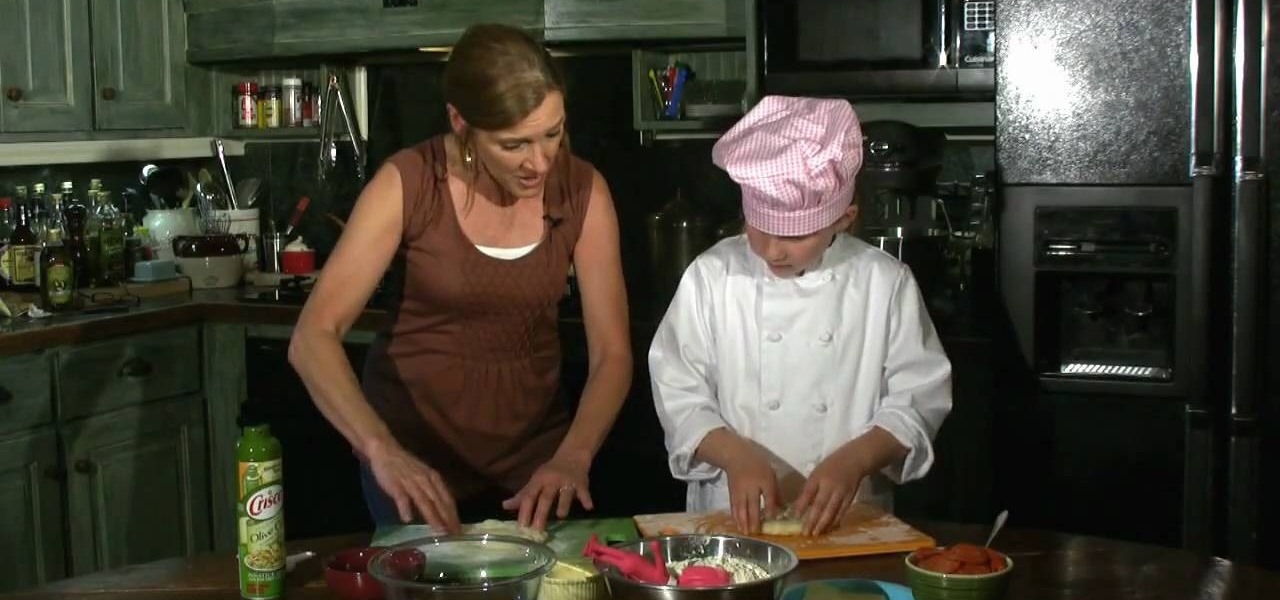
Making bread with your kids can be a fun activity for both you and your young ones. It allows them to feel new things such as bread dough and can introduce to them how some popular foods like pizzas and pretzels are made. This tutorial focuses on how to make bread with your kids fun and enjoyable.
Looking for a creative activity to do with your children? Look no further. In this video, learn how to make adorable "little people" out of clothespins. These clothespin people are perfect decorations for your next family gathering or as one-of-a-kind gifts.
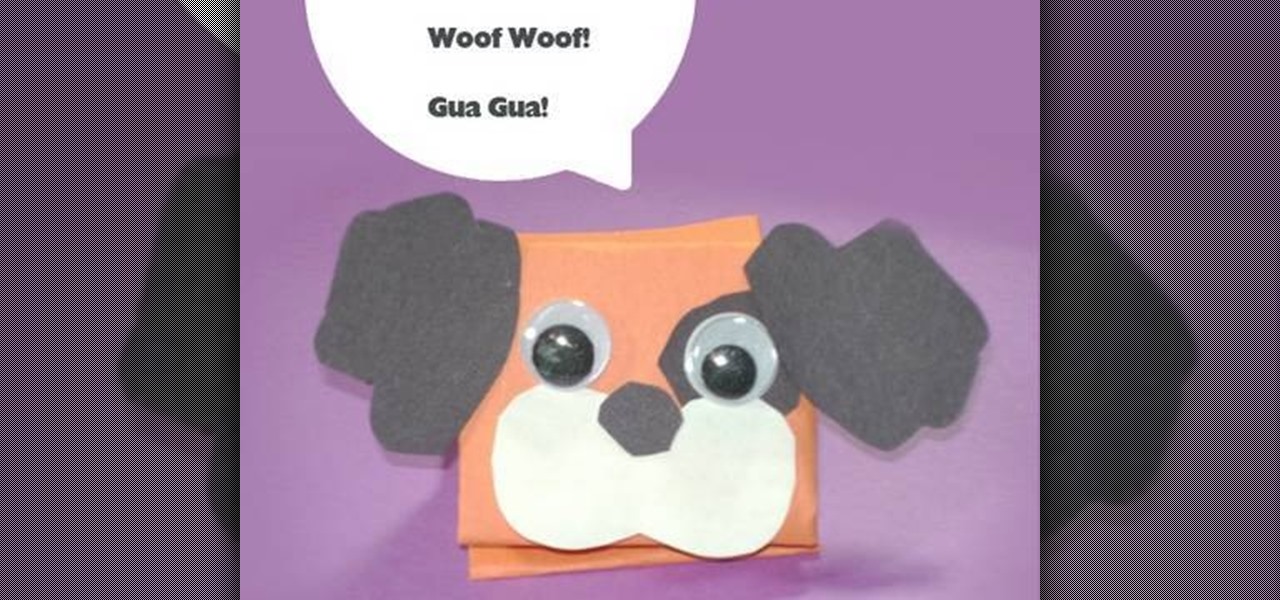
Puppies are one of the most cutest animals out there and the most popular with humans. So why not make a cute puppy made from paper to enjoy for days. This tutorial will show you teachers or parents, how to make a cute puppy dog out of different colored paper. Enjoy!
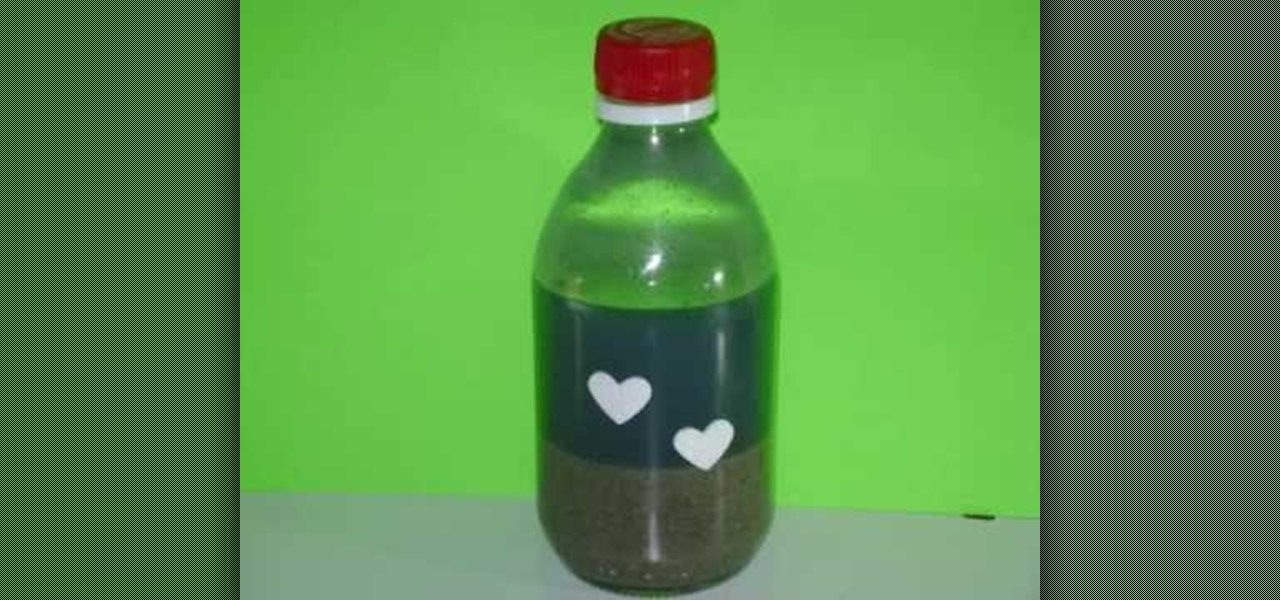
When it comes to keeping your kids entertained, there's nothing like arts and crafts to help stimulate their little minds. So many different objects from home can be used to make a great educational project. This tutorial shows you how to take items from your home in order to make the ocean in a bottle. Enjoy!
Your yard is full of free crafting opportunities! In this tutorial, learn how to take an ordinary stone and turn it into an adorable ladybug. In this craft project, grab a nice flat stone, some paints and some googly eyes and put together a cute little friend for your kids to enjoy. This project is not difficult and can be done (with a little help) by kids of all ages.
A fun way to display photos and artwork in your home is with homemade frames. Keep the crafty feeling of the art and make a colorful frame for display. This project can be done with kids of any age, and they will love helping to decorate their rooms or play areas. These frames are 8 pointed star shaped decorations that add a spark to any wall. All you need are popsicle sticks, glue and any paints or glitter you may want to add to your project. So, get messy and have fun..its time to start cra...
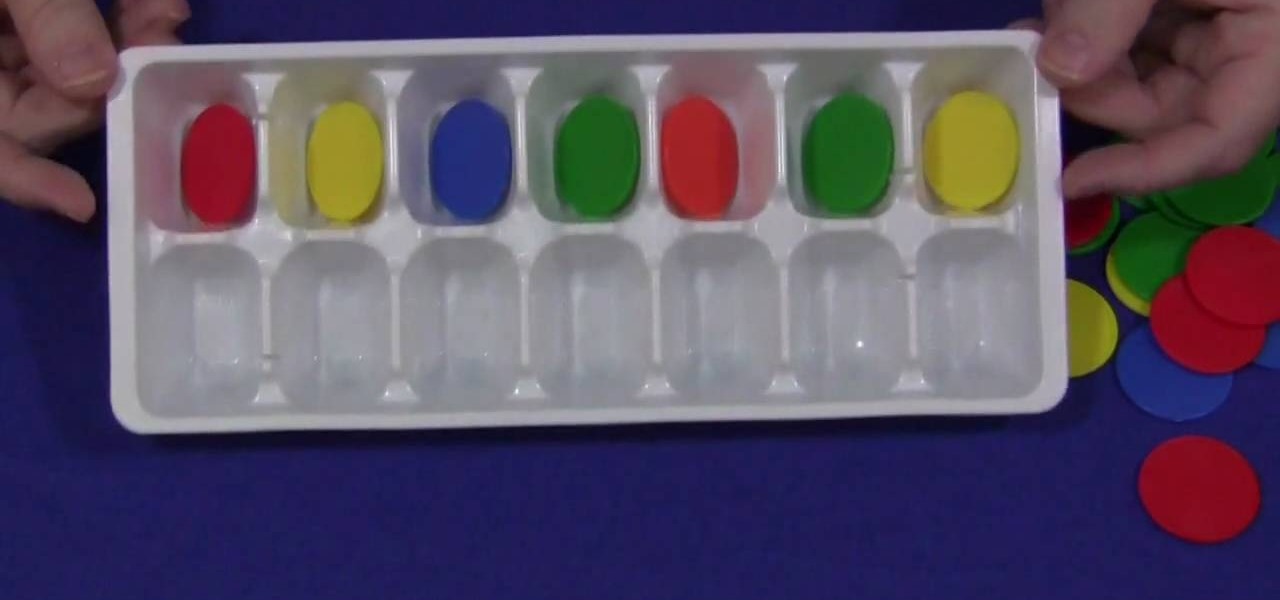
In this video tutorial, viewers learn how to do math with an ice cube tray. Users will need a ice cube tray and counting coins. Users can also substitute the coins for any kind of small counting item that will fit into the tray. There are several ways for the child to do math with the tray such as the teacher directed activity where the teacher gives out an amount of a number and the child would have to count that much using the tray. Users can also use flash cards to solve numbers and simple...
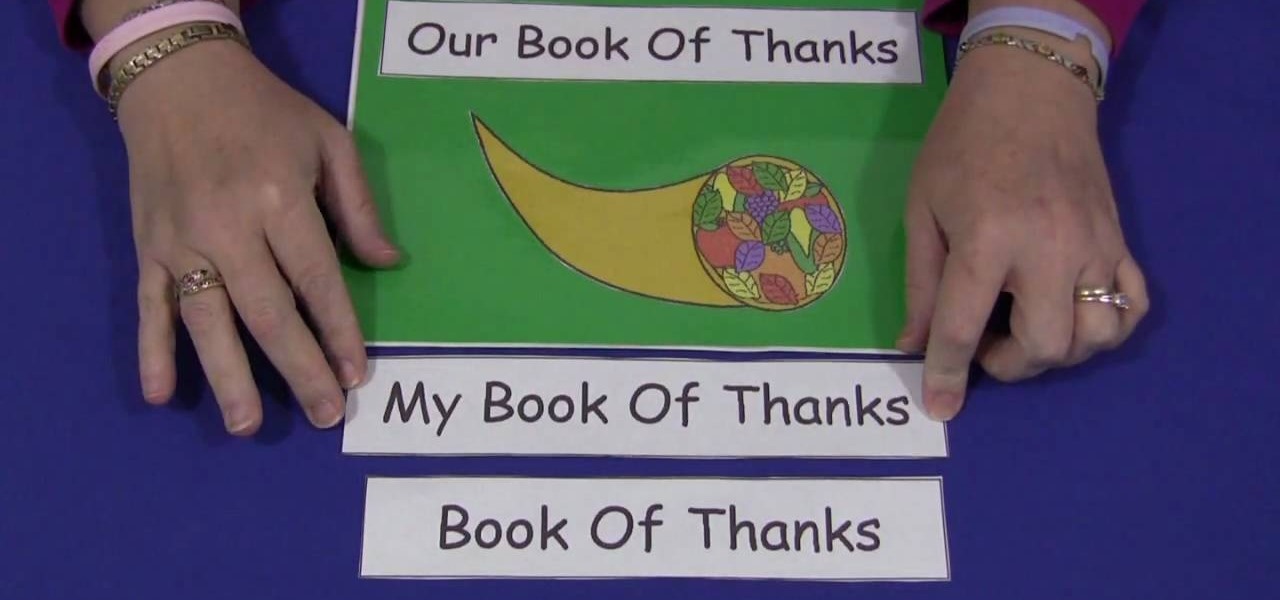
Childcareland demonstrates how to make a Thanksgiving book of thanks with kids in this video. A book of thanks can be done by a group or an individual. It begins a title page which can be labeled to reflect whether it is an individual book called "My Book of Thanks" or an group book called "Our Book of Thanks" or a general book called "Book of Thanks". The back page is a blank match of the cover page. In the middle are five pages labeled "I'm thankful for" with a line for older children to wr...
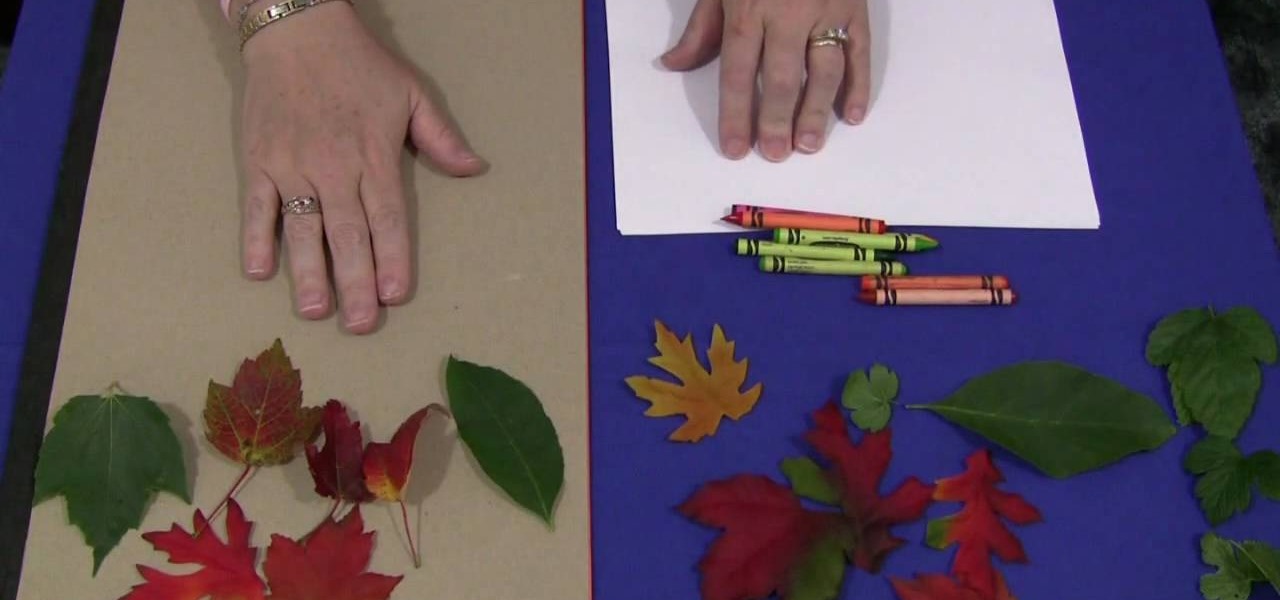
In this Family video tutorial you will learn how to do leaf rubbings for a children's activity. For this you will need a flat surface. If the table top in slightly uneven, put a sheet of construction paper on it. The materials you will need are sheets of paper, crayons and leaves. You can also use fabric leaves if your area doesn’t have any leaves. Take a leaf; put it upside down on a flat surface so that the veins are on top. Put a sheet of paper over the leaf and hold it down with one hand....
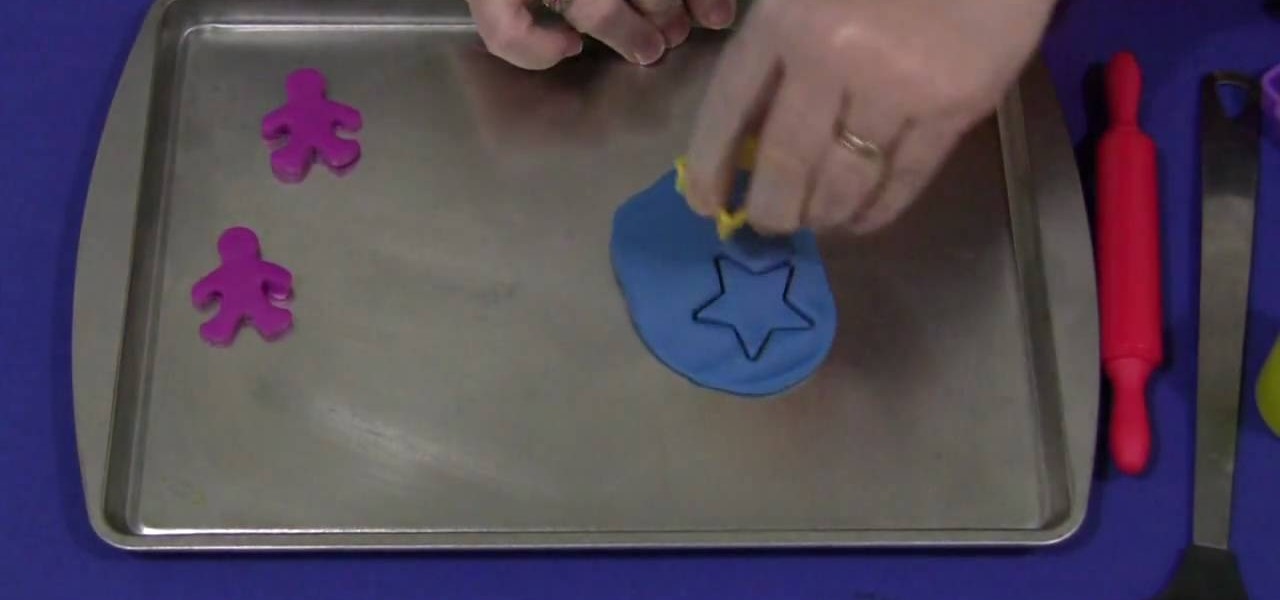
Childcareland demonstrates how to make Play dough Christmas cookies with your kids in this video. You will need play dough, cookie cutters, something to roll with and a baking sheet. Take the play dough and manipulate it until it is soft and flexible. This is good for developing children's hand muscles. Place the dough on the baking sheet. Use a roller to roll out the dough until it is thin. Then the child gets to choose which cookie cutter to use. It doesn't have to be a Christmas cookie cut...
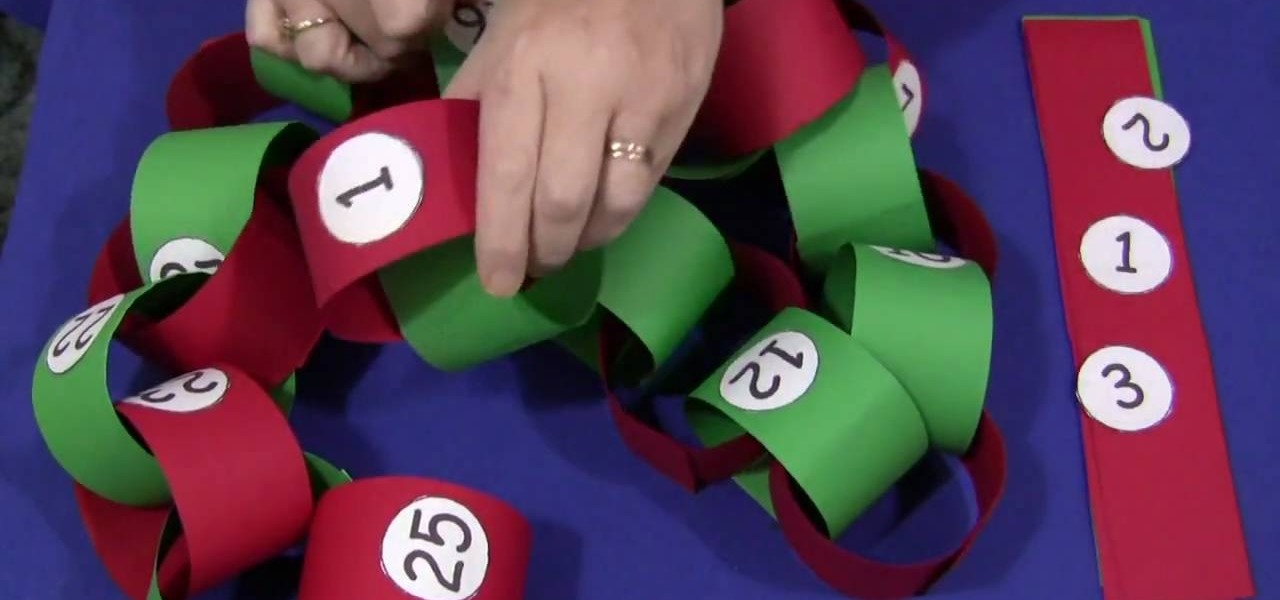
In this video tutorial, viewers learn how to make a Christmas countdown chain. The materials required for this craft are: construction paper, paper cut into small circles, glue and marker (optional). Begin by cutting the green and red construction paper into even strips. Users may choose to write out the numbers or print them out onto paper. Then cut out the numbers into small circles and glue them in the middle of the strips. Alternate the color of the strips each day. Then put the edges of ...
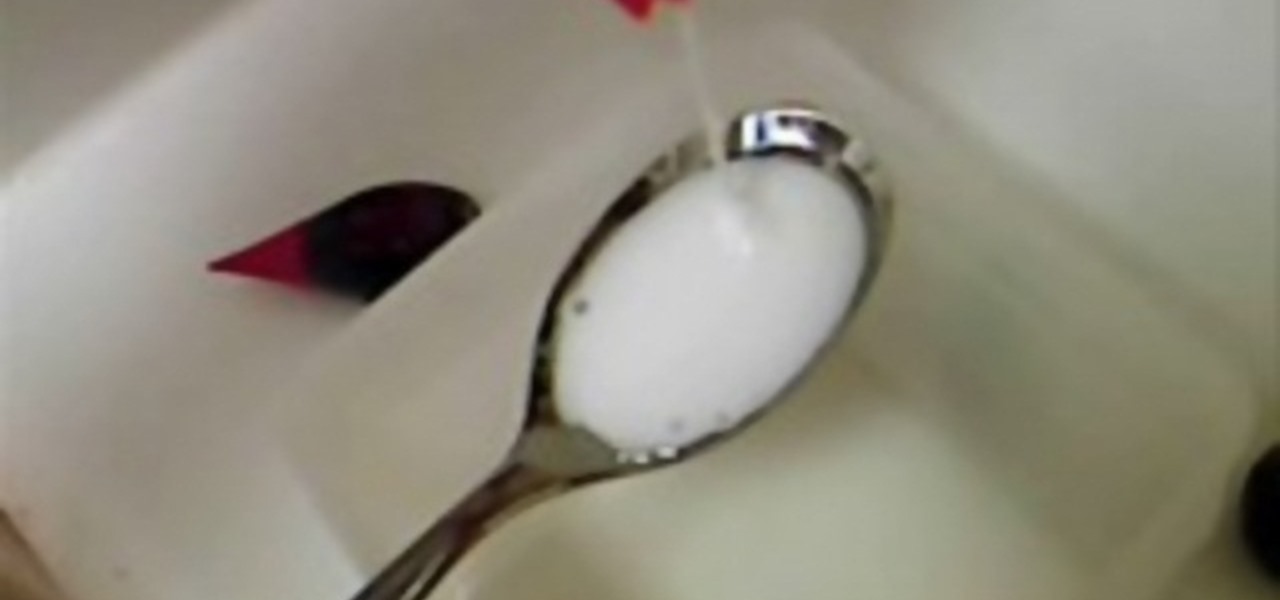
In this how-to video, you will learn how to make your own gak. All you need is borax, food coloring, and school glue. Take five tablespoons of water and mix one teaspoon of borax in a plastic container. Take one tablespoon of white glue and mix it with a tablespoon of water before adding it to a different plastic container. Add three or four drops of the food coloring of your choice. Now, mix it with a spoon and add two teaspoons of your borax solution to the new mix. Once that is done, mix i...
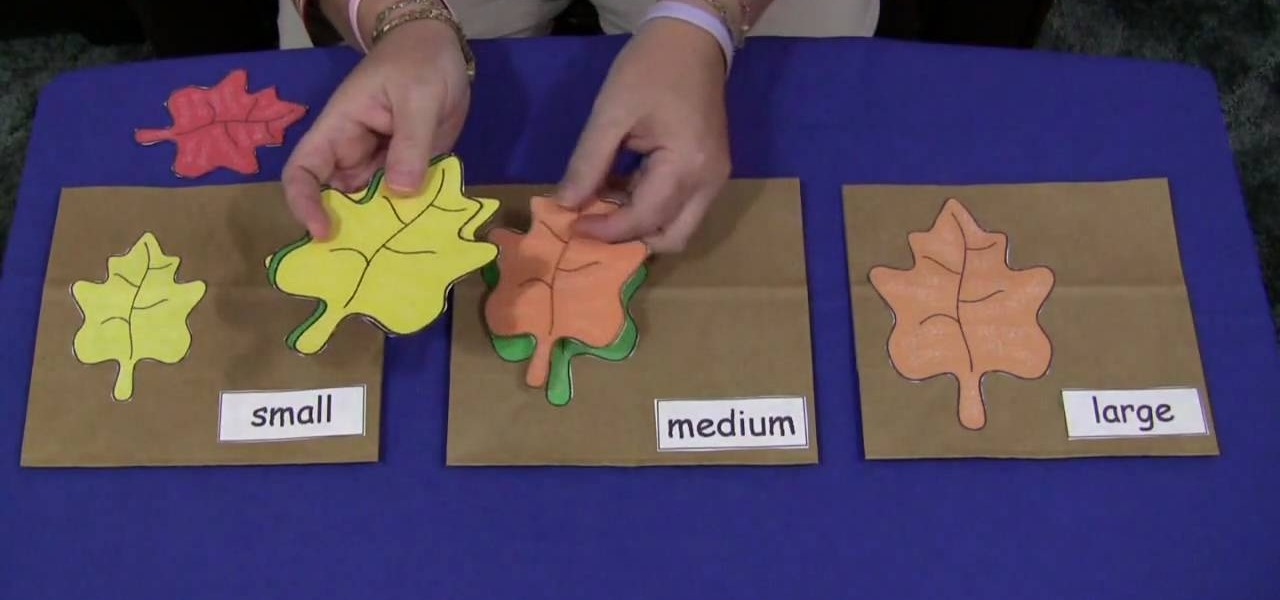
Shelley Lovett shares a great children's fall activity to help develop math skills - leaf size sorting bags. All that is required is three paper bags and some construction paper. Use the construction paper to cut out three different-sized leaves, and to make three labels saying 'small', 'medium', and 'large'. Then simply glue the small leaf and small label on one bag, medium leaf and label on the next bag, etc. To make the loose leaves of the three different sizes they place into the bags, si...