

pbj746 is here to teach you on how to create a glossy rainbow effect using Adobe Photoshop CS4. This can be easily done in a matter of minutes and you can try experimenting with other colors and effects to get variant number of sassy backgrounds.
-Firstly, create a new document under the file tab in Photoshop CS4.
-Next, set the document's Width to 500 and Height to 450.
-Unlock the background and paint the workspace black.
-Next, go to Filters > Render > Fibers.
-Set the variance to 36 and the strength to 1.
-Go to Filters > Blur > Motion Blur and click "Ok"
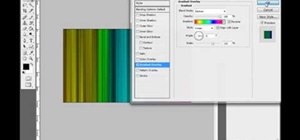
-Next, go to the layer properties of the current layer.
-Select Blending Options and set the gradient to the rainbow color.
-Go to Gradient overlay under Blending options and set the angle to 0 degrees and set the opacity to a 100%
-Set the scale to 110%
-Select the area you want, and mask the area.
-Next, create a new layer and paint it black.
-Go to layer properties > gradient overlay and set the color scheme from black to white. Set the opacity to how you like it.
-You are done.
Just updated your iPhone? You'll find new emoji, enhanced security, podcast transcripts, Apple Cash virtual numbers, and other useful features. There are even new additions hidden within Safari. Find out what's new and changed on your iPhone with the iOS 17.4 update.


Be the First to Comment
Share Your Thoughts