

What's the easiest way to keep track of your website passwords? Maybe in a password-protected document on your computer? Makes sense.
But surprisingly, this is no easy task in Mac OS X. Snow Leopard does not have an easy one-click option for password protecting files and folders, which means more work on your end. Maybe one day there will be an easy way to password protect documents on your Mac, but for now, here are some of your options.
Apple iWork '09
It's not free, but Apple's version of Microsoft Office has built-in security options for protecting your word documents, spreadsheets, and presentations. If you plan on adding password protection to such files, this is by far the easiest route to go. You can try out iWork for 30 days before committing, but it's relatively cheap for the full version, which includes Pages, Numbers, and Keynote.
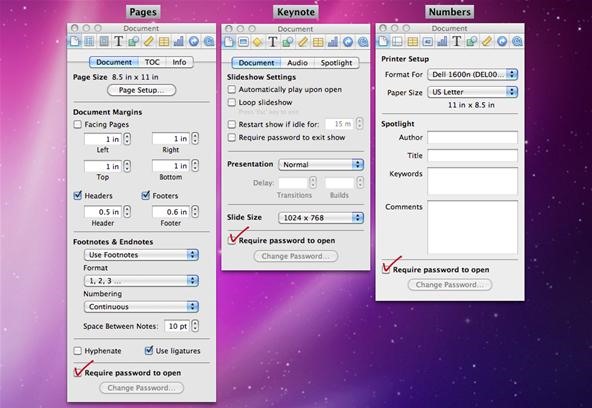
No matter which of the three iWork programs you're using, the process for making password-protected files is the same:
- Open your chosen document in one of the iWork programs.
- Show the Inspector by either:
- Clicking on the Inspector button,
- Going to View > Show Inspector, or
- Using the keyboard shortcut, Option Command I.
- Make sure you're on the Document tab (the first one, looks like a dog-eared page).
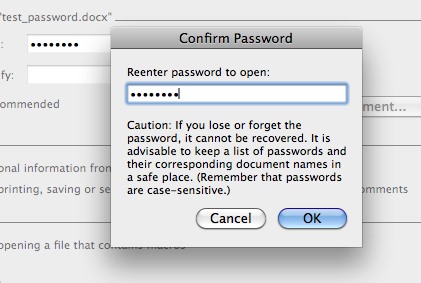
- Check the box at the bottom next to Require Password to Open.
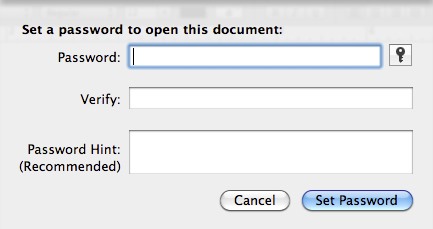
- Enter the password you want to use for the document, then re-enter to verify. You can also add a password hint if you'd like. Once done, press Set Password.
- Save your document.
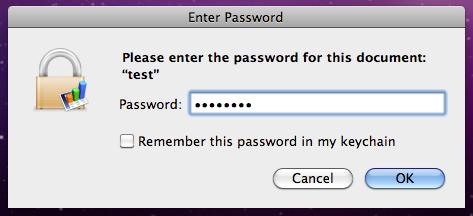
That's it! Now just save your iWork document and it's locked! To open, you and everyone else who has access to the file must enter the chosen password to gain access. The file itself will show a little lock symbol in the Finder next to it's name, as well in the program.
Warnings:
- You can export this password-protected document to another format, like PDF, but not with password protection. A warning will appear if you try, so make sure you want to continue.
- This does not provide the level of security that encryption does.
- There's no way to recover the password if you forget, so make sure to use the Hint option.
Microsoft Office for Mac 2011
Surprisingly, you can also password-protect documents in Excel, Word, and PowerPoint in the Microsoft Office for Mac suite. It's more expensive than iWork, but again, there's a 30-day free trial. For some reason, the process is different for each program.
Word:
- Open your chosen document in Word.
- Show the Preferences by either:
- Clicking on Excel, Word or PowerPoint in the Menu bar, or
- Using the keyboard shortcut, Command , (Command Comma).
- Under Personal Settings, click on Security.
- In the Password to Open box, enter the password you want to use for the document.
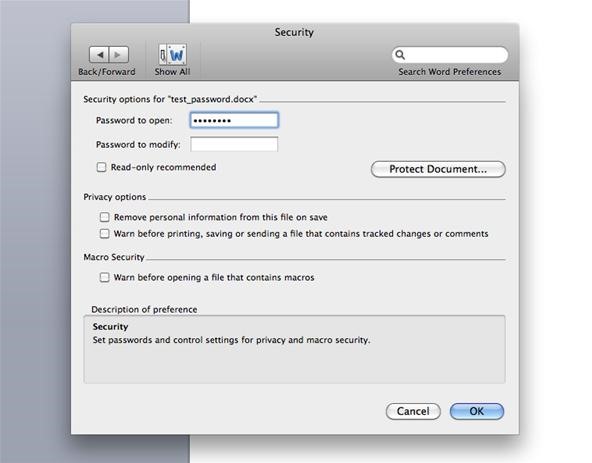
- Press OK and the Confirm Password in the popup box.
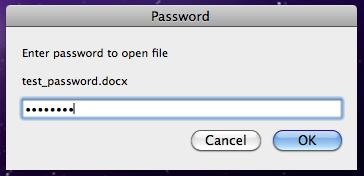
- Save your Word document.
And that's it. Just like iWork—pretty easy. Now, every time you open the file, you'll be prompted to enter the chosen password.
But this is just the basic password protection route. There are a few more options.
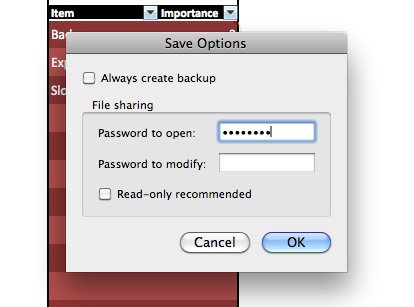
Word: Read-Only Recommended:
If checked, when opening the document, you'll see a recommendation to open the document as read-only. If opened as read-only, any changes must be saved under a new file name. This can be done with or without an added password.
Word: Password to Modify:
Basically the same as Password to Open, only you can still open the file without the password in read-only mode. No changes can be saved to the original document, but a copy can be saved.
PowerPoint:
- Open your chosen presentation in PowerPoint.
- Click on File, the Passwords.
- Check the box next to Encrypt this presentation and require a password to open.
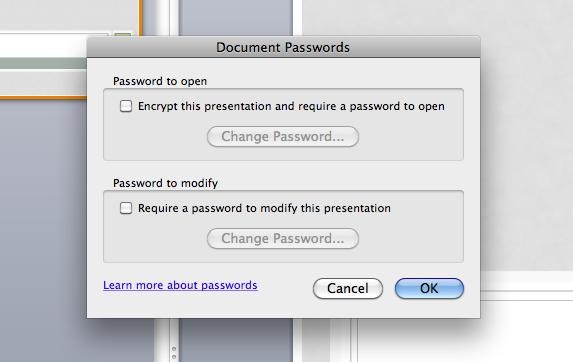
- Enter your chosen password in and verify. Click Set Password.
- Save your PowerPoint presentation.
Done. You now need a password to open the document. You can also set a password to modify the document, just like in Word.
Excel:
Oddly, like I said before, it's a little different than both Word and PowerPoint. It's more like Word, but still a little different; you can't access passwords via the Security option in Preferences. When you're ready to protect your open spreadsheet:
- Go to File, then Save As.
- Click on the Options button.
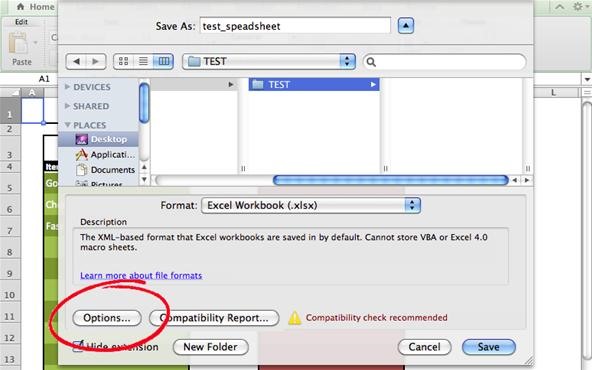
- Enter your chosen password in Password to Open and click OK.
- Re-enter your password to verify when prompted and click OK.
- Continue saving your spreadsheet as usual.
Like Word and PowerPoint, you can also also set a password to modify, as well as the read-only recommendation warning.
Excel Warnings:
- You can save these files as copies or as PDF, but the password protection will be lost.
- This does not provide the level of security that encryption does.
- There's no way to recover the password if you forget, so make sure to record it somehow.
Save as PDF
You can save pretty much any file (including images) in Snow Leopard using the Print > Save as PDF command. When saving as a PDF, you can add password protection by:
- Open your document or image.
- Go to Print > PDF > Save as PDF.
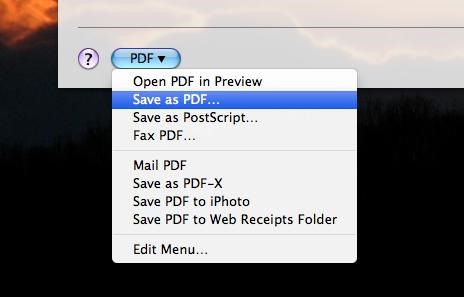
- When the Save box comes up, click on Security Options.
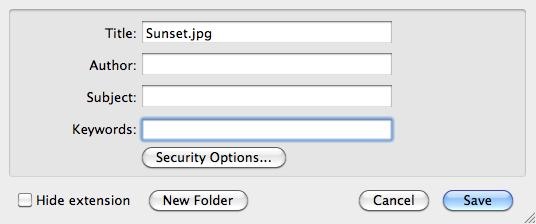
- Check the box that says Require password to open document, then enter your chosen password, then again to verify. Hit OK.
- Continue saving as normal.
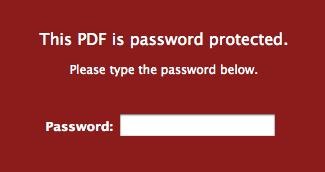
When you try to open the PDF document, you'll be asked for the password.
You can also protect plagiarism or stolen media by checking the Require password to copy text, images and other content box. Also, you can add password protection for printing.
Warning:
- This is not a viable option if you plan on editing anything. It's only for finished products.
Disk Utility
Besides the limited functionality of iWork and Office for Mac password protection, there's Disk Utility, which is pre-installed on all of your Macs (meaning—free). You can't password protect individual files, but you can add security to any folder (which can contain your needed file) by creating a disk image.
- Open up the Disk Utility application, found in Applications > Utilities.
- Go to File > New > Disk Image from Folder... (or use the keyboard shortcut, Shift Command N).
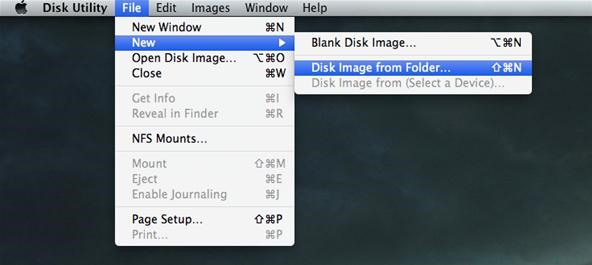
- Locate the folder you want to add password protection for and click Image.

- Change the file name if needed.
- For Image Format, make sure to select read/write so you still have access to edit the files in the folder.
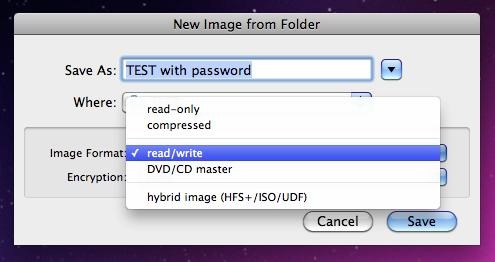
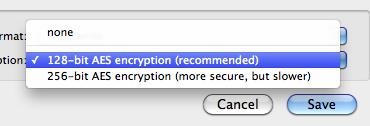
- Choose either 128-bit or 256-bit AES Encryption. Click Save.
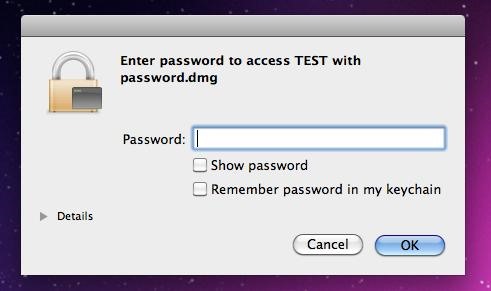
- Now it will start creating your disk image, and it's time to enter your password. Enter your chosen password for the folder, then verify it.
- Un-check the box next to Remember password in my keychain—if you don't, adding this password is pretty much worthless. You could always remove the password from your keychain later, but it's just more work. Just un-check the box.
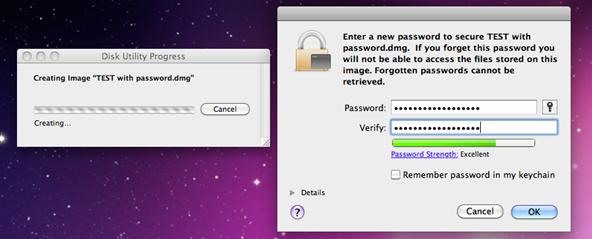
- Press OK and wait for it to complete.
Done. Now whenever you go to open the .dmg, it will ask you for the password. It will then un-encrypt the data and mount the .dmg.
Warnings:
- As always, don't forget your password. You can remember it in the keychain, but this kind of defeats the purpose, since anyone will be able to open the disk image on your computer. This doesn't matter though if you're password protecting a folder to give to someone else on another computer.
- This is more secure than using iWork or Office.
Other Options
The above methods are the easiest way of password-protecting files and folders. Adding passwords directly to iWork and Office docs provides minimal protection, mostly against your standard, everyday computer user. But to get the most protection, using Disk Utility is the best.
Other options for safeguarding your data from prying eyes include:
- Hiding files and folders with Terminal (This does not provide real protection, except from those with absolutely no tech know-how.)
- StuffIt or StuffIt Deluxe (These do pretty much the same thing as Disk Utility, but they cost money.)
- PGP from Symantec (There are various products for endpoint, file and email encryption.)
Just updated your iPhone? You'll find new emoji, enhanced security, podcast transcripts, Apple Cash virtual numbers, and other useful features. There are even new additions hidden within Safari. Find out what's new and changed on your iPhone with the iOS 17.4 update.


Be the First to Comment
Share Your Thoughts