

I assume at this point you have already completed your control panel using Part 1 of this How To guide. Now, if you are anything like me, you couldn't fight the urge to play, and you have your panel sitting on saw horses in the living room.
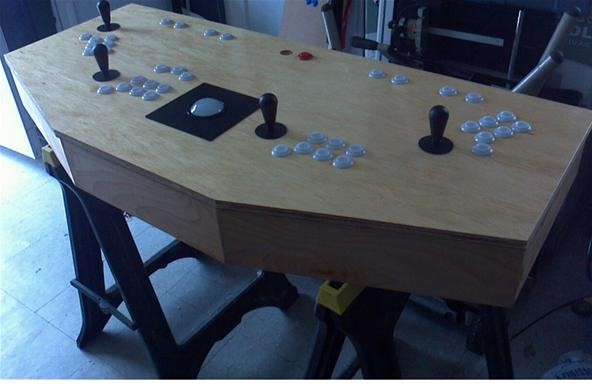
Depending on your situation, your significant other may be totally appalled by the horrendous monstrosity that occupies the space in front of your TV, or you guys haven't stopped playing since. Now, stop playing Ms. Pac-Man and let's finish this cabinet.
Step 1 Cut Pieces for Cabinet Base
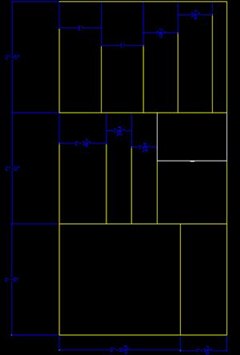
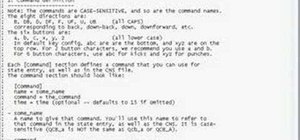
Here is a simplified drawing for the cut lines. It is easiest to cut the board into 3 32" x 48" sections. One section can be set aside, and used for the cabinet back if desired.
From the first cut panel, cut out the two 1' sections which will be the primary support for the widest part of the cabinet. The two 9 7/8" sections will form the front face on either side of the keystone pedestal. The two 7 5/16" sections will form the back of the keystone and the 1'1 3/8" section will be the front of the keystone. There will be quite a bit of leftover board to set aside for another project or other embellishments of your choice to add to the cabinet.
You will also want to cut a 2" x 4" to 2'10 5/8". This will be the back support bar for the control panel.
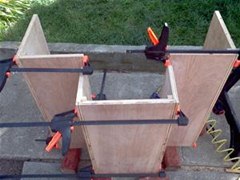
Step 2 Test Assemble Cut Pieces
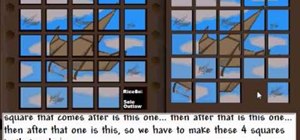
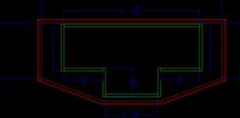 The red lines approximate the bottom of the control panel that was cut out in the first part of the guide. The green lines show how the boards should be arranged. Make sure you have the nicer side of the cut panels facing outward.
On the front edges where the plies of wood can be seen, utilize the router with 1/16" slotting bit and cut a slot on the front facing of each board.
Tips
- The T-Molding you will use is slightly wider than the width of the 3/4" plywood (this board is actually only 0.70" - just shy of a true 3/4").
- Using a piece of scrap plywood, set your router depth so that the T-Molding is flush with the outer edge of each piece. The excess material will hide the seams where the front panels meet the sides.
Cut the slots on the boards, making sure to use the router on the correct side of the board as the depth will be biased in one direction.
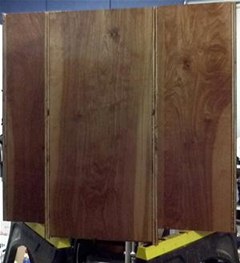
Step 3 Thoroughly Sand Boards and Begin Assembly
Use an electric sander with 220 grit sand paper to sand with the grain of the wood.
This is how the cabinet should look after sanding. I sanded each panel on both sides, and cleaned with mineral spirits prior to dry reassembly.
I used the 5/8" square dowels cut to 30 5/8" lengths. Using wood glue and 1 1/4" brads, join the inner corners. I used an Air Brad Nailer to speed up the process.
Tips
- Start with the keystone section (the front 3 sided box) and check for square often. Make sure no brads are exposed on the exterior sections.
- Use clamps liberally as shown to hold cabinet in square (similar to what is shown).
- The front panel should be flush to the outer edge of the two side panels. The T-Molding in the finishing step will cover any imperfections in the joinery.
- Make sure the square dowels are flush with the topside of the cabinet.
- Thoroughly clean boards before assembly. This will ensure a smooth finish and proper adhesive bonding.
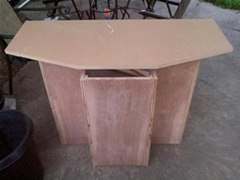
Step 4 Cut Out T Shaped Floor
From the second 2' x 4' x 3/4" MDF board, cut a T-shape floor that will fit snugly on the bottom section of the cabinet.
It will resemble that T-shaped piece from "Tetris". (This actually was a coincidence, but fitting at the same time.)
Install the floor of the cabinet flush with the bottom of the cabinet. Use more 5/8" square dowels cut to length to support the floor. Utilize the same glue and brad assembly methods to firmly attach the floor.
Tips
- A brad installed every 3/4" - 1" will ensure a strong and reliable connection between the cabinet sides and the floor.
- At your option, leg levelers can be installed. I used furniture slides to enhance portability since this cabinet resides on carpet in the living room.
Step 5 Apply Finish to Cabinet
 At this point after the glue has dried, I placed the cabinet on saw horses so I could easily apply the finish at arm level to make sure there were no drips, bubbles, thin spots, etc.
I applied finish to the inside and outside for easier maintenance. Dust will collect on the inside over time, and having a smooth, non-porous surface will be easier to clean than a porous surface. My years of experience as an arcade tech can attest to this.
Allow the finish to dry per can instructions, and light sand with 220 or higher grit sand paper, clean all dust and apply another coat.
All in all, I applied 5 coats. This did take some time, however the end result was infinitely more aesthetically pleasing than after just 3 coats.
Step 6 Install T-Molding
Align the barbed segment in the channel. Press the T-molding in starting from the bottom of the cabinet. Using a rubber hammer, gently tap the T-Molding into the groove. Make sure to work all waves and bubbles out to make sure the installed T-Molding has a sleek look and feel to it.
Step 7 Install Control Panel Bottom
Using the 2" x 4" x 2' 10 5/8" as a crossbeam across the top back of the cabinet. Center and screw the control panel bottom sheet to the cabinet.
I cut out a section on the front of this cabinet for an accessories shelf. Disregard that hole in front. Your cabinet will have a solid front.
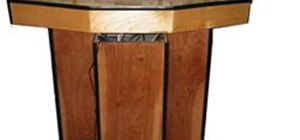
Step 8 Mount Control Panel
Mount the control panel on top of the cabinet, fasten the panel from the underside with 1 1/4". The result should look something like this.
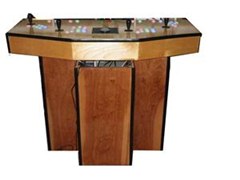
NOW GO AND ENJOY!
Just updated your iPhone? You'll find new emoji, enhanced security, podcast transcripts, Apple Cash virtual numbers, and other useful features. There are even new additions hidden within Safari. Find out what's new and changed on your iPhone with the iOS 17.4 update.


5 Comments
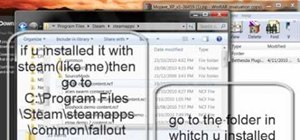
What did you use for the monitor? What software did you use on it? I am planning on using a 19" LCD and Hyperspin to run the emulators because it is awesome!
For this particular build, I just used my TV which has a VGA input on it, and passed the audio to the PC audio input on the back as well. This goes to a 5.1 surround receiver which gives out pretty awesome sound. As for the front end, I used MaLa and mamepp 0.128 with the freely available, license free ROMs. This project was built to fit in front of my entertainment center, so the pedestal height was taken into account to give an unobstructed view of the screen.
So as an update, I just wanted to add that the games are running great. I have had some friends put about 12 hours of testing this cabinet build with 4 players wailing away at the controls and it has survived thus far. Make sure to use a high quality wood glue in your assembly and liberally apply fasteners throughout.
That's awesome! I just finished my stand up 2 player cabinet last night, now just need to setup hyperspin now. I originally used 2 gamepads ripped apart and soldered wires onto them but they gave me too many problems so I ripped them out and went with the minipac with harness, it was totally worth it.
jeremy, that's really cool! can you post pics of the finished cabinet on blog.wonderhowto.com? we'd love to see it!
Share Your Thoughts